by Gardener Myra | May 27, 2024 | House Plants, How To's, Pests, Plant Care
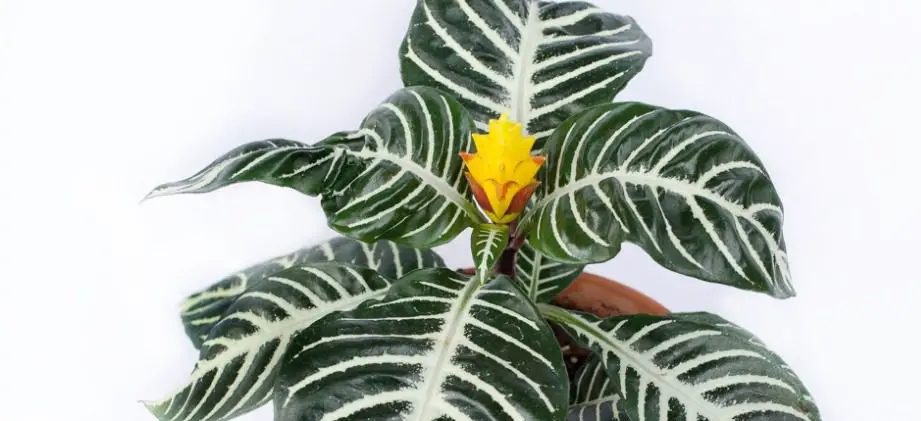
Zebra plants are beautiful, but they can also be somewhat tricky to keep healthy. If your zebra plant is losing leaves, you may be wondering why that’s happening.
There could be a variety of reasons for this problem, and it may take some detective work on your part to figure out the root cause.
In today’s blog post, we’ll go over some possible reasons why your zebra plant may be losing leaves and what you can do about it!
Why Is My Zebra Plant Losing Leaves?
Zebra plants lose their leaves when they are stressed from not enough sunlight, cold temperatures, being transplanted, when given too much water, and if pests are attacking.
I will now go more in-depth into each of these causes and what you can do to save your beloved zebra plant…
1. Not enough sunlight
It’s a good idea to place your zebra plant near a window that gets at least five hours of sunlight per day. If you’re not able to provide the proper amount of light, it’s best to move them outside during spring or summertime when they can get plenty of light!
You see, plants need sunlight to produce chlorophyll. If they don’t get enough sunlight, their leaves will lose their green color and turn yellow or white.
Make sure to rotate your plant so that all leaves receive equal light exposure. Not doing this can result in the plant getting “leggy” and having weak growth, which can cause more leaves to fall off.
You can also use artificial grow lights (Amazon link) to provide the proper amount of light. I use them in the winter and can say they really make a difference in plant growth!
2. To make room for new leaves
Did the leaves fall off when the plants bloomed? When plants blossom, they may get rid of their lower leaves for energy. This is not a problem and usually does not indicate any concerns with your zebra plant’s health.
This means that the leaves will be replaced in a few weeks with new, fresh ones!
3. Cold temperatures
Zebra plants are very hardy, but they should be kept in temperatures above 50 degrees Fahrenheit. If your plant is exposed to colder weather for a long period of time, the zebra plant leaves may turn yellow and fall off.
Your zebra plants can most likely handle cold temps if it’s only temporary – however, the damage will occur when the temperature stays low for an extended period of time.
4. Moving or being transplanted
If you’ve recently transplanted your zebra plant, it’s possible that the leaves fell off due to shock. It can take a while for plants to adjust when they are moved or transplanted into new pots!
This is why you should only repot if absolutely necessary, like if the plant has root rot or is simply too big for the pot.
Unfortunately, many people try to save their zebra plant by repotting it, but this can actually make the issue worse if the plant is already stressed.
5. Overwatering
Zebra plants should be watered frequently, but they do not need to be drowned in water. In fact, if you give your plant too much water all at once when it’s still dry down below, the zebra plant leaves may turn brown fall off!
It’s a good idea to only water when the top inch of soil is dry. You can test this by sticking your finger in the soil. If it’s moist, do not water it!
Watering too often can cause yellow leaves and brown spots to form on the zebra plant. This usually means that the roots are rotting from being soaked with too much water for an extended period of time.
If root rot takes hold, then the plant will start to die and lose leaves. That’s why it’s important to water your zebra plant properly!
The type of water matters too…
If you want to make sure that your plant gets the best water, consider using distilled water instead of tap water. The chemicals and additives in tap water can damage plants over time.
6. Pests (thrips)
If you notice that your zebra plant has lost all of its leaves, then it may be infested with thrips. These are insects that eat the sap from plants and can kill them!
It’s not too difficult to get rid of thrips – just use an insecticidal soap or horticultural oil spray. You’ll need to hit both upper and lower parts of the leaf so make sure to cover each side evenly when spraying.
My favorite way to get rid of plant pests is to use neem oil, which is a natural remedy that works great against thrips and other harmful bugs!
Zebra Plant Leaf Drop FAQ
Zebra plants aren’t particularly simple to maintain. As a result, there are numerous inquiries about how to cure zebra plant leaf drop. I’ll go through some of the most commonly asked questions below:
I bought a new plant and it is losing leaves – what should I do?
Your new plant may just be adjusting to its new environment. Keep it in a well-lit area for at least five hours each day and don’t overwater the plant yet!
The plant likely just needs to be left alone to recover from the stress of being moved to a new location. Making lots of changes may only make the problem worse.
I went on vacation and my zebra plant’s leaves are falling off – what should I do?
The leaves may fall off if you go too long without checking on your plant. A vacation is fine, but the problem occurs when people forget about their plants for weeks or even months at a time!
Inspect the plant for signs of pests, as these may have taken advantage of your absence. You can use neem oil to prevent pests from attacking your zebra plant.
Conclusion
In conclusion, there are several problems that can cause your zebra plant’s leaves to fall off. The most common reasons include overwatering, stress from the environment, and being exposed to cold weather for too long (or moving it during winter).
If you take care of your zebra plant properly, however, it should last for years without any major problems. Your plant will grow healthier and produce more vibrant leaves!
by Gardener Myra | May 27, 2024 | Outdoor And Patio Plants, Pests, Plant Care
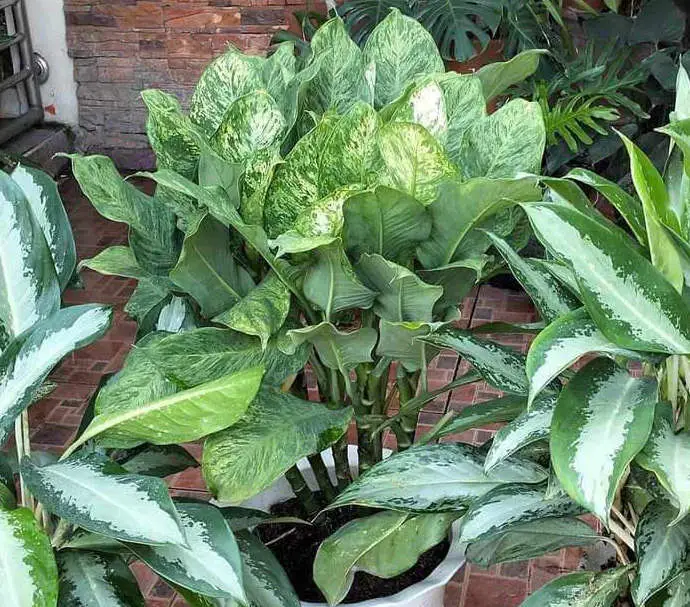
Are the leaves of your Dieffenbachia plant dotted with unsightly holes? Don’t fret! Understanding the causes and cures for these holes will help you revive your beloved houseplant. Dieffenbachia, commonly known as dumb cane, is a popular choice for indoor greenery due to its lush foliage and easy-care requirements. However, holes in the leaves can mar its beauty and indicate an underlying issue.
In this article, we will delve into the various factors that can lead to holes in Dieffenbachia leaves and explore effective remedies to bring your plant back to its vibrant state. From common pests like spider mites and caterpillars to cultural problems such as improper watering or lighting, we’ll cover it all. Armed with this knowledge, you’ll be able to diagnose the cause behind the holes and implement the appropriate solutions.
Don’t let those holes dampen your enthusiasm for indoor gardening. Join us as we unravel the mystery behind Dieffenbachia leaf holes and provide you with the tools to restore your plant to its former glory. Your prized dumb cane will thank you!
Common signs of leaf damage in Dieffenbachia
The first step in diagnosing the cause of holes in your Dieffenbachia leaves is to familiarize yourself with the common signs of leaf damage. While holes may be the most noticeable indication, it’s important to observe any other accompanying symptoms. These can include discoloration, wilting, yellowing, or curling of the leaves. By carefully examining the affected foliage, you can gather valuable clues about the underlying cause and take appropriate action.
It’s also worth noting the location and size of the holes. Are they concentrated in specific areas or scattered throughout the plant? Are they small pinpricks or larger irregular shapes? These details can help narrow down the potential culprits and guide your troubleshooting efforts.
Remember, prevention is always better than cure. Regularly inspect your Dieffenbachia plant for any signs of damage or distress. Early detection can save you time, effort, and ensure the overall health of your plant.
Understanding the causes of holes in Dieffenbachia leaves
Holes in Dieffenbachia leaves can be caused by a range of factors, including pests, diseases, and environmental conditions. It’s essential to identify the root cause to effectively address the issue and prevent further damage. Let’s explore each of these factors in more detail:
Pests and insects that may cause holes in Dieffenbachia leaves
One of the most common causes of holes in Dieffenbachia leaves is pest infestation. Several insects and mites can feed on the plant’s foliage, leaving behind unsightly holes. The most common culprits include spider mites, caterpillars, aphids, and mealybugs.
Spider mites are tiny, eight-legged pests that can cause significant damage to Dieffenbachia leaves. They pierce through the leaf surface to feed on the plant’s sap, resulting in small, yellowish holes with webbing. Caterpillars, on the other hand, chew through the leaves, leaving irregularly shaped holes.
Aphids and mealybugs are sap-sucking insects that can weaken the plant and create holes as they feed. These pests are often found in clusters on the undersides of leaves and can cause extensive damage if left untreated.
Fungal and bacterial diseases that may cause holes in Dieffenbachia leaves
In addition to pests, fungal and bacterial diseases can also lead to holes in Dieffenbachia leaves. Leaf spot diseases, such as Anthracnose and Cercospora leaf spot, can cause irregularly shaped lesions that eventually lead to holes. These diseases are often characterized by dark brown or black spots surrounded by a yellow halo.
Bacterial leaf blight is another common disease that can result in holes in Dieffenbachia leaves. It typically starts as water-soaked lesions that darken and enlarge over time. Eventually, the affected areas may turn necrotic, leading to the formation of holes.
Environmental factors that may contribute to leaf damage in Dieffenbachia
Aside from pests and diseases, environmental factors can also contribute to leaf damage in Dieffenbachia. Improper watering, lighting, temperature, and humidity levels can all take a toll on the plant’s health and result in holes in the leaves.
Overwatering or underwatering can cause stress to the plant, leading to leaf damage. Excess moisture can create a favorable environment for fungal and bacterial pathogens, while insufficient watering can cause the leaves to wilt and develop holes.
Insufficient or excessive light can also impact Dieffenbachia’s overall health. Too much direct sunlight can scorch the leaves, causing them to develop holes. On the other hand, insufficient light can weaken the plant, making it more susceptible to pests and diseases.
Temperature and humidity levels are crucial for Dieffenbachia’s well-being. Drastic temperature fluctuations or low humidity can cause stress and lead to leaf damage. Maintaining a stable environment within the optimal range will promote healthy foliage growth.
Diagnosing the specific cause of holes in Dieffenbachia leaves
Now that we’ve explored the various factors that can lead to holes in Dieffenbachia leaves, it’s time to diagnose the specific cause for your plant. By carefully examining the affected foliage and considering the accompanying symptoms, you can narrow down the potential culprits.
Start by checking for any signs of pests or insects. Look closely at the undersides of leaves, along the leaf veins, and in crevices where they might be hiding. If you spot any pests, identify them using a magnifying glass or consult a gardening expert for assistance.
If pests are not present, examine the holes and surrounding areas for signs of fungal or bacterial diseases. Look for characteristic lesions, discoloration, or any other abnormalities. Compare your observations with images or descriptions of common leaf diseases to make an informed diagnosis.
Lastly, evaluate the environmental conditions in which your Dieffenbachia is growing. Consider factors such as watering practices, lighting conditions, temperature, and humidity levels. Ensure that you are providing the ideal environment for your plant’s optimal growth.
Treating and preventing holes in Dieffenbachia leaves caused by pests and insects
If the cause of the holes in your Dieffenbachia leaves is determined to be pests or insects, it’s crucial to take immediate action to prevent further damage. Here are some effective treatments and prevention methods:
Treatment options for pest infestation
- Manual removal: For larger pests like caterpillars, manually pick them off the plant and dispose of them. Wear gloves to protect your hands and use a pair of tweezers or pruning shears if necessary.
- Insecticidal soap: Use an insecticidal soap specifically formulated for indoor plants. Follow the instructions on the label and apply the soap to the affected leaves, ensuring thorough coverage of both the upper and lower surfaces.
- Neem oil: Neem oil is a natural insecticide that can be effective against a wide range of pests. Dilute the neem oil according to the instructions and spray it onto the affected foliage. Repeat the application every 7-14 days until the infestation is under control.
Prevention methods for pest infestation
- Regular monitoring: Regularly inspect your Dieffenbachia plant for any signs of pests or insects. Early detection can prevent an infestation from spreading and causing significant damage.
- Quarantine new plants: Before introducing a new plant to your Dieffenbachia collection, quarantine it in a separate area for a few weeks to ensure it is pest-free.
- Maintain cleanliness: Keep your indoor gardening area clean and free from debris. Remove fallen leaves and regularly wipe down the foliage with a damp cloth to deter pests.
Treating and preventing holes in Dieffenbachia leaves caused by diseases
If the cause of the holes in your Dieffenbachia leaves is determined to be a fungal or bacterial disease, prompt treatment is essential to prevent further spread and damage. Here are some effective treatments and prevention methods:
Treatment options for fungal and bacterial diseases
- Pruning: Remove and destroy any severely infected leaves or plant parts to prevent the disease from spreading. Make clean cuts with sterilized pruning shears.
- Fungicides: Apply a suitable fungicide to control fungal diseases. Follow the instructions on the label and ensure thorough coverage of the affected foliage. Repeat the application as recommended.
- Bactericides: If bacterial leaf blight is the culprit, apply a bactericide according to the instructions on the label. Ensure complete coverage of the affected areas and continue treatment as directed.
Prevention methods for fungal and bacterial diseases
- Proper watering: Water your Dieffenbachia plant at the base and avoid wetting the foliage. Ensure that the soil is well-draining to prevent waterlogged conditions that can promote disease development.
- Good air circulation: Provide adequate air circulation around your plant by placing it in a well-ventilated area. This will help prevent the growth and spread of fungal and bacterial pathogens.
- Avoid overhead watering: Water your Dieffenbachia plant from the bottom or use a watering can with a narrow spout placing it in a well-ventilated area. This will help prevent the growth and spread of fungal and bacterial pathogens.
- Avoid overhead watering: Water your Dieffenbachia plant from the bottom or use a watering can with a narrow spout to target the soil directly. This minimizes splashing and reduces the risk of fungal spores landing on the leaves.
Conclusion: Maintaining the health of your Dieffenbachia plant
In conclusion, holes in Dieffenbachia leaves can be caused by various factors, including pests, diseases, and environmental conditions. By understanding the underlying causes and implementing appropriate remedies, you can restore the health and beauty of your plant.
Regular monitoring, proper watering, and maintaining a suitable environment are key to preventing future leaf damage. Prompt action and diligent care will ensure that your Dieffenbachia thrives and remains a cherished addition to your indoor garden.
Remember, a healthy and vibrant dumb cane is within your reach. With the knowledge gained from this article, you can confidently diagnose and treat holes in Dieffenbachia leaves, allowing your plant to flourish and bring joy to your living space. Happy gardening!


