Roses are one of the most popular flowers in the world. They are symbols of love, appreciation, and congratulations. Roses come in many colors, but the color that is most associated with roses is red. Red roses represent love and passion.
But sometimes the leaves on roses can turn red, too. In this post, we’ll take a look at what causes red leaves on roses and what you can do about it.
Why Are Rose Leaves Turning Red?
Rose leaves can turn red due to rose rosette disease, jack frost, herbicide damage, or part of the normal growing process. All four of these issues can cause red leaves on roses, so it’s important to diagnose the problem correctly before taking action.
I will now take a look at each of these problems in turn and offer some advice on how to deal with them. This way, you can get your roses back to looking their best in no time.
1. Normal Growing Process
One of the most common reasons for red leaves on roses is simply part of the normal growing process. Young rose plants often have red leaves when they first start to grow. This is nothing to worry about and is perfectly normal. The leaves will eventually turn green as the plant matures.
If you are concerned about your rose plants, simply check to see if they are otherwise healthy and growing well. If they are, then there is no need to worry about the red leaves.
2. Rose Rosette Disease
Rose rosette disease is a viral infection that produces red leaves and red stems on roses. The virus is usually spread by mites and other pests that feed on the rose plants. Infected roses will often have distorted growth and deformed leaves.
These mites are so small that even the wind can carry them from plant to plant. If you have roses that are infected with rose rosette disease, it is important to remove them from your garden right away. Otherwise, the virus can spread and infect other plants.
Symptoms of Rose Rosette Disease
Red pigmentation on leaf veins
Deformed leaves
Easily damaged, especially in cold weather
Thick rose buds
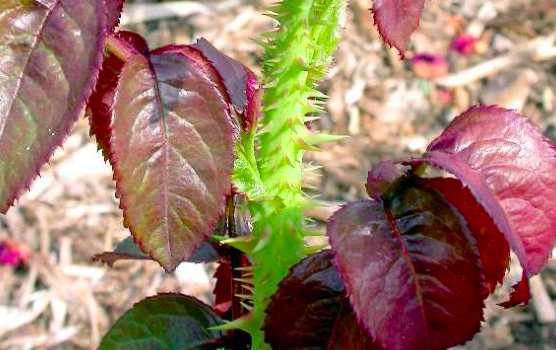
Huge increase in thorns
Red rose stems
Shrunk petioles
These are just a few of the symptoms that can be caused by rose rosette disease. If you think your roses might be infected, it’s important to take action right away. The virus can spread quickly and kill your entire rose garden if left unchecked.
Prevention is the best method for dealing with rose rosette disease. To prevent the virus from spreading, it’s important to isolate infected plants right away. Remove any affected leaves and dispose of them in a plastic bag. It’s also a good idea to remove any dead or dying stems.
You should also take steps to control the mites that spread the virus. These mites are tiny, so they can be difficult to spot. One way to control them is to use a powerful hose sprayer to blast them off of your plants. You can also try using an insecticide specifically designed to kill mites.
If you do prune your roses, be sure to disinfect your pruning tools before using them on other plants. This will help prevent the spread of the virus to other parts of your garden.
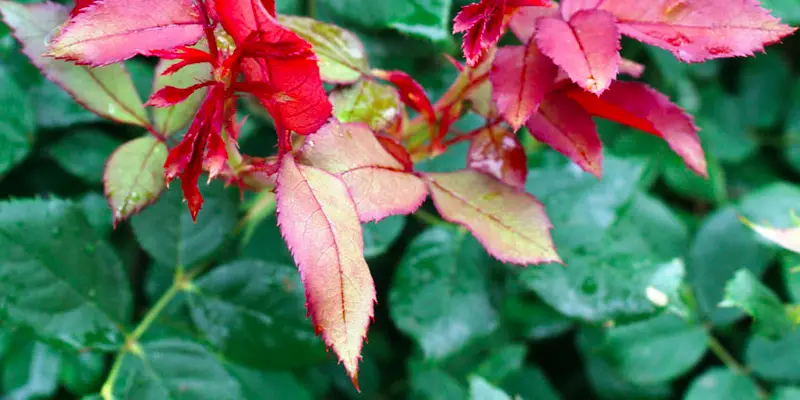
Red rose leaves
3. Frost Damage
Frost damage is another common reason for red leaves on roses. Frost can damage the leaves of roses, causing them to turn red or brown. The tips of the leaves are especially susceptible to frost damage.
So if the edges are changing color, the center of the leaves are still green, and you know there has been a recent frost in your area, then it’s likely that the frost is to blame.
If you live in an area that gets cold winters, it’s important to take steps to protect your rose plants from the cold. One way to do this is to wrap them in burlap or another type of fabric. This will help insulate the plants and prevent the leaves from being damaged by the cold.
After the first has arrived, cover the base of the plant with topsoil or compost to protect it from the cold. Make sure to use enough topsoil that it covers the bud union – this is the point where the roots originally met the stem.
You can also try using a grow light to provide additional warmth for your plants. Simply set up the light so that it shines on the plants for a few hours each day. This will help keep them warm and prevent frost damage.
4. Herbicide Damage
If you use herbicides in your garden, it’s important to be careful not to get them on your roses. Herbicides can damage the leaves of roses, causing them to turn red or brown.
You may not have even noticed that you got herbicide on your roses. If you use a weed sprayer, for example, some of the herbicides may have gotten onto the leaves of your roses. Or if your neighbor uses herbicide and it drifts over into your garden, it can damage your plants.
The best way to prevent herbicide damage is to be careful when using herbicides in your garden. If you use a weed sprayer, make sure that the nozzle is pointing away from your roses. And if you use a granular herbicide, be sure to apply it carefully so that it doesn’t drift onto your roses.
If you think your roses have been damaged by herbicide, the first thing you should do is stop using the herbicide. Then, try washing the leaves of your plants with a solution of water and dish soap. This will help remove any residual herbicide from the leaves.
If the damage is severe, you may need to cut off any affected leaves. This will help prevent the herbicide from causing further damage to your plants. Discard the affected leaves in a plastic bag so that they don’t spread the herbicide to other parts of your garden.
Symptoms of Herbicide Damage
Tangled leaves
Narrower foliage
Surface roots
Spots on the leaves
Red/brown leaves
Red Leaves on Knockout Roses
Knockout roses are known to have bright red flowers and luscious green leaves. But sometimes, even the most beautiful roses can have problems. One of these problems is red leaves.
Knockout roses are vulnerable to all of the same problems that other roses are, including disease, frost damage, and herbicide damage. That said, they are one of the toughest varieties of rose, so if you see red leaves on your Knockout roses, don’t panic!
The first thing you should do is take a look at the rest of the plant. Are there any other symptoms? Is the plant otherwise healthy? If so, then it’s likely that the red leaves are due to one of the problems mentioned above.
If the plant is otherwise healthy, then the red leaves may just be due to a lack of nutrients. Knockout roses are heavy feeders, so they need to be fertilized regularly. If you haven’t been fertilizing your plants, that could be the cause of the red leaves.
Another possible cause of red leaves on Knockout roses is heat stress. Knockout roses are heat tolerant, but if they’re exposed to extreme heat, the leaves may turn red. This is especially common in hot, dry climates.
Should I Prune Red Rose Leaves?
The only time you should prune red rose leaves is if they are infected with a disease or covered in pests. For example, if your rose has rose rosette disease (RRD) or black spot, you will need to remove the affected leaves.
If you see pests such as aphids or spider mites, you should also prune off the affected leaves. These pests can spread quickly and damage other parts of the plant, so it’s important to get rid of them as soon as possible.
If your rose leaves are simply red but don’t show any other signs of disease or pests, then there’s no need to prune them. In fact, pruning off the red leaves could actually do more harm than good.
So if you’re not sure what’s causing the red leaves on your roses, it’s always best to consult with a professional before taking any action. They will be able to help you identify the problem and come up with a plan to fix it.
Conclusion
In conclusion, there are several reasons why your roses might have red leaves. Be sure to check for pests, disease, frost damage, and herbicide damage. If you can identify the problem, you can take steps to fix it. And if you can’t figure out what’s causing the problem, be sure to consult a professional.
Red leaves on roses don’t always have to be a bad thing. In some cases, it can actually be a sign of good health. For example, young roses often have red leaves. This is because they’re still developing and the red color is normal.
However, if a mature rose plant suddenly starts to produce red leaves, it’s usually a sign that something is wrong. Be sure to inspect your plants carefully and take steps to correct the problem. With a little care, you can keep your roses healthy and beautiful for years to come.
Do you have any tips for preventing or fixing red leaves on roses? Share them in the comments below!
Lavender is a popular herb that is used in many different ways. It has a long history of use for medicinal purposes, and it is also used in aromatherapy and as a flavoring. Lavender is a hardy plant that can be grown outdoors in most climates, but it can also be grown indoors.
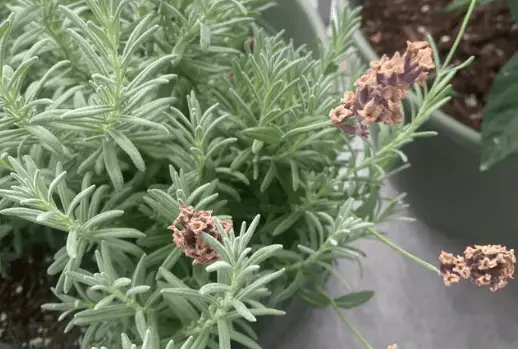
One of the problems with growing lavender is that it tends to turn brown if certain conditions aren’t met. In this article, we will discuss the causes of lavender turning brown, and we will offer some tips on how to prevent it from happening.
Why Is My Lavender Turning Brown?
The most likely reasons for lavender to turn brown are overwatering, pests, fungal diseases, or sun scorch. Each of these causes browning, but the specific type of browning may be different.
Each potential cause has different symptoms that can help you identify the problem. I will now go into more detail about each of these problems so that you can troubleshoot your own lavender plant.
1. Overwatering
Overwatering is probably the most common reason that lavender turns brown. Lavender is a drought-tolerant plant, and it does not like to have its roots wet for extended periods of time. If you water your lavender too often, or if you allow it to sit in water, the roots will start to rot. This will cause the leaves to turn brown and fall off.
To prevent overwatering, make sure that you are only watering your lavender when the soil is dry. Stick your finger into the soil to check, and water only when necessary. It is better to underwater than to overwater.
The soil may also need changing if it is constantly wet. Use a well-draining potting mix, and make sure that the pot has drainage holes. Lavender plants like sandy soil, so you can add some sand to the potting mix to help with drainage.
If your lavender is already turning brown from overwatering, you can try to save it by letting the soil dry out completely and then replanting it in fresh, dry soil. You will also need to check the roots to make sure that they are not rotted. If they are, you will need to trim them off before replanting.
If your lavender is turning brown and you are not sure if it is from overwatering, check for the following symptoms:
Soil that is always wet or soggy
Waterlogged soil that doesn’t drain well
Lavender leaves that are wilting or yellowing
Lavender leaves that are brown and falling off
Lavender stems that are soft or mushy
If you see any of these symptoms, your lavender is probably getting too much water. Try to let the soil dry out, and be sure to check the roots for rot.
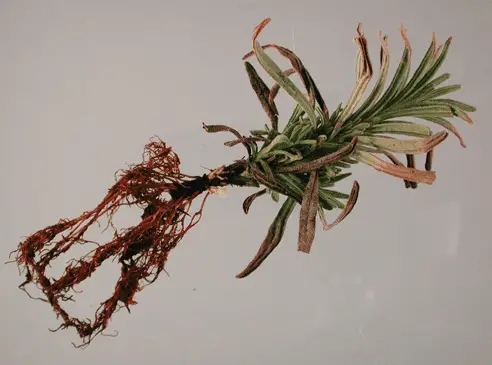
Lavender Root Rot
2. Pests
Pests can also cause lavender to turn brown. The most common pests that affect lavender are spider mites, aphids, and whiteflies. These pests suck the sap out of the leaves, which will cause them to turn yellow or brown. In severe cases, the leaves may fall off completely.
To prevent pests from damaging your lavender, you can try using a pesticide. Be sure to follow the directions on the label, and only use pesticides when necessary. You can also try using natural predators, such as ladybugs, to control pests.
If your lavender is already turning brown from pests, you can try spraying it with neem oil (Amazon link) or insecticidal soap. These products will kill the pests without harming the plant. You can also try using a strong stream of water to blast the pests off of the leaves.
If your lavender is turning brown and you are not sure if it is from pests, check for the following symptoms:
Small insects on the leaves
Yellow or brown leaves
Leaves that are being eaten
Sticky residue on the leaves
Holes in the leaves
If you see any of these symptoms, your lavender may be infested with pests, so be sure to check for insects. You can try using a pesticide, neem oil, or insecticidal soap to get rid of the pests.
3. Fungal Disease
Another potential cause of lavender turning brown is a fungal disease. The most common fungal diseases that affect lavender are powdery mildew and shab disease. These diseases cause the plant to turn brown and die.
To prevent fungal diseases, you can try using a fungicide. Be sure to follow the directions on the label, and only use fungicides when necessary. You can also try to grow your lavender in an area with good air circulation to prevent the fungus from taking hold.
Lavender is from arid climates and does not like humid conditions. If your lavender is turning brown and you are not sure if it is from a fungal disease, check for the following symptoms:
White or gray powder on the leaves
Brown spots on the leaves
Leaves that are wilting or yellowing
Leaves that are brown and falling off
If you see any of these symptoms, your lavender may have a fungal disease. Use a fungicide to get rid of fungal spores, and be sure to grow your lavender in an area with good air circulation.
One very brown lavender
4. Sun Scorch
Finally, another potential cause of lavender turning brown is sun scorch. Sun scorch is a condition that occurs when the leaves are exposed to too much direct sunlight. This can cause the leaves to turn brown and dry out.
To prevent sun scorch, you can try growing your lavender in an area with partial shade. You can also try to water the plant more frequently, and make sure that the soil is always moist.
If your lavender is already turning brown from sun scorch, you can try trimming off the affected leaves. This will help the plant to focus its energy on new growth. You can also try moving the plant to an area with more shade.
Will Brown Lavender Turn Purple Again?
No, it is unlikely that brown lavender will turn purple again. Once the leaves have turned brown, they will not change color. However, the good news is that new growth will be purple. So, if you tackle the original problem (too much sun, pests, etc.), you should see new purple growth during the growing season.
Should I Prune My Brown Lavender?
I only recommend pruning brown lavender plants when absolutely necessary. If more than 50% of the plant is brown, you can try pruning it back to encourage new growth. However, if less than 50% of the plant is brown, I would not recommend pruning it.
Pruning lavenders with a fungal disease can also be a good idea, as this will prevent the disease from spreading. However, be sure to disinfect your pruning tools before and after use to prevent contamination.
Conclusion
Lavender is a beautiful plant that can add color and fragrance to your garden. However, sometimes lavender will turn brown for no apparent reason. If this happens, don’t despair! There are several things you can do to fix the problem.
I hope this article was helpful. If you have any questions, please feel free to leave a comment below. I will do my best to answer your question as soon as possible. Happy gardening!
Mulberry trees are known for their beautiful leaves, which turn a deep yellow in the fall. Many homeowners enjoy watching their mulberry tree change colors each year. If you have a mulberry tree and are noticing that its leaves are starting to turn yellow, there may be a reason why. In this blog post, we will discuss some of the potential causes of yellow leaves on mulberry trees, and how to fix them!
Why Is My Mulberry Tree Turning Yellow?
The leaves of a mulberry tree that are yellow can be caused by incorrect watering, fungal diseases, nutrient deficiencies, lack of sunlight, and environmental stress. The yellowing may look different depending on the cause. If you see yellow leaves on your mulberry tree, it is important to investigate the issue and correct it as soon as possible.
I will go through each of these potential problems one by one so that you can determine what is causing the yellow leaves on your mulberry tree.
1. Incorrect Watering
The mulberry tree grows super-fast, and as a result, it requires a lot of water to stay healthy. If you are not watering your mulberry tree enough, the leaves will start to turn yellow and eventually drop off.
If you think that incorrect watering is the problem, try increasing the amount of water you give your mulberry tree. You should also check to see if the soil is draining properly. If the soil is too compacted or does not have enough drainage, the roots of the mulberry tree will not be able to access the water they need.
To improve drainage, you can add organic matter to the soil, such as compost or peat moss. You can also make sure that the mulberry tree is getting at least an inch of water per week. If you live in an area with a lot of rain, you may not need to water your mulberry tree as often.
Keep in mind that too much water can also be a problem for mulberry trees. If the roots are constantly wet, they will start to rot. Make sure that the soil is draining well and only water your mulberry tree when the top few inches of soil are dry.
If you have been watering your mulberry tree correctly and the leaves are still turning yellow, there may be another problem.
2. Fungal Infections
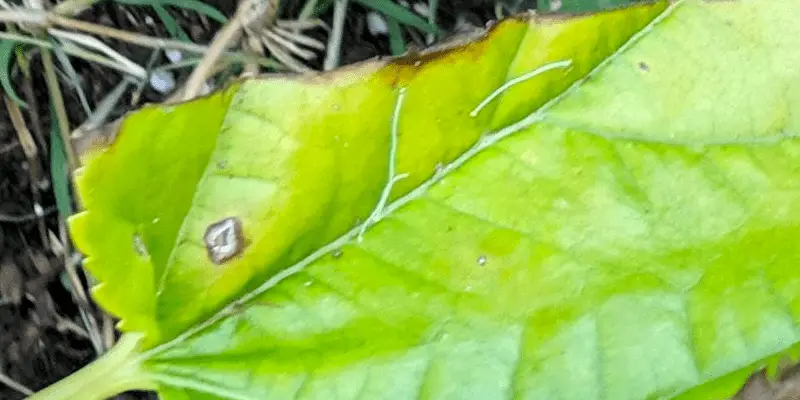
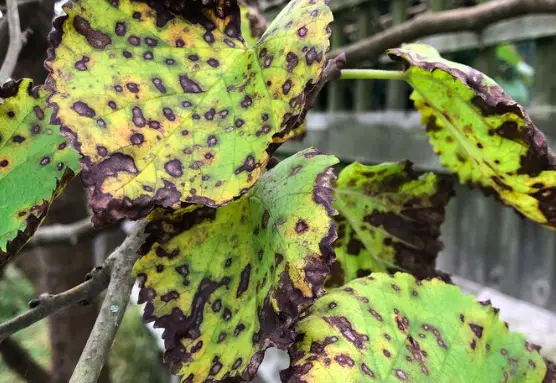
Mulberry trees are susceptible to a few different types of fungal infections, such as leaf spot and anthracnose. These diseases can cause the leaves of the mulberry tree to turn yellow, brown, or black.
You’ll know if a fungal infection is a problem if you see spots on the leaves or notice that the leaves are starting to curl. If you think your mulberry tree has a fungal infection, it’s important to treat it as soon as possible. The sooner you catch and treat the infection, the better chance your mulberry tree has of recovering.
Mulberry leaf spot
Using a fungicide is the best way to treat a fungal infection. You can apply the fungicide directly to the leaves or use a systemic fungicide, which will be absorbed by the roots and transported throughout the plant.
My favorite anti-fungal treatment is neem oil (Amazon link), which is a natural and effective way to combat fungal infections.
If you have a severe infection, you may need to hire a professional tree service to remove infected leaves and branches. In some cases, the entire tree may need to be removed.
To prevent fungal infections in the future, make sure to plant your mulberry tree in an area with good drainage. Also, keep your garden clean and free of debris. Remove any infected leaves or branches as soon as you see them.
3. Nutrient Deficiencies
Mulberry trees can also suffer from nutrient deficiencies, which can cause the leaves to turn yellow. The most common nutrient deficiency in mulberry trees is nitrogen.
If you think that your mulberry tree has a nutrient deficiency, you should have the soil tested. This will tell you what nutrients are lacking and how much needs to be added. You can then amend the soil with the appropriate fertilizer.
Mulberry trees are heavy feeders and will need to be fertilized several times a year. I recommend using organic fertilizer, such as compost or manure. You can also use a chemical fertilizer, but be sure to follow the directions on the package carefully.
Applying fertilizer to the leaves of the mulberry tree is not recommended. This can burn the leaves and damage the tree. Fertilizer should only be applied to the soil around the base of the tree.
Suspected potassium deficiency
4. Lack of Sunlight
Mulberry trees need full sun to thrive. If your mulberry tree is not getting enough sunlight, the leaves will start to turn yellow. You see, the plant won’t receive the energy it needs to produce food (photosynthesis).
To fix this problem, you’ll need to move your mulberry tree to a sunnier location. Make sure that the new spot gets at least six hours of sunlight per day. If possible, try to find an area where the tree will be protected from strong winds.
Once you’ve moved the tree, be sure to water it well. It’s important to give the roots time to adjust to their new surroundings before fertilizing or pruning the tree.
5. Environmental Stressors
There are a number of environmental stressors that can cause the leaves of a mulberry tree to turn yellow. These include cold temperatures, drought, and flooding.
If your mulberry tree is stressed, you’ll need to take action to improve the conditions. If the problem is drought, make sure to water the tree regularly. If the problem is cold temperatures, you may need to wrap the tree in burlap or apply an anti-desiccant spray.
And if the problem is flooding, you’ll need to improve the drainage around the tree.
It’s also important to protect your mulberry tree from pests and diseases. These can weaken the tree and make it more susceptible to stress. Be sure to check your tree regularly for signs of problems.
If you do see any pests, use neem oil to get rid of them. Neem oil is a natural and effective way to combat pests and diseases. Simply mix the neem oil with water and spray it on the leaves of your tree.
Should I Prune Yellow Mulberry Tree Leaves?
It is not necessary to prune yellow mulberry tree leaves unless they have a fungal infection that is spreading to other parts of the tree. If you do need to prune your tree, be sure to sterilize your pruning tools before using them. This will prevent the spread of disease.
To sterilize your pruning tools, simply dip them in a solution of rubbing alcohol and water. The ratio should be 70% alcohol to 30% water. Let the tools soak for at least five minutes, then dry them off with a clean cloth.
Once you’ve sterilized your tools, you can start pruning the yellow leaves from your mulberry tree. Be sure to cut back any diseased or damaged branches. This will help improve the overall health of the tree.
Will Yellow Mulberry Tree Leaves Turn Green Again?
No, yellow mulberry tree leaves will not turn green again. Once the leaves have turned yellow, they will stay that way until they fall off the tree.
If you want your mulberry tree to be healthy and thrive, you’ll need to take action to improve the conditions. This may include moving the tree to a sunnier location, fertilizing the soil, or pruning the tree. By taking these steps, you can help your mulberry tree to recover and produce healthy green leaves.
Conclusion
In conclusion, yellow mulberry tree leaves are a common problem. There are a number of factors that can cause the leaves to turn yellow, including lack of sunlight, environmental stressors, and pests.
I hope this article has been helpful. If you have any questions or comments, please feel free to leave them below. I will be happy to answer them as best I can. Thanks for reading!
In order to understand how to salt the earth so nothing grows, we must first understand what salting the earth means. When farmers want to prevent their enemies from farming their land, they will salt the earth so that nothing can grow.
This is done by spreading a layer of salt on the land, killing any vegetation it comes into contact with. In this blog post, we will discuss how to salt the earth in a way that will render it uninhabitable for plants. Stay tuned!
How to Salt the Earth So Nothing Grows?
There is more to salting the earth than just randomly chucking salt onto the ground until nothing will grow. In order to make sure that your salt does its job, there are a few steps that you must follow.
The first step is to find a source of salt. The most common type of salt used for this purpose is rock salt, which can be found at most hardware stores. Next, salt the roots of any weeds or plants that are already growing on the land. This will prevent them from coming back after the salt has been applied.
Now it’s time to apply the salt to the gaps in-between pavement and other areas where plants might try to grow. Make sure to apply a thick layer of salt so that nothing can break through.
Once you have finished applying the salt, water the area heavily. This will help the salt to seep into the ground and prevent any plants from growing. Salting also works on crabgrass and other types of grass that are difficult to kill with herbicides.
I will not go into deeper details on how to do this in this blog post as I want to focus on the effects of doing so.
1. Root Of Weeds
The first step is to find the root of any weeds. Then, sprinkle salt generously around the roots. this will dehydrate the root system and prevent regrowth. You will then be able to remove the weed easily.
Weed pulling tools make the job a lot easier, but if you don’t have any, a simple gardening hoe will do the trick. The good news is the salt will also prevent new weeds from growing in the future.
2. Between Bricks or Pavement
Grass that grows in the cracks of sidewalks and driveways is not only unsightly, but it’s also a pain to remove. The best way to prevent regrowth is by applying the salt directly to the crack.
This will kill the grass and stop new seeds from germinating. You can use any type of salt for this, but rock salt is the most effective. The salt is small enough to fit into the cracks and seep down to the roots.
3. Crabgrass
Crabgrass is a type of grass that grows in patches and is very difficult to remove. To get rid of it for good, make a saltwater solution by mixing a cup of salt with a kettle full of water. This solution will dehydrate the crabgrass and prevent it from growing back.
Pour the solution over the crabgrass patch and make sure to saturate the area. I tend to do this every 5-7 days to completely kill the crabgrass. You can also use this method on other types of weeds.
How Does Salting the Earth Work?
Plants use osmosis to take water from the ground and transport it to their leaves. The water contains nutrients that the plant needs to grow. As there is a higher concentration of water outside the root, water flows into the root.
However, when salt is added to the ground, it decreases the concentration of water outside the root. This means that water will no longer flow into the root, and the plant will eventually die from dehydration. In fact, water will leave the plant in order to try and dilute the salt concentration.
Will Salting the Earth Ruin Soil Forever?
No, salting the earth will not ruin soil forever. While it will prevent weeds, grasses, and other plants from growing, the soil will eventually recover. The salt will dissipate over time and new plant life will be able to take root.
This is why regular salting is required if you want to keep an area weed-free. The process must be repeated every few months to make sure that the salt doesn’t have a chance to dissipate.
Will Salting the Earth Prevent Weeds from Growing?
Yes, salting the earth will prevent weeds from growing. The salt will kill the roots of any existing weeds and prevent new ones from germinating. This is an effective way to keep your garden or lawn free of unwanted plants.
However, it’s important to note that the process must be repeated every few months as the salt will eventually dissipate.
Conclusion
In conclusion, salting the earth is an effective way to prevent weeds, grasses, and other plants from growing. The main effect of salting the earth is that it makes the land uninhabitable for plants. This is because salt kills vegetation by dehydrating it and preventing it from absorbing water and nutrients.
Now that you know how to salt the earth so nothing grows, put this knowledge to good use! If you have any unwanted plants on your property, make sure to get rid of them by following the steps outlined in this blog post. Salt is a great way to kill plants and keep them from coming back.
Just remember to reapply it every few months to ensure that the area remains weed-free. Thanks for reading!
Do you have a problem with ants in your home? If so, you may be wondering if there is anything that you can do to get rid of them. In this blog post, we will investigate whether or not Cream of Wheat kills ants. Keep reading to learn more!
Does Cream of Wheat Kill Ants?
Yes, I’ve had great success using Cream of Wheat to kill ants! I simply mix up a small batch of the cereal with some water and sugar, and then I set it out where I’ve seen the ants. The ants are attracted to the sweet mixture and they eat it, but the Cream of Wheat quickly expands in their stomachs and kills them.
It’s important to note that while this method does work, it is not a guaranteed solution to your ant problem. If you have a severe infestation, you may need to call in a professional exterminator. However, if you only have a few ants here and there, Cream of Wheat should do the trick!
What If Cream of Wheat Doesn’t Work?
If you’ve tried using Cream of Wheat to kill ants and it hasn’t worked, there are a few other things that you can try. Let’s look at my top three methods:
Method 1 – Boric Acid
Boric acid is a common household item that can be used to kill ants. Simply mix some boric acid with sugar or honey, and then sprinkle it where you’ve seen ants. The ants will be attracted to the sweet mixture and the boric acid will kill them.
Method 2 – Diatomaceous Earth
Another common household item that can be used to kill ants is diatomaceous earth. Diatomaceous earth is a powder made from the fossilized remains of tiny marine creatures called diatoms. It works by puncturing the ant’s exoskeleton, which leads to dehydration and death.
Sprinkle the diatomaceous earth around your home, paying special attention to cracks and crevices where ants might enter. You can also put it in a small container and make a “diatomaceous earth trap” by adding some honey or sugar around the powder.
Method 3 – Essential Oil
If you’re looking for a more natural solution, try using essential oils. Simply mix some water with a few drops of essential oil like peppermint or lavender, and then set it out where you’ve seen the ants. The ants will be repelled by the strong scent of the essential oil and they will stay away from the area.
As you can see, there are a few different things that you can try if Cream of Wheat doesn’t work. So don’t give up hope! One of these methods is sure to get rid of your ant problem.
Method 4 – Pest Control
Call the professionals in if you have a bad infestation and none of these methods seem to be working. A professional pest control company will be able to get rid of your ant problem quickly and effectively. They will also be able to give you advice on how to prevent ants from coming back in the future.
Conclusion
As we have seen, Cream of Wheat can be used to kill ants. However, it is not a guaranteed solution and you may need to try other methods if it doesn’t work. But don’t worry! There are plenty of other options out there that will get rid of your ant problem for good.
Do you have any tips for getting rid of ants? If so, please share them in the comments section below! Thanks for reading!