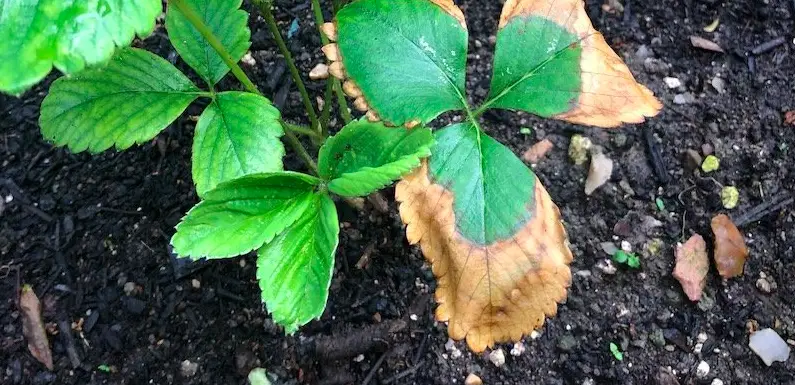
Do you have strawberry plants in your garden? If so, you may have noticed that the leaves are starting to turn brown. Don’t worry, you’re not alone! This is a common problem with strawberry plants, and there are several reasons why it may happen. In this blog post, we will discuss the causes of leaf browning in strawberry plants, as well as some solutions that you can try.
Why Are My Strawberry Leaves Turning Brown?
Brown strawberry plant leaves are typically due to fungal diseases, insects, overwatering, leaf burn, or nutritional problems. The exact type of browning will depend on the underlying cause. For example, if the leaves are turning brown due to a fungal disease, you may see spots or lesions on the leaves. If insects are to blame, you may see chewed leaves or webbing.
To gain a better understanding of why your strawberry leaves are turning brown, I will now discuss each of these potential causes in more detail.
1. Browning Strawberry Leaves from Fungal Infection
Fungal infections are one of the most common reasons for brown leaves on strawberry plants. The most common type of fungal infection in strawberries is called anthracnose.q This disease is caused by the fungus Colletotrichum acutatum and it affects both the fruit and leaves of strawberry plants.
Symptoms include small brown or black spots on the leaves, as well as on the fruit. The spots may be surrounded by a yellow halo. In severe cases, the leaves may turn brown and die.
Anthracnose is most likely to occur during wet weather conditions, so it’s important to avoid overhead watering if possible. Water early in the day so that the foliage has time to dry before nightfall. This will help reduce the chances of fungal spores developing and infecting your plants.
In addition, make sure to remove any affected leaves from the plant as soon as you see them. This will help prevent the disease from spreading. If you have a severe infestation, you may need to use a fungicide to get the problem under control.
My favorite fungicide is neem oil (Amazon link), which is made from the neem tree. It’s a natural product that is safe to use on your plants and isn’t harmful to the environment.
Simply mix it with water according to the directions on the bottle and spray it on your strawberry plants. Be sure to treat both the tops and bottoms of the leaves, as well as any affected fruit. You will need to reapply every few days until the problem is under control.
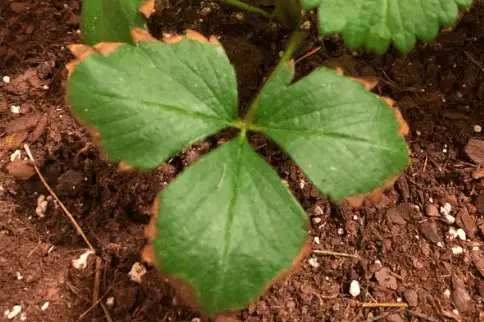
2. Browning Strawberry Leaves from FrostDamage
Frost damage is another common reason for brown leaves on strawberry plants. This typically happens in the spring, when the plants are just starting to grow. The new growth is particularly susceptible to frost damage.
Symptoms include brown tips that look like they’re burnt, as well as brown or black spots on the leaves. In severe cases, the leaves may turn brown and die.
To prevent frost damage in the future, make sure to plant your strawberry plants in an area that is protected from the wind. You may also want to consider covering them with a frost blanket if you live in an area where late frosts are common.
Brown strawberry leaves from frost
3. Browning Strawberry Leaves from Overwatering
Overwatering is another common cause of brown leaves on strawberry plants. When the roots of a plant are constantly wet, they start to suffocate and rot. This can lead to a number of problems, including leaf browning.
Symptoms of overwatering include wilting, yellowing, and browning of the leaves. The leaves may also fall off the plant prematurely. In severe cases, the plant may die if the roots are completely rotted.
To prevent overwatering, make sure to water your plants only when the soil is dry to the touch. Avoid watering in the evening, as this can cause the leaves to stay wet overnight and increase the chances of fungal infection.
In addition, make sure to plant your strawberry plants in well-draining soil. This will help prevent the roots from becoming waterlogged in wet weather.
4. Browning Strawberry Leaves from Pests
Pests can also be a problem for strawberry plants, and they can cause the leaves to turn brown. The most common pests that affect strawberries are spider mites, aphids, and whiteflies.
These pests suck the sap out of the plant, which can lead to yellowing and browning of the leaves. They may also attack the fruits, causing them to become misshapen or discolored. In severe cases, the plant may be completely defoliated.
To prevent pests from becoming a problem, make sure to keep your strawberry plants clean and free of debris. This will help reduce the chances of pests infesting your plants. In addition, you can use a number of different pesticides to control pests.
One of my favorite ways to get rid of pests is with neem oil (Amazon link), which is a natural product that is safe to use around your plants.
To use neem oil on strawberry plants, simply mix it with water according to the directions on the bottle and spray it on your plants. Be sure to treat both the tops and bottoms of the leaves, as well as any affected fruit. You will need to reapply every few days until the problem is under control.
5. Browning Strawberry Leaves from Leaf Burn
Leaf burn is another common problem that can cause the leaves of your strawberry plants to turn brown. Leaf burn is typically caused by too much sun, which can cause the leaves to scorch along the edges.
Symptoms of leaf burn include brown or black spots on the leaves, as well as brown edges. The affected leaves may also curl up or fall off the plant prematurely. In severe cases, the entire plant may be killed.
To prevent leaf burn, make sure to plant your strawberry plants in an area that receives partial shade. You may also want to consider using a shade cloth to protect your plants from the harsh afternoon sun.
6. Browning Strawberry Leaves from Nutrient Deficiencies
Nutrient deficiencies can also cause the leaves of your strawberry plants to turn brown. The most common nutrient deficiency that affects strawberries is iron deficiency, which causes the leaves to change color.
Other nutrient deficiencies that can cause leaf browning include magnesium deficiency and manganese deficiency, which are important for growing healthy leaves. These deficiencies are typically caused by a lack of nutrients in the soil.
To prevent nutrient deficiencies, make sure to fertilize your strawberry plants regularly. I recommend a balanced fertilizer that contains all of the essential nutrients. You can also use a soil test kit to check the nutrient levels in your soil and add amendments as needed.
Will Brown Strawberry Leaves Turn Green Again?
No, unfortunately, once the leaves turn brown, they will not turn green again. These leaves are dying and will eventually fall off the plant.
If you catch the problem early, you may be able to save the plant by taking corrective action. However, in most cases, it is best to simply remove the affected leaves and focus on preventing future problems.
Should I Prune Brown Strawberry Leaves?
There is no need to prune brown strawberry leaves, as they will eventually fall off the plant on their own. The only time I would recommend pruning is if a fungal disease is present, as this can spread to other parts of the plant.
Simply take a pair of sharp pruning shears and cut off the affected leaves at the base. Be sure to dispose of them in the trash so you don’t accidentally spread the disease to other plants.
Conclusion
In conclusion, there are a number of reasons why the leaves of your strawberry plants may turn brown. The most common causes are pests, leaf burn, overwatering, frost damage, fungal infection, and nutrient deficiencies.
If you take corrective action early, you may be able to save the plant. However, in most cases, it is best to simply remove the affected leaves and focus on preventing future problems.
I hope this article was helpful in identifying the reasons why your strawberry leaves are turning brown. If you have any additional questions, please feel free to leave a comment below. Thanks for reading!
Rhubarb leaves turning brown can be a cause for concern for gardeners. There are several reasons why this might happen, and fortunately, there are also several solutions. In this blog post, we will explore the causes of rhubarb leaves turning brown, as well as some ways to correct the problem. Keep reading to learn more!
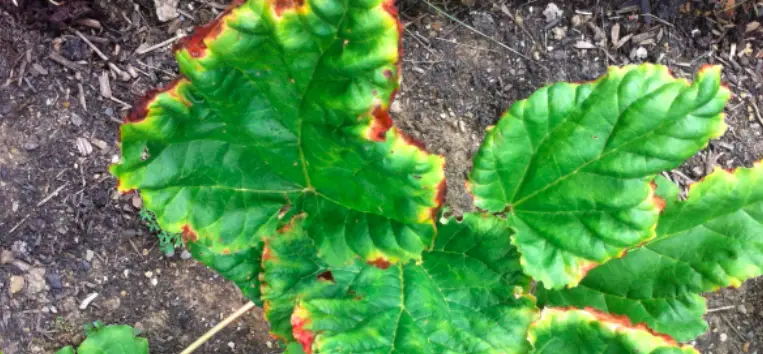
Why Are My Rhubarb Leaves Turning Brown?
Brown leaves on rhubarb plants are typically caused by fungal diseases, insects, overwatering, leaf burn, and nutritional deficiencies. The specific browning will be determined by the reason for the discoloration. Brown, crisp patches may appear on leaves if they are exposed to too much sun, whereas fungal infections cause brown spots.
To gain a better understanding of why your rhubarb leaves are turning brown, it is important to take a closer look at the plant. Check the undersides of the leaves for insects or egg sacs. Fungal diseases often start as small brown spots that eventually spread and cover the entire leaf.
Once you know what is causing the brown leaves, you can take steps to correct the problem. I will now go further into detail about each of the potential causes, as well as their solutions.
1. Browning Rhubarb Leaves from Fungal Infection
If brown spots are appearing on your rhubarb leaves, it is likely due to a fungal infection. The most common type of fungus that affects rhubarb plants is Anthracnose. This disease starts out as small, dark brown spots on the leaves. The spots eventually grow and spread until they cover the entire leaf, at which point the leaf will turn brown and die.
To prevent Anthracnose from infecting your rhubarb plants, it is important to practice good plant hygiene. This means removing any dead leaves or debris from around the plant, as well as pruning any affected leaves. You should also water the plants at the base of the stem, rather than from above, to avoid getting water on the leaves.
If your plant is already infected with Anthracnose, you can treat it with a fungicide. Be sure to follow the instructions on the product label carefully. I recommend using neem oil (Amazon link), which is a natural, organic fungicide.
Simply apply the neem oil to the affected leaves, being sure to cover both sides. You will need to reapply the fungicide every two weeks or so until the infection is gone.
2. Browning Rhubarb Leaves from Overwatering
Overwatering is another common cause of brown leaves on rhubarb plants. When the roots of the plant are constantly wet, they become oxygen-deprived and begin to die. This causes the leaves to turn brown and wilt.
To prevent overwatering, it is important to water your plants only when the soil is dry. You can check the moisture level of the soil by sticking your finger into it. If the soil is dry up to your second knuckle, it is time to water the plant.
If you think your plant is already suffering from overwatering, there are a few things you can do to save it. First, stop watering the plant until the soil is dry. Next, increase the drainage of the pot by adding some holes to the bottom. Finally, you can try replanting the rhubarb in a different pot with fresh, well-draining soil.
3. Browning Rhubarb Leaves from Pests
Insects and other pests are another common cause of brown leaves on rhubarb plants. The most common pests that affect rhubarb are aphids, caterpillars, and Japanese beetles. These pests feed on the leaves of the plant, causing them to turn brown and die.
To prevent pests from infesting your rhubarb plants, it is important to practice good plant hygiene. This means removing any dead leaves or debris from around the plant, as well as pruning any affected leaves.
The best way to get rid of these pests for sure is with neem oil (Amazon link), which works as both a pesticide and a fungicide. Simply apply the neem oil to the affected leaves, being sure to cover both sides.
Moving forward, it is important to take steps to prevent brown leaves on your rhubarb plants. The best way to do this is to practice good plant hygiene, including removing dead leaves and debris and pruning any affected leaves.
4. Browning Rhubarb Leaves from Leaf Burn
Leaf burn is another common cause of brown leaves on rhubarb plants. This usually occurs when the plant is exposed to too much direct sunlight. The leaves will turn brown and dry out, eventually dying.
To prevent leaf burn, it is important to make sure your rhubarb plant is getting enough water. Water the plant at the base of the stem, rather than from above, to avoid getting water on the leaves.
You should also make sure the plant is getting enough shade. If it is exposed to too much direct sunlight, you can try moving it to a different location or providing some additional shading.
5. Browning Rhubarb Leaves from Nutrient Deficiencies
Nutrient deficiencies are another common cause of brown leaves on rhubarb plants. The most common nutrient deficiency that affects rhubarb is nitrogen. This can be caused by a lack of nutrients in the soil or by too much water.
To prevent nutrient deficiencies, it is important to fertilize your rhubarb plants regularly. I recommend using an all-purpose fertilizer (Amazon link) that is high in nitrogen. This will help to ensure that the plants are getting all the nutrients they need.
Will Brown Rhubarb Leaves Turn Green Again?
No, it is extremely unlikely that brown rhubarb leaves will turn green again. Once the leaves have turned brown, they are usually dead and will eventually fall off the plant. If you notice that your plant has a lot of brown leaves, it is important to take steps to prevent further damage.
The good news is that your rhubarb will continue to produce new leaves, even if some of the old ones are brown. As long as you take steps to prevent further damage, your plant will eventually recover.
Should I Prune Brown Rhubarb Leaves?
It is usually not necessary to prune brown rhubarb leaves, as they will eventually fall off the plant on their own. However, if you notice that your plant has a lot of brown leaves, you can help it to recover by pruning some of the affected leaves.
To do this, simply cut off any brown leaves at the base of the stem. Be sure to dispose of the leaves properly, as they can contain harmful toxins.
Conclusion
As we have seen, there are a few different reasons why rhubarb leaves might turn brown. The most common causes are nutrient deficiencies, overwatering, fungal problems, leaf burn, and pests. However, as long as you take steps to prevent further damage, your plant will eventually recover.
If you have any questions or comments, please feel free to leave them below. I would love to hear from you! Thanks for reading!
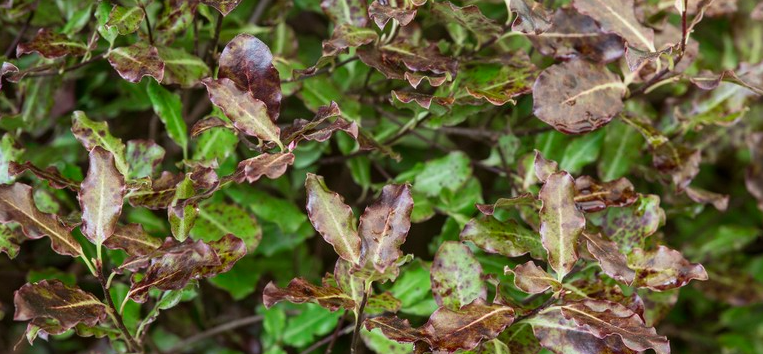
If you have pittosporum plants in your garden, you may have noticed that the leaves are turning brown. This can be a cause for concern, as it may mean that the plant is dying. However, there are several reasons why this may happen, and fortunately, there are also several solutions. In this blog post, we will discuss the possible causes of brown leaves on pittosporum plants and how to address them.
Why Are My Pittosporum Leaves Turning Brown?
The leaves of brown pittosporum are frequently caused by fungal infections, insects, overwatering, leaf burn, and nutritional inadequacies. Brown discoloration on the leaves might appear in a variety of forms for each problem. For example, leaf burn from too much sun will show up as brown, crispy patches on the leaves, while fungal infections usually cause brown spots.
To help you better understand why your pittosporum leaves are turning brown, let’s take a closer look at each of these potential causes:
1. Browning Pittosporum Leaves from Fungal Infection
The most common reason for brown leaves on pittosporum is a fungal infection. Fungal infections are often caused by humid conditions and can be difficult to treat.
Some of the most common fungi that cause problems for pittosporum plants include Phytophthora, Pythium, and Rhizoctonia.
If you suspect that your pittosporum plant has a fungal infection, it’s important to take action immediately. The first step is to remove any affected leaves from the plant. This will help prevent the spread of the infection. Next, you will need to treat the plant with a fungicide.
My favorite fungicide is neem oil (Amazon link), which is a natural and effective option. However, you can also use chemical fungicides if you prefer.
To treat your pittosporum plant with neem oil, simply mix together water and neem oil in a spray bottle and then spritz the plant leaves. Be sure to coat both the top and bottom of the leaves. You will need to repeat this treatment every few days until the infection is gone.
2. Browning Pittosporum Leaves from Overwatering
Another common cause of brown leaves on pittosporum plants is overwatering. When a plant is overwatered, the roots are unable to get the oxygen they need to function properly. This can lead to leaf discoloration and eventually death.
If you think your pittosporum plant is being overwatered, the first thing you should do is check the soil. If the soil is soggy or feels waterlogged, then you know overwatering is the problem.
To fix this, simply reduce the amount of water you are giving your plant. Allow the soil to dry out completely between waterings. Once you have corrected the watering issue, you should see the brown leaves start to fall off and new, green growth emerge.
3. Browning Pittosporum Leaves from Pests
Another possible reason for brown leaves on pittosporum plants is pests. Aphids, scale insects, and mealybugs are all common pests that can cause problems for pittosporum plants. These pests feed on the sap of the plant, which can lead to holes in the leaves and eventual browning.
If you think your pittosporum plant is being attacked by pests, the best thing to do is treat it with an insecticide. I like to use neem oil (Amazon link), which works by suffocating the pests. However, there are many other effective insecticides on the market.
To treat your pittosporum plant with neem oil, simply mix together water and neem oil in a spray bottle and then spritz the plant leaves. Pests like to hide in the crevices of the leaves, so be sure to get good coverage. You will need to repeat this treatment every few days until the pests are gone.
4. Browning Pittosporum Leaves from Leaf Burn
Another common reason for brown leaves on pittosporum plants is leaf burn. Leaf burn is usually caused by too much sun or wind exposure. The leaves will start to turn brown and crispy around the edges.
If you think your pittosporum plant has leaf burn, the best thing to do is move it to a location with more shade or protection from the wind. You can also try misting the leaves with water to help cool them down and prevent further damage.
5. Browning Pittosporum Leaves from Nutrient Deficiencies
Finally, another possible reason for brown leaves on pittosporum plants is nutrient deficiencies. Pittosporum plants need a well-balanced diet of nitrogen, phosphorus, and potassium to thrive. If they are not getting enough of these nutrients, the leaves will start to turn brown.
The best way to correct nutrient deficiencies is to fertilize your plant. I like to use a balanced fertilizer that contains all three of the major nutrients. However, you can also use separate fertilizers for each nutrient if you prefer.
To fertilize your pittosporum plant, simply mix the fertilizer with water according to the package directions and then apply it to the soil around the plant. Be sure to follow the package directions carefully, as too much fertilizer can be just as harmful as too little.
Will Brown Pittosporum Leaves Turn Green Again?
No, brown pittosporum leaves are unlikely to turn green again. Once the leaves have turned brown, they are usually dead and will eventually fall off the plant.
The good news is that pittosporum plants are fast growers and will quickly produce new, green leaves to replace the ones that have died. Just make sure the original cause of the browning is corrected so that the new leaves don’t suffer the same fate.
Should I Prune Brown Pittosporum Leaves?
The only time you should prune brown pittosporum leaves is to stop the spread of the disease. If the browning is caused by a disease, then you will need to remove the affected leaves to prevent the disease from spreading.
Other than that, there is no need to prune brown pittosporum leaves. The leaves will eventually fall off on their own and new, green growth will emerge. So just sit back and enjoy the show!
Conclusion
To sum up, if your pittosporum leaves are turning brown, it could be due to one of several reasons. The most common causes are pests, overwatering, fungal issues, leaf burn, and nutrient deficiencies.
If you think your plant is suffering from any of these problems, the best thing to do is take corrective action right away. Treat the pests, move the plant to a new location, fertilize the soil, and so on.
Most importantly, don’t despair! Pittosporum plants are very tough and resilient. They will quickly bounce back from almost any problem given the chance. So just be patient and give your plant the care it needs, and it will soon be looking as good as new