Do you have a geranium plant in your garden? If so, you may have noticed that the leaves are turning white. Don’t worry, this is normal! In this blog post, we will discuss why the leaves are turning white and what you can do to prevent it. We will also provide some tips for taking care of your geranium plants.
Why Are My Geranium Leaves Turning White?
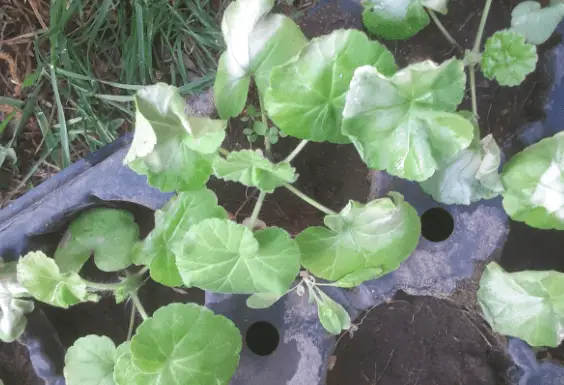
Geranium leaves turning white is usually a sign of powdery mildew, which is a common fungal disease that affects many different types of plants, including geraniums. It happens when fungus spores land on the leaves, and then high humidity and warm temperatures cause the spores to grow and spread. The fungus will eventually cover the leaves with a white, powdery substance.
There’s also a chance that your plant is suffering from a nutrient deficiency, which can cause the leaves to turn white due to not enough chlorophyll. Chlorophyll is what gives plants their green color, so if the leaves are lacking in chlorophyll, they will turn white.
Pests can also cause the leaves of your geranium plant to turn white. Aphids, for example, are small insects that feed on the sap of plants. As they feed, they excrete a sticky substance called honeydew. This honeydew can attract other pests, such as ants and bees. It can also encourage the growth of sooty mold, which is a fungus that will cover the leaves of your plant.
How to Treat White Geranium Leaves?
It’s important to treat white geranium leaves as soon as you notice them. If left untreated, powdery mildew can spread to other parts of the plant and even kill it. Here are some tips for treating white geranium leaves:
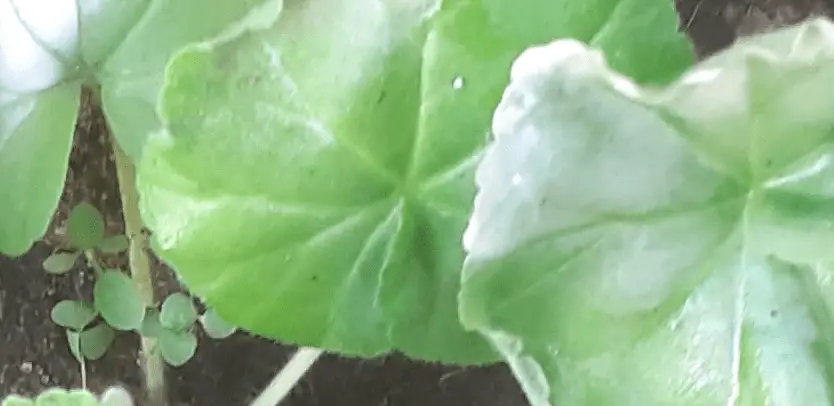
1. Powdery mildew
This needs to be stopped before it continues to spread. Take a look at the leaves and see if they’re covered in a white, powdery substance. If so, this needs to be removed. The best way to do this is by cleaning the leaves with a mixture of water and soap.
Once you’ve removed the powdery mildew, it’s important to use a fungicide to kill any remaining spores. This will prevent the fungus from coming back and infecting your plant again.
There are many different fungicides available on the market, so be sure to read the labels carefully to find one that’s effective against powdery mildew. I love using neem oil as a fungicide, it’s organic and works great!
As powdery mildew loves moist and humid conditions, it’s important to make sure your plant is getting enough airflow. Prune any dead or dying leaves and stems, as these can provide the perfect environment for the fungus to grow.
Powdery mildew leaves
2. Pests
If you think pests are to blame for the white leaves on your geranium plant, you’ll need to take action to get rid of them. Start by inspecting the leaves for any small insects or eggs. If you find any, you can remove them by hand or use an insecticide.
Once you’ve gotten rid of the pests, it’s important to treat the plant with a pesticide to prevent them from coming back. There are many different pesticides available on the market, so be sure to read the labels carefully and choose one that’s effective against the type of pest you have.
Again, I find neem oil to be a great all-natural pesticide. It works on a wide variety of pests and plants, so it’ll easily handle any pests living on your geranium plant.
3. Nutrient deficiency
Plants need a wide variety of nutrients to stay healthy, and if they’re lacking in any of these nutrients, it can cause the leaves to turn white. The most common nutrient deficiency that causes white leaves is a lack of iron.
To treat a nutrient deficiency, you’ll need to fertilize your plant. Choose a fertilizer that’s high in the nutrient that your plant is lacking. For example, if your plant is lacking in iron, choose a fertilizer that’s high in iron.
Be sure to follow the directions on the fertilizer label, as too much fertilizer can be just as harmful as too little. Apply the fertilizer to the soil around your plant, being careful not to get any on the leaves.
Water your plant well after applying the fertilizer, and you should see a difference in the color of the leaves within a few weeks.
And there you have it! These are three common causes of white geranium leaves and how to treat them. If you’re still having trouble with your plant, I recommend taking a sample of the leaves to your local nursery or gardening center.
How to Prevent Geranium Leaves Turning White?
Prevention is always the best cure, so it’s important to take steps to prevent your geranium leaves from turning white in the first place. Here are some tips for preventing white leaves on geranium plants:
Water your plants early in the day so the leaves have time to dry before nightfall
Prune any dead or dying leaves and stems from your plant
Make sure your plant has enough airflow by pruning it regularly and keeping it free of debris
Test the soil around your plant regularly and fertilize as needed
If you notice any pests on your plant, take action to remove them immediately
By following these tips, you can keep your geranium plants healthy and prevent the leaves from turning white.
Conclusion
In conclusion, if your geranium leaves are turning white, it could be due to powdery mildew, pests, or a nutrient deficiency. By taking the proper steps to treat each issue, you can get your plant back to health in no time! And remember, prevention is always the best cure, so take steps to prevent these problems from happening in the first place.
If you have an umbrella plant and lava rock, you may be noticing some mould growing on the lava rock. This is a common problem with these plants, but it’s easy to fix. In this blog post, we will discuss what causes lava rock mould and how to get rid of it.
Why Is My Umbrella Plant Lava Rock Going Mouldy?
Your lava rock is going mouldy because it is constantly moist from the watering of your umbrella plant. The spores of the mould are present in the air and they land on the wet lava rock and start to grow. The best way to prevent this from happening is to make sure that your lava rock is not constantly wet.
This happens to all lava rocks eventually and is not a cause for alarm. In fact, many people think that the mould adds character to the lava rock. Take a look at any wet rock in the wild and you’ll see mould growing on it.
If you don’t want the mould on your lava rock, there are a few things you can do to get rid of it.
How Do I Get Rid Of Lava Rock Mould?
If you already have mould growing on your lava rock, you can remove it with a toothbrush or other small brush. Scrub the mouldy areas with the brush and then rinse the lava rock off with water.
Neem oil (Neem Max is my choice) is a good way to prevent mould from growing on your lava rock. You can find neem oil at most garden stores. Simply apply the neem oil to the lava rock with a brush or spray bottle and it will help keep the mould away.
This is because neem oil is a fungicide that kills mould spores. Plus, as a natural oil, it is safe to use around plants and animals.
You can also prevent mould from growing on your lava rock by keeping it dry. After you water your umbrella plant, make sure to remove any excess water from the lava rock. You can do this by draining the water off of the lava rock or by wiping it down with a paper towel.
You can also try using a different potting medium for your umbrella plant. Instead of using lava rock, you can use gravel, sand, or perlite. These materials are less likely to hold moisture and will not support the growth of mould.
Is Lava Rock Mould Bad for My Umbrella Plant?
No, the mould growing on your lava rock is not bad for your umbrella plant. The mould is not feeding off of the plant and is not causing any harm to it. In fact, many people prefer the mould as it adds character to the lava rock.
While lava rock mould is not bad for your umbrella plant, it can be bad for you if you have allergies or respiratory problems. The mould spores can cause problems for people with these conditions and should be removed from the lava rock.
If you have an allergy or respiratory problem, you should remove the mould from your lava rock and either throw it away or sterilize it.
Conclusion
In conclusion, lava rock mould is a common problem but it is easy to fix. The best way to prevent lava rock mould is to keep the rock dry. If you already have mould growing on your lava rock, you can remove it with a brush or by using neem oil.
I hope this blog post has helped you learn more about lava rock mould and how to prevent it. If you have any questions, please leave a comment below and I will be happy to answer them. Thanks for reading!
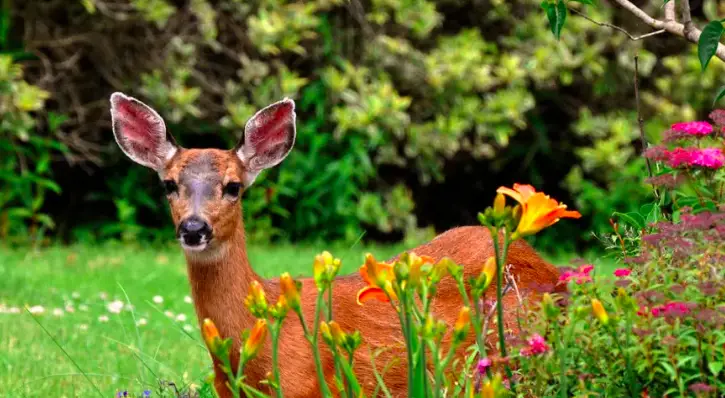
Deer are herbivores and will eat a variety of leaves, twigs, and fruits. While they will eat the leaves of some trees and shrubs, is it common for them to munch on dogwood leaves? In this blog post, we’ll explore whether deer are likely to eat dogwood leaves and what other factors play a role in their feeding habits.
Will Deer Eat Dogwood Leaves?
No, it is extremely rare for deer to eat dogwood leaves. Dogwoods are not a common food source for deer, as they prefer the leaves of other trees and shrubs.
There are a few reasons why deer may avoid eating dogwoods. First, dogwoods have a high tannin content, which can make them bitter and unpalatable to deer. Second, dogwoods are relatively low in nutrients, so they don’t provide the deer with much of the nutrition they need.
So, if you’re wondering whether deer will eat dogwood leaves, the answer is no – it’s not a common occurrence. However, deer that are starving for food may be more likely to eat dogwoods, as they will be desperate for any source of nutrition.
How to Protect Dogwood from Deer?
While deer don’t usually eat dogwood leaves, they can still damage the tree by rubbing their antlers on the bark or eating the buds. If you want to protect your dogwood from deer, you can use a fencing system or deer repellent.
1. Fencing
The best way to protect your dogwood from deer is to build a fence around it. Deer are strong jumpers, so the fence should be at least eight feet tall. You can also use electric fencing, which will give the deer a mild shock when they try to jump over it.
There are lots of options when it comes to fencing materials, so you can choose the one that best suits your needs. If you want a more natural look, you can use wood or stone. If you’re looking for a more durable option, you can use metal or plastic.
I’ve had good success with using this netting from Amazon. It’s less expensive than a fence and it does the job of keeping deer out.
No matter what material you choose, make sure the fence is well-constructed and properly installed. A weak or poorly-built fence won’t do much to deter deer.
2. Deer Repellents
Another way to protect your dogwood from deer is to use a deer repellent. Deer repellents are chemicals that make the leaves of plants taste bad, so deer avoid eating them.
There are lots of different deer repellents on the market, so you can choose the one that best suits your needs. Some deer repellents are made from natural ingredients, while others contain synthetic chemicals.
Whichever deer repellent you choose, make sure to follow the instructions on the label. Some deer repellents need to be reapplied after rain or snow, so it’s important to read the label carefully.
3. Sprinklers
Finally, you can deter deer from eating your dogwood by using a sprinkler system. Deer are afraid of loud noises, so they’ll be startled by the sound of the water and run away.
You can buy a ready-made sprinkler system, or you can make your own. To make your own, all you need is a garden hose and a few sprinklers. Simply attach the sprinklers to the hose and turn them on when you see deer in your garden.
Can Dogwood Be Used as Deer-Resistant Fencing?
Yes, dogwood can be used as deer-resistant fencing. As we mentioned before, dogwoods have a high tannin content, which makes them unpalatable to deer. They are also big and strong, so they can be used to build a durable fence.
If you’re looking for a natural and eco-friendly fencing option, dogwood is a great choice. Plus, it’s an attractive tree, so it will add beauty to your garden as well as function.
Conclusion
In conclusion, deer don’t usually eat dogwood leaves, but they can damage the tree by rubbing their antlers on the bark or eating the buds. If you want to protect your dogwood from deer, you can use a fencing system or deer repellent.
Do you have any tips for protecting dogwoods from deer? Share them in the comments below!
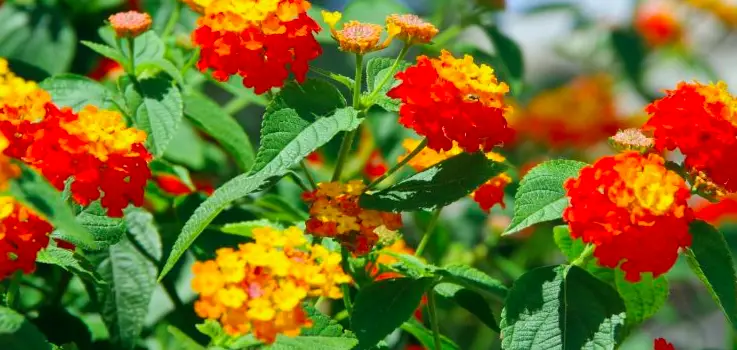
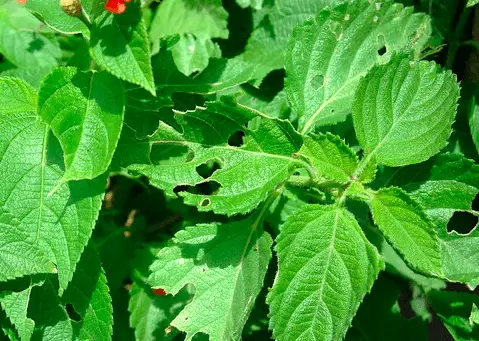
If you’ve been looking at your lantana plants and noticed that they have holes in their leaves, don’t worry – you’re not alone. This is a common problem for lantana growers, but it’s also easy to solve. In this blog post, we will discuss the causes of leaf holes in lantana plants and how to fix them.
Why Are There Holes in My Lantana Leaves?
Holes in lantana leaves usually indicate that the plant is infested with insects. The most common culprits are caterpillars whiteflies, spider mites, lace bugs, aphids, and mealybugs. These pests chew on the leaves of the plant, causing the holes that you see.
These pests are attracted to lantana plants because they are looking for a place to lay their eggs. The larvae of these insects will feed on the leaves of the plant, causing damage. In some cases, the larvae can also spread diseases to the plant.
Look closely under the leaves and nearby stems to find the culprit. There are many clues. For example, caterpillars leave droppings, known as frass, while whiteflies leave a sticky residue on the leaves.
Spider mites leave webbing, and lace bugs have black excrement on the underside of the leaves. Aphids and mealybugs can be harder to find but look for ants crawling around the plant. They are attracted to the honeydew that these pests secrete.
How to Treat Lantana Leaves with Holes?
To get your lantana back on track, you’ll need to treat the plant for pests. You can do this by using a pesticide or an insecticide. Be sure to follow the instructions on the label and apply the product according to the directions.
My favorite way to protect plants from pests is with neem oil (Amazon link), an organic insecticide. Neem oil works by suffocating the insects and preventing them from laying eggs.
To use neem oil, mix it with water according to the directions on the label and spray it on the lantana plant. Be sure to cover the undersides of the leaves where pests like to hide. You’ll need to reapply the neem oil every few days until the pests are gone.
Lantana leaf holes
How to Keep Pests Away From Lantana Leaves?
To prevent pests from infesting your lantana plants in the future, there are a few things you can do.
First, make sure to keep your plants healthy. Pests are attracted to weak and stressed plants. So, give your lantana plants the care they need to stay strong and healthy.
Second, keep the garden clean. Pests like to hide in weeds and debris. So, make sure to remove any weeds or dead leaves from the area around your lantana plants.
Finally, consider using pest control products. There are many organic and chemical options available. Choose a product that won’t harm your plants and that is effective against the pests in your area.
By following these simple tips, you can keep your lantana plants healthy and free of pests.
What Else Causes Holes in Lantana Leaves?
There are a few other reasons why your lantana leaves might have holes.
Drought
First, the plant could be suffering from drought stress. Lantana plants need regular watering to stay healthy. If the soil is too dry, the leaves will start to turn brown and could develop holes.
To fix this problem, water your lantana plants deeply and regularly. Be sure to check the soil before watering to make sure it is dry.
Lack of nutrients
Second, the plant could be suffering from nutrient deficiencies. Lantana plants need a balanced diet of nutrients to stay healthy. If the soil is lacking in nutrients, the leaves will start to turn yellow and could develop holes.
To fix this problem, fertilize your lantana plants with a balanced fertilizer. Be sure to follow the instructions on the label and apply the fertilizer according to the directions.
Disease
Third, the plant could be suffering from a fungal disease. Lantana plants are susceptible to several fungal diseases, including powdery mildew and leaf spot. These diseases cause spots on the leaves and can eventually lead to leaf loss.
To fix this problem, treat your lantana plants with a fungicide. Be sure to follow the instructions on the label and apply the product according to the directions.
Should I Prune Lantana Leaves with Holes?
Once you’ve treated the plant for pests, you can prune away the damaged leaves. This will help the plant to focus its energy on new growth.
To prune the lantana plant, cut off the affected leaves at the base of the plant. Be sure to sterilize your pruning tools before and after use to prevent the spread of disease.
Conclusion
In conclusion, holes in lantana leaves are usually caused by pests. To fix the problem, you’ll need to treat the plant for pests and prune away the damaged leaves. By following these simple tips, you can keep your lantana plants healthy and free of holes.
If you have any questions or comments, please feel free to leave them below. I would love to hear from you. Until next time, happy gardening!
Do you have a Java Fern plant and are wondering why there are holes in the leaves? You’re not alone! Many gardeners have this same question. In this blog post, we will explore the possible reasons for the holes and suggest solutions.
Why Are There Holes in My Java Fern Leaves?
The most likely reason for holes in your java fern leaves is a potassium deficiency. Potassium is an important nutrient for plants and helps with photosynthesis, water retention, and disease resistance.
A lack of potassium can cause leaves to develop lots of tiny holes or brown spots. If the deficiency is severe, the leaves may start to wilt and eventually die.
The other potential cause of holes in java fern leaves is damage from tank fish or snails. They may nibble on the leaves, causing small holes. Alternatively, they may rub against the leaves, which can cause larger tears.
Finally, old age can also cause holes to develop in java fern leaves. As the leaves age, they become less flexible and more prone to tearing. If black coloration is also present on the leaves, it is likely due to old age rather than a deficiency or damage.
How to Treat Java Fern Leaves with Holes?
To treat your java fern, it’s important to stop the cause of the holes. If a potassium deficiency is to blame, you can add a fertilizer that contains this nutrient.
My favorite method of fixing a potassium deficiency is with API Leaf Zone Freshwater Aquarium Plant Fertilizer. This is a liquid fertilizer that you can add to your tank water according to the package directions.
Simply use the dropper to add the appropriate amount of fertilizer to your tank. I like this product because it’s easy to use and it quickly corrects a potassium deficiency.
There’s not much you can do if fish or snails are damaging your java fern leaves. It’s a good idea to find out why they are eating the fern plant. Are they hungry? Are they bored? Answering these questions will help you figure out how to solve the issue.
if the fish are eating the leaves because they’re hungry, you may need to feed them more than you are currently. Check the food label to see how much you should be feeding your fish every day.
If the fish are eating the leaves because they’re bored, you may need to provide them with more hiding places or toys. By doing this, you can keep them entertained and away from the java fern leaves.
You might also consider separating the fish from the java fern plant. This can be done by putting the fern in a different tank or by using a physical barrier like a fish net.
Should I Prune Java Fern Leaves with Holes?
You don’t need to prune java fern leaves with holes, but you can if you want to. If the holes are small and the plant is otherwise healthy, pruning is not necessary.
Pruning can help remove damaged leaves and make the plant look nicer. To prune, simply cut off the affected leaves at the base with a sharp knife or scissors.
Conclusion
In conclusion, holes in java fern leaves are most likely caused by a potassium deficiency or damage from tank fish or snails. To fix the issue, you can add fertilizer or provide the fish with more food or hiding places.
Java ferns are tough plants and can withstand a fair amount of abuse. If your plant has holes in the leaves, don’t despair! By following the tips above, you can get it looking healthy and beautiful again in no time.
Do you have any questions or comments about holes in java fern leaves? Please share your thoughts in the comments below! Thanks for reading!​