If you have a magnolia tree in your yard, you may have noticed that the leaves are starting to turn white. This can be alarming, especially if you don’t know why it’s happening. In this blog post, we will discuss the reasons why magnolia leaves turn white and how to solve the problem!
Why Are My Magnolia Leaves Turning White?
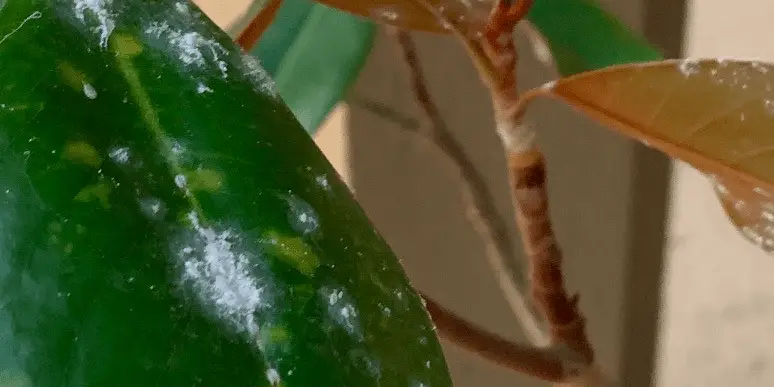
Magnolia leaves turn white for a variety of reasons. The most common reason is called powdery mildew, which is caused by a fungus that grows in humid or wet conditions.
This fungus can cause the leaves to turn white, as well as brown and yellow spots. If you think your tree has powdery mildew, it’s important to treat it immediately!
There’s also a chance that pests and iron deficiency could be causing your magnolia leaves to turn white. If you notice any pests on the leaves, be sure to remove them and treat the area with an insecticide.
As for iron deficiency, you can solve this problem by adding iron sulfate to the soil around your magnolia tree.
Once you’ve determined the cause of your magnolia leaves turning white, you can take the necessary steps to solve the problem!
How to Treat White Spots on Magnolia Leaves?
It’s important to tackle the problem as soon as possible. The earlier you catch it and treat it, the better chance you have of saving your tree! I will now provide an in-depth guide on how to treat each problem:
1. Powdery mildew
If powdery mildew is the cause of your magnolia leaves turning white, you’ll need to treat it with a fungicide as soon as possible.
I love using neem oil as a fungicide for powdery mildew because it’s all-natural, incredibly effective, and safe to use around pets and children. I’ve used it on roses, vegetables, fruit trees, and even in the garden, and it always does a great job of preventing and treating powdery mildew.
To use neem oil as a fungicide, mix it with water and spray it onto the affected leaves. Be sure to treat all of the leaves, even if they don’t all have powdery mildew!
As powdery mildew thrives in moist conditions, it’s also important to make sure your magnolia tree is getting enough airflow. Prune any branches that are blocking airflow and make sure the leaves are dry before nightfall.
You should also avoid watering your magnolia tree from above, as this can cause the leaves to stay wet and promote the growth of powdery mildew. Water the roots directly or use a soaker hose to water the tree.
2. Pests
Take a closer look at the affected leaves and see if you can spot any pests or holes in the leaves. The most common pests that affect magnolia trees are aphids, scale insects, and mites.
If you find any pests on the leaves, be sure to remove them by hand or with a hose. You can also treat the area with an insecticide to prevent further infestation.
I like to use a mixture of neem oil and water in a spray bottle to keep my plants healthy and free of pests. Simply shake the bottle well before each use, and be sure to apply the mixture to the undersides of leaves as well as the stems and flowers.
Make sure no pests travel to other plants as well! Be sure to check your other plants for signs of pests, and treat them accordingly.
3. Iron deficiency
Plants need nutrients to thrive, and one of the most important nutrients is iron. Iron helps the plant to produce chlorophyll, which gives the plant its green color.
If your magnolia tree is lacking iron, you may notice that the leaves are turning white or yellow. This problem can be solved by adding iron sulfate to the soil around your tree.
You can find iron sulfate at your local nursery or garden center. Simply add the recommended amount to the soil around your magnolia tree and water it in well.
Be sure to check the packaging for specific instructions on how much iron sulfate to use. You should also have your soil tested periodically to make sure it’s not lacking in any other nutrients.
How to Prevent Magnolia Leaves Turning White?
Prevention is always the best cure! Here are a few tips to prevent your magnolia leaves from turning white:
Water the roots directly or use a soaker hose to water the tree
Prune any branches that are blocking airflow
Make sure the leaves are dry before nightfall
Have your soil tested periodically and add iron sulfate if necessary
Avoid overwatering
Treat any pests or diseases as soon as possible
By following these tips, you can keep your magnolia tree healthy and prevent the leaves from turning white in the first place.
Care Tips
Stressed magnolia plants are more susceptible to problems like powdery mildew, pests, and nutrient deficiencies. So, it’s important to give your magnolia tree the care it needs to stay healthy.
Here are a few tips for caring for your magnolia tree:
Fertilize your tree regularly with an all-purpose fertilizer or a fertilizer made specifically for magnolia trees
Water your tree deeply and regularly during the growing season
Mulch around the base of your tree to help retain moisture and prevent weeds from growing
Prune your tree annually to remove any dead or diseased branches
Provide enough sunlight for your tree to thrive
By following these care tips, you can keep your magnolia tree healthy and prevent problems like powdery
Conclusion
In conclusion, there are several reasons why magnolia leaves may turn white. These include powdery mildew, pests, nutrient deficiencies, and stress. By taking preventative measures and providing proper care for your tree, you can prevent white leaves from forming.
Do you have any tips for preventing or treating white leaves on magnolia trees? Share them in the comments below!
Mothballs are a common household item that is used to keep moths away from clothes. This has resulted in many people using them on their potted plants. But is this safe to do?
In this article, we will be discussing whether mothballs are safe to use around potted plants. Let’s find out…
Will Mothballs Kill Potted Plants?
Yes, mothballs will kill potted plants as they contain two deadly chemicals, naphthalene, and paradichlorobenzene. These two chemicals work by suffocating the plant’s roots, preventing them from taking in water and nutrients. Over time, this will cause the plant to die.
So if you’re looking for a way to keep your potted plants safe from moths, it’s best to avoid using mothballs. There are many other methods out there that are much safer and just as effective.
Alternatives to Moth Balls in Potted Plants
Let’s take a look at some of the alternatives that you can use to keep moths away from your potted plants:
Lavender: Lavender is a great alternative to mothballs as it naturally repels moths. You can either grow lavender around your plants or use lavender essential oil
Cedar: Cedar is another great option for repelling moths. You can either use cedar chips or cedar oil to keep them away
Cloves: Cloves are a great way to keep moths out of your potted plants. Simply place a few cloves in the pot and they will do the job
Rosemary: Rosemary is another herb that repels moths. You can either grow it around your plants or use the essential oil
Mint: Mint is another great option for repelling moths. You can grow it around your plants or use the essential oil
As you can see, there are many safe and effective alternatives to using mothballs in potted plants. They keep moths away without exposing your plants to chemicals. So if you’re looking for a way to protect your plants from moths, be sure to try one of these methods.
What Pests Do Mothballs Keep Away?
Mothballs keep away a variety of pests, including moths rodents, deer, spiders, snakes, and insects. However, it’s not always legal to use them as they can be harmful to the environment.
In many states and areas around the world, mothballs are only permitted to be used indoors. This is because they can be harmful to animals, birds, and other wildlife if they’re exposed to them.
Even if they are legal to use in your jurisdiction, I still don’t recommend using them as they can be harmful to the environment we love so much.
So if you’re looking for a way to keep pests away from your potted plants, it’s best to use one of the alternatives that we listed above. They’re just as effective and much safer for the environment.
Mothballs on Plants FAQ
There isn’t a lot of information available on using mothballs on plants. However, we’ve compiled a list of the most frequently asked questions to help you out.
Are Moth Balls Toxic to Gardens?
Yes, mothballs are toxic to gardens as they release chemicals into the air and soil that can be harmful to plants, animals, and humans. These chemicals can also persist in the environment long after the mothballs have been removed.
Do Moth Balls Keep Squirrels Out of Flower Pots?
Yes, mothballs will keep squirrels out of flower pots as they don’t like the smell of the chemicals. However, this isn’t a good long-term solution as the chemicals can be harmful to the environment.
Is It Illegal to Put Mothballs Outside?
It is illegal in many countries and regions to put mothballs outside because they may harm the environment. For example, the United Kingdom’s Department for Environment, Food, and Rural Affairs (DEFRA) has banned the use of mothballs outdoors.
Conclusion
Mothballs may be effective at keeping moths away from your potted plants, but they’re not worth the risk. They contain a few harmful chemicals that can be released into the environment, harming plants, animals, and humans.
I recommend using lavender or cedar chips as they still keep moths away but don’t have the same harmful effects on the environment.
What other methods do you use to keep pests away from your potted plants? Let us know in the comments below! I hope this article was helpful and informative. Thanks for reading!
When it comes to fertilizing flowers, there are a lot of different opinions out there. Some people swear by Miracle-Gro, while others think that organic compost is the way to go. But what about dog poop? Is it a good fertilizer for flowers? The answer may surprise you!
Is Dog Poop Good Fertilizer For Flowers?
Dog poop is good fertilizer for flowers when part of a compost mixture. Simply mix it with straw, vegetable waste, grass, and/or leaves. This combination provides essential nutrients that flowers need to thrive, like nitrogen and phosphorus.
However, dog poop can also contain harmful bacteria that can make people and pets sick, so it’s important to compost it properly before using it on your flowers.
Fresh poop contains harmful pathogens and bacteria that not only cause harm but also attract pests and disease. So, while dog poop is good fertilizer for flowers, be sure to compost it first to ensure the safety of your family and pets!
How to Compost Dog Poop for Plants?
To compost dog poop, bury it in a pile of other organic matter and leave it for a few months to break down. Once it’s finished composting, you can spread it around your flower beds. Just be sure to wear gloves and wash your hands thoroughly after handling it!
It’s also important to avoid applying dog poop to any vegetables that you plan to eat. No one wants to eat poop, no matter how well-composted it is!
To make an effective dog poop compost mix, you will first need to gather a range of nitrogen-rich and carbon-rich materials. Here’s a list of items that you can use:
Vegetable waste (nitrogen)
Commercial fertilizer (nitrogen)
Fish scraps (nitrogen)
Green grass clippings (nitrogen)
Animal manure (nitrogen)
Fallen leaves (carbon)
Newspaper shreddings (carbon)
Chopped hay or straw (carbon)
Sawdust (carbon)
It’s also handy to have a thermometer, bin, moisture meter, and shovel. This will help you to monitor the temperature and moisture levels of your compost pile, which is important for effective composting.
To start, simply layer your ingredients in a bin or pile, making sure to alternate between nitrogen-rich and carbon-rich materials. Once you’ve got a good mix going, water it down and cover it with a tarp.
Leave your compost pile for at least two months, turning it every few days to help aerate it. After two months, your compost should be ready to use! Simply spread it around your flower beds and enjoy the benefits of beautiful, healthy flowers.
How to Add Dog Poop Fertilizer to Flowers?
Now that you know how to compost dog poop, it’s time to learn how to use it on your flowers.
When adding dog poop fertilizer to flowers, be sure to use gloves and wash your hands thoroughly afterward. Also, avoid applying it to any vegetables that you plan to eat.
Simple layer 2-3 inches of dog poop compost around your flower beds. Use a fork or shovel to gently mix it into the topsoil. Water well and wait to see how your plants respond!
You may need to adjust the amount of dog poop fertilizer that you use depending on the type of plants and flowers that you have. For example, more delicate flowers may only need a small amount, while heartier plants can handle a bit more. Pay attention to your plants and make adjustments as needed.
Why Fresh Poop Shouldn’t be Used
Fresh dog poop should never be used on flowers or other plants. Let’s find out why…
1. Acidic
While cow manure is relatively neutral, dog manure is slightly acidic, which is why it shouldn’t be used as fertilizer on its own. This can cause problems for plants, especially if the soil is already on the acidic side.
2. Slow to break down
Dog poop takes longer to break down than other types of manure, so it’s best to compost it before using it on your flowers. Otherwise, you run the risk of harming your plants.
3. Parasites can be present
There are a number of parasites that can be found in dog poop, including roundworms, hookworms, and tapeworms. These parasites can infect humans and animals if they come into contact with the feces.
Conclusion
In conclusion, dog poop is good fertilizer for flowers when it’s part of a compost mixture. However, it’s important to compost it properly before using it on your plants to avoid harming them. And, as always, be sure to wash your hands thoroughly after handling dog poop! Thank you for reading.
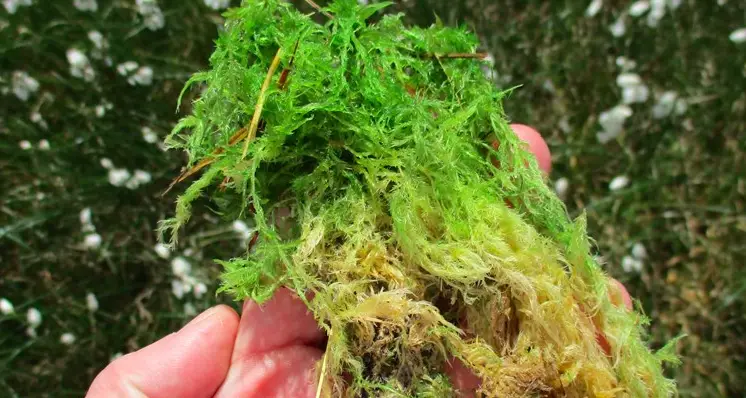
Moss is a type of plant that can be found in many different environments. It can grow on trees, rocks, and even in water. But should you put it in your potted plants? In this blog, we will explore the pros and cons of adding moss to your potted plants. Let’s find out…
Is Moss Good For Potted Plants?
Yes, moss is good for potted plants because it absorbs water and nutrients from the air, which means that your plant has nutrients and moisture available to it 24 hours a day.
But that’s not all – let’s take a closer look at the benefits of moss in potted plants.
1. Helps retain moisture
Soil tends to dry out quickly, especially when the air is hot and dry. This can be a problem for your plant because it needs moisture to survive. But moss can help!
Moss absorbs water and prevents the soil from drying out so quickly. This means that your plant will always have access to moisture, even if you forget to water it for a few days.
In fact, the moss acts like a mulch that helps regulate the temperature and moisture of the soil. Moss also helps keep the roots of your plant cooler in hot weather and warmer in cold weather. This is because moss insulates the roots from extreme temperatures.
2. Boosts plant aesthetics
We all want our potted plants to look their best. But sometimes, soil can make them look a little plain. That’s where moss comes in!
Moss can add a touch of elegance and beauty to your plants. It comes in a variety of colors, including green, red, orange, and even purple! So you can find the perfect color to match your plant.
Plus, moss is soft to the touch, which adds extra texture and interest to your potted plants.
3. Improves plant health
Moss not only helps your plant retain moisture, but it also provides nutrients. Moss contains nitrogen, phosphorus, and potassium – all essential nutrients for plant growth.
Plus, moss absorbs carbon dioxide and produces oxygen, which is vital for plant health. In fact, many people use moss to improve the air quality in their homes!
There you have it – three reasons why moss is good for potted plants! So if you’re looking for a way to improve the health and appearance of your plants, consider adding some moss to their pot. Your plants will thank you for it!
What’s the Best Moss for Potted Plants?
There are thousands of species of moss, but not all of them are ideal for potted plants. In general, you want to choose a moss that is easy to care for and doesn’t require too much water. Some of the best mosses for potted plants include:
1. Sphagnum Moss
Sphagnum moss is one of the most popular types of moss for potted plants. It’s easy to find and relatively inexpensive. Plus, it holds a lot of water, which is perfect for plants that need extra moisture.
It comes from sphagnum bogs, is dried, and then sold in bags. Sphagnum moss is light-colored and has a spongy texture. It’s used around the perimeter of the soil to help hold moisture in.
2. Peat Moss
Peat moss is another popular type of moss for potted plants. It’s made from decomposed plant matter and is found in bogs. Peat moss has a high water-holding capacity and is rich in nutrients, making it perfect for potted plants.
Peat moss is sold in bags and is usually brown or black in color. It’s often used as a soil amendment to improve drainage and aeration.
3. Spanish Moss
Spanish moss is a type of air plant that grows on trees in warm, humid climates. It’s not actually a moss, but it has a similar appearance. Spanish moss is light and fluffy with a silver-green color.
It’s often used as an ornamental plant because of its beautiful cascading shape. But Spanish moss can also be used to help retain moisture in potted plants and hanging baskets.
So there you have it – three of the best mosses for potted plants! Now that you know which moss to choose, you can add it to your plant’s pot and enjoy all the benefits it has to offer.
How Do You Use Moss for Potted Plants?
You can buy pre-mixed potting soil that contains moss, or you can add moss to your existing potting mix. Here’s how to do it:
Purchase some peat moss, potting soil, perlite, and fertilizer
Empty some of the peat moss into a bucket and leave it outside to dry for a few days to soak up moisture. If the weather is dry, use a spray bottle to lightly mist the peat moss
Mix the moss with the potting soil and perlite in equal proportions, and then use a fork to aerate the mixture
Add fertilizer to the mixture and mix it in well. Be sure to read the instructions on the fertilizer packaging to determine how much to add
Fill your plant’s pot with the mixture, and then water it well. Be sure to keep an eye on the moisture level and water as needed
And that’s all there is to it! Now you know how to use moss for potted plants. So go ahead and give it a try – your plants will thank you for it!
Are Moss Poles Good for Potted Plants?
A moss pole is a long, slender pole that is covered in moss. Moss poles are often used as support structures for potted plants. They can help to keep your plant upright and prevent it from toppling over.
Moss poles are also beneficial for plants that need extra moisture. The moss helps to hold water and can provide a source of hydration for your plant. Plus, the moss will help to keep the soil around the roots of your plant moist.
If you’re looking for a way to support your potted plant, consider using a moss pole. Just be sure to choose one that is the right size for your plant and pot.
Conclusion
In conclusion, moss is good for potted plants. It helps to retain moisture, provides nutrients, and improves plant health. Plus, it’s easy to care for and doesn’t require too much water. So if you’re looking for a way to improve the health and appearance of your plants, consider adding some moss to their pot.
I hope this article was helpful. If you have any questions, please feel free to leave a comment below and I will be happy to answer them!
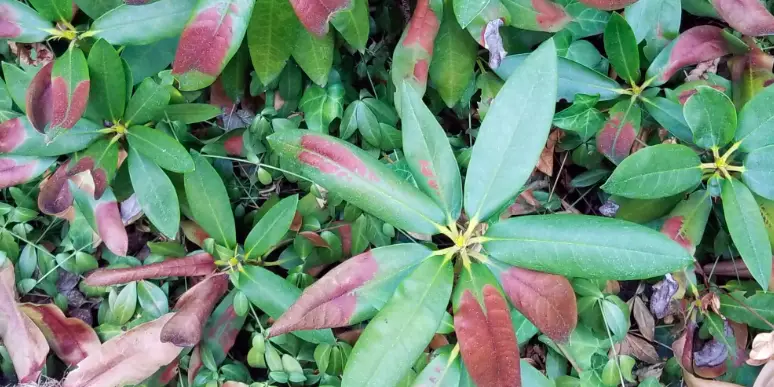
If you’ve been keeping an eye on your rhododendron plants, you may have noticed that their leaves are starting to turn brown. This can be a cause for concern, but don’t worry – it’s not always a sign of trouble. In this blog post, we’ll talk about the possible causes of brown leaves on rhododendrons, and we’ll provide some tips on how to deal with them.
Why Are My Rhododendron Leaves Turning Brown?
Brown rhododendron leaves are frequently caused by fungal infections, pests, overwatering, leaf burn, and nutritional deficiencies. Each problem might result in a distinct type of brown discoloration on the leaves.
It’s critical to figure out what caused the issue so that you can take the appropriate measures to fix it. I’ll go through each of the causes in more depth now.
Browning Rhododendron Leaves from Fungal Infection
Fungal infections are a common cause of brown leaves on rhododendrons. The most common type of fungus is Phytophthora, which results in dark brown or black spots on the leaves.
This fungus typically occurs when there is too much moisture on the leaves – for example if you water your plants in the evening and the leaves don’t have a chance to dry off before nightfall.
It can also happen when fungal spores are present in the soil, and they come into contact with the leaves when you water your plants.
If you think that your rhododendron’s brown leaves are caused by a fungal infection, you should take measures to improve air circulation around the plant and make sure that the leaves are dry before nightfall.
Applying a fungicide is needed to stop the spread of the fungus and protect other plants. I recommend using neem oil (Amazon link), which is a natural, biodegradable alternative to chemical fungicides.
Simply add a few drops of neem oil to your watering can or spray bottle and apply it to the leaves of your plants, making sure to coat the undersides of the leaves where pests are most likely to hide. For best results, apply the solution every 7-14 days.
Browning Rhododendron Leaves from Too Much Water
Overwatering is another common cause of brown leaves on rhododendrons. We tend to think that more water is a good thing, but too much water can actually drown the roots of your plants and cause the leaves to turn brown.
If you think that your rhododendron’s brown leaves are caused by overwatering, you should check the soil to see if it is moist before watering your plant. Stick your finger in the soil – if it feels wet, then wait a few days before watering again.
It’s also a good idea to invest in a moisture meter, which will help you to keep track of the moisture levels in your soil and avoid overwatering your plants.
To save a plant that has been overwatered, you will need to act quickly. Remove the plant from its pot and check the roots. If they are mushy or have started to rot, then you will need to trim them back until you only have healthy roots left.
Once you have trimmed the roots, replant the rhododendron in well-draining soil, and make sure that you don’t water it again until the soil has had a chance to dry out completely.
Browning Rhododendron Leaves from Pests
Pests love eating rhododendron leaves, and they can cause the leaves to turn brown in a matter of days. The most common pests are aphids, scale insects, and mites.
Aphids are small, green insects that congregate on the undersides of rhododendron leaves. They suck the sap out of the plant, which can cause the leaves to turn brown and eventually drop off.
Scale insects are small, hard-bodied pests that attach themselves to the stems and leaves of rhododendrons. They feed on the sap of the plant, which can cause the leaves to turn yellow or brown.
Mites are tiny spider-like creatures that live in the soil and on the undersides of rhododendron leaves. They feed on the cells of the plant, which can cause the leaves to turn brown and eventually drop off.
If you think that your rhododendron’s brown leaves are caused by pests, you should inspect the undersides of the leaves for signs of aphids, scale insects, or mites.
The best way to tackle pests is through the use of neem oil (Amazon link), which will get rid of any pests that are present on your plants.
Simply add a few drops of neem oil to your watering can or spray bottle and apply it to the leaves of your plants, making sure to coat the undersides of the leaves where pests are most likely to hide. For best results, apply the solution every seven days
Browning Rhododendron Leaves from Leaf Burn
Too much sun will cause the leaves of your rhododendron to turn brown. This is especially a problem in the summer months when the sun is at its strongest.
If you think that your rhododendron’s brown leaves are caused by leaf burn, you should move your plant to a shady spot and make sure that it doesn’t get too much sun.
You can also try to protect your plant from the sun by covering it with a light cloth or placing it in a spot where it will get some afternoon shade.
Browning Rhododendron Leaves from Nutrient Deficiencies
Nutrient deficiencies are another common cause of brown leaves on rhododendrons. The most common nutrient deficiency is iron, but nitrogen and magnesium deficiencies can also cause browning leaves.
If you think that your rhododendron’s brown leaves are caused by a nutrient deficiency, you should fertilize your plant with an all-purpose fertilizer that contains iron. You can also try adding some compost to the soil to help improve its nutrient content.
Once you have corrected the nutrient deficiency, you should see a difference in the color of your rhododendron’s leaves within a few weeks.
Browning Rhododendron Leaves FAQs
This plant isn’t easy to grow, so I will now answer a few more questions you may have:
Will brown rhododendron leaves turn green again?
If the leaves are only slightly brown, then they may turn green again if the cause of the problem is corrected. However, if the leaves are severely brown or black, then they will not turn green again.
Should I remove brown leaves from my rhododendron?
If the cause of the browning is due to pests or fungal diseases, then you should remove the affected leaves to prevent the problem from spreading.
Pruning also allows the plant to focus its energy on new growth. Just make sure to use sterilized pruning shears to avoid infecting your plant with diseases.
The best time to prune your rhododendron is in the late summer or early fall. This will give the plant time to recover from the pruning before winter sets in.
Conclusion
In conclusion, there are several reasons why your rhododendron’s leaves may be turning brown. The most common causes are pests, nutrient deficiencies, fungal disease, nutritional deficiency, and too much sun.
I hope the lessons in this article have taught you how to identify the problem and take steps to correct it. With a little care and attention, your rhododendron will be back to its former glory in no time! Thanks for reading!