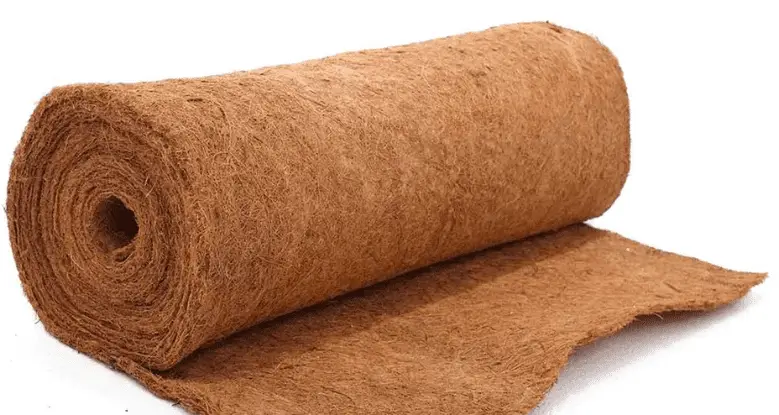
If you’re looking for an environmentally friendly way to keep your garden soil healthy, coco liners may be the answer. Coco liners are made from the husks of coconuts and can be used to line garden beds, pots, and even hanging baskets.
They are a great alternative to traditional plastic or fabric liners, and they last a long time too! In this blog post, we will discuss how long coco liners last, as well as go through some tips on keeping them in good condition.
How Long Do Coco Liners Last?
Coco liners will last for at least two years if correctly cared for. However, if you live in an area with a lot of sun and heat, you may need to replace your coco liner every year. To extend the life of your coco liner, keep it out of direct sunlight as much as possible.
I will now go through some tips on how to care for your coco liners so that they last a long time. Follow each of these tips and you should have no problem getting years of use out of your coco liners!
How to Make Coco Liners Last Longer?
There are a number of things you can do to make sure your coco liners last a long time:
1. Keep animals away
Animals are attracted to the smell of coconuts, and they will dig and chew on the liners if given the chance. They also enjoy using the material as part of their nest, so birds and rodents will be particularly troublesome.
To keep animals away, you can either line the perimeter of your garden beds with chicken wire or place rocks around the coco liners. Having a pet dog or cat may also help to deter animals from coming too close to your garden.
Another way to keep animals away is by using a repellent spray. You can make your own repellent spray by mixing water, vinegar, and peppermint oil in a spray bottle.
Spray the mixture around the perimeter of your garden bed and on the coco liner itself. The scent of the vinegar and peppermint will deter animals from coming close to the area.
2. Keep them moist
Coco liners are hydrophilic, so they will absorb water readily. They will then release the water slowly, which is perfect for plants that need a consistent supply of moisture.
However, not watering coco liners will lead to them becoming dry and brittle. They will no longer be able to hold moisture and will eventually start to break down.
To keep the coco liners moist, mist them with water every few days or whenever the weather is particularly hot and dry. This will keep the material pliable and prevent it from breaking down.
You can also water your plants directly onto the coco liner. This will help to keep the liner moist and will also provide your plants with a much-needed drink!
3. Adjust the liners
The coco liners will gradually change shape and size over time. This is due to the material expanding and contracting as it absorbs and releases moisture.
It’s important to adjust the liners every so often so that they fit snugly against the sides of your garden beds, pots, or baskets. If the liners are too loose, they will start to sag in the middle and could eventually tear.
Fluffing the coco liners is a great way to return the coco liners back to their original shape. Simply soak the liners in water, let them dry out, and then fluff up the fibers with your hands.
Which Coco Liners Last the Longest?
There are high-quality coco liners and then there are the not-so-great ones. It’s important that you buy high-quality coco liners so that they last longer. I’ve had some experience with different brands, and I can tell you that the following brands make high-quality coco liners that will last a long time:
All of the above coco liners should last for at least two years if cared for properly. I’ve had some of the Bosmere coco liners last up to four years!
Coco Liner Alternatives for Longevity
If you’re looking for an alternative to coco liners that will last even longer, then you should consider using the following:
1. Burlap
This is a thin material that costs just a fraction of the price of coco liners. The jute-type ones are very durable and will last for several years if used properly. Use a plastic sheet on top of the burlap to stop it from degrading when the potting soil is used.
2. Paper
You can also use paper to line your garden beds and pots. This is a very inexpensive option, and you can easily find it at your local hardware store. Look for kraft paper that is thick and durable.
Newspapers and other waste paper can also be used, but they will degrade much quicker than the other options on this list.
3. Jeans
Got a pair of old jeans that you don’t wear anymore? You can cut them up and use them to line your garden beds! The denim is very tough and will last for several years.
Add a plastic layer between the soil and jeans to prevent the material from degrading too quickly.
4. Plastic Bag
You can also use a plastic bag to line your garden beds. This is a very cheap option, and you can easily find them at your local grocery store. Look for thick plastic bags that are made from recycled materials.
Add holes in the bottom of the bag so that water can drain out when you water your plants. A bin bag is a great option for this. They are big, cheap, and made from recycled materials.
5. Landscaping Fabric
This is a great option if you’re looking for something that will last for several years. It’s made from a durable fabric that is designed to withstand the elements. Look for a thick fabric that has a tight weave. You can choose to add a plastic layer or not. It’s up to you.
Conclusion
To sum up, coco liners will last for several years if cared for properly. You can extend the life of your coco liner by keeping animals away, watering regularly, adjusting the liner, and using a high-quality coco liner.
You can also use other materials to line your garden beds and pots, such as burlap, paper, jeans, plastic bags, or landscaping fabric. Thanks for reading! I hope this article was helpful.
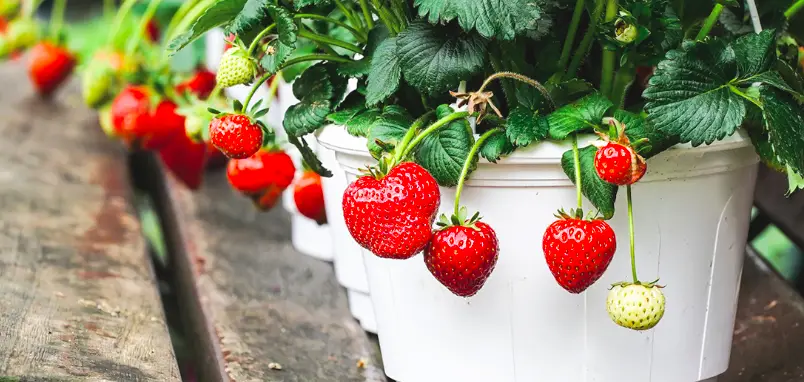
Do you have a green thumb? If so, growing strawberries in containers is a breeze. But even if you don’t have any gardening experience, you can still produce an abundant harvest by following these simple steps. In this guide, we will teach you everything you need to know about fertilizing strawberry plants in containers. By the time you finish reading this article, you will be ready to get started!
How to Fertilize Strawberry Plants in Containers?
Potted strawberry plants require manual fertilization as they do not have access to natural sources of nutrients like they would in the ground. The type of fertilizer you use is important, as using the wrong one can damage your plants.
1. Patience
The first thing to note about fertilizing strawberry plants in containers is that you shouldn’t expect a big yield of strawberries in the first year, even if you fertilized them correctly. You see, the strawberry plant needs time to develop a strong root system before it can produce fruit. So, be patient and enjoy the process!
2. Nitrogen
Secondly, strawberry plants have a big demand for nitrogen in the early spring and late autumn when they are actively growing. During these times, you should use a fertilizer that is high in nitrogen. However, too much nitrogen can result in leafy growth at the expense of fruit production. Therefore, it’s important to find a balance.
3. 10-10-10 Fertilizer
Apply a 10-10-10 fertilizer to your strawberry plants in early spring, when they are just starting to grow. This will give them the nutrients they need to produce healthy leaves and flowers. I prefer granular fertilizers, but any type will do. Just be sure to follow the instructions on the package.
Simply sprinkle the fertilizer around the base of the plant, being careful not to get any on the leaves. Then, water the plant deeply so that the fertilizer can reach the roots. Be sure not to get any fertilizer on the plant itself, as this can burn the leaves.
Repeat this process every month throughout the growing season. And that’s all there is to it! By following these simple steps, you can fertilize your strawberry plants and enjoy a bountiful harvest for years to come.
When to Fertilize Strawberry Plants in Containers?
There are specific times of the year when strawberry plants need to be fertilized. The first application should be in early spring when the plants are just starting to grow. Then, you should fertilize monthly throughout the growing season. Here is what you need to do at specific points of your strawberry plant’s life cycle:
Before Planting
Old soil can be depleted of nutrients, so it’s important to start with fresh soil when you are planting your strawberry plants. You can either buy bags of potting mix or make your own. I like to add some compost to my potting mix for extra nutrients.
Alternatively, you can add a small amount of fertilizer to your old soil. This will give the plants a boost and help them to get established more quickly. Sprinkle some slow release Osmocote fertilizer into the bottom of the planting hole before you add the plant.
This will slowly release nutrients over the course of the following month, giving your plant the food it needs to grow strong and produce fruit.
One Month After Planting
Once your plants are established, you can start fertilizing them monthly. I like to use a granular 10-10-10 fertilizer, but any type of balanced will do. Apply it evenly to the soil and water it in well.
This month of balanced fertilizer sets your plant up for success as it will provide the nutrients it needs to grow strong and produce fruit.
Yearly Applications
After the first year, you can start to fertilizer each year, instead of monthly. This is because the plant will have established a strong root system and will be able to access nutrients more easily.
In September, apply a balanced fertilizer to your plants. This will give them the nutrients they need to produce strawberries. You can also provide a very small amount of fertilizer in early spring, but this is only needed if your plant is struggling to grow.
Simply put, the best time to apply year fertilizer is after the strawberries have finished fruiting. This ensures that the plant has enough food to produce fruit the following year. Fertilizing too early can result in super-soft strawberries – oops!
Are Coffee Grounds Good for Fertilizing Strawberry Plants?
Yes, coffee grounds are an excellent source of nitrogen and other nutrients that strawberry plants need. So instead of throwing them out, why not use them to fertilize your plants?
As we mentioned at the start of the article, nitrogen is essential for healthy leaves and flowers. Coffee grounds are a great source of this nutrient, so they will help your plants to grow strong.
You may have heard that coffee grounds are acidic, and this is true! Fresh coffee grounds can lower the pH of your soil, making it more acidic. However, strawberry plants prefer slightly acidic soil, so this is actually a good thing.
In addition, coffee grounds can help to improve drainage and aeration in the soil. This is important because strawberry plants need well-drained soil in order to thrive and produce fruit.
How to Use Coffee Grounds on Strawberry Plants?
The best way to use coffee grounds on strawberry plants is to simply sprinkle them around the base of the plant. You can do this once a month, or every time you water your plants. The coffee grounds will slowly break down and release their nutrients into the soil.
If you have a lot of coffee grounds, you can compost them first and then use the compost on your strawberry plants. This is a great way to provide them with a slow release of nutrients throughout the growing season.
You can also make a coffee ground liquid fertilizer by steeping coffee grounds in water for a few days. Once the liquid is dark, dilute it with water and use it to water your plants. This is a great way to give them a quick boost of nutrients.
Is Miracle-Gro Good for Fertilizing Strawberry Plants?
Yes, Miracle-Gro is a good fertilizer for strawberry plants. It contains all the nutrients that they need to grow strong and produce fruit. However, it is not the most recommended strawberry fertilizer.
While many people prefer granular fertilizer, I find that Miracle-Gro works okay. It’s easy to use and you can simply mix it with water and apply it to your plants. If you are going to use Miracle-Gro, go for the organic version that doesn’t contain any harmful chemicals that could harm your plants.
Another thing to keep in mind is that Miracle-Gro is a concentrated fertilizer. This means that you need to be careful not to overdo it, or you could end up burning your plants.
I recommend using a much lower concentration than what is recommended on the package. This will ensure that your plants get the nutrients they need without being overloaded.
Are Banana Peels Good for Fertilizing Strawberry Plants?
This may sound strange, but banana peels are actually a great source of nutrients for strawberry plants. They are rich in potassium, which is essential for plant growth.
Here are some benefits of potassium for banana plants:
1. Tugor
Tugor is the pressure that keeps plants upright. Potassium helps to increase the tugor in plants, so they are less likely to fall over. This means your strawberry plants will be less likely to fall over when they are heavy with fruit.
2. Disease Resistance
Potassium helps to increase disease resistance in plants. This means that your strawberry plants will be less likely to get sick and will be more productive. Fungal diseases are a particular problem for strawberry plants, so potassium can be very beneficial.
3. Enzyme Regulation
Potassium helps to regulate enzymes in plants. Enzymes are important for plant growth and reproduction. By regulating enzymes, potassium ensures that your strawberry plants grow and produce fruit effectively.
Banana peels also contain phosphorus, which is important for root development. In addition, they provide a good source of nitrogen and other minerals that strawberry plants need to grow strong and produce fruit.
As you can see, banana peels are a great source of nutrients for strawberry plants. If you have some banana peels lying around, don’t throw them away. Put them to good use and fertilize your strawberry plants with them!
How to Fertilize with Banana Peels?
To fertilize with banana peels, simply place them around the base of the plant. You can do this once a month, or every time you water your plants. The banana peels will slowly break down and release their nutrients into the soil.
If you have a lot of banana peels, you can compost them first and then use the compost on your strawberry plants. This is a great way to provide them with a slow release of nutrients throughout the growing season.
You can also make a banana peel liquid fertilizer by steeping banana peels in water for a few days. Once the liquid is dark, dilute it with water and use it to water your plants. This is a great way to give them a quick boost of nutrients.
Here’s an interesting one – Dry out the banana peels and then grind them up into a powder. This powder can be added to potting mix or used as a top dressing on your strawberry plants.
As you can see, there are many ways to use banana peels to fertilize your strawberry plants. If you have a few lying around, don’t throw them away. Put them to good use and give your plants a nutrient-rich boost.
Do you have any tips on how to fertilize strawberry plants with banana peels? Share them in the comments below!
Is Epsom Salt Good for Fertilizing Strawberry Plants?
I’m a huge fan of epsom salt baths. They are incredibly relaxing and help to ease muscle pain. But did you know that epsom salt is also good for plants?
Epsom salt is rich in magnesium, which is an essential nutrient for plants. Magnesium helps to improve plant growth and increases the production of chlorophyll. Chlorophyll is important for photosynthesis, which is the process that plants use to convert sunlight into energy.
In addition, magnesium helps to increase the uptake of other important nutrients, such as nitrogen and phosphorus. This means that your strawberry plants will be able to get more out of the fertilizer you feed them.
How to Use Epsom Salt on Strawberry Plants?
To use epsom salt on strawberry plants, simply mix it with water and pour it around the base of the plant. You can do this once a month, or every time you water your plants. The epsom salt will slowly dissolve and release its nutrients into the soil.
A few spoons of salt per gallon of water is all you need. If you use too much, it can damage your plants.
So, there you have it – a quick guide on how to fertilize strawberry plants with epsom salt. If you have some lying around, don’t throw it away. Put it to good use and give your plants a nutrient-rich boost.
How Do I Get My Container Strawberries to Grow Bigger?
We all like our strawberries big, juicy, and sweet. But how do we get our container strawberries to grow bigger? Here are a few tips:
Fertilize at the Right Time
Keep the plant healthy at all times by fertilizing at the right time. As we mentioned above, monthly fertilization is a good idea. But make sure to do a soil test first so that you know what nutrients your plant is lacking. This will help you choose the right fertilizer for your strawberry plants. After this, yearly fertilizing in springtime will keep the plant healthy and encourage bigger berries.
Be Patient with Harvesting
You might be tempted to harvest during the first year, but it’s important to be patient. The plant needs time to grow and produce fruit. Once it does, you can enjoy an abundance of delicious, juicy strawberries.
Instead, pick off the flower blossoms before they have a chance to turn into berries. This will help the plant to focus its energy on growing bigger and stronger.
Prune Runners ASAP
Strawberry plants produce runners, which are long stems that grow out of the main plant. These runners can take away energy from the plant, which can result in smaller berries.
To prevent this, simply prune away any runners that appear. This will allow the plant to focus its energy on producing bigger berries, which is always a good thing.
Pick Berries ASAP
Once the berries are ripe, pick them up as soon as possible. Ripe strawberries don’t last long, so you need to eat them or preserve them right away. If you leave them on the plant for too long, they will start to shrink and lose their flavor.
Plus, you don’t want the plant using its energy on berries that are already ready to eat. Once you’ve picked the berries, the plant can focus on producing new fruit.
Replace the Plant Every Few Years
Strawberry plants only produce fruit for a few years before they need to be replaced. After a few years, the plant will start to produce fewer and smaller berries. When this happens, it’s time to replace the plant with a new one.
This might seem like a lot of work, but it’s actually very easy. Simply remove the old plant and replace it with a new one. This will give you fresh, delicious berries for years to come.
What is the Best Fertilizer for Strawberries?
As long as you fertilize at the right time and use the right fertilizer, your strawberry plants will be just fine. But if you’re looking for the best fertilizer for strawberries, let’s look at the following:
Balanced Fertilizer
These fertilizers provide a good balance of nitrogen, phosphorus, and potassium. This is a good option if you’re not sure what your plant is lacking.
The good news is that these fertilizers are easy to find and relatively inexpensive. You can find them at your local gardening store or online. Plus, these fertilizers come with instructions and a lot of support, so you can’t go wrong.
Animal-Based Fertilizer
These fertilizers are made from animal products, such as manure or bone meal. They’re a good option if you want to add some organic matter to your soil. Plus, this is an economical way to fertilize your plants.
Compost
Compost is an excellent way to fertilize your strawberry plants. It’s easy to make and it’s free. Plus, it adds valuable nutrients and organic matter to the soil.
To make compost, simply add some organic material, such as leaves or grass clippings, to a bin. Then, add some water and let it decompose. Once it’s finished, you can add it to your strawberry plants.
As you can see, there are a lot of options when it comes to fertilizing your strawberry plants. But as long as you fertilize at the right time and use the right balance of nutrients, your strawberry plants will be just fine.
Conclusion
In conclusion, fertilizing your strawberry plants is important if you want to produce big, juicy berries. But it’s also important to be patient and pick the berries as soon as they’re ripe. With a little bit of care, you can enjoy delicious strawberries for years to come. Thanks for reading!
I hope this article was helpful. If you have any questions, please feel free to leave a comment below. I’ll be happy to help in any way I can. Thanks for reading!
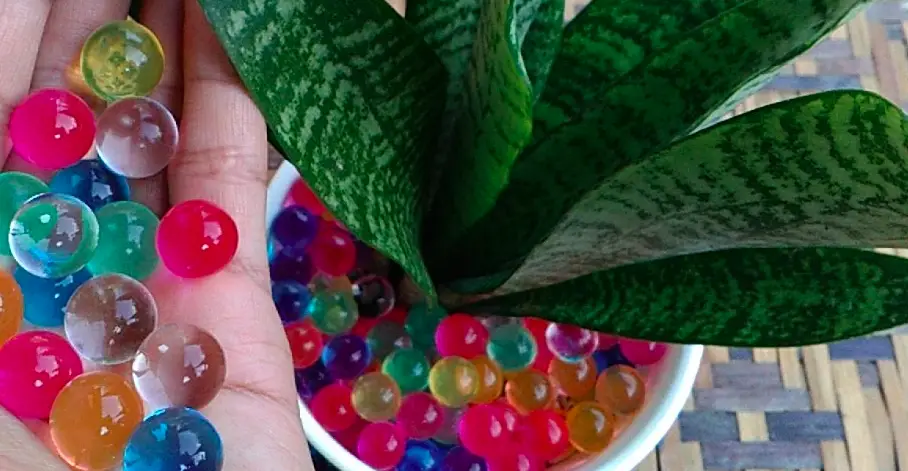
Do you have a green thumb but don’t have the space to garden? Have no fear! You can grow potted plants in water beads. This is a great way to keep your plants healthy and happy while taking up very little space.
In this blog post, we will discuss how to grow potted plants in water beads. We will also provide some tips on how to care for your plants using this method.
How to Grow Potted Plants in Water Beads?
Made from a water-absorbing polymer, water beads are an excellent way to provide your plants with the hydration they need. This way you don’t need to worry about constantly watering your plants. Plus, they look awesome!
A container for your water beads (a clear vase or jar works well)
Potted plants
Once you have gathered your supplies, you are ready to get started:
Fill your container with water beads. You will want to use enough beads to completely cover the bottom of your container
Remove your plant from its current container and clean the roots
Place your potted plant in the center of the container. Gently press down on the plant to ensure that it is secure
Fill the remainder of the container with water beads, up to the rim of your pot
Allow the water beads to soak up water for several hours. You will know they are fully hydrated when they have doubled in size and are soft to the touch
After the beads have soaked up water, place your container in a sunny spot
Your potted plant will now have everything it needs to grow and thrive! Be sure to check on your plant regularly, and add more water to the beads as needed
That’s it! Now you know how to grow potted plants in water beads. Give it a try and see how easy and fun it is! For extra information, I will now go through these steps in further detail…
1. Hydrate Your Beads
The first step is to hydrate your beads. As they’re made of dry granules, the beads instantly expand when they come into contact with water. You’ll want to use enough beads to completely cover the bottom of your container.
You will only know how many beads you need once you’ve added water. So, it’s best to start with a small amount and add more if needed. These beads grow A LOT bigger than you may think.
Here’s a trick – add some water-soluble fertilizer to the water before adding the beads. This way, your plants will get a little nutrition boost from the start!
Allow the beads to soak for a few hours before moving on to the next step. You’ll know they’re ready when they’re much bigger and softer to the touch.
2. Prepare Your Plant
Now it’s time to add your plants! Start by removing your plant from its current container and cleaning the roots. If the roots are pot-bound (wrapped tightly around the inside of the container), gently loosen them before planting.
You may need to use a hose to rinse off all the dirt. Be sure to remove any dead leaves or stems as well. While cleaning the roots is important, try to do it carefully so you don’t damage the plant.
3. Place Your Plant in the Beads
Start by filling the bottom of your container with water beads. Then, place your potted plant in the center of the container and gently press down to ensure that it’s secure. If you’re using a clear container, you can use colored beads for a fun and unique look!
Fill the remainder of the container with water beads, up to the rim of your pot. This will keep everything secure and in place.
How Long Do Water Beads Last in a Pot?
Water beads can last for years when properly cared for. However, you will need to add water to the beads every so often to keep them hydrated. If the beads start to shrink, simply add more water and they will grow back to their original size.
I tend to replace my water beads every two years or so, just to be on the safe side. But, if you take good care of them, there’s no reason why they can’t last for much longer.
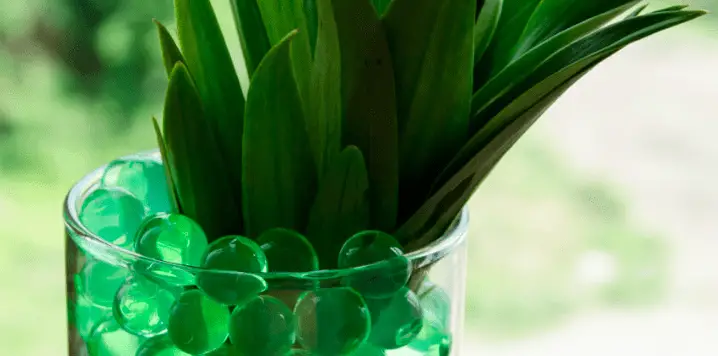
Can Water Beads Be Mixed with Soil?
Yes, water beads can be mixed with soil. In fact, they were designed to be used in gardens! They will slowly release water into the soil, which can be helpful during periods of drought.
Beads effectively hold onto nutrients. This means that, when mixed with soil, they can help fertilize your plants. No longer will nutrients just flow away when you water your plants!
The beads also help with aeration and drainage as they swell and shrink – this creates tiny pockets of air in the soil that allows your plants to breathe. No longer will soil become compacted and suffocate your plants.
Just be sure to use a high-quality soil mix. I like to use an organic potting mix that already has nutrients in it. This way, I know my plants are getting everything they need to grow and thrive.
What Plants Grow Well in Water Beads?
There are certain plants that grow better in water beads than others. Plants with shallow roots work best, as they don’t need a lot of space to grow. Some examples of plants that do well in water beads are:
There are a variety of water beads available on the market. There are clear crystal beads, as well as colored beads. You can even find scented beads!
I love using the colored beads (Amazon link) using clear pots – it creates a really fun and unique look. However, you can use any type of bead you like. Just make sure they’re from a reputable seller with solid feedback.
How Do You Dispose of Water Beads?
It’s important to dispose of water beads properly. While they’re not particularly harmful to the environment, they can clog drains and cause problems for sewage systems.
The best way to dispose of water beads is to simply let them dry out. Once they’re dry, you can add them to your compost bin or let them degrade in your garden. The beads will slowly break down over time and disappear.
Conclusion
In conclusion, water beads are a great way to grow potted plants. They’re easy to use, last for years, and can help your plants thrive. Just be sure to dispose of them properly when you’re done.
Oh, and be sure to use a clear container and colorful beads for a fun and unique look! Have you ever grown potted plants in water beads? What was your experience? Let me know in the comments below! Thanks for reading.
When it comes to gardening, there are a lot of myths and misconceptions out there. One of the most common questions we hear is whether or not charcoal ashes are good for plants.
In this blog post, we will discuss the benefits and drawbacks of using charcoal ashes in your garden, as well as how to use them safely.
Are Charcoal Ashes Good For Plants?
Yes, charcoal ashes are good for plants as they boost microorganisms and nutrients, improve pH levels, and remove pests from the soil. Plus, as a source of potassium, they can promote plant growth and help to prevent disease.
However, you must use charcoal that is free from chemicals and other additives, as these can be harmful to plants. You should also not use too much charcoal, as it can make the soil too acidic for plants.
Which Charcoal Should I Use on Plants?
It’s important to use the correct type of charcoal for your plants. The key is to avoid charcoal that is sold as grilling briquettes, as these often contain chemicals and other additives that can be harmful to plants.
Instead, look for basic charcoal that is nothing more than residue from cooked wood. You can also use briquettes, which is a type of charcoal made from sawdust and other wood waste.
So, if you want to give your plants a boost, consider using charcoal ashes. Just be sure to use the right type of charcoal that doesn’t contain any harmful chemicals.
How to Use Charcoal Ashes on Plants?
There are a number of different ways that charcoal ashes can be used in the garden. Let’s take a look at a few of the most popular methods:
1. Protect from frost
If you live in an area that is prone to frost, you can use charcoal ashes to help protect plants. This is because charcoal ashes can absorb heat and help to keep the soil warm.
In fact, charcoal contains salts that lower the freezing point of the moisture in your soil. This means that your plants can withstand lower temperatures without being damaged by frost.
To use charcoal ashes to protect from frost, simply add a layer of them around the base of plants. You can also add them to the soil of new plants to help protect them from frost damage.
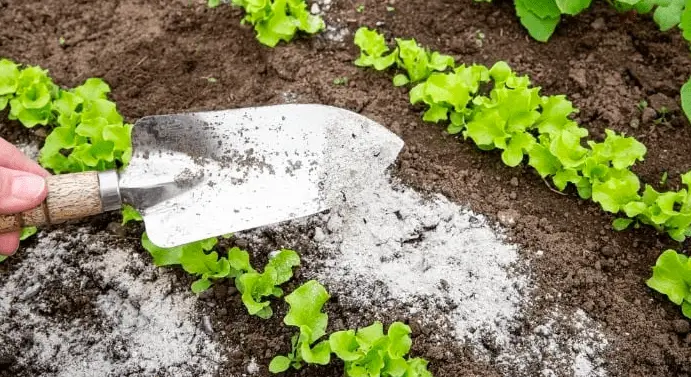
2. Acidic soil
If your soil is too acid for plants, you can use charcoal ashes to help neutralize the pH levels. This is because charcoal ashes contain calcium carbonate, which is a common soil amendment.
To use charcoal ashes to improve pH levels, simply add a small amount to the soil and mix it in well. You may need to test the soil regularly to ensure that the pH levels are where they need to be.
Be careful with how much charcoal you use, as too much can make the soil too alkaline for plants, especially if you own acid-loving plants such as rhododendrons.
3. Pest control
As charcoal ashes can remove pests from the soil, they can be used as a natural pest control method. This is because the dryness of the ash will suck the moisture out of the pests, causing them to die.
Charcoal also contains high levels of lime, which can kill pests that come into contact with it for long enough.
To use charcoal ashes for pest control, simply sprinkle them around the base of plants that are prone to pests. You can also add them to the soil of new plants to help prevent pests from attacking them.
4. Fertilizer
Charcoal ashes can also be used as a fertilizer for plants. This is because they are a source of potassium, which is an essential nutrient for plants.
To use charcoal ashes as fertilizer, simply add them to the soil around plants. You can also mix them into compost or other organic matter to help improve the quality of the fertilizer.
5. Compost
As the ash is made from carbon, it can be added to compost to help with the decomposition process. This will also add nutrients to the compost, which can be beneficial for plants.
To use charcoal ashes in compost, simply add a small amount to your compost pile. You can then mix it in with other organic matter such as leaves or grass clippings.
Conclusion
In conclusion, charcoal ashes are good for plants as they offer a number of benefits, such as boosting microorganisms and nutrients, improving pH levels, and removing pests from the soil. Just be sure to use the right type of charcoal that is free from chemicals and other additives.
Do you have any tips on using charcoal ashes in the garden? Share them with us in the comments below! I hope this article has helped you learn more about the benefits of charcoal ashes for plants.
There are a few reasons why your sunflower might be growing multiple heads, but it’s usually because you own a specific type of sunflower that grows multiple heads. Other reasons include applying too much fertilizer, chemical mutation, and hybrid seeds.
Let’s take a closer look at each one in greater detail to see if we can figure out what’s causing your sunflower to grow multiple heads.
1. Multi-Head Variety
There are actually multiple types of sunflowers that grow more than one head per plant. So, if you’re noticing multiple heads on your sunflower, it might just be the variety that you have. Some common multi-head varieties include:
King Kong Sunflowers
Wild Sunflowers
Solar Flash Sunflowers
Choco Sun Sunflowers
This can be a surprise to those of you who didn’t know that there were multiple types of sunflowers, but it’s actually pretty neat! If you’re interested in growing a multi-head variety, then do some research and see which one would be best for your garden.
2. Too Much Fertilizer
If you applied too much fertilizer to your sunflower, it could cause it to grow multiple heads. This is because the fertilizer gives the plant too much nitrogen, which can cause the plant to produce more leaves and stems than it needs.
If you think this might be the case, then stop using fertilizer for a while and see if that helps your sunflower return to normal.
3. Chemical Mutation
In rare cases, sunflowers can mutate and grow multiple heads as a result of chemicals in the environment. This is most likely to happen if your herbicides blow onto your sunflower while it’s growing.
If you think this might be the case, then try to avoid using any chemicals near your sunflower. If that’s not possible, then you might need to consider moving your sunflower to a different location.
4. Hybrid Seeds
Another reason why your sunflower might be growing multiple heads is that you’re using hybrid seeds. Hybrid seeds are created by cross-breeding two different types of plants, which can sometimes result in mutations.
If you’re using hybrid seeds, then there’s not much you can do about it except wait and see what happens. In most cases, the sunflower will return to normal after a few growing seasons.
As you can see, there are a few reasons why your sunflower might be growing multiple heads. But in most cases, it’s nothing to worry about and is actually pretty normal! So if you’re noticing multiple heads on your sunflower, don’t panic – just enjoy the extra beauty in your garden.
What Types Of Sunflowers Have Multiple Heads?
There are a few types of sunflowers that are known to grow multiple heads. Here are a few of the most common:
King Kong Sunflowers
Choco Sun Sunflowers
Wild Sunflowers
Solar Flash Sunflowers
Irish Eyes Sunflowers
Suntastic Yellow Sunflowers
Maximillian Prairie Sunflowers
Alchemy Sunflowers
Hallo Sunflowers
If you own one of these varieties of sunflowers, then it’s most likely the reason why your sunflower is growing multiple heads. There’s not much you can do about it, but you can enjoy the unique beauty of your multi-headed sunflower!
Multiple Head Sunflower FAQ
There’s a good chance that you still have some questions about multiple head sunflowers. Here are a few of the most commonly asked questions, along with their answers:
How Do You Grow Multi-Headed Sunflowers?
There’s no special treatment required for growing multi-head sunflowers. Just plant the seeds and water them regularly. The sunflower will do the rest!
The only factor to consider is the amount of plant food you give your sunflower. Multi-headed sunflowers require more energy to produce multiple heads, so you might need to give them a little extra fertilizer.
Do All Sunflowers Grow Multiple Heads?
No, not all sunflowers grow multiple heads. In fact, most sunflowers only have one head. The varieties that do grow multiple heads are relatively rare, so you might be lucky to have one in your garden!
Should I Remove the Extra Heads from My Sunflower?
It’s not necessary to remove the extra heads from your sunflower. In fact, most gardeners actually think it’s pretty cool to have a multi-headed sunflower! Take a few pictures and enjoy the uniqueness of your sunflower.
Conclusion
In conclusion, you likely just own a variety of sunflower that is known to grow multiple heads. But don’t worry – it’s perfectly normal and there’s nothing you need to do about it! Just sit back, relax, and enjoy the extra beauty in your garden.
If you have any questions or concerns, feel free to leave a comment below and we’ll be happy to help. Oh, and if you have any images of your multi-headed sunflower, we’d love to see them!