Have you been noticing that your cantaloupe leaves have been turning brown? If so, don’t worry – you’re not alone. This is a common problem with this type of fruit, and there are several things that you can do to prevent it from happening.
In this blog post, we will discuss the causes of leaf browning in cantaloupes, as well as some tips on how to fix the problem.
Why Are My Cantaloupe Leaves Turning Brown?
The most common causes of leaf browning in cantaloupes are fungal diseases, pests, watering issues, and leaf burn. Each cause will give a different type of browning pattern on the leaves.
It’s important to identify the cause of the problem so that you can take the appropriate steps to fix it. I will now go over each of the causes in more detail.
Browning Cantaloupe Leaves from Fungal Infection
One of the most common reasons for browning leaves is a fungal infection. The two most common types of fungi that affect cantaloupes are Alternaria leaf blight and cercospora leaf spot.
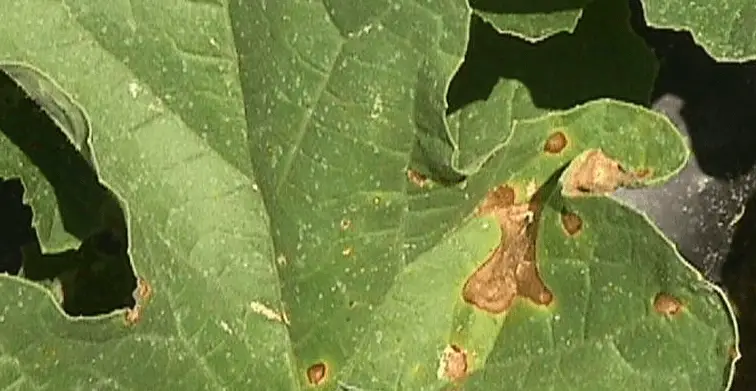
1) Alternaria leaf blight
This type of fungus affects the leaves, stems, and fruit of the plant. The symptoms include small yellow-brown patches that get larger and turn darker brown or black. The leaf tissue will eventually die, and the leaves will drop off.
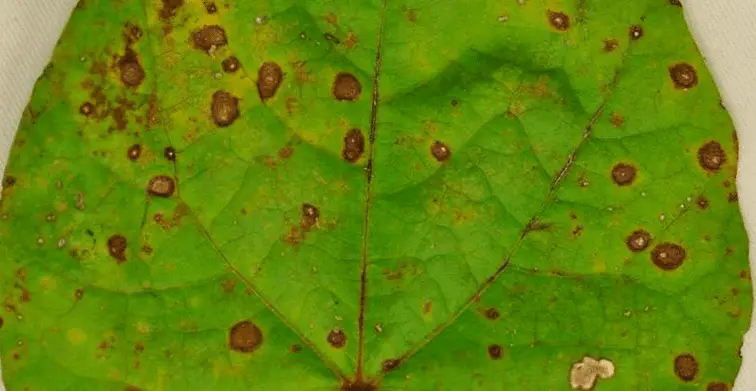
2) Cercospora leaf spot
This type of fungus lives on debris and is spread by wind and rain. The symptoms include small brown spots that spread quickly. This leaf spot disease highlights the importance of keeping your garden free of debris.
The first step to preventing these fungal diseases is to keep water off of the leaves. Water on the leaves creates a perfect environment for fungi to grow. Be sure to water at the base of the plant and not overhead.
The second step is to remove any affected leaves from the plant. This will help prevent the spread of the disease. Dispose of them far away from the cantaloupe patch so that the fungi don’t come back or spread.
The third step is to use a fungicide. Be sure to read the label carefully and follow the instructions. You should apply the fungicide at the first sign of disease and then again every seven to fourteen days.
Neem oil is my favorite type of fungicide because it’s natural, safe to use, and effective for both fungal diseases and pests.
Cercospora leaf spot
Browning Cantaloupe Leaves from Too Much Water
Like with most plants, too much water can cause problems for cantaloupes. When the leaves are constantly wet, it creates an environment that is perfect for fungi to grow. The leaves will start to turn yellow and then brown.
If you think that your cantaloupe plants are getting too much water, the first step is to check the drainage. Make sure that there is good drainage in the area where you’re growing them. If not, consider raised beds or containers.
The second step is to reduce how often you’re watering. Cantaloupes need about one inch of water per week. If it’s been raining a lot, you may not need to water them at all! Let the rain do its job.
The third step is to water at the base of the plant and not overhead. This will help keep the leaves dry and prevent fungi from growing.
Browning Cantaloupe Leaves from Pests
Pests love eating cantaloupe leaves! The most common pests are aphids, cucumber beetles, and squash bugs.
Aphids
These small insects suck the sap out of the leaves, causing them to turn yellow and then brown. They also spread diseases, so it’s important to get rid of them as soon as possible.
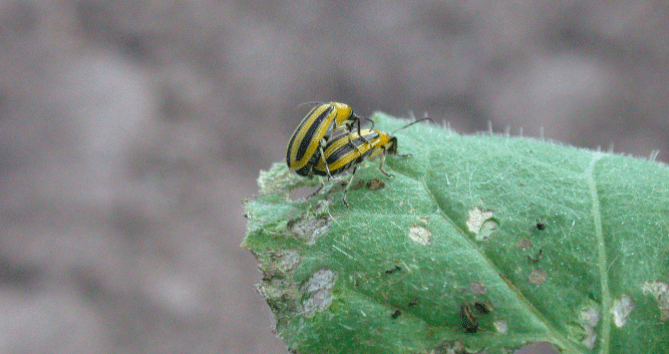
Cucumber beetles
These striped bugs eat the leaves and flowers of cantaloupes. The damage they cause can stunt the growth of the plant or kill it entirely.
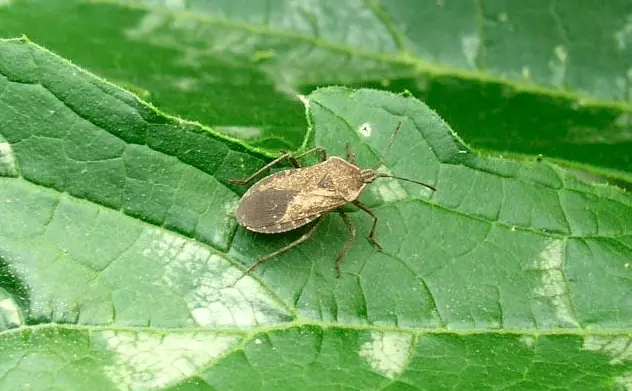
Squash bugs
Like cucumber beetles, squash bugs eat the leaves and flowers of cantaloupes. They like living in amongst lead debris, so keeping your garden clean is the best way to prevent them.
The best way to get rid of pests is to use a pesticide. Be sure to read the label carefully and follow the instructions. You should apply the pesticide at the first sign of pests and keep going until they’re all gone.
Again, neem oil is my favorite type of pesticide because it’s one of the most effective and it’s also safe to use. It works by suffocating the pests and disrupting their life cycle.
Squash bugs
Browning Cantaloupe Leaves from Leaf Burn
Too much sun can cause the leaves of cantaloupes to turn brown. This is called leaf burn and it’s a common problem in hot, sunny climates. The leaves will be crispy and brown on the edges, which is in contrast to the browning caused by too much water or infection.
If you live in a hot, sunny climate, it’s important to keep an eye on your cantaloupe plants and look for signs of leaf burn. If you see any browning, take action to provide some shade and reduce the amount of water they’re getting.
The best way to prevent leaf burn is to provide some shade for your plants. This can be done by planting them in an area that gets partial sun or by using a tarp or other type of shading material.
If the leaves are already brown, you can try trimming them off. This will help the plant focus its energy on new growth. You can also try moving the plant to a shadier spot.
Browning Cantaloupe Leaves FAQs
This plant isn’t the easiest to take care of. I have compiled a list of the most frequently asked questions when it comes to browning leaves on a cantaloupe plant.
Will brown cantaloupe leaves turn green again?
No, unfortunately, once the leaves have turned brown, there is no coming back. The best thing to do is to focus on preventing further damage and encouraging new growth.
Should I remove brown leaves from my cantaloupe?
Yes, you should remove brown leaves from your plant. This will help the plant focus its energy on new growth. Simply cut the leaves off at the stem using a pair of sharp scissors that have been disinfected.
Conclusion
The leaves of cantaloupes are susceptible to a number of problems, including fungal diseases, too much water, pests, and leaf burn. The best way to prevent these problems is to be proactive.
Water at the base of the plant, remove affected leaves, use a fungicide or pesticide, and provide some shade if needed. With proper care, your cantaloupe plants will thrive!
If you are a cantaloupe farmer, or just happen to have a few cantaloupes growing in your garden, you may be wondering why the leaves are turning yellow. Don’t worry, you’re not alone!
This is a question that many people have about this fruit. In this blog post, we will explore the possible causes of this phenomenon and provide some solutions.
Why Are My Cantaloupe Leaves Turning Yellow?
Your cantaloupe leaves are turning yellow because they have been given too much water, not enough sunlight, are suffering from a nutrient deficiency, or have been attacked by pests.
It’s important to figure out which one of these is the problem so that you can take the appropriate action. I will now go into more detail about each of these causes.
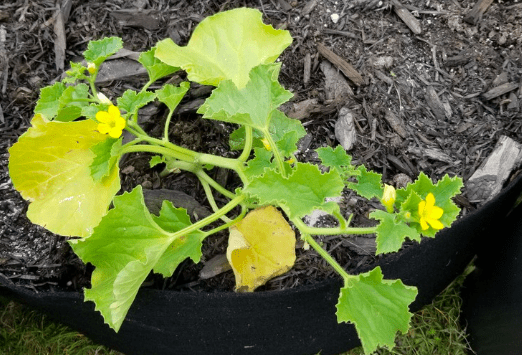
Yellow Cantaloupe from Overwatering
Like with any plant, too much water can be detrimental to a cantaloupe plant. If the leaves are yellow and wilting, this is a sure sign that the plant is getting too much water.
The best way to know if your plant is getting too much water is to check the soil. If it is soggy or mushy, the plant has been given too much water. If the soil is dry, then the plant needs more water.
To fix this problem, you need to either reduce the amount of water you are giving the plant or increase the drainage in the area where it is growing. If you have a cantaloupe that is growing in a pot, make sure to empty out the saucer beneath it after.
If your cantaloupe is growing in the ground, ensure the area has good drainage. You may need to add some gravel or sand to the soil to improve drainage.
When these pests suck the sap from the leaves, they leave behind a sticky substance called honeydew. This substance can attract other pests, such as ants and wasps.
This honeydew also blocks photosynthesis from occurring, further stressing the plant and causing the leaves to turn yellow in the process.
To get rid of these pests, you can use insecticidal soap or neem oil. You can also try to attract natural predators, such as ladybugs and lacewings.
I like using this neem oil as it is an all-natural way to get rid of pests. Neem oil is made from the seeds of the neem tree and it works by disrupting the life cycle of insects.
Apply it to the leaves of your plant, making sure to get the undersides of the leaves as well. You will need to reapply it every few days for it to be effective.
Pests on a cantaloupe
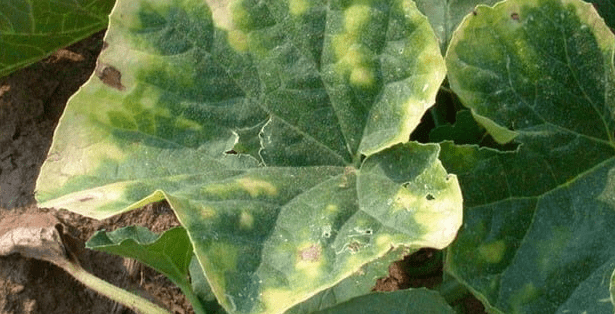
Yellow Cantaloupe from Lack of Sunlight
All plants need sunlight to grow and produce fruit. Cantaloupes are no different. If the leaves of your plant are turning yellow, it could be because it is not getting enough sunlight.
Chlorophyll, which is responsible for the green color in plants, is produced through a process called photosynthesis. This process needs sunlight to occur.
If your plant is not getting enough sunlight, it will not be able to produce chlorophyll and the leaves will turn yellow. The best way to fix this problem is to move the plant to an area where it will get more sunlight.
Yellow Cantaloupe from Manganese Toxicity
Manganese is an essential nutrient for plants. It helps with the production of chlorophyll and the development of strong roots. However, too much manganese can be toxic to plants.
Manganese thrives in soil with a pH below 5.4, so the best way to fix this problem is to test the pH of your soil and adjust it accordingly. You can do this by adding lime to raise the pH or sulfur to lower it.
There’s also a good chance not there aren’t enough nutrients in the soil to support the growth of your cantaloupe plant. This is especially true if the leaves are young and just starting to turn yellow.
The best way to fix this problem is to fertilize the plant with a high-quality fertilizer that contains all of the essential nutrients for plants, especially nitrogen.
Lack of nutrients
Yellow Cantaloupe Leaves FAQs
I will now discuss some of the most frequently asked questions when it comes to yellowing leaves on a cantaloupe…
Should I cut yellow leaves off my cantaloupe?
If the leaves are yellow, they are not doing anything to benefit the plant. In fact, they may even be causing harm. By removing them, you are giving the plant a chance to focus its energy on more productive leaves.
My cantaloupe leaves are yellow and wilting. Is this a problem?
Yes, this is definitely a problem. Wilting leaves are usually a sign of too much or too little water. Check the soil to see if it is soggy or dry. Adjust your watering accordingly.
Why are the tips of my cantaloupe leaves turning yellow?
This is most likely due to a lack of nutrients. The best way to fix this problem is to fertilize your plant with an all-purpose fertilizer. Check the pH of your soil to check if the yellowing is not due to manganese toxicity or deficiency.
Will the yellow leaves spread to other plants?
Only if the cause is a viral or bacterial infection. If the yellowing is due to a nutrient deficiency, pests, or lack of sunlight, it will not spread to other plants. However, there’s a good chance you will see other plants get yellow leaves if they’re treated to the same way.
Does the type of water matter?
It’s always best to give your plants filtered water. This will help to remove any impurities that may be in the water. If you can’t filter the water, let it sit out for a day or two so that the chlorine can evaporate.
Conclusion
In conclusion, there are several reasons why your cantaloupe leaves may be turning yellow. The most common reasons are lack of sunlight, nutrient deficiencies, pests, and viral or bacterial infections.
The main thing you need to do is figure out what is causing the problem. Once you know that, you can take the necessary steps to fix it, whether that’s adjusting your watering, fertilizing, or using neem oil.
I hope this article was helpful in diagnosing the problem. If you have any other questions, feel free to leave a comment below and I will get back to you as soon as possible. Thanks for reading!
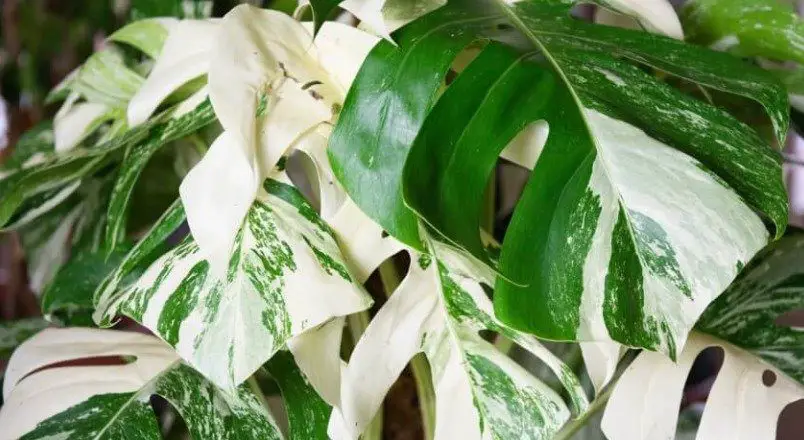
If you’re looking for an interesting houseplant to add to your collection, you may want to consider growing variegated monstera from seeds. This plant is a beautiful addition to any room and is relatively easy to care for. In this blog post, we will discuss whether or not you can grow variegated monstera from seeds.
Can You Grow Variegated Monstera From Seeds?
No, you cannot grow variegated monstera from seeds as the variegation is caused by a mutation. The only way to get a variegated monstera is to propagate it from a cutting or acquire one from a nursery.
You may have seen variegated seeds for sale online – do not be tempted to buy them! These are fake seeds and you will end up being disappointed. Thoroughly research any seller before you make a purchase to ensure that you are getting what you expect.
If you’re set on growing a variegated monstera, your best bet is to find a cutting from an already established plant. Ask around at your local nursery or check online forums and classifieds websites. You may be able to find someone who is willing to sell or trade you a cutting.
Why Can’t Variegated Monstera Plants be Grown from Seeds?
Variegation is caused by a mutation in the cells and this cannot be passed on through seeds. This means that if you were to grow a variegated monstera from seed, the plant could be green and not have any variegation.
A seed from a variegated monstera looks the same as a seed from a green monstera, so it’s impossible to tell which one you will get. This is why buying variegated monstera seeds online is a waste of money as there’s no guarantee that you will get what you want.
As rare plants, and it isn’t possible to know if a monstera will be variegated until it begins to grow and develop leaves, variegated monsteras are more expensive than their green counterparts.
The only way to ensure that you get a variegated monstera is to propagate it from a cutting or buy one from a reputable nursery. This way, you will know for sure that the plant is variegated and you will be able to enjoy its beautiful foliage.
How Can You Get A Variegated Monstera Plant?
If you’re looking for a variegated monstera, the best way to get one is by propagating it from a cutting or buying one from a reputable nursery.
Variegated monsteras are more expensive than green monsteras because they are rarer. This is due to the fact that their variegation is caused by a mutation and not all plants will have this.
When buying a variegated monstera, make sure to do your research and buy from a reputable source. This way, you can be sure that the plant is genuine and that you will get what you pay for.
There are many variegated monstera cuttings available on Etsy and other online plant retailers. They are stunning, but be warned, they are also quite pricey, especially just for a leaf! Buying a fully-grown variegated monstera can cost thousands of dollars.
Look at the reviews to get an idea of quality and make sure to ask the seller any questions you may have before making a purchase.
What Will Happen If I Germinate Variegated Monstera Seeds?
As we’ve discussed, you cannot grow variegated monstera from seeds as the variegation is caused by a mutation. If you were to germinate ‘variegated monstera seeds’ from an online seller, you will likely grow any random plant or crop, such as a green monstera or even another type of plant entirely.
The seller will basically just sell the cheapest type of seed they can find and market it as variegated monstera seeds to make a quick profit. Don’t be scammed – only buy variegated monstera plants from reputable sources!
Where Can I Buy Variegated Monstera Seeds?
Etsy! But these seeds aren’t real. They are most likely just cheaper, common seeds that have been marketed as variegated monstera seeds. As such, stay away from these ‘variegated monstera seeds’ and only buy plants or cuttings from reputable sources.
Conclusion
In conclusion, you cannot grow variegated monstera from seeds as the variegation is caused by a mutation. The only way to get a variegated monstera is to propagate it from a cutting or acquire one from a nursery.
Be careful when buying online as there are many fake sellers who will try to scam you by selling non-variegated seeds as variegated. Do your research and only buy from reputable sources to ensure that you get a genuine, beautiful variegated monstera plant. Thanks for reading!
Do you have a variegated monstera? Let us know in the comments below!
If you have noticed small holes in the leaves of your plum tree, don’t worry – you’re not alone. This is a common problem for plum trees and there are several reasons why it might happen. In this blog post, we will discuss the causes of leaf holes in plum trees and offer some solutions to help you fix the problem.
Why Are There Holes in the Leaves of My Plum Tree?
The most likely reason for holes in the leaves of your plum tree is leaf shot disease has infected the tree. Leaf shot disease is caused by a fungus that attacks the leaves of plum trees.
The fungus produces spores which are spread by wind and rain to other leaves on the tree. These spores then germinate and grow, causing small holes to appear in the leaves. The fungus also causes the leaves to turn yellow and eventually fall off the tree.
Leaf shot disease spreads quickly and can kill a plum tree if it is not treated as soon as possible. Let’s take a look at some of the solutions you can use to treat this disease.
How to Save Plum Tree from Leaf Shot Disease?
The first step to take when saving your plum tree from leaf shot disease is to remove all the affected leaves from the tree as soon as you notice them. This will help to prevent the spread of the disease to other parts of the tree.
Dispose of them far away from the tree so that the spores cannot blow back onto the leaves or other plants. It is also important to prune any dead or dying branches from the tree. These branches can provide a home for the fungus and help it to spread.
Once all the affected leaves have been removed, you should treat the tree with a fungicide. This will kill any remaining spores and help to prevent the disease from returning.
There are several fungicides available for treating leaf shot disease. I like using this neem oil for any fungicide needs because it’s a natural solution that works well.
Be sure to follow the instructions on the fungicide label carefully. Apply the fungicide to the tree as soon as you notice any holes in the leaves and continue to treat the tree every few weeks until all the leaves recover.
By following these steps, you can save your plum tree from leaf shot disease and enjoy its fruit for many years to come.
How to Prevent Shot Hole Disease from Returning to Plum Tree?
The best way to prevent leaf shot disease from returning to your plum tree is to practice good hygiene. This means removing all the affected leaves from the tree as soon as you notice them and disposing of them far away from the tree.
You should also prune any dead or dying branches from the tree and treat the tree with a fungicide every few weeks. By keeping the area clean and instantly removing any fungus spores, there’s little chance for the disease to come back and attack your plum tree.
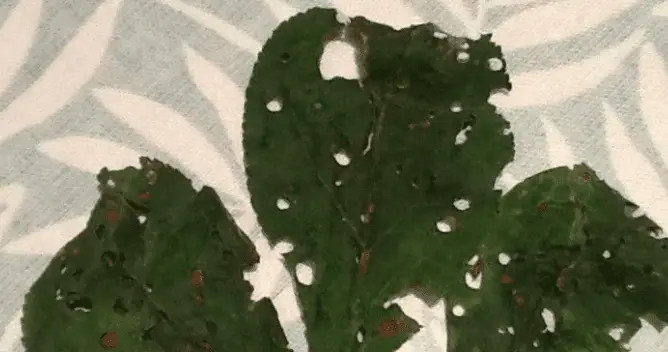
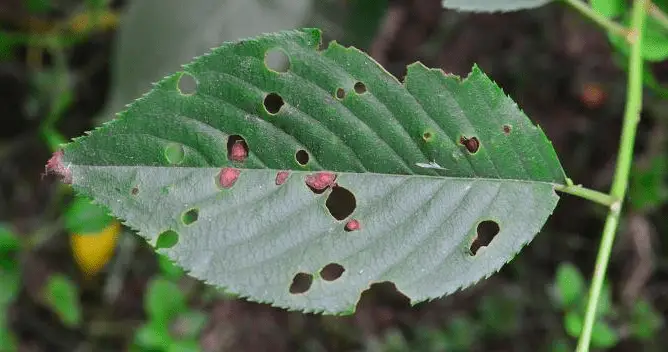
What Does Shot Hole Disease Look Like on Plum Trees?
Shot hole disease on plum trees looks like small holes in the leaves. There are usually more than one or two holes and they tend to be clustered together. The leaves might also turn yellow or brown and eventually fall off the tree.
The disease spreads and multiplies quickly, so it’s important to take action as soon as you notice any small symptoms. While a few holes may seem like nothing to worry about, they could quickly turn into a serious problem if the disease is left untreated.
If you think your plum tree might have leaf shot disease, take a closer look at the leaves and compare them to the pictures in this blog post. If you’re still not sure, contact a professional for help.
Conclusion
In conclusion, there’s a good chance that holes in the leaves of your plum tree are caused by leaf shot disease, which is a serious problem that needs to be treated immediately.
Fortunately, there are some things you can do to save your plum tree. Be sure to remove all the affected leaves, prune any dead branches, and treat the tree with a fungicide. With proper care, your plum tree will be back to normal in no time!
However, it’s important to keep in mind that the best way to prevent leaf shot disease is to practice good hygiene. This means removing any affected leaves as soon as you notice them and disposing of them far away from the tree.
Do you have any tips for preventing or treating leaf shot disease? Share them in the comments below!
Do you have a cherry tree in your yard? If so, you may have noticed that the leaves are starting to develop holes. This can be a sign of trouble, and it’s important to determine the cause of the problem so that you can take corrective action.
Why Are There Holes in the Leaves of My Cherry Tree?
The most likely reason for holes in the leaves of your cherry tree is that shot hole disease has affected the tree. This is a fungal disease that causes the leaves to develop small, round holes.
The fungus overwinters in infected leaves that have fallen to the ground, and in the spring, the spores are carried by wind or rain onto newly developing leaves. Once the spores land on a leaf, they penetrate through the surface and start to grow.
As the fungus grows, it causes the leaf to develop small, round holes. The affected leaves will eventually turn yellow or brown and fall off the tree. If shot hole disease is left untreated, it can cause serious damage to your cherry tree and even kill it.
Fortunately, there are a few things that you can do to treat and prevent shot hole disease. Let’s find out…
How to Save Cherry Tree with Leaf Holes?
If you think that shot hole disease is the cause of holes in your cherry tree leaves, there are a few things that you can do to save the tree.
First, make sure to remove any infected leaves from the ground as soon as possible. This will help to prevent the fungus from overwintering and spreading in the spring.
Next, prune off any affected branches and dispose of them properly. This will help to prevent the disease from spreading to other parts of the tree. these affected branches should be disposed of far away from the rest of your yard so that the disease does not spread.
Finally, you can treat the tree with a fungicide. This will help to kill the fungus and prevent it from causing further damage. Be sure to follow the instructions on the label carefully so that you do not harm the tree.
Neem oil is a great option for an organic fungicide that will not harm the environment. I use it on all of my plants that have problems with disease or pests.
By following these steps, you can save your cherry tree from shot hole disease. However, it’s important to take preventive measures to ensure that the disease does not return in the future.
How to Prevent Shot Hole Disease from Returning to Cherry Tree?
The best way to prevent shot hole disease from returning to your cherry tree is to practice good hygiene. This means that you should remove any infected leaves or branches from the ground as soon as possible and dispose of them properly.
You should also prune your cherry tree regularly to remove any dead or diseased branches. This will help to improve the tree’s overall health and make it less susceptible to disease.
Finally, you can apply a fungicide to the tree on a regular basis. This will help to kill any spores that are trying to infect the tree. Neem oil is a great option for an organic fungicide that will not harm the environment.
What Does Cherry Shot Hole Disease Look Like?
Shot hole disease on cherry trees looks like small, round holes in the leaves. These leaves will then start to change color, turning yellow or brown. Eventually, the leaves will fall off the tree.
Shot hole disease acts fast, so don’t be surprised if each leaf has dozens of holes in it. The disease can quickly spread throughout the tree, causing extensive damage that can’t be reversed.
Conclusion
In conclusion, if you have noticed holes in the leaves of your cherry tree, it’s important to take action. The most likely cause of the problem is shot hole disease, which is a fungal infection.
Fortunately, there are a few things that you can do to treat and prevent shot hole disease. First, make sure to remove any infected leaves from the ground as soon as possible. Next, prune off any affected branches and dispose of them properly. Finally, you can treat the tree with a fungicide.
By following these steps, you can save your cherry tree from shot hole disease. However, it’s important to take preventive measures to ensure that the disease does not return in the future. The best way to prevent shot hole disease from returning is to practice good hygiene and apply a fungicide to the tree on a regular basis.
I hope that this article was helpful in treating and preventing shot hole disease in your cherry tree! If you have any questions or comments, please feel free to leave them below. Thanks for reading!