Monstera deliciosa is a beautiful, tropical plant that is popular in homes and offices around the world. Its large leaves and lush growth make it a showstopper!
Monstera is a relatively easy plant to care for, but there are some things you should know about its soil and potting mix. In this blog post, we will discuss whether or not you can use orchid potting mix for your monstera plant.
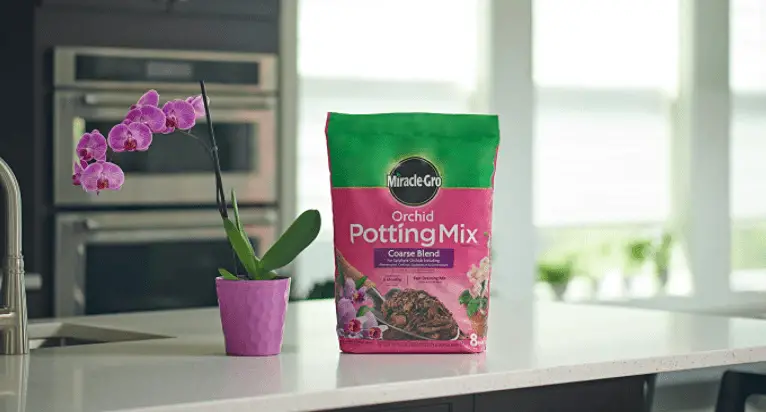
Can I Use Orchid Potting Mix for Monstera?
No, you should not use orchid potting mix for your monstera plant. The orchid potting mix is too light and airy for monstera, and it does not provide the right nutrients that monstera plants need to thrive.
However, you can use SOME orchid potting mix in your monstera potting mix. We recommend using about 20-30% orchid potting mix and the rest should be a quality monstera potting mix.
If you cannot find a quality monstera potting mix (this tropical potting mix is great), you can make your own! To do this, simply start with a standard potting mix, and then a handful of coco fiber, perlite, and some bark.
What Does Orchid Potting Mix Contain?
Orchid potting mix is made up of a variety of materials, including bark, sphagnum moss, charcoal, and perlite. These ingredients work together to provide the perfect environment for orchids to grow in.
The bark provides structure and drainage, while the sphagnum moss holds moisture and nutrients. The charcoal helps to keep the potting mix clean and free of toxins, and the perlite provides aeration.
As you can see, the ingredients in the orchid potting mix are very different from what monstera plants need to thrive. For this reason, we do not recommend using an orchid potting mix for your monstera plant.
Why Can’t I Use Orchid Potting Mix for Monstera?
The main reason you cannot use orchid potting mix for monstera is that it is too light and airy. This can cause the roots of your plant to dry out quickly, which will lead to stress and eventually death.
In addition, the orchid potting mix does not provide the right nutrients that monstera plants need to thrive. There are none of the vital nutrients like nitrogen, phosphorus, or potassium that monstera plants need to grow.
For these reasons, it’s best to stick with a quality monstera potting mix or make your own. This will ensure that your plant gets the nutrients it needs and has the proper drainage to avoid root rot.
What Soil Does Monstera Need?
Monstera needs a well-draining soil that is rich in organic matter. The soil should be loose and airy, yet moist and rich. A good monstera potting mix will have a mixture of rich organic matter, such as compost or manure, and lightweight material like perlite or coco fiber.
The organic matter will provide nutrients for your plant, while the perlite or coco fiber will help to aerate the soil and keep it from getting too compacted.
You can find these ingredients at your local garden center or online. Simply mix them together in a large container and you are ready to pot your monstera!
When it comes to watering, monstera likes to be kept evenly moist. However, they are sensitive to overwatering, so make sure you allow the top inch of soil to dry out between waterings.
Conclusion
In conclusion, you should not use orchid potting mix for your monstera plant. However, you can use some orchid potting mix in your monstera potting mix.
Remember that monstera plants need well-draining soil that is rich in organic matter. While orchid potting mix provides the latter, it does not provide the former.
We hope you found this blog post helpful! If you have any further questions, please feel free to reach out to us. We are always happy to help!
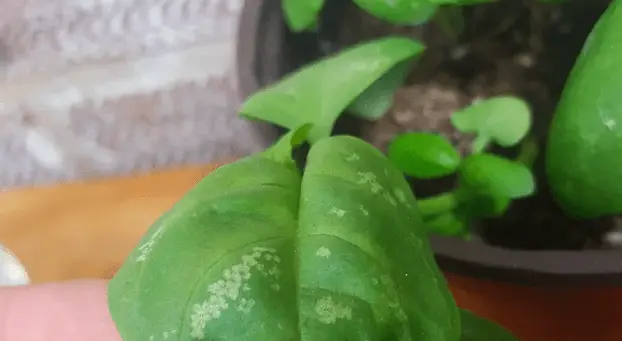
Do you have white spots on your basil leaves? If so, don’t worry – you’re not alone! This is a common problem for basil growers. In this blog post, we will discuss the causes of these white spots and how to prevent them from happening. We will also provide some tips for fixing the problem if it does occur.
Why Are There White Spots on My Basil Leaves?
The white spots on your basil leaves are either from a fungus or pests. The most common type of fungus is called powdery mildew, whereas the most common type of pest to attack basil plants is the aphid.
Powdery mildew is a type of fungus that thrives in warm, humid conditions. It can cause the leaves of your basil plant to turn white and eventually die. If you live in an area with high humidity, it’s important to take measures to prevent powdery mildew.
Pests, such as aphids, can also cause white spots on your basil leaves. Aphids are small, winged insects that feed on the sap of plants. These pests should be removed from your basil plant as soon as possible to prevent further damage.
How to Treat White Spots on Basil Leaves?
It depends on the cause of the white spots. If the spots are from powdery mildew, you can treat them with a fungicide. If the spots are from pests, you can remove the pests by hand or use an insecticide.
I will now provide an in-depth guide on how to treat each problem:
1) Powdery mildew
If the spots on your basil leaves are from powdery mildew, you can treat them with a fungicide. There are many different types of fungicides available, but I recommend using a natural fungicide such as neem oil. Neem oil is safe to use around children and pets, and it is effective at treating powdery mildew.
To use neem oil, mix it with water according to the instructions on the bottle. Then, apply the mixture to your basil plant using a spray bottle. Be sure to cover the entire plant, including the undersides of the leaves. Apply the fungicide every seven to 14 days until the powdery mildew is gone.
Powdery mildew thrives in a moist environment, so it’s important to water your basil plant at the base, not from above. Allow the soil to dry out between watering. It can also be a good idea to monitor the humidity levels in your grow area. If the humidity is too high, you can try using a dehumidifier.
2) Pests
If the spots on your basil leaves are from pests, you can remove the pests by hand or use an insecticide. To remove aphids by hand, simply wipe them off of the leaves with a damp cloth. You can also spray them off with water from a hose.
If you have a serious infestation, you may need to use an insecticide. Yet again, neem oil is a good choice that works exceptionally well for aphids. You can also use an insecticide that contains pyrethrin, such as Safer’s Insecticidal Soap.
Make sure no pests have traveled inside your home, as they can quickly spread to other plants. To prevent pests from entering your home, keep your grow area clean and free of debris. Inspect your plants regularly for signs of pests, and take action immediately if you see any.
3) Iron deficiency
If you see white spots on your basil leaves, it could also be a sign of an iron deficiency. Iron is essential for the proper growth of basil plants. A lack of iron can cause the leaves to turn yellow, and eventually white.
To treat an iron deficiency, you will need to fertilize your basil plant with an iron-rich fertilizer. You can find iron-rich fertilizers at your local garden center. Follow the instructions on the fertilizer label for the best results.
It’s also important to make sure your basil plant is getting enough water. Water stress can cause an iron deficiency, so be sure to water your plant regularly and deeply. Allow the soil to dry out between watering to prevent root rot.
How to Prevent White Spots on Basil Leaves?
Prevention is always the best cure when it comes to white spots on basil leaves. To prevent powdery mildew, water your basil plant at the base and allow the soil to dry out between watering. Monitor the humidity levels in your grow area, and try to keep them below 60%. If the humidity is too high, you can try using a dehumidifier.
To prevent pests from attacking your basil plant, keep your grow area clean and free of debris. Inspect your plants regularly for signs of pests, and take action immediately if you see any. You can also try using yellow sticky traps to trap aphids before they have a chance to infest your plant.
Prevent nutrient deficiency by fertilizing your basil plant with a high-quality fertilizer. Follow the instructions on the fertilizer label for the best results. Be sure to water your basil plant regularly and deeply to prevent water stress.
Can I Eat Basil That Has White Spots?
If there was a small pest issue, then just wash the basil thoroughly before use. Although the flavor might not be as strong or attractive as usual, these leaves should be okay to eat.
However, basil plants that have a fungal disease should be avoided at all costs! Eating such plants will likely make you very sick…
Personally, I would chuck the basil into the trash.
Care Tips
Stressed basil plants are more vulnerable to attack from pests and disease. As such, you should do everything in your power to give your plants what they need to thrive. Here are some tips for taking care of your basil plants:
Make sure they’re getting enough light (no less than 8 hours per day)
Keep temperature moderate – basil does not like to be too cold, but it also doesn’t appreciate being in a warm and humid environment. Watch the plant closely if you notice wilting leaves or drooping stems.
Give them plenty of water, but don’t overwater! Basil has a relatively high preference for dry soil conditions over wet ones. You can tell whether your plant needs more water by looking at its roots; moist soil indicates that watering is necessary while dry dirt means the opposite. Too much water will cause root rot which will only make matters worse!
If you want to ensure a continual supply of basil leaves, start harvesting the plant when it reaches 6-8 inches in height.
If you’re looking for a way to help with pest control, be sure to purchase natural pesticides like neem oil or insecticide soap.
The Importance of Basil
If you’re wondering why so many people are obsessed with basil, it’s likely because it has such a huge variety of uses. It can be added as an herb to your favorite recipes – like pesto, Thai dishes, or even desserts!
It also has a variety of medicinal purposes. For example, basil tea can help with motion sickness and headaches while basil essential oils have been known to alleviate anxiety. There’s no denying the power that this plant holds over our cultures around the world…
In my opinion, basil is a plant that you can’t live without!
Conclusion
In conclusion, if you have white spots on your basil leaves, it’s important to figure out the cause. The most common causes are powdery mildew and pests. Once you know the cause, you can take measures to treat the problem.
Prevention is always the best cure when it comes to white spots on basil leaves. By following the tips in this article, you can prevent powdery mildew and pests from attacking your plant.
I hope this article was helpful. If you have any questions, please feel free to leave a comment below. I will try to get back to you as soon as possible. Thanks for reading!
If you’re like me, you probably have a few Monstera plants around your house. They are such beautiful and easy-to-care-for plants! But did you know there is a right and wrong way to water them? In this blog post, we will discuss the best way to water monstera plants – from the top or the bottom?
Do You Water Monstera from Top or Bottom?
Both methods of watering have their pros and cons, so it’s really up to you which method you choose. Bottom watering gets the winning vote as it allows the roots to have direct contact with the water.
Plus, bottom watering means there’s no need to wait for the water to travel through the soil and reach the roots – they’re already getting a good soaking!
Let’s take a closer look at each method…
Benefits of Watering Monstera from the Top
Here are the benefits of watering your monstera plant from the top:
1) Watering from the top is the most common method
First, let’s get one thing out of the way – watering from the top is the most common method of watering plants, including monsteras. If you’re new to plant care, this is probably the method you’re most comfortable with.
2) It’s quick and easy, and you can see exactly where the water is going
Watering from the top is quick and easy. You can simply turn on the faucet and let the water flow directly onto the plant.
3) Easy to test the moisture level of the soil without having to remove the plant
Watering from the top also allows you to test the moisture level of the soil without having to remove the plant from its pot. Simply stick your finger into the soil and feel around for moisture. If it’s damp, then your plant is getting enough water.
Cons of Watering Monstera from the Top
Now let’s take a look at the downside of watering from the top:
1) Can’t take water out of the soil if you accidentally use too much
First, if you accidentally use too much water when watering from the top, it can be difficult to remove the excess water from the soil. This can lead to root rot or other problems.
2) Can be difficult to reach the roots when the plant is pot-bound
Another downside of watering from the top is that it can be difficult to reach the roots when the plant is pot-bound. If the roots are compacted, they may not be able to absorb all of the water you’re giving them.
3) Surface mold can grow if the soil stays moist for too long
Finally, if the soil stays moist for too long, surface mold can grow. This is especially true if you live in a humid climate. This can lead to disease and more pests in your home.
Benefits of Watering Monstera from the Bottom
So, what are the benefits of watering your monstera plant from the bottom?
1) Easier for roots to receive water
First, watering from the bottom is easier for roots to receive water. They don’t have to travel through the soil to get to the water – it’s already there waiting for them!
2) No water lands on leaves
Another benefit of watering from the bottom is that no water lands on the leaves. This is important because wet leaves are more susceptible to disease and fungus growth.
Cons of Watering Monstera from the Bottom
Of course, there are also some downsides to watering from the bottom:
1) It can be difficult to know how much water to use
When watering from the bottom, it can be difficult to know how much water to use. There’s always the chance that you soak your plant for too long or not long enough. A little bit of practice will help you get the hang of it.
2) Can take more preparation
Depending on how you water from the bottom, it can take more preparation. Simply adding water to a tray or saucer isn’t too hard, but many people water their plants in the bathtub or sink. This can take a bit more time to set up and clean up afterward.
So, there you have it! The pros and cons of watering your monstera plant from the top or bottom. Now it’s time to decide which method is right for you!
Conclusion
In conclusion, I believe that watering your monstera plant from the bottom is the best method. It’s easier for the roots to absorb water and there’s no risk of wetting the leaves. However, it’s ultimately up to you to decide what works best for your plant. Experiment and see what gives you the best results. Thanks for reading!
Do you have any tips on watering monstera plants? Share them in the comments below!
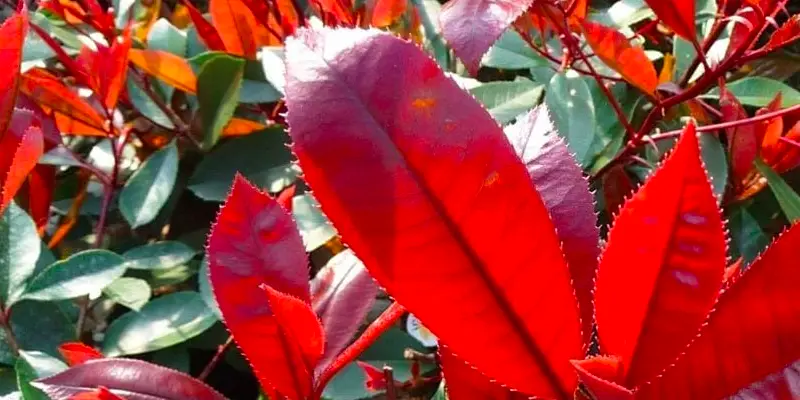
Red is the color of love, passion, and excitement. It’s no wonder that so many people choose to plant red evergreen shrubs in their yards! These plants are beautiful and provide a pop of color in the wintertime.
In this blog post, we will discuss 11 different types of red evergreen shrubs. We’ll give you information on each one so that you can decide which one is right for your yard!
11 Red Evergreen Shrubs
Below are 11 popular types of red evergreen shrubs:
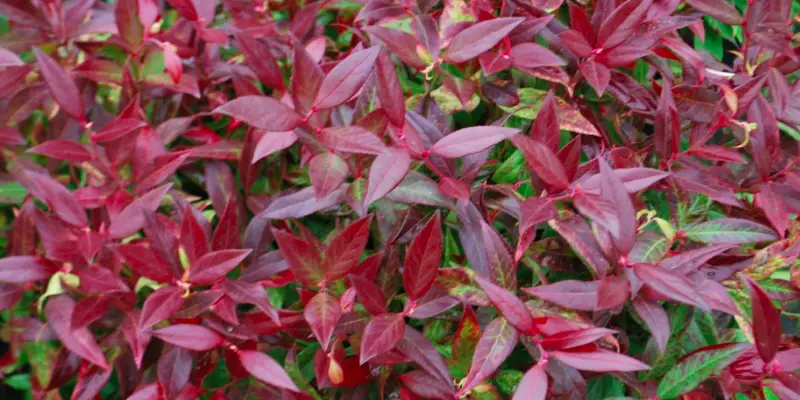
1. Photinia × Fraseri ‘Red Robin’
This plant is dark red when young, maturing to a deep green. It’s an evergreen shrub that can grow up to 4m high and wide. The Fraseri ‘Red Robin’ is perfect for hedges, screens, or foundation planting.
It prefers full sun but will tolerate some shade. Plant the Fraseri in soil that is moist but well-drained. Leave the shrub unpruned to admire the beautiful white flowers that appear in spring.
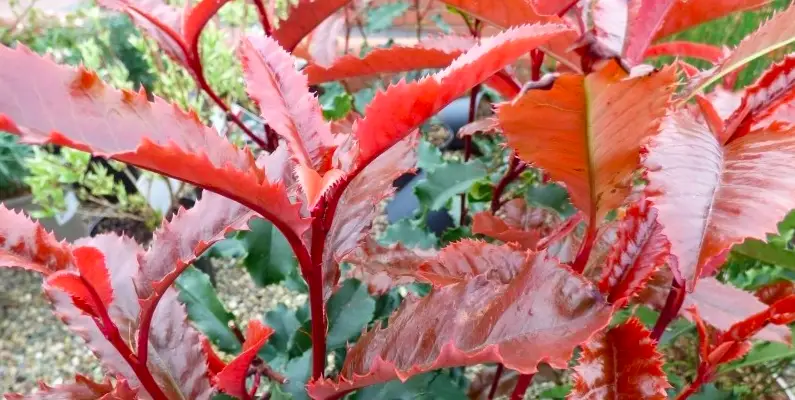
This is a compact bush that grows to be about 2.5m tall. It has dark green leaves with red margins. The new growth of this plant is a beautiful crimson color. It’s a great choice for hedges or foundation planting.
The margins of the leaf are serrated, or finely toothed, which gives a unique look that sets it apart from other types. Plant the Photinia Serratifolia in soil that is moist but well-drained. It prefers full sun but can tolerate partial shade when grown in hot climates.
Water the Photinia Serratifolia regularly during the first growing season to help establish a deep, extensive root system. Once established, this plant is relatively drought tolerant. Fertilize in spring with a balanced fertilizer.
Photinia Serratifolia Crunchy ‘Rev100’ Photinia
3. Cordyline Australis ‘Red Star’
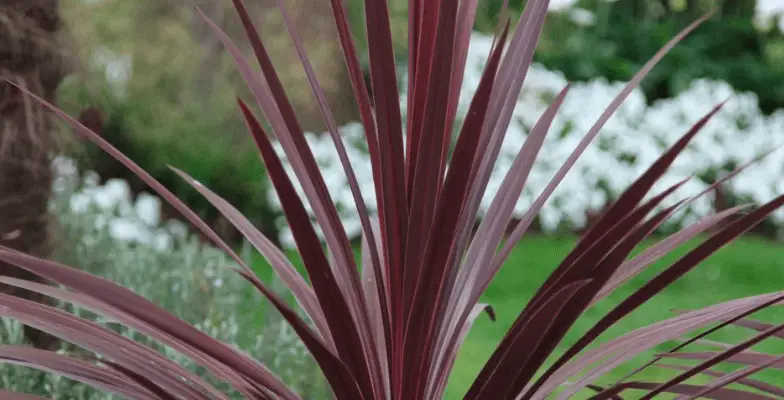
Excellent as a container plant on a patio or as part of a landscape, the Cordyline Australis ‘Red Star’ is a striking plant. It has long, thin leaves that are burgundy with cream variegation. The new growth of this plant is a beautiful crimson color.
It grows best in well-drained soil and full sun. This makes it perfect as a border plant or as a specimen in a garden bed. It’s also salt tolerant, so it’s a good choice for coastal gardens.
Cordyline Australis ‘Red Star’
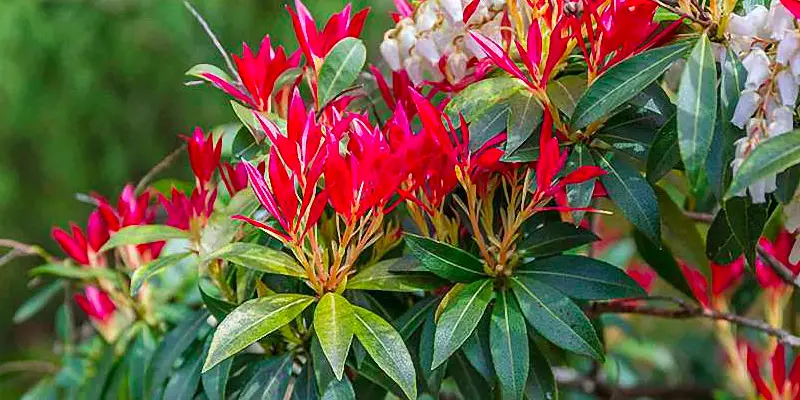
4. Pieris ‘Forest Flame’
This is one of the most vibrant red evergreen shrubs available when young. It starts with a cream and pink variegation that matures into a deep red, before finally turning green. It can reach heights of up to 4m
The Pieris ‘Forest Flame’ is perfect for use as a specimen plant or in a foundation planting. It prefers full sun but will tolerate some shade. Plant the Pieris in soil that is moist but well-drained.
Pieris ‘Forest Flame’
5. Coprosma Repens ‘Pacific Dawn’
The Coprosma Repens ‘Pacific Dawn’ is a low-growing shrub that reaches about 0.75m in height. It has variegated leaves with burgundy, cream, and green colors. These colors turn into a deep maroon hue in winter.
It’s perfect for use as a groundcover or in rock gardens. The Coprosma Repens ‘Pacific Dawn’ reaches heights of 1.5m, making it slightly shorter than the previous two plants. It prefers full sun but will tolerate some shade.
It’s a good idea to plant the Coprosma Repens in a container. This allows you to control the soil moisture and drainage, as well as take it inside during cold winters.
Coprosma Repens ‘Pacific Dawn’
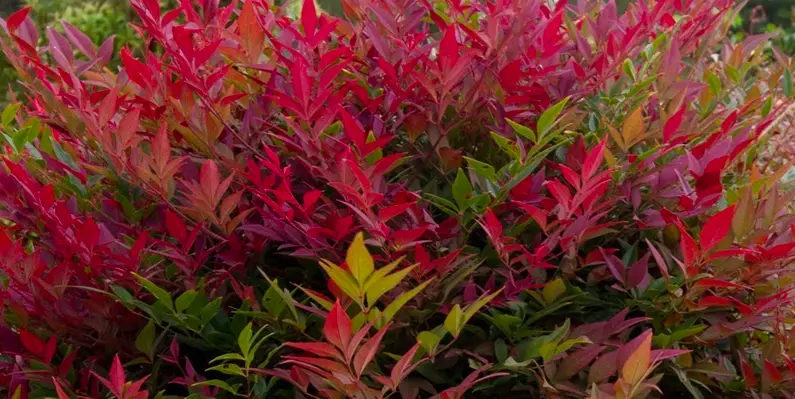
6. Nandina Domestica Obsessed ‘Seika’
This is a beautiful shrub that has red, laciniate leaves. The Nandina Domestica Obsessed ‘Seika’ can grow up to 1m in height and width.
It’s perfect for use as a groundcover or in rock gardens. This plant prefers full sun, so make sure to plant it in an area that gets plenty of sunlight. The soil should be well-drained to mimic its natural habitat.
Nandina Domestica Obsessed ‘Seika’
7. Leucothoe Scarletta (‘Zeblid’)
This is a compact shrub that reaches approximately 60cm in height. It has dark green leaves with a red margin when mature, but grows as dark red when young. The Leucothoe Scarletta is perfect for use as a groundcover or in rock gardens.
Wait until spring to be blessed with the beautiful, bell-shaped white flowers. Plant the Leucothoe Scarletta in soil that is moist but well-drained. It prefers full sun but will tolerate some shade.
Leucothoe Scarletta (‘Zeblid’)
8. Photinia x Fraseri ‘Canivily’
For some of the deepest red evergreen foliage, look no further than the Fraseri ‘Canivily’. The leaves are dark red when young, maturing to a deep green.
The shrub flowers in spring, with white flowers that appear before the leaves. If you’re lucky, the shrub will also reveal red berries that last into winter. It can grow up to 4m high, so this is no small plant.
Plant the Photinia x Fraseri ‘Canivily’ in full sun for the best color. It will tolerate some shade but won’t be as vibrant. The soil should be moist but well-drained.
Photinia x Fraseri ‘Canivily’
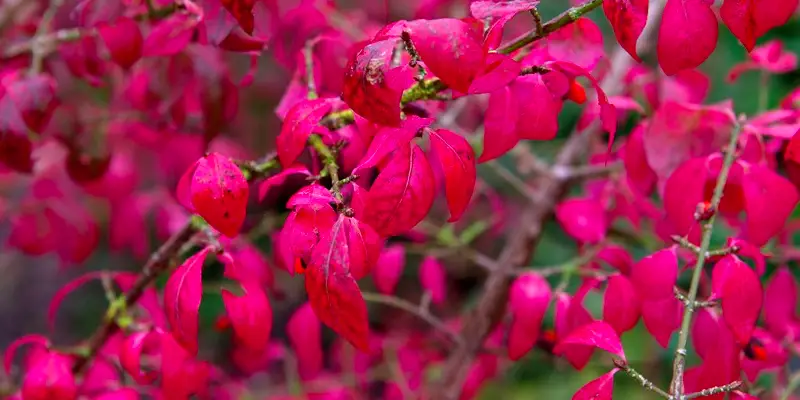
9. Euonymus Alatus
Deciduous or evergreen, the Euonymus Alatus is a beautiful plant that can grow up to 12m in height. It has captivating red leaves and produces small, yellow-green flowers.
Wait until the autumn for the plant to produce fruits that are pink before they eventually turn red. These fruits contain seeds that birds love to eat. Plant the Euonymus Alatus in full sun for the best growth potential.
Euonymus Alatus
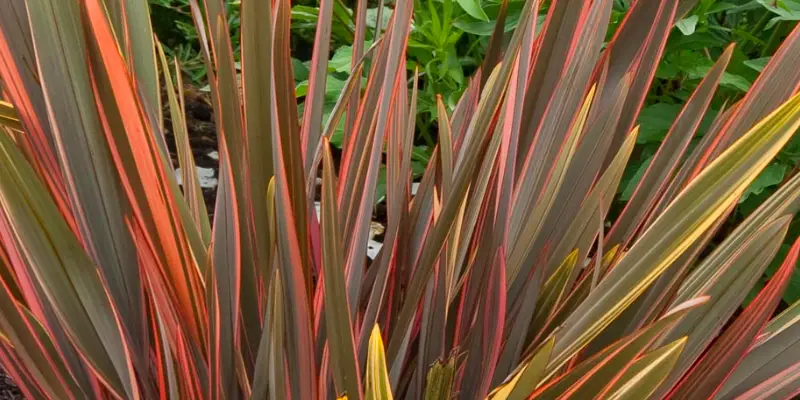
10. Phormium ‘Sundowner’
This is a striking, evergreen plant that can be found in red and orange hues. It has long, thin leaves that can grow up to one meter in length. The total height can reach up to 1.5m.
Just like the many other shrubs on this list, the Phormium ‘Sundowner’ prefers full sun but will tolerate some shade. Interestingly, the soil can be acid, alkaline, or neutral. This is one of my favorite red evergreen shrubs for sure!
Phormium ‘Sundowner’
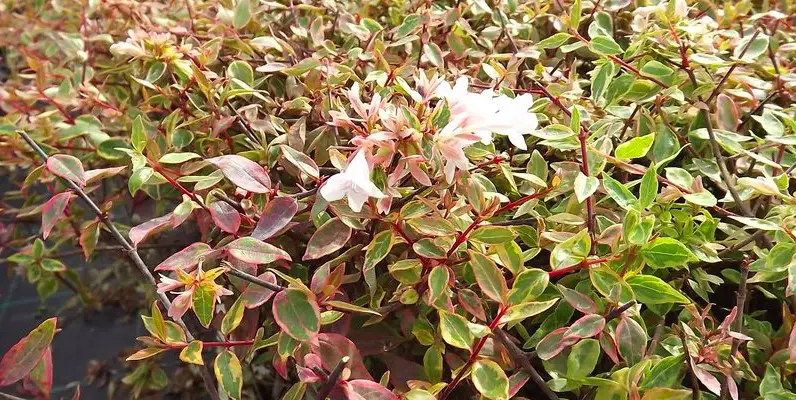
11. Abelia × Grandiflora Sunshine Daydream
The Abelia × Grandiflora Sunshine Daydream is a compact, evergreen shrub that reaches approximately 1.2m in height. It has beautiful, variegated leaves with shades of yellow, green, and pink.
This plant grows flowers that are a lovely shade of pink, as well as have a sweet fragrance. They appear in the late spring and early summer. Give the plant full sun for full growth potential.
Abelia × Grandiflora Sunshine Daydream
Conclusion
In conclusion, there are many red evergreen shrubs to choose from. Hopefully, this list has helped you narrow down your choices. Be sure to take into account the plant’s height, as well as its sun and shade preferences. Most importantly, have fun and enjoy your new plants. Happy gardening!
Do you have a favorite red evergreen shrub? Let us know in the comments below.
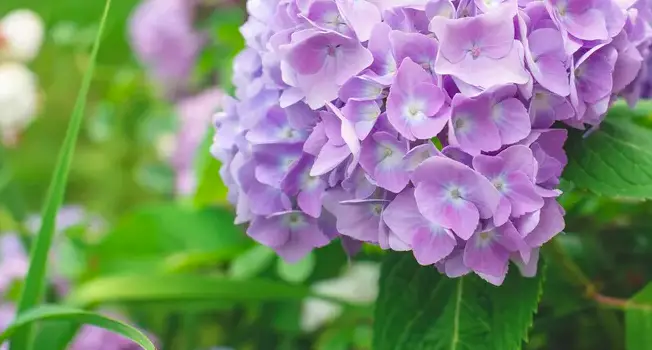
Holly Tone is a popular plant food that is often used on evergreen trees and shrubs. But can you use it on hydrangeas? In this blog post, we will answer that question and provide some tips for using holly tone on hydrangeas. Let’s find out…
Can You Use Holly-Tone on Hydrangeas?
Yes, you can use holly-tone on hydrangeas. Holly-tone works on all acid-loving plants, and hydrangeas are one of those plants. Holly-tone is great for hydrangeas because it provides them with the nutrients they need to grow and bloom.
It’s important to follow the directions on the holly-tone package when applying it to your hydrangea. Holly-tone is a concentrated fertilizer, so you will need to mix it with water before applying it to the plant.
How to Use Holly-Tone on Hydrangeas?
There are a few rules to follow when using holly-tone on hydrangeas:
Apply holly-tone to the soil around the base of the plant.
Do not apply holly-tone to dry soil. Water your hydrangea first, then apply holly-tone
Holly-tone can be applied twice a month during spring or fall
Follow the directions on the holly-tone package for the best results
In terms of amounts to use, it’s recommended to use 1 pound of fertilizer for every 10 square feet of garden area. Only use half this amount when applying in late fall. This is a general rule of thumb, so it’s best to check the package directions for specific instructions.
When to Use Holly-Tone on Hydrangeas?
Apply holly-tone to hydrangeas in early spring, before new growth begins. This will give the plant a boost of nutrients that it needs to grow and bloom. You can also apply holly-tone in late fall after the plant has finished blooming. This will help the plant store energy for the winter and prepare for the next growing season.
Doing it at the wrong time of year, such as in the middle of summer, can actually do more harm than good. The plant may not be able to process all of the nutrients and it could lead to problems down the road.
Holly-tone is a great fertilizer for hydrangeas. When used correctly, it can help the plant grow and bloom. Just be sure to follow the directions on the package and use it at the right time of year. Your hydrangeas will thank you for it!
Conclusion
In conclusion, holly-tone can be used on hydrangeas. It’s important to follow the directions on the package and use it at the right time of year. Holly-tone is a great fertilizer for hydrangeas and can help the plant grow and bloom.
Do you have any questions or comments? Please share them in the comments section below. We would love to hear from you!