Holes In Pothos Leaves – The Main Reasons and Solutions

Holes In Pothos Leaves – The Main Reasons and Solutions

Pothos plants are one of the best plants to have in your home because they thrive on neglect. You can forget about watering them, and they will still grow strong. Unfortunately, there is a downside to this plant: sometimes it gets holes in its leaves!

This blog post will list the main reasons why pothos leaves get holes, as well as some solutions that you can use to fix it.

Why Are There Holes In My Pothos Leaves?

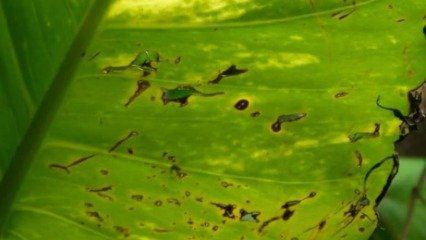
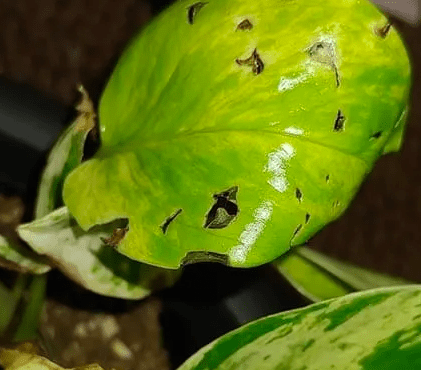
Holes in your pothos leaves are generally because of liriomyza melanogaster infestation. This is a pest that tunnels into your beloved pothos plant, which causes small holes to appear.

These pests love to chew on pothos leaves, and they will quickly move from one leaf to the next if left unchecked. The good news is that there are a few things that you can do to get rid of them!

This can be a surprise for many, as the pest hides during the day. They do most of their “mining” during the hours of darkness, so you may not even know that they are there until the damage is already done.

But that’s not all… Pothos plants are also susceptible to a fungal disease that gives holes that causes holes and discolored leaves. You can usually tell if your plant has a fungal disease because the leaves will usually look slimy and wet.

How To Stop Holes in Pothos Leaves?

The only way to stop pests from attacking your pothos is to remove the pests from the plant with a pesticide, like a neem oil or pyrethrum. Be sure to read the instructions on the pesticide thoroughly so that you know how to use it safely and effectively.

Your plants will have to be treated on a regular basis. Giving a dose of neem oil spray (Amazon link) will remove any pests from your pothos. You may want to sprinkle the neem oil on all of your plants, just in case the pests make a run for it!

Simply mix the neem oil with water according to the directions on the bottle. Then, use a spray bottle to apply the mixture to your plants, making sure to coat the underside of the leaves where pests like to hide.

If your pothos has a fungal disease, then you will need to take steps to remove the fungus from the plant. This can be done by spraying the affected leaves with neem oil or a similar fungicide.

You can also remove the affected leaves from your plant by cutting them off near their base to remove any fungal spores that may still be attached to them. Make sure to discard them away from your home to avoid reinfecting the plant!

Once you have treated your plant, you will need to keep an eye on it to make sure that the holes don’t come back. If they do, then you will need to re-treat the plant with pesticides or fungicides.

fungus holes
This looks like holes from fungus

How to Keep Pests Away From Pothos Leaves?

The best way to keep pests away from pothos leaves is to practise good plant care. This means giving the correct amount of water, fertilizer, and light that your plant needs to stay healthy. A healthy plant is better able to fight off pests and diseases than a weak one.

You can also try using yellow sticky traps to catch any flying pests before they have a chance to land on your plants. These traps are coated with a sticky substance that will trap the pests, preventing them from doing any damage.

You can also remove any potential hiding places for them. This means that you should trim back any overgrown leaves and branches, as well as remove any dead leaves from the plant.

What Else Causes Holes in Pothos Leaves?

We have already discussed the two main reasons for holes in rhododendron leaves, but there are a few other things that can cause them:

Animals

If your pothos is outside, then it is possible that an animal has been nibbling on the leaves. This could be anything from a rabbit to a deer, so you will need to take steps to protect your plant if this is the case.

The best way to do this is to put a fence around your plant or to cover it with netting. This will stop the animals from being able to reach the leaves and will protect your plant.

You may even have a pet that is causing the holes in your rhododendron leaves! If you think that this is the case, then you will need to take steps to stop them from being able to reach the plant.

Weather

Hail and strong winds can cause holes in pothos leaves, as well as other types of damage. If you live in an area that is prone to bad weather, then you should take steps to protect your plants.

The best way to do this is to put them in a sheltered spot, such as next to a wall or under a tree. This will stop the wind from being able to reach them and will protect them from any hail or other debris that might be blown around.

Physical Damage

Holes in pothos leaves can also be caused by physical damage. This could be anything from being hit by a ball to being scratched by a cat.

If your plant is new, maybe the distributor or store didn’t wrap it properly and it got damaged in transit.

If you think that physical damage is the cause of the holes in your pothos leaves, then you will need to take steps to protect the plant. This means that you should keep it in a safe place where it won’t be hit or scratched.

Should I Prune Pothos Leaves with Holes?

There’s usually no need to prune pothos leaves with holes, as the plant will eventually outgrow them. However, if the holes are caused by a pest or disease, then you may need to remove the affected leaves.

This will prevent the pests or diseases from spreading to other parts of the plant and will also stop them from doing any further damage.

Pruning is also a good way to encourage new growth, so if your plant is looking a bit sparse, then pruning the affected leaves can help to promote new growth.

What are Leaf-Mining Pothos Pests?

A leaf-mining pest is a type of insect that burrows into the leaves and eats away at them. This can eventually leave your pothos plant without even one green leaf left on it! Luckily, there are ways to treat this problem so you don’t have to worry about it happening in the future.

Other pothos pests include aphids, mealybugs, and scale. The first step in treating your plant is to identify the pest that’s attacking it. Once you’ve done this, pick up some neem oil to get rid of them as soon as possible!

How To Keep Your Pothos Healthy?

Soil: Pothos like moist soil that isn’t too wet. The pH range of the soil should ideally be around 6 to 6.5.

Location: Place your pothos near the indirect light that is received daily. The plant should be kept away from cold drafts.

Watering: Pothos plants thrive when they’re regularly watered, but ensure you don’t water until the soil is dry at the top. Being mindful of your watering schedule is one way to avoid over-watering.

Fertilizing: To maintain the growth of your pothos plant, give it some liquid fertilizer every 4 weeks or so.

Temperature and humidity: If possible, you should keep your indoor or outdoor pothos plant at a temperature between 60-80°F. A humidifier can help your plant thrive in any home environment.

Pruning: To stop leggy foliage, you should occasionally prune it.

Conclusion

Leaf-mining pests are the main problem when it comes to pothos leaf holes. There’s also the chance of fungal infection. Either way, you should be able to stop the holes by using some neem oil spray (Amazon link).

Remember to keep an eye on the overall health of your pothos plant. This includes making sure it’s receiving the right amount of water, fertilizer, and light. A healthy plant is more likely to resist pests and diseases!

Do you have any other tips for keeping pothos plants healthy? Let us know in the comments below!

Do Deer Eat Osteospermum?

Do Deer Eat Osteospermum?

Deer are herbivores and they love to eat plants. This can include flowers, shrubs, and trees. But what about osteospermum?

Osteospermum is a genus of flowering plants that includes about 120 species. The flowers are daisy-like and come in a variety of colors including white, yellow, pink, purple, and blue. They are native to Africa but have been introduced to other parts of the world including Europe, Australia, and North America.

Do Deer Eat Osteospermum?

No, deer do not eat osteospermum. The plants are not palatable to them and they will avoid eating them if possible. This is good news for gardeners who want to grow these flowers because they don’t have to worry about deer eating them.

While deer won’t eat osteospermum if they aren’t starving, they may still damage the plants. This is because deer like to rub their antlers on trees and shrubs. So, even though the plants themselves are safe from being eaten by deer, they may still suffer some damage.

Plus, there’s no guarantee that deer won’t eat osteospermum if they’re desperate enough. So, it’s always a good idea to take steps to protect your plants from deer if you live in an area with a large deer population.

Will Osteospermum Deter Deer?

While deer don’t eat osteospermum, they won’t necessarily avoid an area where these plants are growing. This means that osteospermum won’t deter deer from coming into your yard or garden.

If you’re looking for a plant that will deter deer, there are several options to choose from. Some good choices include:

  • Mint
  • Lavender
  • Marigolds
  • Sage

Plant these and other deer-resistant plants around your osteospermum to help keep deer away. You can also use commercial deer deterrents, such as sprays and granules, to help keep deer away from your plants.

How to Protect Osteospermum from Deer?

There are a few things you can do to protect your osteospermum plants from deer:

1. Fencing

The most effective way to keep deer out of your garden is to build a fence. Deer can jump high, so make sure the fence is at least eight feet tall.

This is the best option if you’re looking for a long-term solution. But it can be expensive and time-consuming to build a fence. Personally, I recommend using this netting from Amazon as an affordable way to stop deer from eating your plants.

2. Keep Osteospermum High Off the Ground

If you don’t want to build a fence, another option is to keep your osteospermum plants high off the ground. You can do this by planting them in hanging baskets or pots.

The deer won’t accidentally trample your plants and they’ll be out of reach if the deer does try to eat them.

3. Deer Repellents

There are a variety of deer repellents on the market that you can use to deter deer from eating your plants. Plus, many of them can be found in your kitchen.

Mint, lavender, and garlic are all great options for natural deer repellents. You can also make your own deer repellent by mixing water, vinegar, and essential oils together. Simply spray the mixture on your plants and the deer should stay away.

4. Sprinklers

The last thing you can do to protect your osteospermum plants from deer is to install a sprinkler system. When the deer walks by, the sprinklers will turn on and startle them.

This works well because deer dislike random movement and noise. But it can be expensive to install a sprinkler system and you’ll need to make sure it’s turned on whenever the deer are active.

Can Osteospermum Be Used as Deer-Resistant Fencing?

Even though deer don’t eat osteospermum, the plants are slightly too small to be used as deer-resistant fencing. However, they can be used in conjunction with other plants to create a deer-resistant barrier.

For example, planting osteospermum alongside taller plants like holly will make it more difficult for the deer to jump over the fence.

Conclusion

In conclusion, deer don’t eat osteospermum but they may damage the plants. There are a few things you can do to protect your plants, including fencing, keeping them high off the ground, and using deer repellents.

I hope this article was helpful. If you have any questions, please feel free to leave a comment below. Happy gardening!

Does Dawn Dish Soap Kill Armyworms?

Does Dawn Dish Soap Kill Armyworms?

Armyworms are a common pest that can cause a lot of damage to your lawn or garden. If you are looking for a way to get rid of them, Dawn dish soap may be the answer. In this blog post, we will discuss whether Dawn dish soap is effective at killing armyworms and how to use it properly.

Does Dawn Dish Soap Kill Armyworms?

Yes, Dawn dish soap is effective at killing armyworms. The soap works by breaking down the armyworm’s exoskeleton, which leads to dehydration and death. In fact, Dawn dish soap can kill most types of pests, including earwigs, aphids, and mites.

This means it is great for use in your garden or lawn. If you have a pest problem, consider using Dawn dish soap as an economical and effective solution.

How to Use Dawn Dish Soap to Kill Armyworms?

To use Dawn dish soap to kill armyworms, mix one tablespoon of soap with one gallon of water. Then, pour the mixture over the affected area. The soap will kill the armyworms on contact. Be sure to cover the entire area, as armyworms can move quickly.

The best time to apply the mixture is in the evening, as armyworms are most active at night. This will mean the armyworms come into contact with the soap as they are crawling around your lawn or garden. You should see a noticeable difference within a few days.

You may need to reapply the mixture every few days until the problem is under control. However, Dawn dish soap is safe to use around children and pets, so you don’t have to worry about harmful chemicals.

Here’s a step-by-step guide on how to use Dawn dish soap to kill armyworms:

  1. Mix one tablespoon of soap with one gallon of water
  2. Pour the mixture over the affected area
  3. Be sure to cover the entire area, as armyworms can move quickly
  4. Apply the dish soap just before dusk when the armyworms start feeding
  5. You may need to reapply the mixture every few days until the problem is under control

What Do Armyworms Look Like?

Armyworms are small, green caterpillars that are about one to two inches long. They have a dark stripe running down their back and can be found in many different habitats, including gardens, lawns, and fields. Armyworms often travel in large groups and can quickly destroy plants.

If you think you may have an armyworm problem, look for the following signs:

  • Large groups of small, green caterpillars
  • Damaged leaves or plants
  • Stripped bark from trees
  • Moths flying around at night

If you notice any of these signs, take action immediately. Armyworms can do a lot of damage in a short amount of time, so it’s important to get rid of them as soon as possible.

Conclusion

In conclusion, Dawn dish soap is an effective and safe way to kill armyworms. Be sure to mix the soap with water and apply it to the affected area. You may need to reapply every few days, but Dawn dish soap is safe to use around children and pets. If you have an armyworm problem, take action immediately to prevent further damage.

Have you ever used Dawn dish soap to kill armyworms? I would love to hear your stories about it in the comments below! Thanks for reading.

Why Is My Topiary Dying?

Why Is My Topiary Dying?

Topiaries are a beautiful addition to any garden, but they can be a little tricky to care for. If you’re not sure why your topiary is dying, don’t worry! We’re here to help. In this blog post, we will discuss the most common reasons topiaries die and how to prevent it.

Why Is My Topiary Dying?

There are a number of reasons why your topiary might be dying, including incorrect watering, lack of sunlight, poor soil quality, pest infestation, and disease. Most of the time, a lack of water is the culprit. Topiaries need to be watered regularly, especially during hot weather.

Topiaries are beautiful, unique plants that make a great addition to any home. However, they can be delicate and require special care. If you’re having trouble with your topiary, here are a few potential problems and solutions:

1. Incorrect Watering

Topiary plants dry out quickly, so they need to be watered regularly. During hot weather, they may need to be watered daily. You can tell if a topiary is dying due to lack of water if the leaves start to dry, turn brown, and wilt. The best way to water a topiary is to soak the roots with a hose or watering can. Allow the water to seep deep into the soil before letting it drain out.

Overwatering can also be a problem. If the leaves of your topiary are wilting or yellowing, it’s likely that you’re overwatering. The only way to know when to water your topiary is to check the soil regularly. The best way to do this is to stick your finger about an inch into the soil. If it feels dry, it’s time to water.

If you suspect your topiary is dying due to too much water, stop watering for a few days and see if the plant improves. If it does, you can resume your normal watering schedule. However, if it doesn’t recover, inspect the roots for signs of root rot. If the roots are mushy or black, they are probably rotting and will need to be replaced.

2. Lack of Sunlight

Topiaries need at least six hours of sunlight a day to thrive. If your topiary is not getting enough light, it won’t be able to produce the food it needs to survive. As a result, the leaves will begin to turn yellow and eventually fall off.

You can fix this issue by moving your topiary to a sunnier location. If possible, place it in an east- or south-facing window. Alternatively, you can use grow lights to provide the extra light your plant needs.

3. Poor Soil Quality

Topiaries need well-drained soil in order to thrive. If the soil is too dense or doesn’t drain properly, the roots will rot and the plant will die. To improve drainage, mix in some sand or perlite when planting your topiary. You can also make sure that the pot has drainage holes so that excess water can escape.

It’s also worth noting whether a fertilizer has been used as this could be the problem. Topiaries don’t need a lot of fertilizer, and too much can actually damage the plant. If you think your topiary might be getting too much fertilizer, flush the soil with water to remove any excess.

But if you’ve never used fertilizer before, your topiary might just need some. In this case, use a balanced fertilizer that will add the nutrients your plant needs without overdoing it.

4. Pest Infestation

Pests can quickly kill a topiary if they are not controlled. The most common pests include aphids, scale insects, and mealybugs. These pests feed on the leaves of the plant, causing them to turn yellow and eventually die.

To get rid of pests, start by spraying your topiary with water. This will remove some of the pests but won’t kill them all. Next, use insecticidal soap or neem oil to kill the remaining pests. Make sure to follow the instructions on the label carefully.

5. Disease

Diseases are another common reason for topiary death. The most common diseases include powdery mildew, root rot, and leaf spot. Powdery mildew is a white or gray fungus that grows on the leaves of the plant. Root rot is a fungal disease that attacks the roots of the plant. Leaf spot is a bacterial or fungal disease that causes brown or black spots on the leaves.

To prevent diseases, reduce humidity around the plant and make sure the leaves are dry before nightfall. It can also help to clean up any fallen leaves or debris from around the plant. If your topiary does get a disease, you can treat it with a fungicide or bactericide. Make sure to follow the instructions on the label carefully.

As you can see, there are a number of potential reasons for a topiary’s death. By troubleshooting the problem and taking corrective action, you should be able to save your plant. With proper care, your topiary will thrive for years to come.

Conclusion

In conclusion, the three most common reasons for a topiary’s death are overwatering, lack of sunlight, and poor soil quality. To prevent these problems, water regularly, place in a sunny location, and mix in sand or perlite when planting. If you do experience a problem, troubleshoot the issue and take corrective action as soon as possible.

Do you have a topiary that’s not looking so good? Share your story in the comments below! I would love to hear from you.

Carolina Sapphire Cypress Turning Brown

Carolina Sapphire Cypress Turning Brown

The Carolina Sapphire Cypress is a beautiful tree that can be found in the southeastern United States. It is known for its dark green leaves and blue-gray bark.

Unfortunately, many people are noticing that their Carolina Sapphire Cypress trees are starting to turn brown. In this blog post, we will explore the possible reasons why this is happening and how you can save your tree!

Why Is My Carolina Sapphire Cypress Turning Brown?

Overwatering, insect damage, fungal disease, and leaf burn are the most common causes of your Carolina Sapphire Cypress browning. The type of browning will help to identify the problem.

For example, if the leaves are brown and moist, it is most likely due to overwatering. Whereas if the leaves are brown and dry, it is most likely due to leaf burn. If the leaves are brown and have holes in them, it is probably due to insect damage.

I will now go over each of these problems in more detail and offer solutions on how to fix them.

1. Overwatering

The Carolina Sapphire Cypress is a drought-tolerant tree that does not need a lot of water. In fact, too much water can be harmful to the tree. If you are watering your tree more than once a week, it is likely that you are overwatering it.

To fix this problem, cut back on the amount of water you are giving your tree. Water it only when the soil is dry to the touch. If you live in an area with a lot of rain, make sure to drain any excess water from the roots of your tree.

The roots could be waterlogged, which is preventing the tree from getting the oxygen it needs. in fact, this can even cause root rot that will kill your tree.

If you think your tree has root rot, it is important to act quickly. Remove the tree from the ground and replant it in fresh, well-draining soil. You should also water your tree with a fungicide to help prevent the spread of disease.

If you think that overwatering is not the problem, continue reading to learn about other possible causes of browning.

2. Leaf Burn

Leaf burn is a common problem with Carolina Sapphire Cypress trees. It is caused by the tree getting too much sun or wind. The leaves of the tree will start to turn brown and dry out. This is especially common in areas of the country that have hot, dry summers.

To fix this problem, you can try to move your tree to a shadier spot. If that is not possible, you can also try to water your tree more often. This will help to keep the leaves from drying out.

You should also make sure that you are not using any chemicals on your tree that could be causing leaf burn. If you are using fertilizers, herbicides, or pesticides, switch to organic products.

3. Pests

Many different types of pests can cause problems for your Carolina Sapphire Cypress. Aphids, scale insects, and mites are all common pests that can infest the tree. These pests suck the sap out of the leaves, which causes them to turn brown and die.

To get rid of these pests, you can use a variety of methods. You can try to remove them by hand or with a hose. You can also use insecticidal soap or horticultural oil to kill them.

If you have a serious infestation, you may need to call a professional pest control company. Personally, I’ve had good success with neem oil (Amazon link), but there are many different products on the market that will work.

4. Fungal Disease

Fungal diseases are another common problem with Carolina Sapphire Cypress trees. These diseases are caused by fungi that live in the soil. They can attack the roots, trunk, and leaves of the tree.

Some common fungal diseases include root rot, powdery mildew, and leaf spot. These diseases can cause the leaves of your tree to turn brown and die.

To prevent these diseases from happening, make sure the garden is clean and free of debris. You should also water your tree at the base, not from above. This will help to keep the leaves dry and prevent fungi from growing.

If you think your tree has a fungal disease, you can treat it with a fungicide. There are many different products on the market. Again, neem oil is an effective fungicide that I’ve had good luck with.

Will Brown Carolina Sapphire Cypress Leaves Turn Green Again?

No, it is unlikely that brown leaves on a Carolina Sapphire Cypress will turn green again. Once the leaves have turned brown, they are dead. You can remove them from the tree to tidy it up, but they will not grow back.

The good news is that new growth will eventually replace the dead leaves. If you take care of your tree and give it the proper care, it will continue to thrive for many years.

I hope this article was helpful in diagnosing the problem with your Carolina Sapphire Cypress. If you have any other questions, feel free to leave a comment below and I’ll be happy to help. Thanks for reading!

Should I Remove Brown Leaves from My Carolina Sapphire Cypress?

There’s no need to remove brown leaves from your Carolina Sapphire Cypress unless they are interfering with the new growth. If the brown leaves are at the bottom of the tree, they will eventually fall off on their own.

However, you can tidy up your tree by removing any dead branches or leaves that are hanging down. This will help to improve the tree’s appearance and allow it to focus its energy on new growth.

Conclusion

In conclusion, brown leaves on a Carolina Sapphire Cypress are usually caused by one of four things: too much sun, pests, fungal disease, or leaf burn.

I hope this article was helpful in diagnosing the problem with your Carolina Sapphire Cypress. If you have any other questions, feel free to leave a comment below and I’ll be happy to help. Thanks for reading!