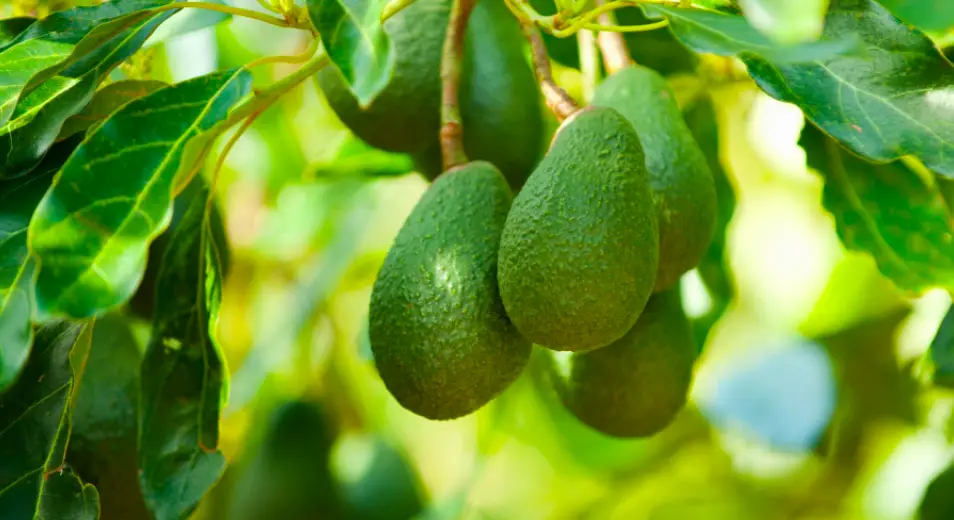
If you are an avocado farmer in Southern California, then you may be wondering when the best time to prune your avocado trees is. After all, you want to make sure that your trees are healthy and produce plenty of fruit.
The answer depends on a few factors, such as the age of your trees and the type of pruning that needs to be done.
In this blog post, we will discuss the different times of the year when you should prune your avocado trees in order to get the most benefits from your harvest!
When to Prune Avocado Trees in Southern California?
The best time to prune avocado trees in Southern California is during the late winter – typically in the months of January or February.
This is done to control the size and shape of the avocado tree and to encourage new growth. While you can prune an avocado tree at any time of year when necessary, pruning during the late winter is best for trees growing in Southern California.
Another benefit of pruning in late winter is that it can help increase the yield of your avocado crop. In fact, pruning early on in the year will delay leaf hardening and increase early fruit growth.
it’s worth noting that this guidance is for heavy pruning. Giving an avocado tree at any time of year is generally considered good for the tree – just be careful not to overdo it!
How to Prune an Avocado Tree in Southern California?
Pruning is an important part of avocado tree care, and there are a few things to keep in mind when you are pruning your trees. First, always use clean and sharp tools when pruning. This will help prevent infection and disease in your trees. Second, make sure to avoid damaging the bark of the tree.
When pruning, always cut above a node – this is where new leaves and branches will grow from. Plus, avoid pruning more than 25% of the canopy at one time. Doing so can shock the tree and delay new growth.
To prune an avocado tree in Southern California, you will first need to remove any dead or diseased branches.
Next, prune any branches that are growing low to the ground. it’s also a good idea to prune holes into the tree to allow light to reach the center.
Finally, cut back any branches that are growing out of control. You should also remove any suckers that are growing from the base of the tree.
When pruning the limbs of the avocado tree, be sure to space them around 4 feet apart. This will ensure that the tree gets plenty of sunlight and air circulation.
Conclusion
So, there you have it! Now you know when and how to prune avocado trees in Southern California. Be sure to follow these tips so that your trees stay healthy and produce plenty of delicious fruit for you and your family! Thanks for reading!
Do you have any other tips for pruning avocado trees? Let us know in the comments below!
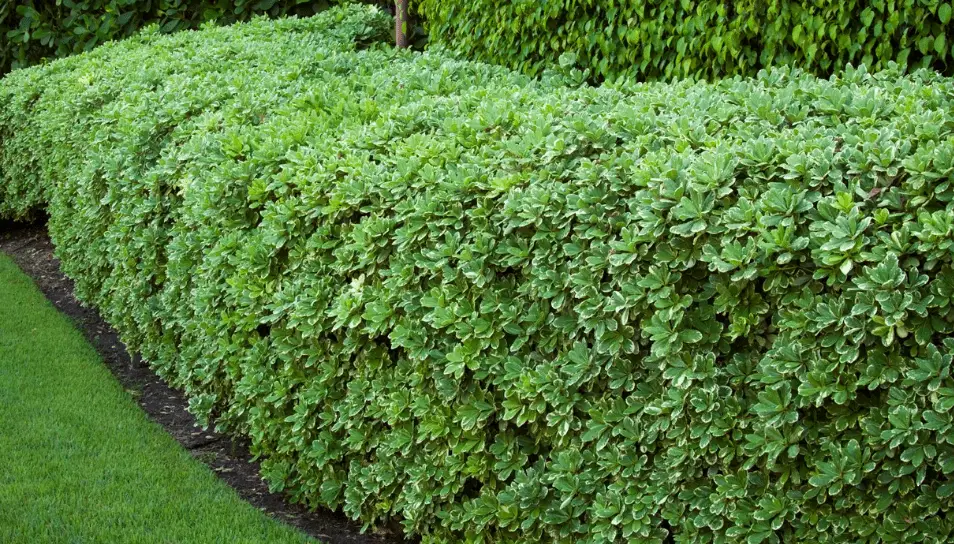
Do you have a pittosporum in your garden? If so, you may be wondering when the best time to prune it is. They are beautiful, flowering shrubs that can add interest and beauty to any garden.
In this blog post, we will discuss the best time to prune pittosporum and provide some tips on how to do it properly.
When to Prune Pittosporum?
Pittosporum should be pruned two to three times per year. The best times to prune pittosporum are in late winter or early spring, and then again in summer.
Regular pruning will keep your pittosporum healthy and looking its best. It will also encourage new growth, which can be helpful if your plant is starting to look a bit leggy.
That’s why pruning your pittosporum plants when they’re young is so important – it will help them to develop a strong, healthy structure that can withstand the rigors of pruning as they mature.
Failing to prune pittosporum regularly can result in a plant that is lanky and unruly. The branches will get thicker and heavier, and the plant will become less able to support itself. This can eventually lead to the plant toppling over.
When pruning pittosporum, the most important thing to remember is that you should never remove more than one-third of the plant’s total height. This will ensure that your plant remains healthy and doesn’t become too stressed.
How to Prune Pittosporum?
The best way to prune pittosporum is by using sharp, clean pruning shears. You should make sure that you sterilize your pruning shears before each use, especially if you’re going to be cutting through any diseased tissue.
You can also use a hedge trimmer if you have a large pittosporum that needs to be pruned. However, hedge trimmers can damage the plant if they’re not used correctly, so it’s important to be careful.
When using pruning shears, you should make sure that you cut at a 45-degree angle. This will help to encourage new growth and prevent the plant from becoming too leggy.
Start by removing any dead, dying, or damaged branches. Next, trim back any branches that are crossing or rubbing against each other. Finally, cut back any branches that are longer than the others – these are typically the ones that are growing most quickly and will need to be pruned more frequently.
Cut off the top few inches of each branch, making sure that you angle your cuts so that they’re slightly outward-facing. This will encourage new growth to emerge from the base of the plant.
After you’ve finished pruning, use a rake to remove any fallen leaves or debris. This will help to keep your plant healthy and free from pests and diseases.
When to Avoid Pruning Pittosporums?
While it can be tempting to prune your pittosporum whenever it starts to look a bit overgrown, there are a few times when you should avoid pruning.
First, avoid pruning in on hot days. The heat can cause the plant to become stressed, which can lead to problems with new growth. Plus, the leaves can burn if they’re exposed to direct sunlight after being cut.
It’s also best to avoid pruning during the harsh winter months. Pittosporums are semi-deciduous, which means that they will lose their leaves during this time. Pruning while the plant is dormant can cause it to bleed, which can damage the plant.
Conclusion
In conclusion, the best time to prune pittosporum is in early spring, and then again in summer. Remember to never remove more than one-third of the plant’s total height, and to use sharp, clean pruning shears. If you follow these tips, your pittosporum will stay healthy and look its best.
I hope this blog post was helpful! If you have any questions, please feel free to leave a comment below. Thanks for reading!
If you’re like most people, you probably have a pair of kitchen scissors lying around somewhere. And if you’re like most people, you may also be wondering if those kitchen scissors can be used to prune your plants.
The answer is…maybe? It depends on the type of scissors and the type of plant. In this blog post, we will explore the topic of using kitchen scissors to prune plants in more detail!
Can I Use Kitchen Scissors to Prune My Plants?
Yes, you can use kitchen scissors to prune your plants. However, they must be sharp and the right size. If they are not, you run the risk of damaging your plants. I still recommend using proper pruning shears, but if you don’t have any, kitchen scissors will do in a pinch.
There are a few things to keep in mind when using kitchen scissors to prune your plants. Let’s go over them now.
1. Sharpness
The first thing to consider is whether or not your kitchen scissors are sharp. If they are not, you run the risk of damaging your plant. Kitchen scissors can be sharpened, but it’s best to use a pair that is already sharp.
Imagine trying to make a cut with a dull pair of scissors. It wouldn’t be very effective, would it? The same goes for pruning your plants. You want to make sure that your kitchen scissors are sharp so that you can make clean, precise cuts that don’t damage your plant.
2. Size
Another thing to consider is the size of your kitchen scissors. If they are too big or too small, they may not be effective for pruning your plants. The ideal size will depend on the type of plant you’re trying to prune.
For example, if you’re trying to prune a small plant, you’ll want to use small scissors. If you’re trying to prune a large plant, you’ll want to use larger scissors. It’s that simple!
3. Sterilized
To avoid spreading disease, it’s important to sterilize your scissors before using them to prune your plants. The best way to do this is to use rubbing alcohol. Simply wipe down the blades of your scissors with a cloth soaked in rubbing alcohol.
This will kill any bacteria or fungi that may be on the blades and prevent them from spreading to your plants. Once you’re finished sterilizing your scissors, you’re ready to start pruning!
4. Type of Plant
Finally, you need to consider the type of plant you’re trying to prune. Some plants are more delicate than others and require special care when being pruned. If you’re not sure how to prune a particular type of plant, it’s best to consult with a professional.
Kitchen Scissors vs Gardening Shears
There are a number of different types of kitchen scissors. The most common is the all-purpose scissors, which can be used for a variety of tasks including cutting paper, opening packages, and yes, even pruning plants. All-purpose scissors are usually made from stainless steel and have two blades that come together in the middle.
Kitchen scissors tend to be less strong than gardening shears, so if you’re going to use them to prune your plants, make sure they are sharp. You should also avoid using kitchen scissors on woody plants, as they can damage the blades.
Pruning shears, on the other hand, are specialized tools that are designed specifically for pruning plants. They usually have one straight blade and one serrated blade, which helps to grip the plant tissue as you cut. Pruning shears are also typically made from hardened steel, which makes them much sharper than all-purpose scissors.
So, if you have a pair of all-purpose scissors and you need to prune your plants, go ahead and give it a try. Just be careful not to damage your plants. And if you have the chance, invest in a pair of pruning shears! They will make your life much easier.
Conclusion
In conclusion, yes, you can use kitchen scissors to prune your plants. However, there are a few things you need to keep in mind. Make sure that your scissors are sharp and the right size for your plant.
Also, be sure to sterilize your scissors before use, and consult with a professional if you’re not sure how to prune a particular type of plant. Thanks for reading!
Do you have any questions or comments? We’d love to hear from you! Leave us a comment below or contact us today. And be sure to check out our website for more gardening tips and tricks! Happy gardening!
If you have a Bird of Paradise plant and it is drooping, you may be wondering what is wrong. This can be a common problem for this type of plant, but there are several things that could be causing it. In this blog post, we will discuss the most common reasons why a Bird of Paradise droops and how to fix the problem!
Why Is My Bird of Paradise Drooping?
The most likely reason why your Bird of Paradise is drooping is due to incorrect watering. This plant needs to be watered regularly, but not too much. Allow the top inch of soil to dry out in between watering. If you notice the leaves drooping, water the plant immediately.
Another reason why your Bird of Paradise may be drooping is due to a lack of humidity. This plant loves humid environments and will start to droop if the air is too dry. Try placing a humidifier near your plant or setting it on a pebble tray filled with water.
If you have followed the watering and humidity instructions and your plant is still drooping, it may be due to a lack of light. Bird of Paradise plants need bright, indirect sunlight to thrive. Move your plant to a brighter location and see if that helps.
Another typical cause of the elephant ear plant drooping is a lack of light. To flourish and grow, this plant requires well-lit, indirect sunshine. If they don’t get enough sunshine, the leaves will droop and appear glum.
How to Stop Elephant Ear Plant Drooping?
Take action asap when you see your plant drooping because the longer you wait, the tougher it becomes to bring your plant back to life.
1) Improve watering
The first step is to check your watering habits. Are you watering too little or too much? The soil should be moist but not soggy. To check, stick your finger about an inch deep into the soil. If it’s bone-dry, it’s time to water. If it’s mud-like or mushy, you may be overwatering.
If your plant hasn’t received enough water, give it a good soaking until water runs out of the drainage holes at the bottom of the pot. Allow the soil to dry out in between waterings.
I like to do this procedure in the kitchen sink or bathtub to avoid making a mess. When watering directly from the tap in this manner, make sure the temperature of the water is lukewarm.
If you think you’ve been overwatering your plant, let the soil dry out completely before watering again. This will help to prevent root rot, a common problem among potted plants.
2) Increase humidity
Bird of Paradise plants thrives in humid environments. As such, they are susceptible to drying out quickly in homes with central heating or air conditioning.
Test the humidity of your home with a hygrometer, which you can find at most hardware stores. The ideal humidity level for Bird of Paradise is over 50%.
If the humidity needs to be increased, there are a few easy ways to do so.
Place the plant on a pebble tray: Fill a shallow dish with pebbles and water. Place your plant on top of the pebbles. As the water evaporates, it will increase the humidity around your plant.
Use a humidifier: This is my personal favorite method. I have a humidifier (Amazon link) in my office that I use to keep my plants happy and healthy. Simply turn it on and let it work its magic!
Mist the leaves: Use a spray bottle filled with distilled water to mist the leaves of your plant. Do this once or twice a day, or as needed.
By increasing the humidity around your plant, you should see an improvement in its appearance.
3) Provide more light
As we mentioned earlier, Bird of Paradise plants need bright, indirect sunlight to thrive. In fact, I’ve found they need more light than other plants in my home. Those huge leaves need a lot of energy! If your plant is drooping, it may be due to a lack of light.
Move your plant to a brighter location and see if that helps. Simply left in the corner of a room is not going to cut it. I like to place mine near a south- or west-facing window.
If you don’t have a spot in your home that gets enough natural light, you can supplement with grow lights.
Grow lights come in all shapes and sizes, so there’s sure to be one that fits your needs. I have a small grow light that I use for my plants. It’s about the size of a desk lamp and has two fluorescent bulbs.
I placed my grow light on an adjustable plant stand so I can raise or lower it as needed. This allows me to get the light as close to the plants as possible without burning them.
If you decide to go the grow light route, make sure to get one that emits both blue and red light (like this one on Amazon) Plants need both of these colors for proper growth.
Droopy Bird of Paradise FAQs
You’re bound to have questions about your droopy Bird of Paradise. Here are answers to some of the most common questions I get.
How do I get my Bird of Paradise leaves to stand up?
For those leaves that are flopping over, you can try staking them. Simply insert a stake into the potting mix and tie the leaf to the stake with plant ties or an old piece of cloth.
I like to use bamboo stakes because they’re strong and durable. You can find them at most hardware stores or online.
Should I prune droopy Bird of Paradise leaves?
There is no need to prune droopy leaves. In fact, you should avoid pruning your plant unless absolutely necessary. Pruning will damage the plant and could lead to further problems.
Will droopy leaves kill my Bird of Paradise?
No, droopy leaves will not kill your plant. However, it’s important to find out the cause of the drooping and address it as soon as possible.
It’s possible that the cause of the droopiness can lead to other problems that could be fatal to your plant. For example, too much water can lead to root rot, fungal problems, and a whole host of other issues.
Do I need to re-pot a drooping Bird of Paradise?
No, you don’t need to re-pot a drooping Bird of Paradise. In fact, I would recommend against it unless absolutely necessary. Re-potting can be stressful for your plant and could lead to further problems.
The only time I re-pot a plant is if it’s rootbound, the potting mix is old and needs to be replaced, or if I suspect that root rot is present.
Will my droopy Bird of Paradise recover?
Yes, your droopy Bird of Paradise will recover if you manage to fix the problem. The key is to figure out the cause of the drooping and address it as soon as possible. With a little care and attention, your plant will be back to its perky self in no time!
Conclusion
In conclusion, there are a few things you can do to help your droopy Bird of Paradise. First, check the soil to see if it’s too wet or dry. Second, increase the humidity around your plant. And third, provide more light.
If you can’t seem to figure out the problem, or if your plant is not responding to treatment, it’s best to consult with a professional. They will be able to diagnose the problem and recommend a course of action.
I hope this article was helpful. If you have any questions, please feel free to leave a comment below. And as always, happy gardening!
If you are the proud owner of a Sunshine Ligustrum, you will want to make sure that you water it properly. This can be a bit tricky, as these plants do not like wet feet. In this blog post, we will discuss the best way to water your Sunshine Ligustrum so that it stays healthy and happy!
How to Water Sunshine Ligustrum?
Sunshine Ligustrum should be watered often to get established, but after that, it is a drought-tolerant plant that does not require a lot of water.
The best way to water your Sunshine Ligustrum is to use a soaker hose or drip irrigation system. This will help to keep the roots of the plant moist without drowning them.
If you cannot use a soaker hose or drip irrigation system, you can water your Sunshine Ligustrum by hand. Be sure to water the base of the plant and not the leaves.
You can test the soil by sticking your finger in it. If the soil is dry, it is time to water your Sunshine Ligustrum. However, if the soil is still moist, you can wait a bit longer before watering again.
Can I Give Tap Water to My Sunshine Ligustrum?
You can, but tap water contains chlorine and other chemicals that can be harmful to your Sunshine Ligustrum. It is best to use filtered or distilled water for your plant.
If you only have the option of using tap water, then leave it out in a dish for 24 hours before watering your Sunshine Ligustrum with it. This will give the chemicals time to evaporate out of the water.
Can I Use Cold Water on My Sunshine Ligustrum?
Coldwater isn’t going to seriously hurt your Sunshine Ligustrum, but it can stress the plant. It’s best to use water that is room temperature or slightly warmer to prevent any shock to the system.
Can I Use Warm Water on My Sunshine Ligustrum?
Yes, you can use warm water on your Sunshine Ligustrum. In fact, some gardeners believe that it’s best to use water that is slightly warmer than room temperature. This will help the plant absorb nutrients more efficiently.
Can I Use Distilled Water on My Sunshine Ligustrum?
Yes, you can use distilled water on your Sunshine Ligustrum. This is actually the best type of water to use, as it does not contain any chemicals that could potentially harm your plant.
However, distilled water is free from some helpful minerals that plants need, so you may want to consider using filtered water instead.
What Happens if I Overwater My Sunshine Ligustrum?
Overwatering any plant is not good, but it can be especially damaging to a Sunshine Ligustrum. These plants do not like wet feet, so too much water can cause the roots to rot. This will lead to a sickly plant that is more susceptible to pests and disease.
If you think you have overwatered your Sunshine Ligustrum, stop watering it for a while and let the soil dry out. It’s important to only add more water when the soil has completely dried out.
Signs That Your Sunshine Ligustrum Is Overwatered
Wet leaves that hang
Moldy soil
Rotten roots
Discolored leaves
What Happens if I Underwater My Sunshine Ligustrum?
Underwatering your Sunshine Ligustrum can stress the plant and cause the leaves to turn yellow. The plant may also drop its leaves if it is not getting enough water.
If you think you have underwater your Sunshine Ligustrum, start watering it more frequently and add enough so that the soil is fully saturated. Adding mulch is also a good idea, as it will help the soil retain moisture.
Signs That Your Sunshine Ligustrum Is Underwatered
Dry leaves
Dark or translucent leaf edges
Hard, dry soil
Leaf drop
Conclusion
In conclusion, it is important to water your Sunshine Ligustrum correctly. Water it often when first planting, then less frequently once it is established. Be sure to use filtered or distilled water to prevent any chemicals from harming your plant. And finally, don’t forget to add mulch to help the soil retain moisture!