
by Gardener Tim | May 13, 2022 | Plant Care
Emerald Green Arborvitae, also known as Thuja occidentalis ‘Emerald Green’ is a popular evergreen tree that is prized for its fast growth rate and dense foliage.
It is often used in landscaping projects, but one question that many people have is whether or not it is deer resistant. In this blog post, we will take a look at the Emerald Green Arborvitae and discuss whether or not deer will eat it.
Are Emerald Green Arborvitae Deer Resistant?
No, Emerald Green Arborvitae are not deer resistant. While the foliage is usually great for blocking out unwanted views, it is not enough to stop deer from wandering into your yard and nibbling on your trees.
The good news is that at least the Emerald Green Arborvitae will stop deers and other animals from seeing what else is in your yard, so they will not be as attracted to it.
Will Deer Eat Emerald Green Arborvitae?
Yes, deer will eat Emerald Green Arborvitae. In fact, they are quite fond of the foliage and will often strip the leaves off of the branches, which can damage or even kill the tree.
This isn’t great news for those who are hoping to use Emerald Green Arborvitae as a way to deter deer from their property. While the trees won’t attract deers from all areas of your city, they will give them a chew-able snack if they happen to wander into your yard.
So, if you’re looking for a deer-resistant tree, the Emerald Green Arborvitae is not the best choice. However, if you’re okay with the occasional deer munching on your trees, then they can still be a beautiful and practical addition to your landscaping.
How to Keep Deers Out?
If you live in an area with a lot of deer, it is best to either choose a different tree or take measures to protect your Emerald Green Arborvitae from being eaten. One way to do this is by wrapping the trunk of the tree with a deer-resistant material, such as a chicken wire.
There are also some alternative plants that you can use that are deers don’t like. I recommend junipers, fir trees, false cypress, inkberry hollies, Leyland cypress, spruces, and pines.
Building high barriers are the best way to keep deer away from your beloved garden, but if you don’t have the time or money to invest in one, then planting a different tree may be your best bet.
Conclusion
In conclusion, Emerald Green Arborvitae are not deer resistant and will be eaten by deer if they have the chance. If you live in an area with a lot of deer, it is best to take measures to protect your trees or choose a different tree altogether.
by Gardener Tim | May 12, 2022 | Facts, Plant Care
When it comes to taking care of your plants, it is important to give them the right nutrients in order for them to grow healthy and strong. You may be wondering if fertilizer and plant food are the same things.
In this blog post, we will discuss the differences between fertilizer and plant food, as well as when you should use each one.
Are Fertilizer and Plant Food the Same?
No, fertilizer and plant food are not the same. Plant food is a natural substance that is made up of minerals, nitrogen, and other nutrients that plants use to grow. Fertilizer is a man-made substance that delivers many of the same nutrients to the soil so that plants can absorb them and use them to grow.
Here are the key differences between fertilizer and plant food:
Fertilizer Is Commercially Available
You can walk into any garden center or home improvement store and find a wide variety of different fertilizer products. In fact, there are so many different options that you may not even know where to start. On the other hand, plant food is not commercially available.
Fertilizer Is More Concentrated
Fertilizer is more concentrated than plant food, which means that it can deliver a higher concentration of nutrients to the soil. This can be beneficial if your plants are not getting the nutrients they need from the soil.
Plant Food is Found Naturally by Plants
Plant food is found naturally by plants, which means that it is not necessary to add it to the soil. However, fertilizer must be added to the soil in order for plants to get the nutrients they need.
Fertilizer is Needed Less Often
Your plants make food each and every day. This means that they are constantly using up the nutrients in the soil. Fertilizer is needed less often than plant food because it’s simply used to replenish the soil with nutrients that have been used up.
Let’s now define the two terms we are discussing today…
Plant food
We give water to our plants every week, but plants need more than H20 to survive and thrive. They need food, just like us! The good news is that they’re able to create their own food through a process called photosynthesis.
During this process, plants use the sun’s energy to create the food they need to grow (a substance known as glucose). This food is then used by the plant to create its own tissues, such as leaves, stems, and flowers.
While plants are able to create their own food, there are times when they need a little boost. This is where fertilizer comes in.
Fertilizer
Fertilizer is a substance that contains the nutrients plants need to grow, such as nitrogen, phosphorus, and potassium. These nutrients are essential for plant growth, but they can be depleted over time due to factors like weathering and erosion.
When this happens, plants may not be able to create the food they need to grow, which is where fertilizer comes in. Fertilizer can be applied to the soil to replenish the nutrients that have been lost, giving plants the boost they need to grow healthy and strong.
It’s a bit like when humans take vitamins – we’re giving our bodies the nutrients it needs to function properly.
There are natural and synthetic forms of fertilizer. As the name suggests, natural fertilizer is made from natural materials, such as manure, seaweed, and bone. These natural fertilizers also contain helpful microorganisms, like fungi and good bacteria.
Synthetic fertilizers are made from chemicals, like nitrogen, phosphorus, and potassium. These fertilizers are often more concentrated than natural fertilizers, so they need to be used carefully.
Now that we know the difference between fertilizer and plant food, let’s discuss when you should use each one…
When to Use Fertilizer?
Fertilizers should be used when plants are not getting the nutrients they need from the soil. This can happen for a number of reasons, including:
- The soil is depleted of nutrients due to factors like weathering and erosion
- The plant needs a boost of nutrients to grow healthy and strong
- The plant is not able to create the food it needs to grow
As you can see, fertilizer can be a helpful tool for gardeners and farmers alike. It can be used to replenish the nutrients in the soil so that plants can grow healthy and strong.
Is It Possible to Use Too Much Fertilizer?
Yes, it is possible to use too much fertilizer. When this happens, the plant can be damaged or even killed. This is because the plant will take in more nutrients than it needs, causing an imbalance.
Leaf burn is a common symptom of over-fertilization. This is when the leaves of the plant turn brown or yellow due to the excess nutrients. If you see this happening, it’s important to stop fertilizing the plant and give it time to recover.
It’s important to follow the directions on the fertilizer label carefully to avoid using too much. If you’re unsure how much to use, it’s always best to err on the side of caution and use less rather than more.
Conclusion
In conclusion, fertilizer and plant food are not the same. Fertilizer is more concentrated than plant food and is used to replenish the nutrients in the soil. Plant food is found naturally by plants and is not necessary to add to the soil.
I hope this article has helped you understand the difference between these two terms. If you have any questions, please feel free to leave a comment below. Thanks for reading!
by Gardener Tim | May 12, 2022 | Pests
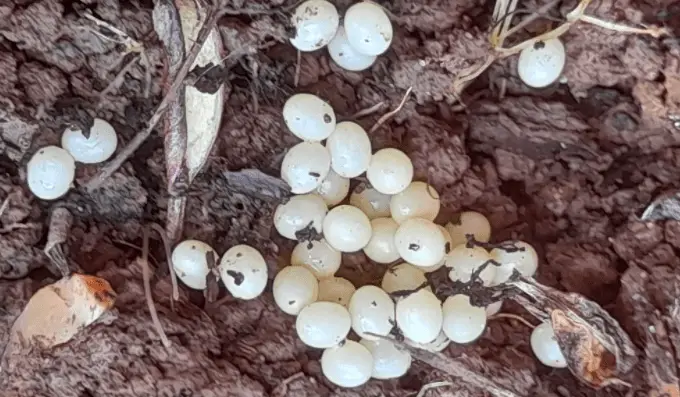
Have you ever noticed little white eggs in the soil? If so, you’re not alone. Many people have seen these eggs and are curious about what they are. In this blog post, we will answer that question and provide some information about why they are there.
What Are the White Eggs in My Soil?
These are the eggs of one of many pests that enjoy attacking gardens, such as slugs, earwigs, and cutworms. The eggs are laid in the soil and hatch into larvae that then begin to feed on your plants. If you have a lot of these eggs in your soil, it’s likely that you will have an infestation of one or more of these pests.
Why Are There White Eggs in My Soil?
There are a few reasons why these pests may be laying eggs in your soil. It mainly comes down to your soil providing a warm and moist environment for the eggs to hatch.
Your plant also acts as a reliable food source for the larvae. Once they hatch, they will start to feed on your plant’s leaves, stems, and roots. This can cause damage to your plant and make it more vulnerable to disease.
What Should I Do About White Eggs in My Soil?
If you find white eggs in your soil, it’s important to take action to prevent an infestation of pests. While they may not be much of a nuisance, not taking action can result in significant damage to your plants.
The best way to prevent an infestation is to remove the eggs from your soil as soon as possible. You can do this by hand or with a garden hose. Be sure to dispose of the eggs properly so that they cannot hatch and cause further damage. Adding neem oil (Amazon link) will prevent the eggs from making a return.
Here’s how to do that:
- Use a small shovel or trowel to scoop up the eggs.
- Put the eggs in a plastic bag and seal them tightly
- Throw the bag away in your garbage can
- If you have a lot of eggs, you may need to repeat this process until they are all gone
If you own a fish pond, you can also simply feed the slug or snail eggs to your fish as they are a natural part of their diet. Your fish will love you for it!
Once you’ve completed the above steps, it’s important to stop white eggs from returning to your soil. Let’s find out…
How to Prevent Snails and Slugs from Laying Eggs in Soil?
As pests enjoy moist soil, it’s important to make sure that your soil is not too wet. This can be achieved by ensuring that your plants are getting enough water and that the drainage in your garden is good.
Snails and slugs lay their eggs on the surface of the soil. This means that regularly disrupting the surface of the soil can help to prevent them from laying eggs. You can do this will a rake or hoe.
It’s also important to remove any potential hiding places that pests can use to hide. This includes piles of leaves, mulch, or stones. If you find snails or slugs in your garden, be sure to dispose of them properly so that they cannot lay eggs.
You can also create a barrier around your plants using slug pellets, sharp sand, or grit. This will make it more difficult for snails and slugs to reach your plants and lay their eggs.
Finally, consider using an insecticide to kill any pests that are present in your garden. Neem oil is a natural option that is safe to use around plants. It is made from the seeds of the neem tree and is effective at killing a range of pests, including snails and slugs.
Who Is the Culprit?
The most common pests that leave white eggs in soil are slugs and snails. These pests are attracted to moist environments and will lay their eggs in soil that is damp.
While slugs and snails are the most common culprits, there are a few other pests that may also be responsible. These include earwigs, cutworms, and millipedes. All of these pests enjoy feeding on plants and can cause damage to your garden.
White eggs from slugs and snails tend to be oval or round, covered in slime, and typically half a cm in diameter. They can be found in small groups of just a few eggs or in large clusters containing hundreds of eggs.
Other Types of White Eggs Found in the Garden
It’s not just snails and slugs that lay eggs in the garden. A range of other creatures also does this, including birds, reptiles, amphibians, and mammals.
If there are lizards present where you live, then there’s a good chance that you’ll find their eggs in your garden. These eggs are typically white, leathery, and slightly translucent.
Now, before you dig up these eggs, it’s worth noting that these eggs can be beneficial to your garden. This is because they actually eat the slugs and other pests that attack your plants.
Conclusion
In conclusion, white eggs in soil are most likely to be from slugs, snails, or other types of pests. These pests lay their eggs in moist soil because it provides an ideal environment for the eggs to hatch.
If you find white eggs in your soil, it’s important to take action to prevent an infestation of pests. The best way to do this is to remove the eggs from your soil and dispose of them properly.
I hope you found this article helpful. If you have any questions or comments, please feel free to leave them below. Happy gardening!
by Gardener Tim | May 2, 2022 | Plant Care
If you have a pothos vine and it breaks, what should you do? Many people don’t know how to handle this situation. In this blog post, we will discuss what to do if your pothos vine breaks and some of the best ways to care for it.
Broken Pothos Vine: What Should I Do?
If your pothos has broken, the first thing you should do is assess the damage. If the stem is only slightly broken, you can simply remove the damaged portion and continue to care for your plant as usual.
It’s recommended to use sharp, clean scissors or shears when trimming your plant. This will help prevent the spread of diseases. You can then choose to throw away the vine or keep it in a glass of water.
Other Things You Should Know
To avoid breakages, it’s important to keep your pothos plant healthy. Some tips for doing this include:
- water regularly, but allow the soil to dry out in between watering
- fertilize monthly during the growing season
- provide bright, indirect light
It’s also recommended to provide enough space for your pothos to grow without restriction from other plants or objects. If you follow these tips, you can help prevent breakages and keep your pothos plant healthy and thriving.
Broken Pothos Vine FAQ
If you have a broken pothos vine, you’re probably wondering how to care for it. Here are some frequently asked questions that can help:
Should I throw away a broken pothos vine?
It’s entirely up to you whether or not you want to do this. When my pothos’ stem/leaf broke, I kept it in a vase of water for several months. You can see that I dislike throwing things away!
What if my pothos has a lot of broken or damaged vines?
Remove any broken or damaged stems to safeguard the plant from harm. If you have one or two sound nodes, you may try again by propagating the pothos plant from them.
Why did my pothos vine break?
One of the most typical causes of breaking stems is root rot. This occurs when the plant is overwatered and its roots begin to decay.
Vines can break in a variety of ways. They may simply break off if they become too heavy or when there isn’t enough support for them. Sometimes, the stem may become weak and break under the weight of the leaves.
You can only guess the reason for your pothos vine breaking. But, in the meantime, you can focus on caring for the plant and preventing further breakages.
Conclusion
In conclusion, pothos vines can break for a variety of reasons. If this happens, you should assess the damage and take care of the plant accordingly.
Removing severely damaged or broken stems is often necessary. You can then choose to keep the vine or throw it away.
To avoid breakages, it’s important to keep your pothos plant healthy by watering regularly, fertilizing monthly, and providing bright, indirect light. It’s also recommended to provide enough space for your pothos to grow without restriction from other plants or objects.
Do you have any tips for caring for a broken pothos vine? Let us know in the comments below!
by Gardener Tim | Apr 29, 2022 | House Plants
If you’re like me, then you probably love spending time in your garden. There’s nothing quite like getting your hands dirty and watching things grow. However, if you’re new to gardening, then you may be wondering whether or not you need to line your planter box.
In this blog post, we talk about why you may or may not need to line your planter box, as well as some tips on how to do it.
Do I Need To Line My Planter Box?
Yes, you should line your planter box, especially if the box is made from metal or wood. The purpose of lining is to create a barrier between the soil and the planter material. It will help prolong the life of your planter and prevent the material from rotting.
You see, moisture can cause the wood to rot and the metal to rot. Plus, there are organisms in the soil that can damage the planter material over time. Lining the planter will prevent all of this damage from happening and help your planter last longer.
There’s no need to use a liner if your planter box is made from plastic or ceramic materials as they’re not as susceptible to rotting and becoming damaged. You may also want to use a liner if you’re planting delicate plants that need extra protection.
What Material Should You Use?
There are a few different materials that you can use to line your planter box. However, plastic is the only one that completely protects the planter from moisture. If you’re using a liner made from another material, make sure to add a layer of plastic on top to create a barrier.
This is the best way to stop metal planter boxes from rusting. The plastic lining is also very durable and economical, which means it will save you money in the long run as it won’t need to be replaced as often.
What if you have a wireframe planter?
You can line a wireframe planter with many different materials. But, you’ll want to make sure that the material is durable and can withstand the elements.
Here are the most popular options when it comes to lining a wireframe planter:
Coconut fiber – This is a natural fiber that’s very durable and absorbent. It’s also eco-friendly and will help to keep your plants healthy. Coconut fiber is expensive and usually needs to be purchased from specific stores that are not always available.
Landscape fabric – This is a synthetic fabric that’s very strong and durable. It will last a long time and is also rot-resistant.
Sphagnum moss – This is a natural material that’s very absorbent. It will help to keep your plants healthy and can also be used as mulch. The downside is that the moss will need to be replaced on a frequent basis, which can be expensive in the long run.
No matter what material you choose, make sure to secure it in place with wire or staples. This will prevent the liner from moving around and becoming damaged.
How Often Should You Replace The Liner?
The liner should be replaced every few years, or as needed. If you notice that the material is starting to degrade, then it’s time to replace it. This will happen less if you use durable materials like plastic.
Also, if you’re planting different types of plants, then you may need to replace the liner more often due to damage from moving the plants in and out.
How Do You Install A Planter Box Liner?
Installing a liner is relatively simple and only requires a few supplies that you probably already have around the house.
Before you install your liner, it’s important to clean the planter box. This will remove any dirt, debris, or build-up that’s present. Once the box is clean, allow it to dry completely before adding the liner.
First, measure the inside of your planter box to determine how much liner material you’ll need. Next, cut the liner to size using a sharp knife or scissors. I like to sterilize any equipment I use to cut the liner to avoid transferring any bacteria.
Now, it’s time to install the liner. If you’re using a plastic liner, simply place it inside the planter box and smooth out any wrinkles or creases. If you’re using another type of liner, make sure to add a layer of plastic on top for extra protection.
The best way to install your planter is by stapling it in place. Start at one end of the box and work your way around, making sure that the liner is tight and secure.
Finally, fill your planter box with soil and plants, and you’re all done! Depending on the type of liner used, your new planter box should last for several years.
Conclusion
In conclusion, lining your planter box is a great way to extend its life and protect your plants. It’s an easy project that only requires a few supplies, so there’s no excuse not to do it!
Plastic liners are the most effective and durable option, but other materials can be used if you prefer. Follow these simple steps and you’ll be well on your way to creating a beautiful and long-lasting garden! Thanks for reading!


