Do you ever notice ants leaving black dots on plants? Have you ever wondered what those dots are and why the ants are depositing them there? In this blog post, we will discuss the purpose of these black dots and provide some insight into why ants choose to create them. Keep reading to learn more!
Why Are Ants Leaving Black Dots on Plants?
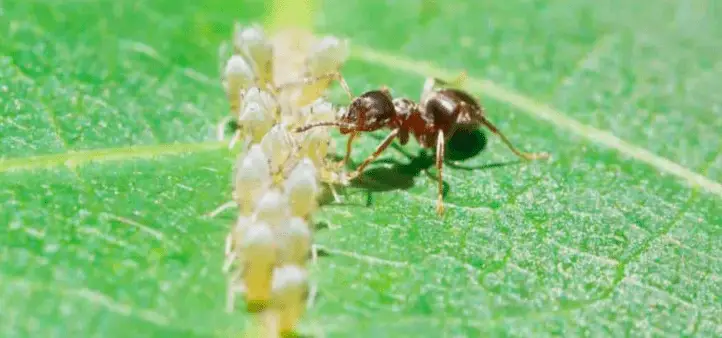
The truth is that the ants aren’t leaving black dots on the plants – they’re actually eating the sticky residue left behind by aphids! Aphids are small, wingless insects that feed on the sap of plants. As they feed, they excrete a substance known as honeydew, which looks like black dots.
This sweet substance is a favorite food of ants, which is why you’ll often see them congregating around aphid-infested plants.
The honeydew excreted by aphids also attracts other insects, such as bees and wasps. These insects are drawn to the sweet scent of the honeydew and will often feed on it, inadvertently collecting and spreading aphids from plant to plant.
In addition to being a food source for ants, bees, and wasps, honeydew is also responsible for the growth of sooty mold. This type of mold often appears as a black or gray coating on plant leaves and stems.
How to Remove Honeydew from Plants?
If you have aphids on your plants, you’ll likely notice an accumulation of honeydew. To remove this sticky substance, simply wash it off with a stream of water from your hose. You can also use a soft cloth or sponge to wipe away the honeydew.
Take care not to spread aphids when cleaning honeydew from your plants. Be sure to dispose of any cloths or sponges that come into contact with honeydew in a sealed bag so that aphids cannot escape and infest other areas of your garden.
If you have a severe aphid problem, you may need to treat your plants with an insecticide. I find good success with neem oil, but there are many effective products on the market. Be sure to follow the instructions on the label and apply the insecticide according to the directions.
How to Get Rid of the Ants?
If you’re dealing with ants in your garden, the best way to get rid of them is to remove the source of their food – the aphid honeydew. Once you’ve treated your plants for aphids, the ants will likely move on in search of another food source.
You can also discourage ants from entering your garden by creating a physical barrier. Ants are attracted to the scent of honeydew, so placing a band of sticky material (such as double-sided tape) around the perimeter of your garden can help keep them out.
In addition, keeping your garden clean and free of debris will make it less inviting to ants. Be sure to remove fallen leaves and other organic matter from the ground so that ants cannot use them as a bridge into your garden.
Conclusion
In conclusion, the black dots on plants are actually honeydew excreted by aphids. This sticky substance attracts ants, bees, and wasps, which can inadvertently spread aphids from plant to plant. To remove honeydew from your plants, simply wash it off with water or wipe it away with a soft cloth.
If you have a severe aphid problem, you may need to treat your plants with an insecticide. Thanks for reading! I hope this article was helpful.
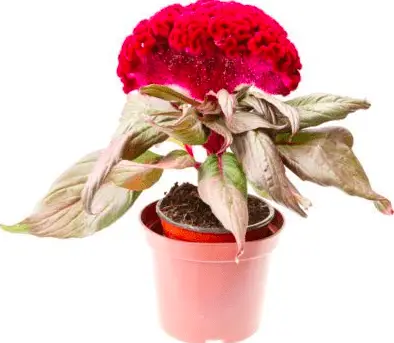
One of the most frustrating things for a gardener is to see their hard work go to waste. This is what can happen when you have celosia plants in your garden that start to turn brown.
There are many reasons why this might happen, but fortunately, there are also many solutions. In this blog post, we will discuss the causes of browning celosia plants and how to correct the problem.
Why Is My Celosia Turning Brown?
The most likely reasons for your celosia turning brown are overwatering, pest damage, fungal disease, and leaf burn. While all reasons cause brown celosia leaves, the browning can be slightly different.
For example, browning from overwatering is typically characterized by wilting and yellowing leaves. The browning from pest damage is usually in the form of holes or chewed edges on the leaves. And finally, the fungal disease will often cause spots or blotches on the leaves that eventually turn brown.
I will now discuss each of these reasons in more detail and how you can correct the problem.
1. Overwatering
The most common reason for celosia plants to turn brown is overwatering. This is especially true if you live in an area with high humidity. When the air is already full of water, your celosia plants don’t need as much water from you.
The leaves fo brown because they are not able to get the oxygen they need from the roots. The roots are suffocated by the water and can’t take in enough oxygen to keep the leaves healthy.
In fact, the roots may even start to rot, which causes them to go black, mushy, and smelly. Check the roots of your celosia plants to see if they are rotting. If they are, you will need to replant them in fresh soil.
To correct this problem, you will need to change your watering habits. First, check the soil before watering. If the top inch of soil is already moist, then your plant doesn’t need more water.
Second, water your celosia plants at the base of the plant so that the leaves don’t get wet. This will help to prevent diseases that can cause browning. Finally, make sure that you are using a well-draining soil mix.
2. Pests
Another common reason for browning celosia leaves is pests. There are many different types of pests that can damage your plants, including aphids, caterpillars, and earwigs.
These pests will typically cause holes or chewed edges on the leaves. You may also see them crawling around on the plant itself. If you see pests on your celosia plants, you will need to take action to get rid of them.
The first step is to identify the type of pest that is causing the damage. This will help you to choose the most effective treatment. Once you have identified the pest, you can treat your plants with an insecticide or remove them by hand.
I recommend using neem oil (Amazon link) as it’s an organic and effective way to get rid of pests. Simply mix the neem oil with water according to the manufacturer’s instructions and spray it on your plants.
3. Fungal Disease
Another common problem that can cause browning celosia leaves is fungal disease. There are many different types of fungi that can infect your plants, including powdery mildew and black spot.
These diseases typically cause spots or blotches on the leaves that eventually turn brown. You may also see a gray or white powder on the leaves. If you think your plant has a fungal disease, you will need to take action to treat it.
The first step is to identify the type of fungus that is causing the problem. This will help you to choose the most effective treatment. Once you have identified the fungus, you can treat your plants with a fungicide.
Again, neem oil is an organic and effective way to get rid of fungi. Simply spray it all on areas of the plant, not only those that are visually affected. This will help to prevent the spread of the disease.
4. Leaf Burn
Finally, another common reason for browning celosia leaves is leaf burn. This is usually caused by too much sun or wind exposure. The leaves will turn brown and dry out if they are exposed to too much sun or wind.
To correct this problem, you will need to move your plants to a location that is out of direct sunlight or wind. If possible, try to find a spot that is shady and protected from the wind.
You can also protect your plants by covering them with a light cloth or cheesecloth. This will help to filter out some of the sun and wind while still allowing air and water to reach the leaves.
Will Brown Celosia Leaves Turn Green Again?
No, it is unlikely that brown celosia leaves will turn green again. Once the leaves have turned brown, they are typically dead and will not recover.
However, if the problem that caused the browning is corrected, new growth should be green. So, if you can identify and fix the problem (for example, by changing your watering habits), then new growth should be healthy and green.
Should I Remove Brown Leaves from My Celosia?
It’s not necessary to remove brown leaves from your celosia plant. The dead leaves will eventually fall off on their own. However, you can remove them if you want to tidy up the plant.
To remove the leaves, simply cut them off at the base of the plant with a sharp knife or pruning shears that have been sterilized with rubbing alcohol.
Conclusion
If you have celosia plants that are turning brown, don’t worry! There are many possible reasons for this problem, and it is usually not difficult to fix. Just be sure to identify the cause of the problem so that you can take the appropriate action. With a little care, your celosia plants should be green and healthy in no time!
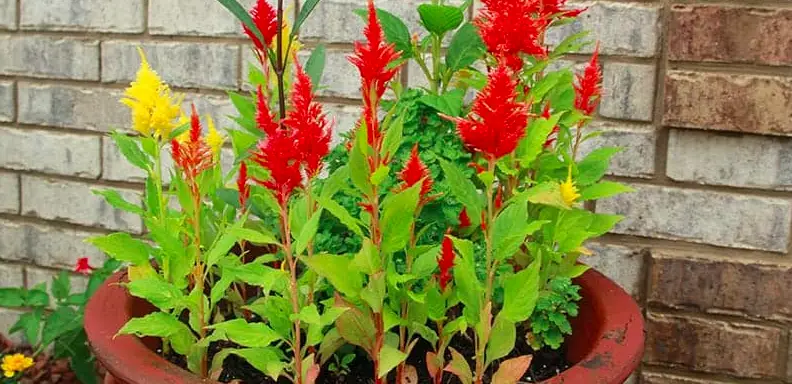
There’s no doubt that celosia is a beautiful flower. It can be used to add color and interest to any garden or landscape design. But did you know that you can also grow celosia in pots? This makes it the perfect choice for gardeners who have limited space, or for those who want to grow the plant year-round. In this blog post, we will discuss everything you need to know about growing celosia in pots!
Can Celosia Grow in Pots?
Yes, celosia can grow in pots both inside and outside. This makes it the perfect choice for gardeners who have limited space, or for those who want to grow the plant year-round in their garden, on their patio, or even on their balcony.
When growing celosia in pots, it is important to make sure that the pot is large enough to accommodate the plant’s roots. If the pot is too small, the plant will not be able to grow properly and may even die.
It’s also worth considering the type of pot you use. Celosia does best in pots that have drainage holes in the bottom to allow excess water to drain out. If your pot doesn’t have drainage holes, you will need to be careful not to overwater the plant, as this can lead to root rot.
From there, increase the size of the pot when the celosia plant becomes root-bound or starts to outgrow its pot. For a full-grown celosia plant, choose a pot that is at least 30cm wide and deep.
How to Water Celosia Grown in Pots?
The key to watering celosia is to make sure the plant has enough water, but not too much. Celosia plants grown in pots need to be monitored more closely than those grown in the ground, as its hard to tell when the plant is getting too much or not enough water.
When watering celosia, always check the soil before adding more water. The soil should be moist but not wet. If the soil is dry, give the plant a good soaking until water begins to drain out of the bottom of the pot. Then, allow the plant to dry out completely before watering again.
Overwatering is the number one cause of death for celosia plants grown in pots. When the roots of the plant are constantly wet, they will begin to rot and the plant will eventually die. If you think your plant is getting too much water, it’s best to err on the side of caution and allow the soil to dry out completely before watering again.
Which Type of Celosia Is Best Grown in Pots?
The Celosia argentea plant is best grown in a container as a houseplant. The plants can reach up to 30 inches tall, with smaller varieties only growing to a modest 10-12 inches. This makes them the perfect size for growing in pots on a windowsill or shelf.
The plant is known for its colorful, plume-like flowers that bloom throughout the summer months. The flowers can be white, pink, red, purple, or yellow in color. Celosia argentea is a low-maintenance plant that does not require much care or attention.
If you are looking for a plant that is easy to grow and care for, Celosia argentea is a perfect choice. It will add color and interest to any room in your home, and is sure to brighten up your day!
What Are the Best Pots for Celosia?
When choosing a pot for celosia, it is important to consider the size of the plant and the type of pot you use. The best pots for celosia are those that are big enough and have drainage holes. This will allow the plant to grow properly and prevent root rot.
I recommend terracotta pots for celosia (Amazon link) as they are a good size and have drainage holes. Terracotta is also a natural material that allows the plant to breathe, which is important for celosia plants.
If you are growing celosia indoors, I recommend using plastic pots as they are lightweight and easy to move around. Plus, they won’t break if you drop them!
Conclusion
Wrapping up, we have learned that celosia can grow in pots both inside and outside. This opens up a world of possibilities for gardeners with limited space, or for those who want to appreciate their celosia for longer periods.
It’s also important to remember that growing celosia in pots will stunt the growth of the plant. If you are looking for a plant that will reach its full potential, it is best to grow celosia in the ground.
If growing your celosia in a pot inside, consider that celosia plants like full sun, so choose a spot near a window where the plant will get plenty of light. This can be hard to achieve in the winter months.
Overall, growing celosia in pots is a great option for those with limited space or for those who want to add color and interest to their home. The plant is easy to care for and does not require much attention. Just be sure to choose a pot that is large enough for the plant, and remember to water carefully to avoid overwatering. With a little care and attention, your celosia plant will thrive!
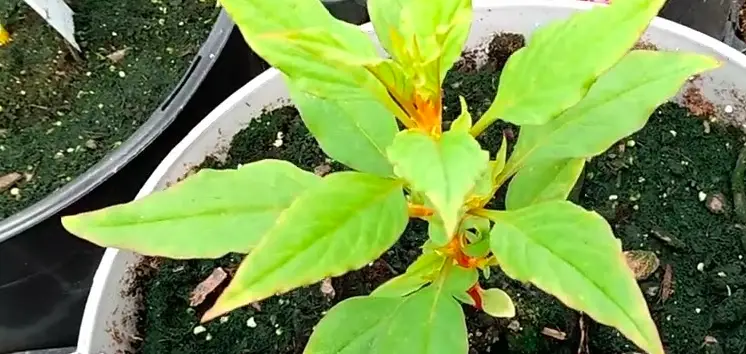
If you’ve been growing celosia plants in your garden, and have recently noticed that they are starting to turn yellow, you may be wondering what is wrong. Don’t worry – it’s not necessarily a sign that your plants are dying.
In this blog post, we will explore some possible causes of yellowing celosia plants, and offer tips on how to correct the problem.
Why Is My Celosia Turning Yellow?
The main reasons for yellow leaves on a celosia plant are overwatering, fungal infections, nutrient deficiencies, not enough sunlight, and environmental stressors.
I will now go into more detail about each of these potential causes, starting with the most common one – overwatering. It’s worth noting that the yellowing will like slightly different depending on the exact cause.
1. Overwatering
One of the most common reasons for celosia plants to turn yellow is overwatering. When plants are overwatered, they can start to suffocate and their leaves will begin to turn yellow.
The best way to avoid this problem is to make sure that you only water your plants when the soil is dry. If you’re not sure whether the soil is dry, you can stick your finger in it – if it feels damp, then you don’t need to water.
Another way to tell if your plants are overwatered is to look at the leaves. If they’re wilting or drooping, that’s a good indication that they’re not getting enough oxygen and are suffocating.
If you think your plants are overwatered, the best course of action is to stop watering them for a few days and see if the problem corrects itself. If not, you may need to repot them in dryer soil.
Failure to take action against overwatering can lead to root rot, which is a serious problem that often leads to death. The roots will go black, mushy, and smelly, so it’s important to catch the signs early before root rot sets in.
2. Fungal Infections
Fungal infections are another common cause of yellow leaves on celosia plants. These infections can be caused by a variety of fungi, including powdery mildew and black spot.
Fungal infections will usually start off as small spots on the leaves, which will then spread and turn the whole leaf yellow. The leaves may also develop a powdery or fuzzy appearance.
If you think your plant has a fungal infection, it’s important to take action quickly. The best way to treat a fungal infection is with an anti-fungal spray or powder.
My favorite anti-fungal treatment is neem oil (Amazon link), which is a natural and effective way to get rid of fungi on celosia plants.
You can also try to prevent fungal infections from happening in the first place by ensuring that your plants have good air circulation. This can be achieved by spacing them out properly when you plant them, and by not overcrowding them.
Fungal infections are more common in humid conditions, so if you live in an area with high humidity, it’s worth taking extra care to prevent these infections from occurring.
3. Nutrient Deficiencies
Nutrient deficiencies are another possible cause of yellow leaves on celosia plants. The most common nutrient deficiency that affects these plants is iron deficiency.
Iron is essential for the creation of chlorophyll, which gives plants their green color. When there’s not enough iron in the soil, the leaves will start to turn yellow.
Other nutrient deficiencies that can cause yellowing leaves include magnesium, nitrogen, and potassium deficiencies. These are less common than iron deficiency, but can still occur if the soil isn’t well-balanced.
The best way to correct a nutrient deficiency is to use a fertilizer that contains the missing nutrient. For example, if your plant is deficient in iron, you can use an iron-rich fertilizer.
It’s important to make sure that you’re using the right fertilizer for your plant. Celosia plants are not heavy feeders, so you don’t need to use a lot of fertilizer. A little goes a long way with these plants.
If you over-fertilize, you could end up burning the roots of your plant, which will cause even more yellowing leaves. So, be sure to follow the instructions on the fertilizer package and only apply as much as is recommended.
You should also have your soil tested to see what nutrients it is lacking. This will give you a better idea of what kind of fertilizer to use and how often you need to apply it.
4. Lack of Sunlight
Celosia plants need plenty of sunlight to thrive. If they’re not getting enough sunlight, the leaves will start to turn yellow.
These plants prefer full sun, but will tolerate partial shade. If your plant is in a shaded area, it’s likely that the leaves are turning yellow because it’s not getting enough light.
The best way to fix this problem is to move your plant to a location that gets more sunlight. If possible, try to place it in an area where it will get at least six hours of direct sunlight per day.
You may also need to increase the amount of artificial light that your plant is getting if it’s not possible to move it to a sunnier location. This can be done by using grow lights.
Grow lights come in a variety of shapes and sizes, so you’ll need to choose the right one for your plant. I like to use LED grow lights because they’re energy-efficient and don’t produce a lot of heat.
5. Environmental Stressors
There are a number of environmental stressors that can cause yellowing leaves on celosia plants. These include:
Too much or too little water
Extreme temperatures (either hot or cold)
Poor air circulation
Pests or diseases
If you suspect that one of these stressors is causing your plant’s leaves to turn yellow, the best thing to do is try to correct the problem.
For example, if your plant is getting too much or too little water, adjust your watering schedule accordingly. If the temperature is too hot or cold, move your plant to a location where the temperature is more moderate.
And if there’s poor air circulation around your plant, try to improve it by moving it to a location with better airflow.
You should also keep an eye out for pests and diseases. These can cause a lot of stress for your plant, which can lead to yellowing leaves. If you see any pests or diseases on your plant, be sure to remove them as soon as possible.
Should I Cut Yellow Leaves off My Celosia?
There is usually no need to cut yellow leaves off your celosia plant. In most cases, the plant will eventually outgrow the problem and the yellow leaves will fall off on their own.
If you want to speed up the process, you can gently pull the yellow leaves off by hand. This won’t harm the plant and will help it to focus its energy on new growth.
You should only remove a small number of leaves at a time, as too many removed at once can stress the plant.
Will Yellow Celosia Leaves Turn Green Again?
It is unlikely that yellow celosia leaves will turn green again. However, if the cause of the yellowing is corrected, new growth will be healthy and green.
This is good news for gardeners who want to keep their plants looking their best. By correcting the problem that is causing the yellowing, you can ensure that your plant will continue to produce healthy, green growth.
Conclusion
In conclusion, there are a number of reasons why celosia leaves may turn yellow. Only you know your plant and its growing conditions, so it’s up to you to determine the cause of the problem.
Once you know what is causing the yellowing, you can take steps to correct the issue and keep your plant healthy and happy. Thanks for reading!
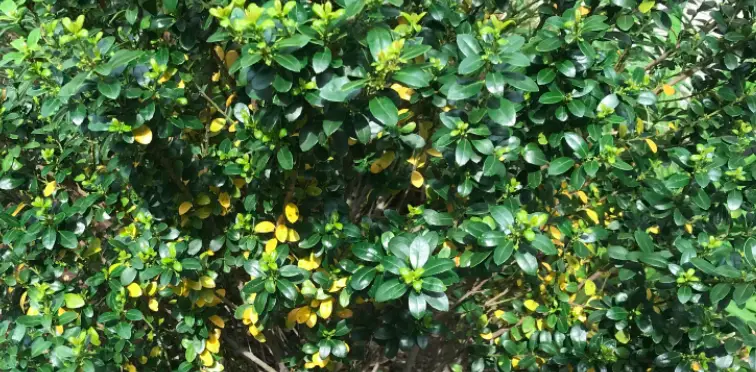
If your sky pencil holly is turning yellow, you may be wondering what is wrong. Don’t worry – we are here to help! In this blog post, we will discuss the possible causes of yellow leaves on a sky pencil holly and how to correct them.
Why Is My Sky Pencil Holly Turning Yellow?
The main reasons for yellow leaves on a sky pencil holly are over- or under-watering, lack of sun, fungal diseases, or environmental stressors.
Each of these problems tends to give different clues, so it is important to carefully observe your holly before taking corrective action. I will now go into more detail about each of these problems so that you can make an informed decision about how to proceed.
1. Incorrect watering
If you notice that the leaves on your sky pencil holly are yellow and droopy, it is likely that you are either over- or under-watering the plant.
Over-watering can cause the roots to rot, which will prevent the plant from taking up water and nutrients from the soil. This will cause the leaves to turn yellow and eventually drop off.
Under-watering will also cause the leaves to turn yellow, but they will be dry and crispy rather than droopy.
The best way to determine whether you are watering your holly too much or too little is to check the soil. The soil should be moist but not soggy. If it is bone dry, give the plant a good watering. If the soil is soggy, allow it to dry out before watering again.
Once you have corrected the watering problem, you should see new growth within a few weeks. If your holly is still not looking its best, read on to learn about the other possible causes of yellow leaves.
2. Fungal Infections
Fungal infections are another common cause of yellow leaves on a sky pencil holly. These infections often occur when the plant is under stress, such as from too much or too little water.
If you think your holly might have a fungal infection, look for other signs such as black or brown spots on the leaves, fuzzy growth on the leaves or stems, or a bad smell.
If you find any of these signs, it is important to take action immediately. Fungal infections can spread quickly and kill an entire plant if left untreated.
The best way to treat a fungal infection is with a fungicide. You can purchase a fungicide at your local garden center or online. Be sure to follow the instructions on the label carefully.
I love using neem oil to treat fungal infections. Neem oil is a natural fungicide that is safe to use around children and pets. Simply mix a few drops of neem oil with water and spray it on the affected areas.
3. Lack of Sunlight
If your holly is not getting enough sunlight, the leaves will turn yellow. This is because the plant is not able to produce enough chlorophyll, which gives leaves their green color.
To correct this problem, simply move your holly to a location that receives more sunlight. If possible, choose a spot that gets at least six hours of indirect sunlight per day.
If you are unable to provide your holly with more sunlight, you can try using artificial lighting. Grow lights are a great option and can be found at most hardware stores.
4. Environmental Stressors
There are a number of environmental stressors that can cause yellow leaves on a sky pencil holly. These include cold temperatures, wind, drought, and salt.
If you live in an area with harsh winters, it is important to protect your holly from the cold. The best way to do this is to plant it in a pot that can be brought indoors.
You can also try wrapping the pot in burlap or placing it on a bed of straw to insulate it from the cold. Just be sure to bring it inside before the first frost.
If you live in an area with high winds, you will need to take steps to protect your holly from wind damage. The best way to do this is to plant it in a sheltered spot, such as next to a fence or house.
Should I Cut Yellow Leaves off My Sky Pencil Holly?
There is usually no need to cut yellow leaves off of your sky pencil holly. The plant will naturally shed older leaves as it produces new growth.
The only case in which you would need to remove yellow leaves is if they are caused by a fungal infection. In this case, it is important to remove the affected leaves to prevent the infection from spreading.
To remove infected leaves, use sharp pruning shears to cut them off at the base of the plant. Be sure to disinfect the shears with rubbing alcohol before and after use.
Will Yellow Sky Pencil Holly Leaves Turn Green Again?
It is unlikely that yellow leaves on a sky pencil holly will turn green again. Once leaves have turned yellow, they are usually doomed.
The best thing you can do is focus on preventing future problems by giving your holly the care it needs. This includes providing adequate sunlight, water, and nutrients.
Conclusion
In conclusion, there are a number of reasons why a sky pencil holly’s leaves may turn yellow. The most common causes are lack of sunlight, environmental stressors, and fungal infections.
If you think your holly’s leaves are turning yellow due to one of these problems, take action immediately. The sooner you address the problem, the better chance you have of saving your plant.
Do you have a sky pencil holly that’s experiencing yellow leaves? What do you think is causing the problem? Let us know in the comments below! And be sure to check out our other blog post on how to care for sky pencil hollies.