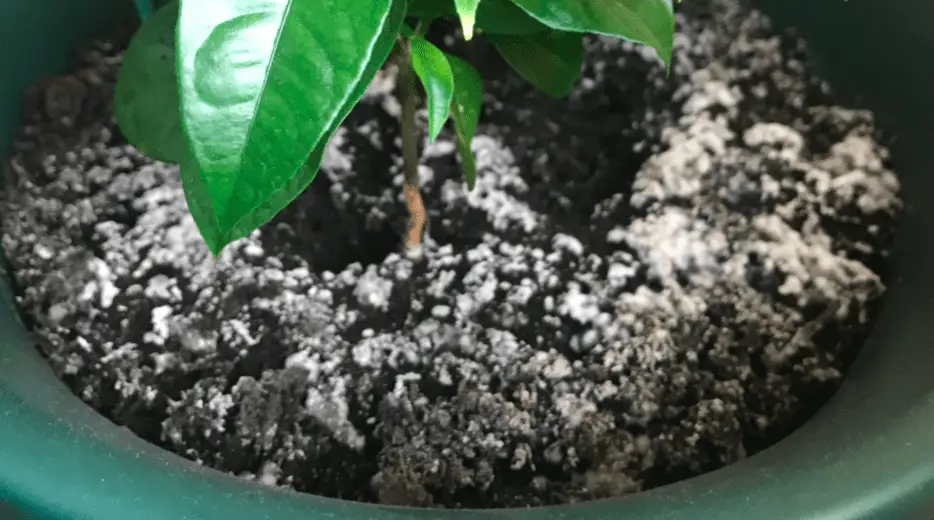
If you’ve been tending to a garden or flower bed, and have noticed an unsightly white mold on the surface of the soil, you’re not alone. This is a common problem for gardeners, but what causes it and how can you get rid of it? In this blog post, we will discuss the causes of white mold in soil, and provide some tips on how to get rid of it!
Why Does My Soil have White Mold at the Surface?
The main reason for white surface mold is the presence of too much moisture. This can be caused by a number of factors, such as overwatering, poor drainage, or high humidity.
If the mold is only present at the surface and not throughout the entire depth of the soil, it is likely due to one of these reasons. Let’s go through each of these factors one by one.
1) Overwatering
If you’re watering your plants too frequently, or for too long each time, this can lead to waterlogged soil which is the perfect breeding ground for mold. The best way to determine if you are overwatering is to check the moisture level of the soil before watering. If the top inch or so of soil is already moist, you don’t need to water.
In fact, if the surface soil stays moist for longer than a day or two, that’s a sign that mold is just around the corner if you don’t take steps to dry it out.
One way to cut down on surface mold from watering is to water your plants in the morning so they have time to absorb the water before nightfall. This will also help reduce the risk of fungal diseases, as fungi love dark, moist conditions.
It’s also a good idea to create a watering schedule for your plants. This will help you avoid overwatering, as you’ll know exactly how often to water each plant.
2) Poor drainage
If your soil doesn’t drain well, this can also lead to mold growth. You see, when you add water to your soil, the water needs somewhere to go. If it can’t drain away, it will just sit on the surface of the soil and lead to mold.
There are a few ways to improve drainage in your soil. One is to add perlite or vermiculite to the soil, which will help it to drain better. You can also create drainage holes in the bottom of pots or raised beds.
Another way to improve drainage is to make sure that your plants are not crowded. If they are too close together, this can impede water from draining away properly. Be sure to give each plant enough space to grow.
3) High humidity
If you live in an area with high humidity, this can also lead to mold growth. The best way to combat this is to make sure that your plants have good air circulation. This means not overcrowding them, and providing adequate ventilation if they are indoors.
Using a dehumidifier in your home may seem like overkill, but there are situations when one can come in handy, such as if you live in a very humid climate or are growing mold-prone plants indoors.
You can test the humidity in your home with a hygrometer, which is the best way to really know whether the air is too humid.
How to Remove White Surface Mold from Houseplant Soil?
Once you’ve identified the cause of the mold, you can take steps to remove it and prevent it from coming back.
If the mold is only on the surface of the soil, you can simply scoop it off with your hands or a spoon. If it’s widespread, you may need to sift through the soil to remove all of the mold spores.
To really kill any mold spores that may be lurking in the soil, use a fungicide that is safe for use on houseplants. My favorite fungicide is neem oil because it’s natural, effective, and safe to use.
Once you’ve removed the mold, it’s important to take steps to prevent it from coming back. As we mentioned before, one of the main causes of mold is too much moisture.
So, be sure to water your plants only when the soil is dry, and avoid overwatering. You should also make sure that your plants have good drainage and air circulation.
If you live in a humid climate, you may need to take extra steps to reduce the humidity in your home. This can be done with a dehumidifier or by opening windows on days when the weather is not too hot or cold.
Taking these steps should help to prevent mold from growing on the surface of your soil. If you do notice mold starting to form, be sure to remove it right away so it doesn’t have a chance to take hold.
Conclusion
In conclusion, mold can form on the surface of your soil for a variety of reasons. The most common causes are too much moisture, poor drainage, and high humidity.
Mold can be a tricky problem to solve, but by taking some preventative measures and being vigilant, you can keep it from becoming a big issue in your home.
We hope you found this article helpful. If you have any questions or comments, please feel free to leave them below. And be sure to check back soon for more tips and tricks for keeping your home mold-free!
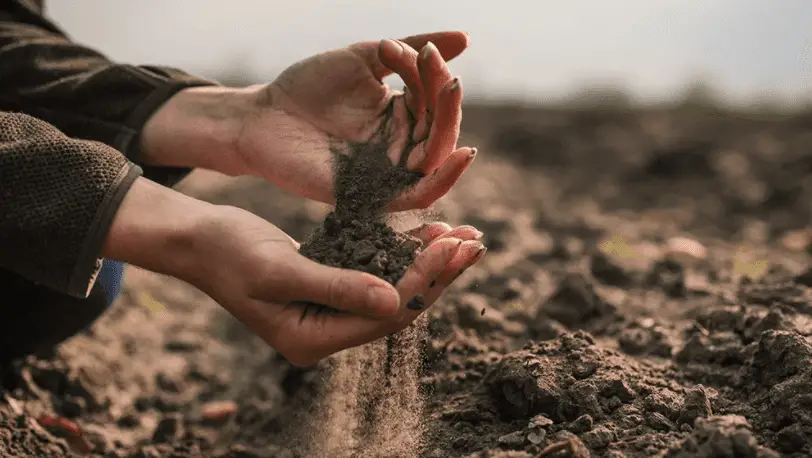
One of the most common questions gardeners have is whether or not they should add sand to their garden soil. The answer to this question depends on a variety of factors, including the type of soil you have and what you are growing.
In this blog post, we will explore the benefits and drawbacks of adding sand to garden soil, so that you can make an informed decision about what is best for your plants!
Should You Add Sand To Garden Soil?
It depends on what type of soil you already have and what plants you are growing. For example, some plants like aerated soil while others prefer nutrient-dense soil.
If you own succulents or cacti, for instance, adding sand to your soil can improve drainage since these plants come from arid regions. In fact, the perfect soil mix for succulents includes lots of sand.
I will now talk about each type of soil and when you should or shouldn’t add sand to it.
Sandy Soil
Sandy soil is well-drained but does not retain nutrients well. If you want to add sand to sandy soil, do so sparingly. You can also mix in some organic matter, such as compost, to help improve the soil’s ability to hold onto nutrients.
Clay Soil
Adding sand to clay soil can be a great way to improve drainage. However, you will need to add a lot of sand in order to make a significant difference. It is also important to note that adding too much sand to clay soil can make it difficult for roots to penetrate the soil.
Loamy Soil
Loamy soil is a good middle-of-the-road option – it has decent drainage and nutrients. If you have loamy soil, you may not need to add any sand at all. However, a small amount of sand can improve drainage if your soil is on the heavy side.
The Benefits of Adding Sand to Soil
Drainage – First, as we mentioned, it can improve drainage. This is especially important in areas with high rainfall or if you are growing plants that prefer well-drained soil.
Loose – Second, sand can also help loosen up compacted soil. If your soil is too dense, adding sand can make it easier for roots to penetrate the soil and access nutrients.
Aeration – Third, sand also helps improve aeration. This is important for plant growth because it allows roots to access the oxygen it needs to thrive.
The Drawbacks of Adding Sand to Soil
Sand is not a perfect solution, and there are a few drawbacks to consider before you add it to your soil.
Loss of Nutrients – First, sand is not very good at retaining nutrients. This means that if you add sand to your soil, you will need to fertilize more often in order to maintain healthy plant growth.
Weeds – Second, sand can also help weed seeds germinate and grow. If you are trying to control weeds in your garden, adding sand is not the best solution.
You also need to be careful about using clay and sand together. Think about it – what do builders use? A concrete mix that is made with clay and sand. Yes, adding clay and sand together can make a concrete-like mixture that is very difficult for roots to penetrate.
The key is to use the right ratio of ingredients. It’s important to add nutrient-dense soil amendments, such as compost, to improve the texture and quality of your soil.
Adding compost will also help improve the nutrient profile and water-holding capacity of your soil. Your plants will more than appreciate it!
What Kind of Sand Should I Add to Soil?
Horticultural sand is perfect for adding to garden soil. It is a type of sand that contains different size particles, which is great for drainage. Horticultural sand is also known as coarse sand, sharp sand, and quartz sand.
If you can’t find horticultural sand, you can use builder’s sand instead. It is a type of sand that is also great for drainage. However, the builder’s sand does not have as many different size particles.
Can I Put Sand on Top of Soil?
You can, but it is not the best solution. The sand is better when mixed in with the soil. This is because it will help improve drainage and aeration.
If you put sand on top of the soil, it will likely just blow away in the wind. The sand will also make it difficult for water to penetrate the soil, which can lead to problems with plant growth.
The bottom line is that adding sand to garden soil can be beneficial. However, you need to use the right type of sand and add the right amount. Too much sand can actually do more harm than good!
Conclusion
In conclusion, whether or not you should add sand to your garden soil depends on the type of soil you have and what plants you are growing. Adding sand can improve drainage, but it also has some drawbacks.
Be sure to weigh the pros and cons before making a decision about whether or not to add sand to your garden soil! Thanks for reading!
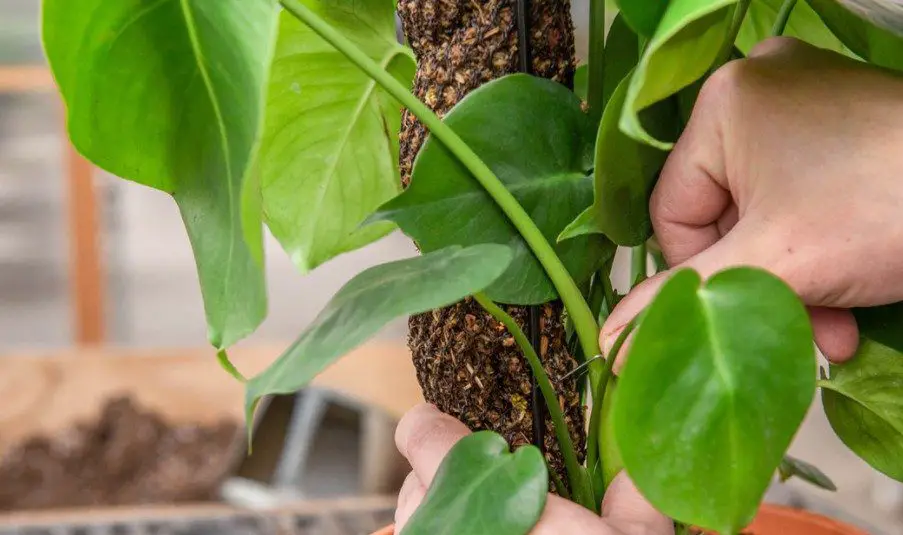
A moss pole is a gardening tool that is used to support the growth of plants. The moss allows the roots to easily climb up the pole and take hold.
They have been around for years and there are many different models on the market, but it may not be your best option if you have other options available.
In this post, we will discuss six of the most popular alternatives to moss poles so that you can pick one that will work best for your needs!
Moss Pole Alternatives
Here are six of the most popular alternatives to moss poles:
1.Coir Poles (coco fiber)
Coir is a natural fiber made from the husks of coconuts. It is often used in gardening because it is water-resistant and biodegradable. It is made by wrapping the coir around a metal or bamboo pole, which means you can make this pole yourself!
All you need is some coir, metal or bamboo pole, and some wire. You will have to wrap the fibers around the pole in tight layers so that they can be sturdy enough for your plants.
2. Bamboo Poles
Bamboo poles are strong and can be used to support heavy plants. They are also very stylish if you want something that is attractive in your garden or patio.
Bamboo is one of the oldest and most traditional ways to stake a plant. It is the perfect balance of sturdiness and nature. While PVC pipes are solid, they are unsightly when placed in the ground. Bamboo is a great alternative, especially if you are looking for something that will blend into your garden’s landscape.
You can also cut them to your desired length, which is a nice benefit that you may not get from other types of poles.
3. Trellis
Trellis is a bit different from the other options on this list but is a great way to add some extra support to your plants. You can either buy a trellis or make one yourself using materials like wood, metal, plastic, or even bamboo!
If you are looking for an easy option, you can purchase a pre-made trellis at your local gardening store. They come in different shapes and sizes, so you should have no problem finding one that will work for your needs.
4. PVC Pipe
PVC pipe is a popular choice for gardeners because it is sturdy and can be cut to the desired length. It is also less expensive than some of the other options on this list.
These poles last for years because they are made of quality materials. The downside is that they will need to be painted if you want them to look good in your garden or home.
5. Metal Pipe
A metal pipe is a good option for gardeners who want a more rustic look in their garden. It is also very sturdy and can support heavy plants. There is no chance for the pole to break apart, unlike softer plant poles.
The downside is that the surface is so hard that any aerial roots can’t attach themselves to the pole as easily when compared to moss poles.
6. Wooden Sticks
Wooden sticks are the least expensive option on this list, and they are also very easy to find. However, they are not as sturdy as some of the other options listed here. You can simply search your garden for fallen branches and use those.
Some gardeners even use wooden slabs for their poles. If you go this route, make sure that the wood will not rot over time. However, when done correctly, this allows you to grow your own tree-like plant in your home! Here’s a video of someone doing exactly that:
Why I Think Moss Poles Are the Best
They provide structure and support to plants that do not have a strong root system on their own. This is why they are commonly used for greenery such as ivy, pothos, and monstera plant.
In fact, I have one in the room where I am currently writing! It is a monkey leaf monstera that needs a pole to grow cling onto. Without the pole, the leaves would fall and flop onto the ground.
Moss is the best because it can attach to the pole and provide a grip for the plant’s roots. I prefer moss because I can push the aerial roots into the surface, which I simply cannot do with other moss pole alternatives, like bamboo.
Conclusion
In conclusion, there are benefits and drawbacks to all of these alternatives, but moss poles remain the most popular option for greenery. I think the benefits of using a moss pole outweigh the drawbacks, but you should decide what is best for your needs.
If you are looking for a sturdy and stylish gardening tool to support the growth of your plants, then you may want to consider a coir pole. Coir is a natural fiber made from the husks of coconuts and it is water-resistant and biodegradable.
PVC pipe is a good choice for gardeners who want a sturdy pole that can be cut to the desired length, and a metal pipe is a good option for gardeners who want a more rustic look in their garden.
If you are looking for an inexpensive option, then wooden sticks are a good choice. However, they are not as sturdy as some of the other options listed here. You can simply search your garden for fallen branches and use those.
I hope you have enjoyed this post. Thanks for reading!
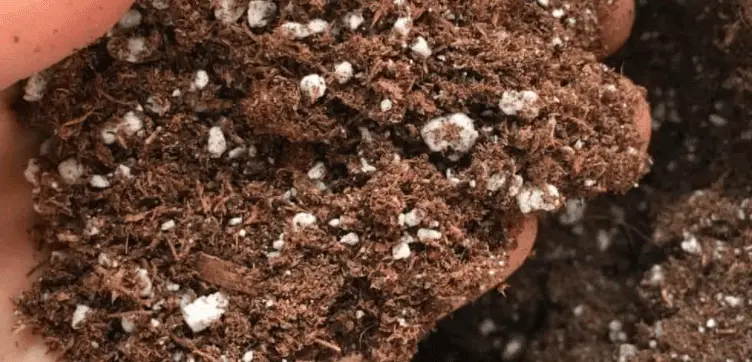
Have you ever seen little white balls in your garden soil? If so, you’re not alone! These little spheres are actually quite common, but many people don’t know what they are or why they’re there. In this blog post, we will discuss the purpose of these mysterious little balls and how to get rid of them if necessary.
What Are the White Balls in Soil?
The white balls found in your soil are either fungus balls or pieces of perlite. If the balls suddenly appeared one day, then they are most likely balls of fungus. Perlite is added as an ingredient to potting mixes, so it should have been there when you first got your plant or changed the soil.
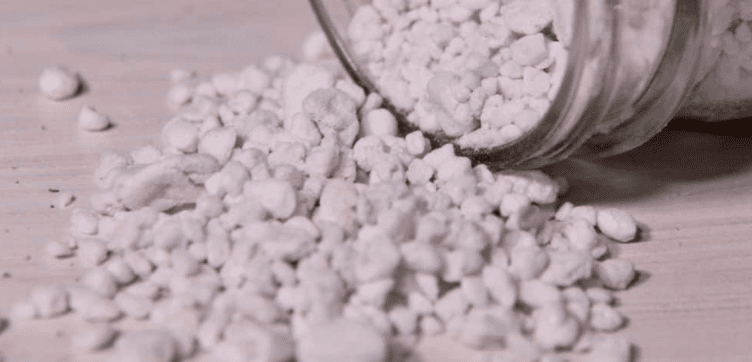
Perlite is nothing to worry about. In fact, it’s simply a type of volcanic glass that is often used in gardening and horticulture. It has a very porous surface, which makes it ideal for aerating the soil and helping roots to grow.
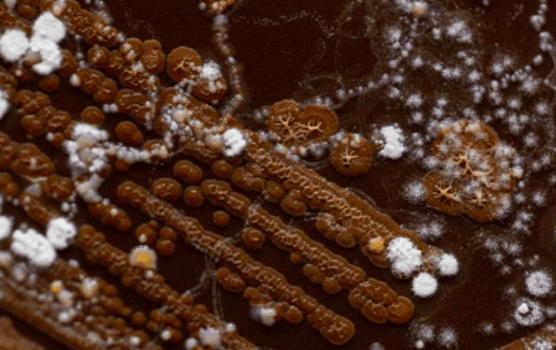
Fungus balls, on the other hand, are exactly what they sound like – balls of fungi! They are often found in moist soil and can be either white or brown in color. While they are not too harmful to plants, many gardeners choose to remove them from their soil.
How to Remove Fungus Balls from Soil?
If you want to get rid of the fungus balls in your soil, there are a few different methods you can try. The easiest method is to just scrap the surface layer of soil where the fungus balls are present. You can also try to remove them with a garden fork or trowel.
Another method is to completely repot your plant. This will give you the opportunity to start with fresh, clean soil. You can also add a fungicide to your plant’s new soil to kill off any remaining fungal spores that may be present.
Using fungicide is generally considered the most effective method for getting rid of fungus balls. You can find fungicides at your local garden center or nursery. Be sure to follow the instructions on the label carefully, as some products may be harmful to plants if used incorrectly.
Neem oil is my go-to fungicide for most garden problems. It’s a natural product made from the seeds of the neem tree, and it’s very effective at killing fungi. You can usually find it in liquid or granular form.
Fungus balls
Are Fungus Balls Damaging to Plants?
No, fungus balls won’t cause too much harm to your plants. However, they can sometimes compete with plant roots for moisture and nutrients. If you notice your plants struggling, it may be due to the presence of fungus balls in the soil.
The presence of the fungus can also lead to plant diseases, such as root rot. If you notice any of these problems, be sure to remove the fungus balls from your soil right away.
Leaving fungus can result in it spreading to other areas of the plant and to other plants in the garden. Besides, it looks gross, right? No one wants to see loads of white balls in their garden. So, if you spot them, be sure to take care of the problem right away!
How to Prevent White Fungus Balls in Soil?
Now that you’ve got rid of them, you’re probably wondering how to prevent white balls in soil. The best way to prevent fungus balls is to make sure your plant’s pot has good drainage.
You see, the fungus thrives in moist conditions. By ensuring that your plant’s pot has good drainage, you can help to keep the soil dry and prevent the fungus from growing.
This also means being careful with how much water you’re giving your plant. Water your plant only when the soil is dry to the touch – overwatering can lead to problems like fungus growth.
If you’re still worried about white balls in your soil, you can always add perlite to your potting mix (another white ball). This will help to aerate the soil and keep it from getting too compacted.
How Long Do Fungus Balls Live In Soil?
Fungus balls can live in soil for years, especially if the conditions are ideal for their growth. However, they need decaying matter to survive. Once this matter is gone, the fungus will start to die off.
You can speed up the process by removing the balls from your soil and increasing air circulation around your plants. This will help to dry out the soil and make it less hospitable for the fungus.
Should I Remove Perlite from Soil?
No, you don’t need to remove perlite from your soil. In fact, as we mentioned before, perlite can actually be beneficial for your plant! It helps to aerate the soil and keeps it from getting too compacted.
Here’s a full list of perlite benefits:
Aeration
Drainage
Root growth
Prevents soil compaction
Keeps potting mix light
Lasts for years
Economical
As you can see, there are many benefits to using perlite in your soil. They are added to the soil for a reason, so there’s no need to remove them!
Perlite
The only time when you may want less perlite in your soil is if you’re growing plants that prefer a more compacted environment, or if there’s too much perlite in the soil.
In fact, perlite can be the solution to the other type of white balls – fungus! it can help to aerate the soil and prevent the fungus from growing.
Conclusion
In conclusion, the white balls in your soil are most likely either pieces of perlite or fungus balls. Perlite is nothing to worry about and can actually be beneficial for your plant. Fungus balls, while not harmful, can be unsightly.
If you want to get rid of them, you can try scraping the surface layer of soil or repotting your plant. You can also prevent them from growing in the first place by ensuring that your plant’s pot has good drainage. Thanks for reading!
Do you have any questions or comments about white balls in soil? Let us know in the comments below! And be sure to check out our other gardening blog posts for more helpful tips and advice. Happy gardening!
Do you ever look at leaves and wonder why they have yellow eggs on them? No? Just me then. Well, regardless of whether or not you’ve ever wondered about it, today we’re going to explore the answer! What are these eggs, anyway? And what do they do? Keep reading to find out!
Why Are There Yellow Eggs on Leaves?
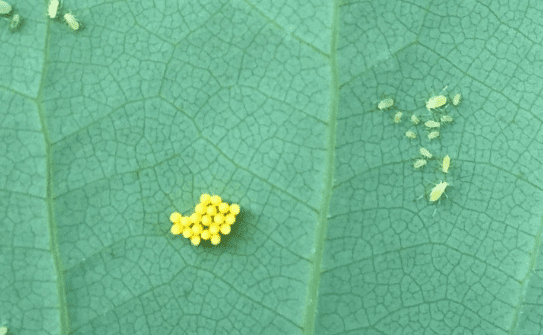
The yellow eggs you see on leaves are most usually from moths, beetles, aphids, and stink bugs. The female insect lays them there so that her offspring will have food when they hatch, which is why you’ll often see them near the edges of leaves. The eggs are usually yellow or green, and they’re laid in groups so that the larvae can feed on the leaf tissue together.
These eggs will hatch and the larvae will start to eat the leaf, which can cause damage to the plant. In some cases, the larvae will even bore into the stem of the plant, which can kill it. The good news is that there are predators that like to eat these eggs, so they don’t always have a chance to hatch and do their damage.
What Insect Lays Yellow Eggs on Leaves?
Moths, beetles, aphids, and stink bugs are the most common culprits. However, there are over a thousand different species of insects that lay eggs on leaves, so it’s hard to say for sure which one laid the eggs you’re seeing.
If you’re curious about which insects are common in your area, your best bet is to contact your local extension office or agriculture department. They’ll be able to tell you which insects are most likely to lay eggs on leaves in your area and what you can do to prevent them from doing so.
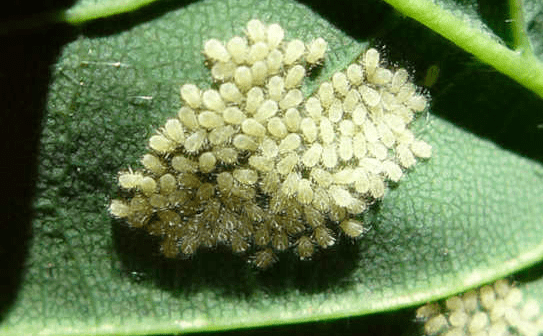
If you have a houseplant, I think aphids are the most likely to lay eggs on the leaves. These are very small insects that live in colonies and feed on plant sap. They can cause a lot of damage to a plant, so it’s important to control them if you see them on your plants. In fact, the aphids themselves look like eggs!
Aphids actually look like eggs
Are Yellow Insect Eggs Harmful?
No, the yellow eggs you see on leaves are not harmful to humans. However, as we mentioned before, they can cause damage to plants. If you have a garden or houseplants, it’s essential to check them regularly for eggs and larvae. If you see any, you can remove them by hand or with a pesticide.
It’s best to get rid of the yellow eggs on your houseplant before they hatch and the larvae start to feed. If you wait too long, the damage they cause could be irreversible. Simply scrape the eggs off of the leaves with a cotton swab and dispose of them.
While the larvae can cause damage to plants, they’re actually a food source for many animals. Birds, amphibians, reptiles, and even some mammals will eat them. So while they may not be good for your plants, they are good for the environment!
Aphid eggs
How to Get Rid of Yellow Eggs on Leaves?
The easiest way to get rid of yellow eggs on leaves is to remove them by hand. You can do this with a cotton swab that’s been dipped in rubbing alcohol. Simply swipe the eggs off of the leaves and dispose of them.
Be careful as you don’t want to crush the eggs and release the larvae. If you do, you’ll have a mess on your hands that I’m sure you’d rather avoid. If you have a lot of eggs to remove, you may want to use a small paintbrush instead of a cotton swab.
If you have a lot of eggs or if they’re hard to reach, you can also use an insecticide. I recommend neem oil as it’s a natural insecticide that’s safe to use and works on nearly all plants. Simply mix it with water according to the directions on the bottle and spray it on the affected leaves.
You’ll need to reapply neem oil every few days until you no longer see any eggs or larvae. Once they’re gone, be sure to wash your plants with soap and water to remove any residual oil.
How to Prevent Insects from Laying Yellow Eggs on Leaves?
Prevention is the best way to deal with yellow eggs on leaves. If you can stop the insects from laying their eggs in the first place, you won’t have to worry about them hatching and causing damage to your plants.
One of the best ways to prevent insects from laying eggs on your plants is to use row covers. These are pieces of fabric that you can lay over your plants to keep insects out. They work well for preventing aphids, moths, and beetles from laying their eggs on your plants.
Another way to prevent insects from laying eggs on your plants is to use traps. You can buy commercially available traps or make your own using a variety of different materials. For example, you can use yellow sticky traps to catch aphids and whiteflies. You can also use bait traps to catch beetles and moths.
Finally, be sure to keep your plants healthy as weak and unhealthy plants are more susceptible to insect damage. This means giving them the proper amount of water, fertilizer, and light. By taking good care of your plants, you’ll make them less attractive to insects and less likely to be damaged by them.
Conclusion
In conclusion, it’s likely that a pest has laid its eggs on your plant leaves. The most common offenders are aphids, moths, stink bugs, and beetles. If you see them on your plants, be sure to remove them as soon as possible.
I hope this article has helped you understand why there are yellow eggs on your plant leaves and how to get rid of them. If you have any questions or comments, please feel free to leave them below. I’ll be happy to help in any way I can. Until next time, happy gardening!