There are a lot of questions that go through people’s minds when it comes to gardening. One of the most common ones is whether or not to add earthworms to potted plants.
People often wonder if earthworms are necessary for plant growth and if they do more harm than good. In this blog post, we will answer these questions and provide you with some valuable information about earthworms and their role in gardening!
Should I Add Earthworms to Potted Plants?
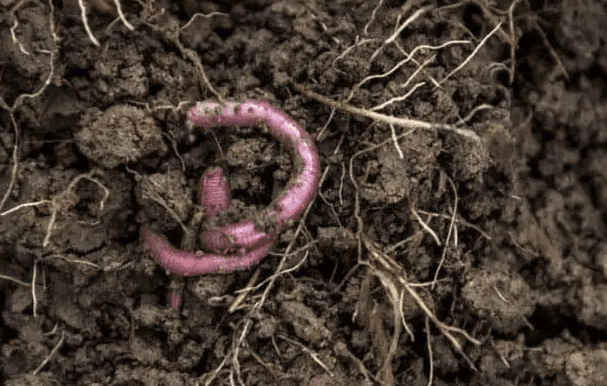
Earthworms aerate the soil and help to loosen compacted earth, making it easier for roots to grow. They also help improve drainage and the pH of the soil. In addition, earthworms consume organic matter and release nutrients that are essential for plant growth.
However, it’s not recommended to add earthworms to potted plants as they need to consume a lot of organic matter to survive, which means they are likely to start munching on the roots of your plants.
Keep reading to learn more about earthworms and what role they play in gardening!
What are Earthworms?
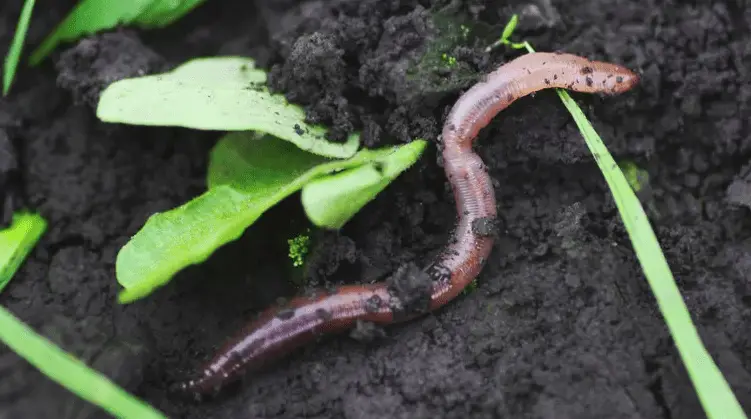
Earthworms are invertebrates that live in the soil. They have a long, slender body and range in color from pink to red. Earthworms typically measure about 12 inches in length but can grow up to 36 inches!
Earthworms are often referred to as “nature’s plow” because of their ability to aerate the soil. They do this by burrowing through the earth, which creates tunnels that help improve drainage and water retention.
Do Earthworms Eat Plant Roots?
While roots aren’t the favorite food of earthworms, they will consume them if there isn’t enough organic matter for them to eat. This is why it’s not always recommended to add earthworms to potted plants.
In fact, you may want to take action if you notice earthworms in your potted plants. The best way to remove them is to gently dig them out with your hands or a tool.
Benefits of Adding Earthworms to Potted Plants
While it’s not recommended to add earthworms to potted plants, there are some benefits to adding them to your beloved plants.
1) Micro and macronutrient fertilizers
Worm castings (poop) are one of the best fertilizers for plants. It’s full of essential nutrients that help promote growth, including nitrogen, phosphorus, and potassium.
2) Aerate the soil
As we mentioned before, earthworms aerate the soil by burrowing through it. This helps improve drainage and water retention in the potted plant.
3) Acidic soil conditions
Earthworms secrete a mucous that helps to create acidic soil conditions, which are ideal for most plants. This is because most plants thrive in slightly acidic soil with a pH between 5.5 and 7.
How to Deter Worms from My Potted Plants?
If you’re worried about earthworms getting to your potted plants, there are a few things you can do to deter them.
1) Keep plants inside
There are hundreds of earthworms crawling around in your backyard, but you won’t find many (if any) in your living room. By keeping potted plants indoors, you can avoid earthworms altogether.
If you do have to put your plants outside for a bit, keep a close eye on them and bring them back inside as soon as possible.
2) Use warm water
Earthworms are sensitive to changes in temperature. You can use this to your advantage by watering your plants with warm water. The warmth will deter earthworms from getting too close to your plants.
Any worms that are present in the soil will immediately come to the surface and run away. From there, you can scoop them up and move them to a better location.
3) Use a physical barrier
You can also create a physical barrier between your plants and earthworms by surrounding the plant pot with gravel, sand, or even coffee grounds. Just make sure the layer is thick enough that earthworms can’t tunnel through it!
4) Diatomaceous earth
This powder is made from the fossilized remains of algae and can be found in most hardware stores. Diatomaceous earth works by puncturing the exoskeleton of insects, which leads to dehydration and death.
To use it, simply sprinkle a layer around your plants and reapply as needed. Keep in mind that diatomaceous earth can also harm beneficial insects, so use it sparingly and only if the above methods don’t work.
5) Coffee grounds
Add coffee grounds to the soil to deter earthworms. You see, worms hate both the texture and smell of coffee grounds.
To use this method, simply add a layer of coffee grounds to the top of your soil and reapply as needed. You can also mix coffee grounds into the soil before planting. This should stop earthworms from bothering your plants!
6) Keep your plant healthy
A healthy plant is less likely to be attacked by pests and diseases. This is because a strong plant can better defend itself against predators. Plus, there’s no dead matter for worms to eat if your plant is healthy!
To keep your plants healthy, make sure they are getting enough sun, water, and nutrients. Also, don’t forget to monitor them for signs of distress (e.g., wilting leaves) so you can take action quickly.
Other Types of Worms
Earthworms aren’t the only type of worms that can live in your potted plants. There are also segmented worms, such as:
Grubworms
These are larvae of beetles and are often mistaken for earthworms. Grubworms are white or cream-colored with a brown head. They can grow up to two inches long and are often found in soil that is high in organic matter.
There’s no benefit to having grubworms in your potted plants, so it’s best to get rid of them if you find any.
Cutworms
These are the larvae of moths and can be a major problem for gardeners. Cutworms are brown or black and grow up to two inches long. They get their name from their habit of cutting off young plants at the base.
If you find cutworms in your potted plants, remove them as soon as possible. Otherwise, they will continue to damage your plants!
Nematodes
Nematodes are tiny, translucent worms that live in the soil. They range in size from one to two millimeters long and are often too small to be seen with the naked eye.
There are both beneficial and harmful nematodes. Beneficial nematodes help break down organic matter and provide nutrients for plants. On the other hand, they can attack the roots of your plants.
Conclusion
In conclusion, there are both benefits and drawbacks to adding earthworms to potted plants. It’s ultimately up to you to decide whether or not you want to add them to your plants. Just remember to take all the above factors into consideration before making a decision!
I hope this article was helpful. If you have any questions or comments, please feel free to leave them below. Thanks for reading!
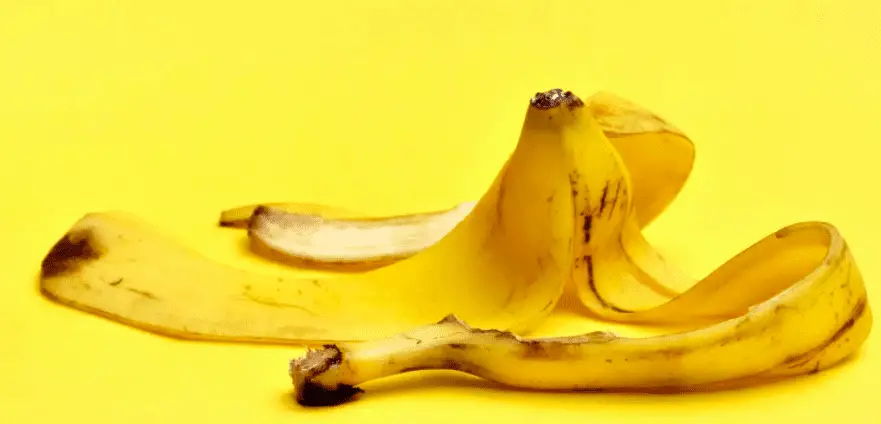
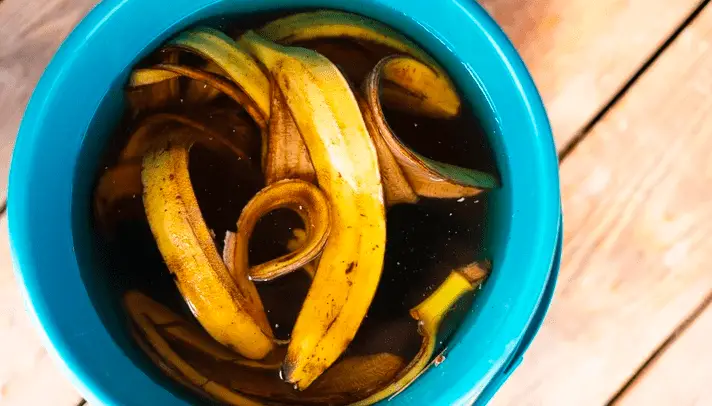
Bananas are a delicious fruit that is packed with nutrients. But did you know that you can also use the peel to water your plants? Believe it or not, banana peel water is great for plants! In this blog post, we will discuss how to use banana peel water for plants and some of the benefits that it provides.
What is Banana Peel Water?
Banana peel water is made by steeping the peel of a banana in water. This process extracts the nutrients from the peel and infuses them into the water.
Banana peel water is rich in potassium, which is an important nutrient for plants. Potassium helps plants to grow and develop properly. It also helps to regulate moisture levels in the soil and prevents root rot.
As banana skins are usually thrown away, using them to make banana peel water is a great way to recycle them. It is also a cost-effective way to provide your plants with the nutrients they need.
How to Use Banana Peel Water for Plants?
To use banana peel water for plants, simply steep the peels in boiled water and allow them to cool. Once the peels have infused the water with their nutrients, you can water your plants with it.
You can also add banana peels directly to your compost pile. This will help to improve the quality of your compost and provide nutrients for your plants.
How to Make Banana Peel Water?
Making banana peel water is easy! Simply follow these steps:
Place the peels of two or three bananas in a pot of boiling water
Allow the peels to steep in the water for 30 minutes
Remove the peels and allow the water to cool
Pour the banana peel water into a watering can and water your plants
This is how you use boiling water to make banana peel water. You can also use cold water, but it will take longer for the nutrients to infuse into the water.
You can also pulverize the banana peels and add them to your plants. Simply chuck the banana skins into a blender or food processor and blend until they are broken down. You can then add the pulverized banana peels to your plants’ soil.
This is a great way to provide your plants with a slow release of nutrients. The smaller you can make the pieces of the banana skin, the better!
What Are the Benefits of Using Banana Peel Water for Plants?
There are many benefits of using banana peel water for plants. As we mentioned earlier, banana peel water is rich in potassium, which is an important nutrient for plants.
Potassium
As we mentioned, bananas are high in potassium. Potassium is an important nutrient for plants, as it helps them to grow and develop properly. Plants sometimes struggle to uptake potassium from the soil, so using banana peel water is a great way to give them a boost.
Organic fertilizer
Using banana peel water means you don’t have to use chemical fertilizers, which can be harmful to the environment. Banana peel water is a great organic fertilizer that will provide your plants with the nutrients they need.
Economical
Banana peels are usually thrown away, so using them to make banana peel water is a great way to recycle them. It is also a cost-effective way to provide your plants with the nutrients they need.
There’s no need to spend money on expensive fertilizers when you can use banana peel water for your plants! Plus, eating bananas is a great way to get your daily dose of vitamins and minerals.
As you can see, using banana peel water for plants has many benefits. So next time you’re eating a banana, don’t throw away the peel! Use it to water your plants or add it to your compost pile. Your plants will thank you for it!
Why Do Plants Need Potassium?
Potassium is an electrolyte that helps plants to grow and develop properly. It is involved in many processes, including photosynthesis, water uptake, and the transportation of nutrients throughout the plant.
Potassium is one of the most important nutrients for plants, and it is often deficient in the soil. This can lead to stunted growth, yellowing leaves, and poor fruit production.
In fact, potassium can be used to boost your plant’s immunity to pests and diseases. So not only is it important for plant growth, but it can also help to protect your plants from harm.
Did you know that potassium is one of the three main nutrients in NPK fertilizers – along with nitrogen and phosphorus? This shows just how important it is for plants!
Precautions When Using Banana Water for Plants
While using banana water for plants is generally safe, there are a few things you should keep in mind.
First of all, if you are using boiled water to make banana peel water, be sure to allow the water to cool before watering your plants. Boiling water can damage plant roots, so it’s important to let it cool first.
Second, if you are using pulverized banana peels, be sure to add them to your plants’ soil and not directly to the plant itself. The high potassium content in banana peels can burn plant leaves, so it’s important to add them to the soil instead.
Finally, don’t overdo it! Too much banana peel water can actually be harmful to your plants. Start with small amounts and increase gradually as needed.
Misting Plants with Banana Peel Water
There are many ways to use banana peel water for plants. You may have heard of people misting their plants with the water. Personally, I’m not a huge fan of this method as I think it’s a bit of a waste. The banana peel water is better when it’s in the soil.
If you’re going to mist your plants with banana peel water, make sure you do it in the morning so the leaves have time to dry before nightfall. Otherwise, you run the risk of fungal diseases taking hold.
Conclusion
In conclusion, using banana peel water for plants is a great way to provide them with the nutrients they need. It is also an economical and eco-friendly way to fertilize your plants. So next time you’re eating a banana, don’t throw away the peel! Use it to water your plants or add it to your compost pile.
I hope this article was helpful. If you have any questions or comments, please leave them below. I would love to hear from you!
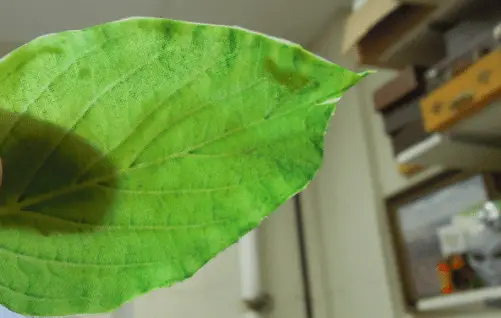
One of the most common questions that gardeners have is why their leaves are turning transparent or translucent. There can be a number of reasons for this, but some are more common than others. In this blog post, we will discuss the most common causes of leaves turning transparent or translucent and what you can do to fix them!
Why Are My Leaves Turning Transparent?
Leaves turn transparent when there is not enough chlorophyll in them. Chlorophyll is what gives leaves their green color and helps them to produce food for the plant. There are a number of reasons why there might not be enough chlorophyll in the leaves, including nutrient deficiency, damaged roots, and high alkaline soil.
I will now jump into each of these topics so that you can have a better understanding of why your leaves might be turning transparent.
1) Nutrient deficiency
Plants need nutrients to produce chlorophyll. If they are not getting enough of certain nutrients, their leaves will start to turn transparent. The most common nutrient deficiencies that cause this problem are nitrogen and magnesium.
If you think that your plant might have a nutrient deficiency, the first thing you should do is test your soil. You can either do this yourself with a soil test kit or take a sample of your soil to a local nursery.
Once you know what nutrients your plant is lacking, you can amend your soil with the appropriate fertilizer. It is important to only fertilize your plant as needed because too much fertilizer can actually be harmful to plants.
2) Damaged roots
Another common reason for leaves turning transparent is damaged roots. This can be caused by a number of things, including over-watering, pests, and diseases. Damaged roots are not able to absorb nutrients from the soil as effectively, which can lead to chlorophyll deficiency and transparent leaves.
If you think that your plant has damaged roots, the first thing you should do is check the roots for signs of damage. If you see any root damage, you will need to address the problem immediately. This usually means removing diseased roots with sharp shears and replanting the plant in fresh, well-drained soil.
3) Pests and diseases
Pests and diseases are common problems that can cause leaves to turn transparent. Aphids, whiteflies, and spider mites are all common pests that attack plants and suck the chlorophyll out of their leaves. These pests can be difficult to control, but there are a number of products on the market that can help.
If you think that your plant has a pest or disease problem, the first thing you should do is identify the problem. Once you know what you are dealing with, you can choose the appropriate treatment. There are a number of organic and chemical treatments available for both pests and diseases.
Neem oil is a great organic treatment for pests and diseases. It is safe to use around children and pets and is very effective at controlling a wide variety of pests and diseases.
4) High alkaline soil
Another common reason for leaves turning transparent is high alkaline soil. This type of soil has a pH that is higher than seven, which can make it difficult for plants to absorb nutrients. This can lead to chlorophyll deficiency and transparent leaves.
If you think that your soil is too alkaline, the first thing you should do is test the pH of your soil. You can either do this yourself with a soil test kit or take a sample of your soil to a local nursery.
5) Heat stress
Another common reason for leaves turning transparent is heat stress. This usually happens when plants are exposed to too much heat, either from the sun or from artificial lights. Heat stress can burn the leaves of a plant and cause them to turn transparent.
If you think that your plant is experiencing heat stress, the first thing you should do is move it to a cooler location. If possible, place the plant in an area where it will receive filtered sunlight for part of the day.
Most plants need less sunlight than you may think, so it is important to make sure that your plant is not getting too much sun. If you are using artificial lights, make sure that they are not too close to the plant.
Will Transparent Leaves Turn Green Again?
Yes, it is possible for transparent leaves to turn green again. However, it is important to address the underlying problem that is causing the leaves to turn transparent. Otherwise, the leaves will likely turn transparent again.
If you are having trouble getting your plant’s leaves to turn green again, the best thing to do is consult with a local nursery or an expert. They will be able to help you identify the problem and find a solution.
Personally, I found that the addition of fertilizer and the correct amount of sun exposure helped keep my leaves green.
If your leaves stay transparent, then you can always trim them off. New leaves will eventually grow in their place and, with any luck, they will be green. Just make sure to use shears that are clean and sharp to avoid damaging the plant.
Conclusion
In conclusion, chlorophyll is what gives leaves their green color. If your leaves are turning transparent, it is likely due to a deficiency in chlorophyll. This can be caused by a number of factors, including root damage, pests and diseases, high alkaline soil, and heat stress.
If you are having trouble getting your plant’s leaves to turn green again, the best thing to do is consult with a local nursery or an expert. They will be able to help you identify the problem and find a solution.
Personally, I found that the addition of fertilizer and the correct amount of sun exposure helped keep my leaves green. If your leaves stay transparent, then you can always trim them off. New leaves will eventually grow!
Do you have green balls in your soil? If so, don’t worry – you’re not alone! These little guys are actually a pretty common sight, and they’re nothing to be concerned about.
In this blog post, we will discuss what green balls are, what causes them to form, and how to get rid of them if necessary. Stay tuned for more information!
What Are The Green Balls in My Soil?
The green balls in your soil are likely insect eggs, fruits, or small fertilizer balls. Insect eggs are the most common cause, as many insects lay their eggs in soil – especially if the soil is rich in nutrients.
There’s no need to panic if you see green balls in your soil. In most cases, they’re nothing to be concerned about. However, if you’re unsure of what they are or you want to get rid of them, we recommend consulting with a professional. I will now give an overview of each of these potential causes:
1) Insect Eggs
As we mentioned, insect eggs are the most common cause of green balls in soil. Many different types of insects lay their eggs in the soil, including beetles, moths, wasps, and flies.
The egg itself is usually white or light-colored, but it is surrounded by a green or brown casing. This casing is made of a hard material that protects the egg from predators and the elements.
How to Remove Green Insect Eggs from Soil?
As you may expect, it’s a good idea to get rid of these eggs before they have a chance to hatch. If you don’t, you could end up with a LOT of insects in your yard or inside your house.
Simply scrape the eggs off of the soil and dispose of them far away from your home. To really remove any potential threat, you can also treat your soil with an insecticide.
Neem oil is a great natural option that is safe to use around children and pets. It’s an organic, biodegradable insecticide that works to kill eggs, larvae, and adult insects.
How to Prevent Green Insects from Laying Eggs?
Prevention is better than cure, as they say! To prevent insects from laying eggs in your soil, there are a few things you can do:
Keep your yard clean and free of debris. Insects love to hide in clutter, so removing it will make your yard less attractive to them
Trim back any overgrown plants or weeds. These provide a perfect hiding spot for insects, so keeping them under control will help deter them from your yard
Treat your soil with an insecticide on a regular basis. This will create a barrier that will prevent eggs from being laid in the first place
Insect eggs
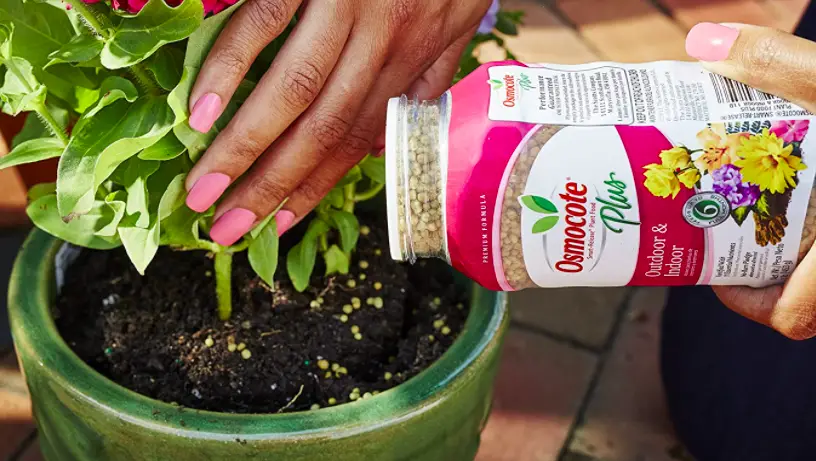
2) Fertilizer Balls
Another potential cause of green balls in your soil is fertilizer. Many commercial fertilizers come in small, round pellets that are easy to spread evenly over a large area.
These pellets are usually made of organic materials like manure, compost, and bone meal. They slowly release nutrients into the soil as they break down, which helps to promote plant growth.
If you think your green balls might be fertilizer pellets, simply check the label of the product you used. It will likely say if it contains small pellets or granules.
Should I Remove Fertilizer Balls from Soil?
Fertilizer balls are not harmful to your soil or plants, so there’s no need to remove them. In fact, they can actually be beneficial!
As we mentioned, fertilizer pellets slowly release nutrients into the soil as they break down. This helps to promote plant growth and keep your soil healthy.
If you’re concerned about the appearance of the balls in your soil, you can simply remove the fertilizer balls and use a different method to apply the fertilizer. For example, you could use a liquid fertilizer instead.
Fertilizer Pellets
3) Fruits
These fruits can fall from the plant and roll into the soil, where they may become hidden among the leaves and dirt. If you have a fruit tree or vine in your yard, it’s possible that these green balls are simply fallen fruits.
To confirm this, simply take a closer look at the green balls in your soil. If they are soft and have a wrinkled surface, they are probably fruits.
If you don’t want animals to eat the fallen fruit and spread seeds around your yard, you can remove them from the soil. Otherwise, you can leave them be and let nature take its course!
How to Find Out What the Green Balls Are?
If you’re still not sure what the green balls in your soil are, there are a few things you can do to find out.
First, take a closer look at the balls and see if you can identify any patterns. Are they all the same size? Do they have the same color or texture?
Next, try to determine where the balls are coming from. Are they all in one area of your yard, or are they spread out?
Finally, think about what else is going on in your yard that could be causing the green balls. Have you recently applied any fertilizer or pesticides? Are there any fruit trees or vines nearby?
Answering these questions will help you narrow down the possibilities and figure out what the green balls in your soil are.
When fertilizer balls are squeezed, the hard casing cracks and a type of salt excretes. Insect eggs are more rubbery to the touch, and cracking the egg will usually result in insects spilling out.
If you have any concerns about the substance, contact your local cooperative extension office for assistance in identifying it.
Conclusion
In conclusion, the green balls in your soil are most likely insect eggs, fertilizer pellets, or fallen fruits. If you want to get rid of them, simply scrape them off of the soil and dispose of them far away from your home.
As you can see, there are a few different potential causes of green balls in your soil. In most cases, they are nothing to worry about and can be easily removed.
If you’re concerned about the presence of these green balls, simply check for signs of insects or fertilizer pellets. If you don’t see any, chances are they’re just fallen fruits.
Moss poles are a great way to add some green life to any garden or yard, but they can be difficult to maintain. Moss pole care starts with keeping the moss moist so it doesn’t dry out and die. But how do you keep moss pole moist? In this blog post, I’m going to share five unique ways that you can keep your moss pole moist.
How to Keep Moss Pole Moist?
Here are the five unique ways that you can keep your moss pole moist:
1. Pouring water directly onto the pole
The first method is to water your pole at the same time as you water your plants. Simply place your pole near the plants and make sure that it gets watered every time you water the surrounding area.
In fact, watering the moss pole in this way means some of the water will drip down onto the soil, which further waters your plant. As such, keep a close eye on how much water is dripping.
2. Mist the pole
This is probably the most common method for keeping moss moist. Just mist the pole with a water bottle every day or two to keep it healthy and green. I like to do it in the morning, but you can do it whenever is best for you.
Make sure to mist along the whole length of the pole to keep everything moist. The common mistake is to only spray water at the top of the pole, which causes the bottom of the pole to dry out.
3. Use a room humidifier
If you have a room humidifier, put it near your moss pole. This will add moisture to the air and help keep the moss moist. Humidifiers are great for those of you who own tropical plants that thrive in moist environments.
I use one when the humidity in my bedroom is too low for my monstera to grow well. You can buy a humidifier for pretty cheap, and they come in all shapes and sizes.
4. Use a pebble tray
If you don’t want to invest in a machine, you can put one or two pebble trays directly under the plant. Fill these with water and use this to keep your moss moist throughout the day. This adds moisture to the surrounding area but it isn’t as effective as using a humidifier machine.
If you have a bathroom with a shower or bathtub, keep your moss pole in that room. The humidity from the shower and tub will help keep it moist throughout the day. I only wish my bathroom was large enough to use this method…
Should I Water My Moss Pole?
Yes, you should water your moss pole to help keep it healthy and green. The best way to do this is by pouring water directly onto the pole, misting it, or using a room humidifier. Just be sure to water it regularly so the moss doesn’t dry out.
Dry moss is not only an eyesore, but it’s also difficult to revive. So, be sure to water your moss pole often to keep it healthy and green – your plants will thank you!
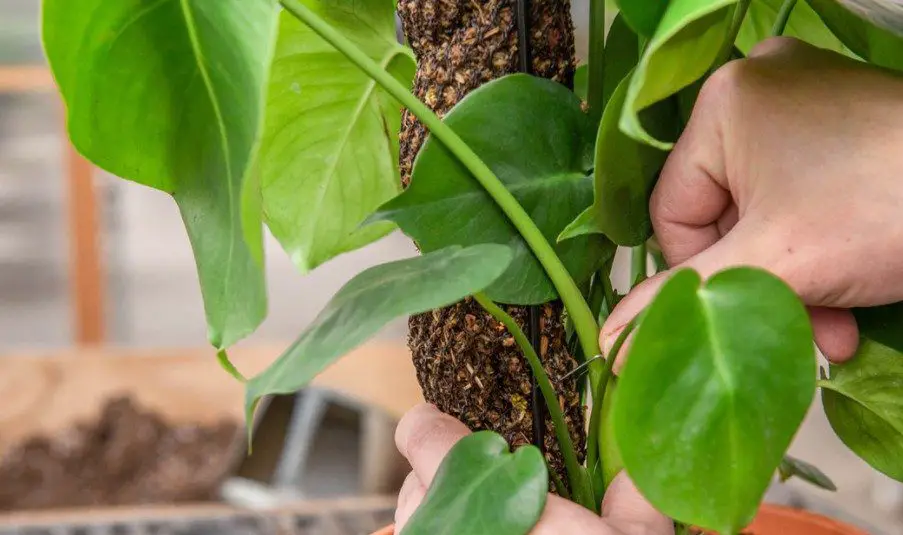
What Does a Moss Pole Do?
Moss poles make it easy to stake your plant and keep them growing upwards. Without moss poles, many of our plants would simply grow in every direction and fall to the floor. This is common with vine plants, like pothos. By using moss poles, we can control the growth of our plants and keep them looking neat and tidy.
A moss pole is also a great way to add some green life to any garden or yard. They’re easy to install, and they come in a variety of colors and styles. Plus, they’re low maintenance – all you have to do is water them regularly to keep them healthy and green.
Why Does My Moss Pole Need to Be Moist?
Moss poles need to be kept moist so the moss on top doesn’t die. If you don’t water your pole, it may not have enough moisture for this moss and will eventually dry out. This is what causes most of our moss poles to die off after a few months or years.
Furthermore, the aerial roots will have difficulty clinging to dry poles, which will make it difficult for the plant to grow upwards. This is why you should wet your moss pole two or three times per week in order to keep the moss healthy and green.
Conclusion
In conclusion, there are many different ways to keep your moss pole moist. These include pouring water directly onto the rod, misting it, using a room humidifier, filling pebble trays with water and placing them under the rods, keeping your plant in a humid room (bathroom), or using a rock garden.
Whichever method you choose to use, just remember that moss poles need to be kept moist in order for the plant to stay healthy and grow upwards.
Thanks for reading this article. Please visit this blog again for more great content on moss pole care.