Looking for a new and exciting houseplant to add to your collection? Check out the Calathea Leitzei – also known as the White Fusion Calathea. This tropical plant is sure to impress with its beautiful white leaves and easy care requirements. Keep reading for more information on how to care for your new Calathea Leitzei!
Calathea Leitzei – Calathea White Fusion
Botanical Name: Calathea lietzei
Family: Marantaceae
Size: 2 feet tall
Sun Exposure: Dappled light
Soil: Moist, but well-drained
pH: Acidic
Bloom: Summer
Hardiness Zones: 11b-12b USDA
Native: Tropical South America and Mexico
What Does a Calathea Leitzei Look Like?
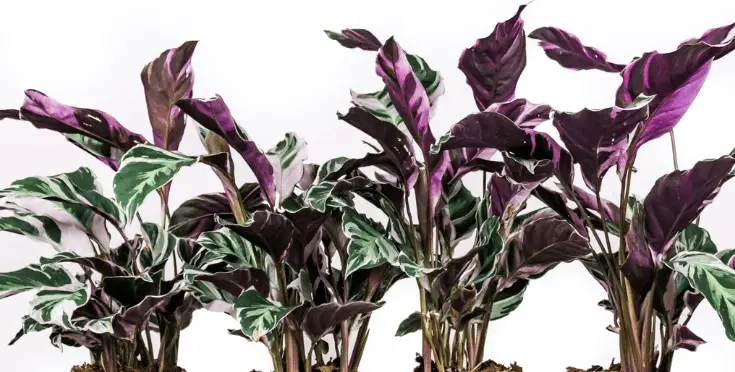
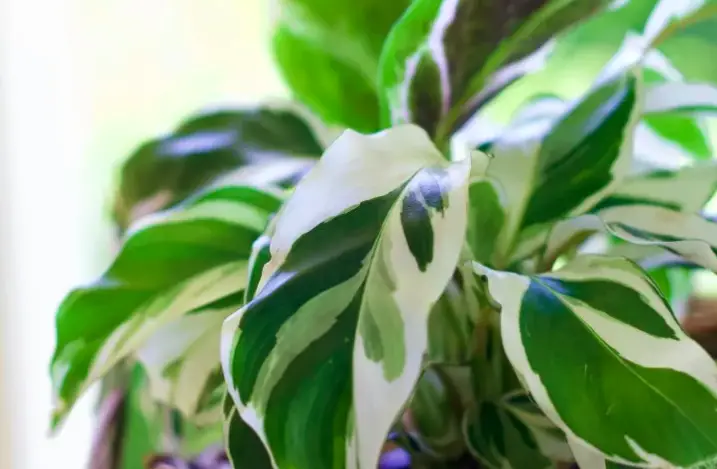
The Calathea Leitzei gets its nickname, the White Fusion Calathea, from its beautiful white-variegated leaves. These leaves are oval-shaped and have a green stripe down the center. The White Fusion Calathea can grow to be about 24 inches tall and wide, making it a great size for most homes and offices.
Interestingly, the underside of a Calathea Leitzei’s leaves is purple. When the leaves are young, they tend to be more green with white variegation, but this changes slightly when the plant ages.
It’s easy to see why the Calathea Leitzei is such a popular houseplant! This plant is not only beautiful but also relatively easy to care for. Keep reading for more information on how to keep your White Fusion Calathea healthy and happy.
How to Water Calathea White Fusion?
The Calathea Leitzei is a tropical plant, which means that it likes its soil to be moist at all times. However, the soil should drain well to avoid a build-up of water which can lead to root rot. The best way to water your White Fusion Calathea is to use the “soak and dry” method.
To do this, simply water your plant until the soil is completely saturated. Then, allow the top few inches of soil to dry out before watering again. It’s important to not let the soil get too dry, as this can stress the plant and lead to leaf drops.
In general, you should water your Calathea Leitzei about once a week. However, you may need to water more frequently during the summer months or if your home is particularly dry. Be sure to check the soil before watering to make sure that it actually needs water.
The best way to check the soil is to stick your finger about an inch into the potting mix. If the mix feels dry, it’s time to water. If the mix is still moist, wait a few days and check again before watering.
Calathea White Fusion Light Requirements
The Calathea Leitzei likes bright, indirect light. This means that it should be placed in a spot where it will get plenty of light but won’t be in direct sunlight.
If you notice that your plant’s leaves are starting to turn yellow or brown, this is a sign that it’s not getting enough light. Move your plant to a brighter spot and you should see an improvement within a few days.
Conversely, if the leaves of your Calathea Leitzei are starting to get burnt or dried out, this is a sign that it’s getting too much light. Move your plant to a spot with less light and you should see an improvement within a few days.
In general, the Calathea Leitzei does best in an east- or west-facing window. This gives enough light to the variegation to show without causing any damage to the leaves.
Calathea White Fusion Temperature Requirements
The Calathea Leitzei is a tropical plant, which means that it likes warm temperatures. It should be kept in an area where the temperature does not drop below 60 degrees Fahrenheit.
This can be hard to achieve in some homes, especially during the winter months. Make sure it isn’t placed near any open windows or doors, as this can cause the temperature to drop too low for the plant.
Calathea White Fusion Soil Requirements
The Calathea Leitzei likes moist, well-drained soil. The best way to achieve this is to use a potting mix that is specifically designed for tropical plants. You can find these mixes at most garden centers or online.
A mix of perlite, bark, and potting soil is also a good option for the Calathea Leitzei. This is a lightweight mix that will help to ensure good drainage and aeration.
When potting or repotting your Calathea Leitzei, be sure to use a pot that has drainage holes. This will help to ensure that the plant’s roots do not sit in water, which can lead to root rot.
Calathea White Fusion Humidity Requirements
The Calathea Leitzei is a tropical plant, which means that it likes high humidity. If your home is particularly dry, you may need to take some extra steps to increase the humidity around your plant.
One way to do this is to place your pot on a tray of pebbles and water. The water will evaporate and help to increase the humidity in the immediate area.
You can also use a humidifier near your Calathea Leitzei. This is the best way to increase the humidity if you have multiple plants or if your home is very dry from central heating.
How to Fertilize Calathea White Fusion?
The Calathea Leitzei does best with a fertilizer that is high in nitrogen. This helps to promote growth and keep the leaves looking green and healthy.
You can use a liquid fertilizer or slow-release pellets. If using a liquid fertilizer, you should fertilize your plant about once a month during the growing season. If using slow-release pellets, you should fertilize your plant every two to three months.
As with all plants, it’s important not to over-fertilize your Calathea Leitzei. This can lead to a build-up of fertilizer in the soil, which can burn the roots and make the leaves weak.
How to Prune Calathea White Fusion?
The Calathea Leitzei does not need to be pruned very often. You can remove any yellow or brown leaves as they occur. You can also trim back any long, leggy stems.
Other than that, you should only prune your plant when it becomes too large for its pot. When this happens, you can cut the plant back by about one-third. Be sure to use sharp, clean shears to avoid damaging the plant.
Calathea White Fusion Propagation
The Calathea Leitzei can be propagated by division or by stem cuttings.
To propagate by division, you will need to remove the plant from its pot and carefully divide the roots into two or three sections. Each section should have several leaves and some healthy roots.
To propagate by stem cuttings, you will need to take a cutting that is about four inches long. The cutting should have at least two leaves. Place the cutting in a pot of moistened soil and keep it warm and humid.
You should see roots begin to form within two to four weeks. Once the roots are established, you can move the plant to a pot of its own.
Calathea White Fusion Pests and Diseases
The Calathea Leitzei is susceptible to mealybugs, spider mites, and scale insects. These pests eat away at the leaves, causing them to have holes, brown spots, or yellow patches.
If you see any of these pests on your plant, you will need to treat it with an insecticide. You can also try using a mixture of soap and water.
The Calathea Leitzei is also susceptible to root rot and leaf spot diseases. These diseases are caused by too much moisture.
To prevent these diseases, make sure you plant your Calathea Leitzei in well-drained soil and avoid overwatering. If you do notice any signs of disease, you will need to treat the plant with a fungicide.
Neem oil is one of the best fungicides for Calathea White Fusion. It’s a natural product that is safe to use around pets and children. Plus, it can be used to get rid of pests as well.
How to Repot Calathea White Fusion?
The Calathea Leitzei should be repotted every two to three years. Repotting too much should be avoided as it can damage the plant’s roots and upset the delicate balance of the soil.
When repotting, you will need to use a pot that is only one size larger than the current pot. This will help to prevent the roots from becoming too compact and will allow the plant to continue growing.
To repot your plant, gently remove it from its current pot and place it in the new pot. Fill in any empty space with fresh potting mix and water well.
It’s best to repot your Calathea Leitzei in the spring or summer when it is actively growing. This will help the plant to recover quickly and start putting out new growth.
When does the Calathea Leitzei Bloom?
The Calathea Leitzei blooms sporadically throughout the year. However, it typically blooms more in the summer months when the days are longer and the temperatures are warm.
The flowers of the Calathea Leitzei are small and white. They are borne on long, slender stems that rise above the foliage. While the flowers are not particularly showy, their appearance of them is a blessing.
It’s rare for Calathea White Fusion to bloom indoors. So if you see them, you have somehow created the perfect environment for your plant – yay!
Common Calathea White Fusion Problems and Solutions
There are a few common problems that you may encounter when growing a Calathea Leitzei. Let’s answer some of the most frequently asked questions about this plant.
Why are the leaves of my Calathea Leitzei Turning Brown or Yellow?
One of the most common problems with Calathea Leitzei is leaf browning or yellowing. This can be caused by several factors, including too much sun, too little water, or a build-up of fertilizer in the soil.
If you notice that the leaves of your plant are turning brown or yellow, you will need to take a closer look at your care routine. Make sure you are not overwatering or underwatering your plant.
You should also check the amount of fertilizer you are using. Too much fertilizer can lead to leaf burn, so it’s important to follow the directions on the package.
Finally, make sure your plant is not getting too much sun. The leaves of Calathea Leitzei will scorch if they are exposed to direct sunlight for too long. If possible, move your plant to a location with filtered light or dappled shade.
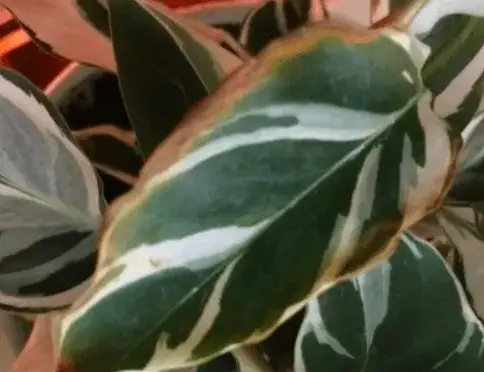
Leaf browning
Why are the leaves of my Calathea Leitzei Curling?
There are a few reasons why the leaves of your Calathea Leitzei may be drooping or curling. One possibility is that the plant is getting too much sun. The leaves will curl up to protect themselves from the harsh sunlight.
If your plant is getting too much sun, you will need to move it to a location with filtered light or dappled shade. Another possibility is that the plant is not getting enough water. The leaves will droop when they are thirsty, so make sure you are watering your plant regularly.
What to do about Calathea White Fusion root rot?
Root rot is a serious problem that can kill your plant. If you notice that the roots of your Calathea Leitzei are rotting, you will need to take action immediately.
First, you will need to remove the plant from its pot and check the roots. If they are black or mushy, they are infected with root rot. You will need to cut away the affected roots and repot the plant in a fresh potting mix.
Once you have repotted your plant, make sure you are not overwatering it. Water only when the top inch of soil is dry to the touch.
Is Calathea White Fusion poisonous?
Calathea White Fusion is considered non-toxic to humans and animals. However, the sap of the plant can cause skin irritation in some people. If you notice any redness or swelling after coming into contact with the plant, wash the area with soap and water.
Related Questions
Let’s answer some related questions about Calathea White Fusion.
Is Calathea White Fusion a good houseplant?
Calathea White Fusion is an excellent houseplant because it is easy to care for and tolerant of low light conditions. It also has beautiful leaves that will add interest to your home décor.
Where can I buy Calathea White Fusion?
Calathea White Fusion is widely available from online retailers and nurseries. You can also find it at some big box stores, such as Home Depot or Lowe’s.
How much does Calathea White Fusion cost?
The cost of Calathea White Fusion varies depending on the size of the plant and where you purchase it. Expect to pay anywhere from $15 to $30 for a medium-sized plant.
Should I mist my Calathea White Fusion?
Calathea White Fusion does not require misting, but you can do it if you want to. Misting will help to increase the humidity around the plant, which is beneficial during the dry winter months.
Use a clean spray bottle filled with distilled water to mist the leaves of your plant. Mist once or twice a week, or as needed to keep the leaves from drying out.
Does Calthea White Fusion purify the air?
Calathea White Fusion is not an air purifier plant. However, it can help to improve the quality of the air in your home by releasing oxygen and absorbing carbon dioxide. Whatever difference it makes will be minimal, so don’t rely on this plant to purify the air in your home.
Can I put Calathea White Fusion outside?
Calathea White Fusion is not tolerant of cold weather and should not be placed outdoors where temperatures fall below 60 degrees Fahrenheit. If you live in a warm climate, you can put your plant outside during the summer months. Just make sure to bring it back inside before the temperature starts to drop.
Conclusion
In conclusion, Calathea Leitzei is a beautiful plant that is relatively easy to care for. With proper care, your plant will thrive and produce stunning foliage. Just be sure to keep an eye out for common problems, such as leaf browning or curling.
As you can see, the care guide is similar to other types of Calathea variety. So if you already have experience with caring for Calathea, then you should have no problem taking care of this plant.
Do you have any questions or tips about Calathea White Fusion care? Share them in the comments below!
In this blog post, we will discuss the definition of a heterogeneous mixture and if soil meets that description. We will take a look at examples of heterogeneous mixtures to see how they compare to the soil. Finally, we’ll conclude with our final answer.
Is Soil a Heterogeneous Mixture?
Yes, soil is a heterogeneous mixture. It is made up of different parts that have different chemical and physical properties. For example, sand, silt, and clay are all different parts of soil that have their own unique properties.
Compared to other heterogeneous mixtures, soil is a relatively simple mixture. However, it still has many complexities that make it difficult to study. The different parts of soil interact with each other. This means that the properties of soil can change if just one part is changed.
Take into account all these factors when you are studying soil and trying to understand it better. Soil is a complex mixture, but it’s also an important one! As gardeners or farmers, we need to know how soil works so that we can help our plants grow and thrive.
What Does Heterogeneous Mean?
Now that we know soil is a heterogeneous mixture, let’s define what that means. Heterogeneous mixtures are combinations of two or more elements where each element has different properties from the others.
This is in direct contrast with a homogeneous mixture, which is a combination of elements where all the properties are the same. For example, pure water is a homogeneous mixture because all the water molecules are the same.
How Does Soil Compare to Other Heterogeneous Mixtures?
Soil is a relatively simple mixture when compared to other heterogeneous mixtures. It usually only has three main parts: sand, silt, and clay. However, these three parts can have many different properties depending on their location in soil and in the environment.
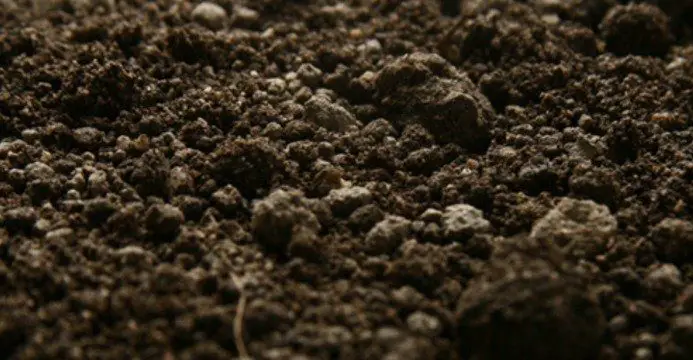
What is Soil?
Soil is the mixture that forms the uppermost layer of earth in all landscapes. It is made up of organic material, minerals, water, and air. It is very important to know how soil works and what it is made of because we interact with different types of soil every day.
Most of you reading this will use soil to grow plants in your garden or potted plants in your home. As you may or may not know, there are different types of soil and each one has its own set of properties.
Most soil contains a mixture of sand, silt, and clay. These three parts can have many different properties depending on their location in soil and in the environment. For example, if you have a lot of clay in your soil, it will be very sticky and hard to work with. However, if you have a lot of sand in your soil, it will be loose and easy to work with.
Soil also contains organic material, minerals, water, and air. The organic material is made up of dead plants and animals. This material breaks down over time and becomes part of the soil. Minerals are inorganic materials that come from rocks or the earth’s crust. They are very important for plant growth.
Why is Soil Not a Homogenous Mixture?
Soil is not a homogenous mixture for two main reasons. The first reason has to do with the different parts of soil interacting with each other. This means that the properties of one part may change depending on what other parts are present in the same location.
The second reason why soil isn’t a homogeneous mixture is due to how it is formed. Since soil is constantly changing, it can’t be classified as a homogeneous mixture because the properties may change over time.
Is Soil a Mixture Or Compound?
Soil is a mixture because it contains ingredients that physically combine with each other, instead of chemically combining. This means that the ingredients in soil can be separated by physical means. For example, if you were to grind up a clump of soil into a powder, you would be able to see all the different parts (sand, silt, and clay).
In contrast, compounds are substances where the atoms are chemically bonded together. This means that the molecules cannot be separated by physical means. For example, water (H20) is a compound because the atoms are chemically bonded together and you cannot physically separate them.
Conclusion
In conclusion, soil is a heterogeneous mixture. It has different parts with different properties, and these parts interact with each other. Soil is complex, but also important as it helps plants grow and thrive.
I hope this blog post has helped you gain a better understanding of soil and the other heterogeneous mixtures out there. Please do not hesitate to leave any comments or questions in my inbox.
Ants are a common household pest. They can be found in kitchens, bathrooms, and outside. Basically, they get everywhere!
If you have an ant problem, you are likely searching for the best way to get rid of them. One solution you might have heard about is using neem oil spray – but how effective is neem oil for killing ants?
This blog post will discuss the effectiveness of neem oil for killing ants and how it works. Let’s get started…
Does Neem Oil Kill Ants?
Yes, neem oil kills ants if you spray it on their trails and nests. It works by disrupting their hormonal system, which eventually leads to death. They become unable to reproduce and eventually all ants in the colony die off.
Neem oil (Amazon link) is a natural product that can be used to get rid of ants without using harsh chemicals. It is safe for people, pets, and the environment. I highly recommend using neem oil if you are having an ant problem.
If you are looking for a natural way to get rid of ants, neem oil is a good option. It is affordable and easy to use. Just be sure to spray it directly on the ants and their nests. The neem oil will be most effective when the ants are targeted directly, rather than when the plant is sprayed randomly.
What Is the Best Method for Killing Ants With Neem Oil?
There is no one best method for using neem oil to kill ants. The most important thing is that you apply it directly to the ant trails and nests. If it can reach their bodies, then most likely they will die from exposure to the pesticide.
The key is to spray the neem oil on all areas that the ants frequent the most. Simply spray the neem oil in the areas where you see the ants and then wait for them to die.
It can take a few days for the neem oil to kill all of the ants, so be patient. You may have to reapply it if there are still some ants alive after a few days. I recommend using it every few days until all of the ants are gone.
How Does Neem Oil Kill Ants?
Neem oil works by disrupting the hormonal system of the ants, which the ants can’t effectively recover from, so die. The neem oil will also kill any eggs that the ants have laid, so it is a good option for getting rid of an ant infestation.
Also, neem oil will kill any aphids on your plant, so it can be used to get rid of ants that have invaded your garden. This is good news as ants love eating the sap that aphids leave your plants. So not only will you directly kill the ants, but the neem oil kills their food source.
Is Neem Oil a Good Option for Killing Ants?
Yes, neem oil is a good option for killing ants because it works well and is safe to use around people and pets. The best part about using this product is that you can get rid of your ant problem without having to spend money on harsh chemicals or dangerous pesticides.
Conclusion
In conclusion, neem oil is a good option for killing ants. It works by disrupting their hormonal system, which eventually leads to death. The neem oil will also kill any eggs that the ants have laid, so it is a good option for getting rid of an ant infestation. I recommend using this product if you are having an ant problem.
Neem oil is also safe to use around people and pets, making it an ideal choice for getting rid of an ant infestation. Be sure to spray the neem oil directly on the ants and their nests to get the best results.
The closer you get to the source of the infestation, the better. It can take some time for the neem oil to work, so be patient. However, you should start seeing fewer ants after a few days of using it every day or several times per week.
I hope this article was helpful. If you have any questions, please feel free to reach out to me. Thanks for reading!
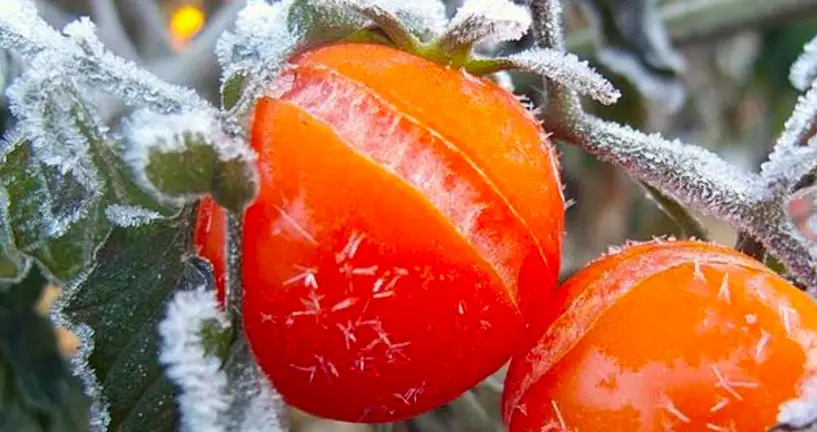
It’s been a tough winter for gardeners in many parts of the country. One question that has been on everyone’s mind is whether or not tomato plants can recover from frost damage.
In this blog post, we will explore the factors that play into whether or not tomato plants can recover from frost damage, and offer some tips on how to help them along if you find yourself in this situation.
Can Tomato Plants Recover from Frost Damage?
Yes, it’s possible for tomato plants to recover from frost damage, but it depends on a number of factors. The severity of the frost damage, the age and health of the plant, and the temperature of the soil all play a role in whether or not a tomato plant will be able to recover.
This means it’s important to act quickly if you think your tomato plants have been damaged by frost. Check for signs of frost damage such as wilted leaves, blackened stems, and brown spots on the fruit.
The best way to deal with tomato plant frost damage is to stop it from ever happening in the first place. We will discuss some tips on how to do this later in the blog post.
For now, let’s focus on what you can do if your tomato plants have already been damaged by the frost…
How to Save Tomato Plants from Frost Damage?
Pruning the damaged leaves, and then moving the plants to a warm location is the best way to save tomato plants from frost damage. If you can’t move the plants, then covering them with a tarp or burlap sack will help to protect them from further damage.
1) Prune
Removing the damaged leaves will help the plant to focus its energy on the healthy parts of the plant. Simply take a pair of sharp scissors and cut away the damaged leaves, being careful not to damage the healthy leaves or stems.
Make sure all equipment is clean and sterilized before use to avoid spreading disease among plants. Rubbing alcohol or a bleach solution can be used to sterilize equipment.
2) Move
Next, you’ll want to move the plants to a warmer location. If possible, bring them indoors or into a greenhouse. If this isn’t possible, then placing them in a sunny spot outdoors will help.
Just make sure that the temperature doesn’t drop below freezing at night, as this can further damage the plants. A south-facing window is a good spot to place them if you’re bringing them indoors.
3) Cover
If you can’t move the plants, then covering them with a tarp or burlap sack will help to protect them from further damage. Make sure the cover is secure so that it doesn’t blow away in the wind.
You can also use blankets, towels, or newspapers to cover the plants. Just make sure that the material you’re using is breathable so that the plant doesn’t suffocate.
While 33 Degrees F is the coldest temperature tomato plants can tolerate, I recommend keeping them above 50 degrees F if possible.
If the temperature drops below 33 degrees F, then the plants will start to experience frost damage. This is why it’s so important to take steps to protect your plants if you know a cold snap is coming.
How to Protect Tomato Plants from Frost?
The best way to protect tomato plants from frost is to take preventive measures. Some things you can do to protect your plants include:
1) Using covers
you can use row covers, tarps, or burlap sacks to protect your plants from the cold. This will help to trap the heat and protect the plants from the frost and cold winds.
Mini Hoop House Kits are perfect for covering a row of tomato seedlings. I use the Tierra Fleece Tunnel for my tomato plants, and it does a great job of protecting them from the cold.
It has steel hoops that support a fleece cover, and it’s easy to set up and take down. Drawstring closures help to trap the heat inside, while the adjustable length makes it easy to cover multiple plants.
2) Garden cloches
This is a plastic dome that is placed over a plant to protect it from the cold. Cloches work well for protecting individual plants, and they can be placed over the plant after it has been transplanted into the garden. Make sure to remove the cloche during the day so that the plant doesn’t get too hot, as this can damage the leaves.
The SYITCUN Plant Coversare great and they come in packs of six. They are made from eco-friendly greenhouse plastic, which is both UV resistant & weather resistant. It’s like having mini-greenhouses in your backyard!
3) Shelterbelt
A shelterbelt is a row of trees or shrubs that are planted in an area to protect it from the wind. This is a great option if you have a large garden, as it will help to protect all of your plants from the cold winds.
There are many different types of trees and shrubs that can be used for a shelterbelt. Some popular options include:
Spruce
Fir
Pine
Juniper
Hemlock
4) Wall O Water
This is a product that consists of plastic tubes that are filled with water. They are placed around the plant, and the water helps to trap the heat and protect the plant from the frost. The Wall O Water is easy to set up, and it’s a great option for protecting individual plants.
The Wall O Water is available in packs of three, six, or twelve. These are the onesI’ve used in the past. They helped insulate plants to -3°C here in the UK.
5) Water before the evening
Watering your plants in the evening helps to protect them from the frost. The water will help to trap the heat, and it will also provide a layer of insulation. Just make sure that you don’t water the plants too late, as this can encourage fungal growth.
I recommend doing it a few hours before sunset. This seems to strike a perfect balance between providing enough water and not encouraging fungal growth.
6) Apply mulch
Use a layer of mulch around the base of your plants to help protect them from the cold. Mulch is any material that is used to cover the soil, and it helps to insulate the ground and prevent heat loss.
Mulch can be made from organic materials like straw, leaves, or bark. I recommend applying roughly six inches of mulch around the base of your plants. This will help to insulate the roots and protect them from the cold.
7) Christmas Lights
This may seem like an odd one, but Christmas lights can actually help to protect your plants from the frost. The lights will emit heat, which will help to keep the plants warm.
Simply wrap the lights around the base of the plant, and make sure that they are turned on before the sun goes down. This will help to keep the plants warm throughout the night.
Now, these lights won’t work miracles, but they can help to raise the temperature around the plants by a few degrees.
Conclusion
In conclusion, it’s possible for tomato plants to recover from frost damage. However, the most important thing is to take steps to prevent the damage from happening in the first place.
There are many different ways that you can protect your plants from frost. I’ve listed some of the most popular methods above. Simply choose the one that’s best for you, and your plants will be safe from harm.
I hope this article was helpful. If you have any questions, please feel free to leave a comment below. I’ll be happy to help. until next time, happy gardening!
Knowing how far apart to space arborvitae plants is a question that many people have, and the answer can vary depending on the size of the tree and your specific landscaping plans.
In this blog post, we will discuss some general guidelines for spacing Emerald Green Arborvitae trees, as well as some tips for those who are looking to create a hedge or screen with these beautiful trees.
How Much Space to Leave Between Emerald Green Arborvitae?
It’s important to give Emerald Green Arborvitae enough space when planting them in your yard. If you plant them too close together, they can become stressed and overcrowded, which can lead to problems like disease and pests.
A good rule of thumb is to plant Emerald Green Arborvitae trees about 36′ ′ apart. This will give them enough room to grow and fill in without becoming overcrowded.
Of course, you may need to adjust this spacing depending on the size of the tree and your specific landscape. If you are unsure, it’s always best to consult with a professional before planting.
Creating a Hedge or Screen with Emerald Green Arborvitae
If you are looking to create a hedge or screen with Emerald Green Arborvitae, you will need to plant them closer together than if you were just planting them as single specimen trees.
A good rule of thumb is to plant Emerald Green Arborvitae trees about 24′′ apart when creating a hedge or screen. This will allow them to grow close together and create the dense, evergreen barrier that you are looking for.
It also depends on how quickly you want to achieve the desired width of your hedge or screen. Planting your trees loser together means less waiting time for them to fill in and achieve the desired width.
Do you really want to wait for 10 years for your privacy hedge to fill-in? If not, 24″ apart is a good rule of thumb for achieving the desired results in just a couple of years.
Again, it’s always best to consult with a professional before planting if you are unsure about the spacing.
How Far Should My Emerald Green Arborvitae Be from the Fence?
When planting Emerald Green Arborvitae trees next to a fence, you will want to leave about 2 feet of space between the tree and the fence. This will give the tree enough room to grow without damaging the fence.
It’s also important to consider the height of the fence when planting Emerald Green Arborvitae next to it. If the fence is too tall, the tree may not get enough sun. If the fence is too short, the tree may grow over it and cause damage.
What Happens if I Plant My Emerald Green Arborvitae Too Close Together?
If you plant your Emerald Green Arborvitae too close together, they will soon hit each other’s root systems and become stressed. This can lead to problems like disease, pests, and poor growth.
To avoid these problems, it’s important to space your Emerald Green Arborvitae trees properly from the start. Once planted, it is almost impossible to move them without causing damage, so it’s best to get it right the first time.
What Happens if I Plant My Emerald Green Arborvitae Too Far Apart?
If you plant your Emerald Green Arborvitae too far apart, they will not form a dense, evergreen screen or hedge. They will also take longer to fill in and may never reach their full potential size.
You may have wanted to create a privacy screen, but now all you’ve done is provided cover for an unwanted spy!
Planting your Emerald Green Arborvitae too far apart is a common mistake that people make. If you are looking to create a screen or hedge, it’s important to plant them close together from the start.
Conclusion
In conclusion, it’s important to know how far apart to plant Emerald Green Arborvitae trees. They should be spaced about 36′′ apart when planted as single specimen trees and 24′′ apart when planted as part of a hedge or screen.
When planting next to a fence, you will want to leave about two feet of space between the tree and the fence. Keep in mind the height of the fence when choosing a location to plant Emerald Green Arborvitae.
Please do drop me a message if you have any further questions!