by Gardener Tim | Nov 23, 2021 | Plant Care
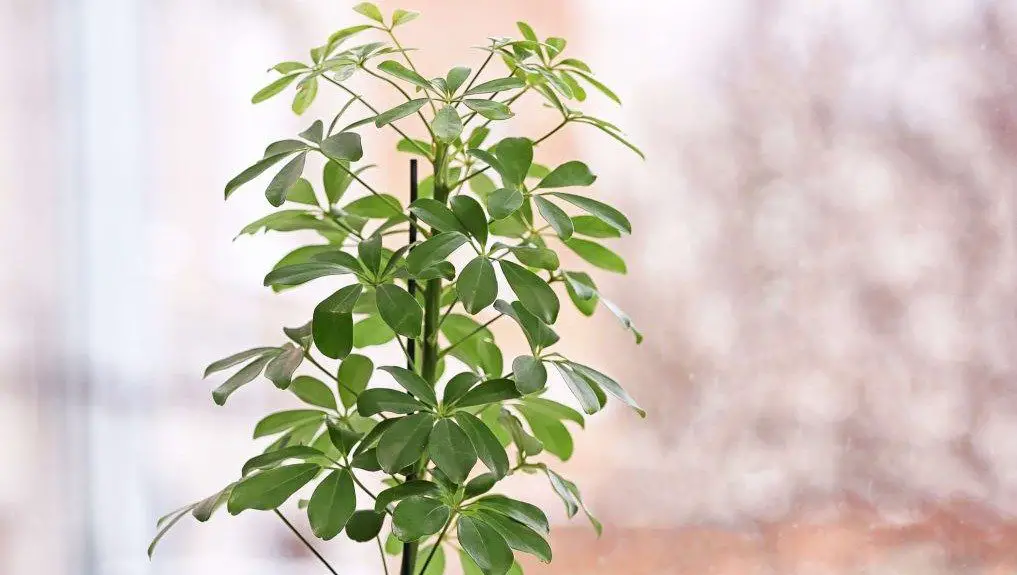
Holes in your umbrella plant are not a good sign. It is important to understand what the cause of these holes could be so that you can address the problem before it becomes worse.
There are many potential reasons for this issue, including pests or diseases that you should keep an eye out for when looking at your plant.
Read on to learn more about why there might be holes in your umbrella plant and how to handle the situation if you see any!
Why Are There Holes in My Umbrella Plant?
The most likely reason that you’re seeing holes in your umbrella plant is because of a pest called liriomyza melanogaster, which tunnels through plants and leaves behind destruction when they’re finished!
You may not even realize that these bugs are on your plant as they are very small and only become active at night. This is when they chew through plants and make their telltale holes.
There is also the chance that your umbrella plant has a fungal disease… This is not the fun kind of disease!
Symptoms include brown or black spots on leaves, lesions along veins, and holes in between those veins. Fungus is a serious issue so you will need to take action as soon as possible if this is what’s causing your umbrella plant to have holes.
How To Save the Umbrella Plant from Pests?
One of my favorite home remedies for leaf miners is to spray your umbrella plant with neem oil. This will kill any larvae and prevent new infestations.
Neem oil (amazon link) is an organic pesticide that is safe for your plant. Follow the instructions on the bottle to ensure you are using it correctly. I use it on the leaves and stems of my plants, but not directly on the flowers or fruit (if you have any).
If your plant has a fungal infection, guess what, the neem oil works for that too! In fact, you can use it for all kinds of pests and diseases including mildews, molds, aphids, whiteflies, spider mites…
When using neem oil at home I recommend mixing a solution containing one tablespoon of the product in one gallon of water. Apply this to your plant by spraying both sides of leaves and stems.
How To Keep An Umbrella Plant Healthy?
Prevention is the best way to handle this issue, so be sure that you keep your umbrella plant healthy in order to prevent pests and diseases from attacking it. Make sure that your plant gets plenty of sunlight during the day, especially if it’s an indoor variety.
Location: Umbrella plants like to be in the warm and humid climates of zones five through nine. You can keep them outside during temperate seasons and bring them inside when cold weather approaches.
Pruning: Keep your umbrella plant pruned to keep it from getting too tall and overwhelming. If you do not like the shape of your umbrella plant, trim off any stems that are sticking out or growing up towards the top
Watering: Umbrella plants like to be watered regularly, so keep the soil moist and don’t let it dry out too much. I like to water mine once a week during the spring and summer months.
Fertilizing: Keep your umbrella plant fertilized as well… But only use fertilizer every few months and at half strength! If you over-fertilize with a high nitrogen content product this can cause root damage, which will lead to more issues.
Conclusion
In conclusion, it is important to pay attention to your umbrella plant if you see holes in the leaves. This could be due to pests or diseases that can cause significant damage and destroy your plants, so it’s best not to leave them untreated!
Be sure that you are maintaining a healthy environment for your plant by providing plenty of sunlight during the day, making sure that it is not too hot or cold where you are, and using neem oil to protect your plant!
by Gardener Tim | Nov 23, 2021 | House Plants, Plant Care
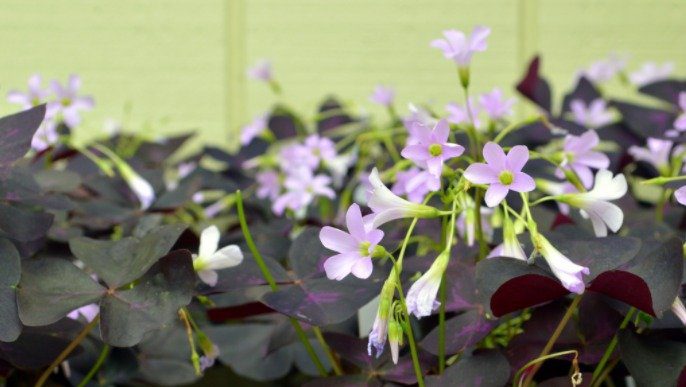
A Shamrock Plant is a popular houseplant. It is low-maintenance and grows well in most homes because it can tolerate dry air, bright light, and less frequent watering.
The leaves on the plant are shaped like shamrocks and often have a bit of red coloring on them. This blog post will help you identify why your shamrock plant might be leggy or not growing to its full potential!
Why is My Shamrock Plant Leggy?
Shamrock plants become leggy because the plant is trying to move closer to the sun. They do this to get as much light as possible. If you have a shamrock houseplant in a darker room or one that doesn’t get any natural light, it will be leggy because of this lack of sun.
As such, you can fix a leggy shamrock plant by providing the plant with more light. Doing this will help the plant grow fuller and have a more lush appearance. It is important to provide your shamrock plant with enough bright indirect sunlight, but not direct sunlight!
I will now go more in-depth into how you can save a leggy shamrock plant…
1) Prune the leggy leaves from the plant
New growth is encouraged when you cut plants that are leggy, so prune off any leggy leaves or stems. This will encourage the plant to produce new growth and get your plant ready for the next step.
Shamrock plants should be pruned during the growing season when they are actively growing and have the most energy. Use sterilized scissors and cut back any parts of the plant that are leggy and do not have growth at their tips.
2) Move the shamrock plant to a brighter location
Moving the plant to a brighter location will encourage it to start growing. Shamrock plants can thrive in bright, direct sunlight and this is what you should provide your plant if possible.
If you are unable to provide your plant with sunlight, you can try using LED grow lights (Amazon link). Just be careful not to leave the leggy shamrock in an area that is too hot and sunny for very long as this can cause sunburns on the leaves.
You should also make sure to rotate the plant every few days so that it is getting adequate light from all directions, as this will encourage even growth. Failure to do this will cause the plant to become lopsided.
I love using grow lights on nearly all of my tropical plants. They seem to grow like crazy and look healthier than the plants that do not get any artificial light.
There are many different kinds of grow lights on the market today, so be sure to find one that is appropriate for your needs.
Leggy Shamrock FAQ
Shamrock plants aren’t a common houseplant, but a lot of people ask me about them. Here are some frequent questions I get about leggy shamrocks…
Should I repot a leggy shamrock plant?
It’s a good idea to repot your shamrock plant if its leaves are yellow or dying. You should also repot your plant if its roots are growing out of the drain holes at the base of its pot. When repotting your shamrock plant, make sure you use a soil mix that drains well and has plenty of organic matter (peat moss is good).
What position should I keep my leggy shamrock plant in?
The ideal location for your plant is one that receives plenty of bright, indirect light. To maintain constant temperature levels between 60 and 75 degrees Fahrenheit, keep it away from heat vents and air conditioners!
Will a leggy shamrock plant recover?
Yes, your shamrock plant will recover if you are able to provide it with more light, prune off any damaged leaves, and replant in a larger pot. This will encourage new growth.
Conclusion
In conclusion, if you have a shamrock plant that’s leggy, then it means the plant is trying to move closer to its source of light. To fix this problem and encourage new growth, give your shamrock plant more light by moving it near a window or invest in an LED grow light!
I hope this article was helpful! If you liked it, then please like and share the article on social media. Let me know if this worked for your Shamrock Plant or what other problems you’ve had with them.
by Gardener Tim | Nov 22, 2021 | House Plants, How To's, Plant Care
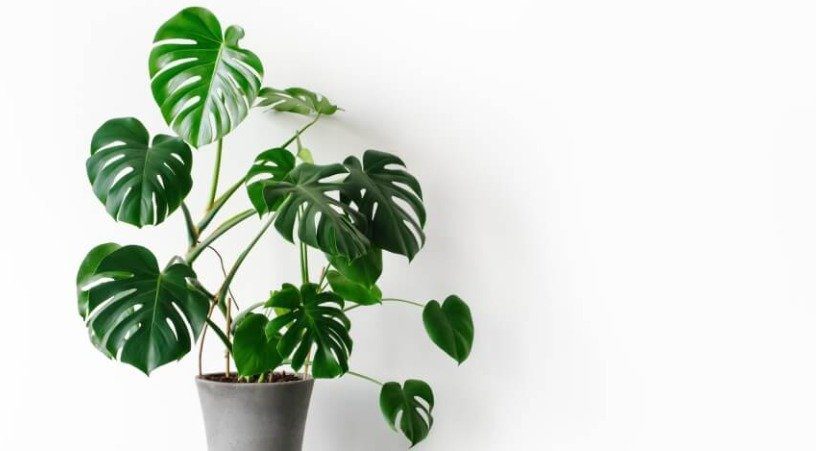
Monstera plants are popular houseplants that come in many different sizes. When it is time for you to repot your monstera, you may be wondering how to split a large monstera plant multiple pants that can be potted into smaller plants.
Well, this blog post will show you the steps that need to be taken to successfully divide an older monstera plant into separate pots. Let’s get started!
How to Split a Large Monstera?
Here is a step by step process to splitting a monstera plant:
1. Prepare your monstera plant
Splitting can be a stressful process for your plant, so ensure it isn’t already stressed out. You can do this by giving your monstera the correct amount of water, light, and humidity in the week before you start.
2. Remove the monstera plant from the pot
The first thing you need to do is remove your monstera from its pot. You will want to use a sharp tool for this process, such as a knife or spade. Be very careful when removing the plant from its current pot! The roots are very delicate and can easily break if you aren’t gentle.
3. Prune any brown roots or stems
Once you get the plant out of its pot, there’s a chance that you’ll see brown roots. These are dead and need to be removed. Use a pair of sterilized monstera scissors to snip the roots off so they aren’t in your new pot.
4. Cut the root ball
Next, it is time to use a sharp tool to divide the root ball into multiple pieces. You may be able to find some natural divisions that won’t require you to break the roots too much. The less damage you cause, the better chance the new plants have at growing.
5. Pop the divisions into new pots
Once you’ve created your new divisions, place each one in its own container that is about three inches wider than the root ball. You’ll want to use rich potting soil when repotting them so they can grow quickly and healthily.
Give the plant plenty of water and inlight so it can get back to growing! With time, your monstera plant will fill the new pot and you’ll have multiple plants to enjoy in your home!
Monstera Division FAQ
It’s not always simple to split a monstera plant. As such, I will now answer some common questions I receive about monstera plants:
When is the best time to split monstera plants?
Monsteras can be split at any time during their growing season. This is typically when they are actively growing. Sometimes it is easier to undo the root ball if you wait until after a heavy rain or watering session, but this isn’t necessary for division.
Can I divide my monstera plant into more than two pots?
Yes! If your Monstera has grown too large and outgrown its current pot, you can divide it into multiple pots. It’s common to end up with at least three plants when splitting a large monstera plant, but sometimes more.
How often should I divide my monstera?
Monsteras are easy to divide and can be done every year or two. Some people prefer not to do this more than once a year so they don’t accidentally hurt the plant with too many divisions.
I personally like to give mine some time in between each division. I tend to only split a monstera if the plant is too large for its pot and is tipping over.
Should I repot or divide my monstera?
Your monstera plant should be repotted if it has root rot or has become too large for the pot. If you would like a few smaller monsteras, then dividing is a good option, especially if your monstera has outgrown its pot and is tipping over.
Is it easy to split a monstera plant?
Yes, it is quite easy to split a monstera plant. It just takes some time and patience to do it right! My top tips are to make sure you use sterilized equipment and be careful when handling roots.
Can I divide my monstera outside?
Yes, you can divide your monstera outside if you want to, but make sure it doesn’t get too hot or cold where you are. This will require you to bring the plant back inside after division.
Where to put my monstera after division?
After you divide your monstera, make sure to place the new divisions in a location that is similar to where they were previously. If you move them somewhere warmer or colder, this may shock your plant and make it go into dormancy for a while.
What are the benefits of dividing a monstera?
Splitting a monstera plant into smaller plants allows you to share your favorite houseplant with friends and family! It also gives you a chance to control the size of your plant and keep it from getting too big for its pot.
Without splitting, you will likely have to use a grow pole to hold the weight of a large monstera plant. In fact, some people give their monstera plant away as it became too big. If only they had read this article!
Conclusion
In conclusion, the process of dividing a monstera plant is easy to do. You just need some time, sterilized tools, and patience when handling roots. Once you divide your monstera plant into smaller plants, make sure to give them adequate room for growth.
I hope this blog post was helpful in showing how to split a large monstera plant multiple pants that can be potted into smaller pots. Please do not hesitate to contact me if you have any questions about how to divide a monstera plant.
by Gardener Tim | Nov 22, 2021 | House Plants, How To's
There are many reasons why you would want to divide a shamrock plant. Perhaps you don’t have enough space in your garden, or maybe you just want more plants so that they will grow faster and produce more flowers. Either way, dividing shamrock plants is an easy process if you follow the correct steps.
How to Divide a Shamrock Plant?
Here is a step by step process to divide shamrock plants:
1. Prepare your shamrock plant
Get your plant ready for the division for watering thoroughly in the lead-up to dividing. This will help to soften the ground around the roots so that the root ball is easier to divide.
It also keeps your plant happy and reduces stress, which is great considering you’re about to chop it into smaller pieces.
2. Remove the shamrock plant from the pot
This might be tough, so you may have to wiggle the root ball back and forth until it breaks free from the roots around the edge. If your soil is very dry or hard-packed, you may need to water the plant several days in advance so that it’s soft enough for you to remove from the pot.
3. Prune any brown roots or stems
If your plant is looking a bit worse for wear, make sure to prune any dead or brown roots before dividing. This will help to prevent your plant from rotting before it’s even been divided.
Root rot is a serious issue with shamrock plants, so it’s important to remove any dead or dying roots before it becomes a bigger problem.
4. Divide the root ball into sections
The root ball is the base of your shamrock plant, and it’s usually a clump or ball of roots. You can divide this into smaller chunks by using a sharp spade to slice through the middle.
This will split your root ball in half, but you may need to do this several times depending on how many plants you are dividing.
5. Pop the divisions into new pots
After you’ve divided your root ball into sections, pop them into new pots with fresh soil. Finish by placing the pots into a shady spot for your new plants to grow.
It’s important that you don’t place them in direct sunlight since they are still recovering from being divided, so it can take several weeks before they recover and start growing again.
Don’t forget to water! Shamrock plants need plenty of water after division or else they will wilt and die. After about six weeks, your plants should be fully recovered and ready to grow again! You can then plant them into the garden or place them in a sunny spot indoors if you want them as houseplants.
Shamrock Plant Division FAQ
Dividing a shamrock plant may seem daunting. As a result, I will now ease your concerns by answering some of the most frequently asked questions regarding this topic.
How often should I divide my shamrock plant?
I only divide shamrock plants when they become too large to handle. This tends to be every two to three years. Doing it too much will weaken the plant, so I recommend waiting until it becomes necessary.
Can I divide my shamrock plant in the fall or winter?
I prefer to do this task during springtime so that new growth will have time to establish roots before winter arrives. However, you can also divide your plants in autumn if it is preferable for you – just be sure to water them well!
How to know when to divide my shamrock plant?
The most common indicator is when the plant begins to crowd itself in its pot. This can be signified by yellowing leaves, weak growth, or an overall lack of flowers. These are all signs that the plant is too crowded and needs to be divided.
When is the best time to divide my shamrock plant?
The best time to divide a shamrock plant is during spring or summer. This will give the divisions time to establish roots and grow before winter comes again. The plant will have the most energy during these seasons, and you will get a great result.
Is it easy to divide a shamrock plant?
Yes, it is very easy to divide a shamrock plant. All you need is some basic gardening tools and the desire to do so, along with the steps mentioned in this article. My top tip is to take your time and use sterilized tools so that you won’t infect your new shamrock plants with any bacteria or fungus.
How big do shamrock plants grow after division?
After dividing a shamrock plant, you should expect it to grow around one foot tall. This is a great height for most gardens and will ensure that the plant won’t become too crowded again in just a few years.
What are the benefits of dividing a shamrock plant?
There are many benefits to dividing a shamrock plant. The biggest benefit is that it will allow your plants to grow faster and produce more flowers for you! This can be great if you have lots of parties or events coming up where lots of people need to see the plant in full bloom.
It also makes the plant easier to manage. If you only have a small garden, then dividing your shamrock plant can help it to remain in a manageable size instead of becoming too large for its surroundings.
Conclusion
In conclusion, the process of dividing a shamrock plant is very simple. All you need to do is follow the steps in this blog post, and your shamrock plant will be divided within a few minutes! The main benefit of doing so is that it will allow for faster growth and more flowers during the springtime.
If it becomes overcrowded again after a short while, then feel free to repeat the process and divide it again! I recommend dividing your shamrock plants every two to three years unless it is necessary sooner.
by Gardener Tim | Nov 22, 2021 | House Plants, How To's, Plant Care
When you have a schefflera plant that is outgrowing its space, you need to know how to divide it up so that both plants can live in the same amount of space. It’s important to take your time and do this correctly so that your new plants will be healthy and look good for years!
How to Divide a Schefflera Plant?
Here is a step by step process to divide schefflera plants:
1. Prepare your schefflera plant
Division can be stressful for your plant. As such, be sure to keep your plant happy by following the basic schefflera care rules. Also ensure that you’re regularly watering so that the root ball is moist, not dry (this will make it easier to break up).
2. Remove the schefflera plant from the pot
This can be done by turning it upside down and gently tapping the edge of your pot to help loosen the roots. It might take a little force, but this shouldn’t damage your plant too much as long as you’re careful.
If you find that there is some resistance when trying to remove your plant from its container, try adding a small amount of water to the soil and leave it overnight. This can make it much easier for your plant to detach itself from its container.
3. Prune any brown roots or stems
Brown, dead roots, and stems should be removed. This will make it easier for your plant to re-establish itself in its new space and grow healthy again. Use sterilized shears or clippers to do this.
4. Separate the root ball
The root ball needs to be separated into two new plants. You can do this by sticking your hand between the roots and gently pulling them apart until you have a clean break.
You can normally find a place on the root ball where it naturally divides, so start there. The goal is to cause the least amount of damage possible.
5. Pop the divisions into new pots
Find a pot that is about the same size as your original container, and then fill it with well-draining soil. Plant your division just like you would any other new houseplant. the last step is to water the schefflera thoroughly to allow for roots to grow.
Schefflera Plant Division FAQ
Dividing a schefflera plant may seem daunting. As a result, I will now ease your concerns by answering some of the most frequently asked questions regarding this topic.
How often should I divide my schefflera plant?
Schefflera plants grow very slowly, so they only need to be divided every two or three years. This is not something you should worry about often!
I only divide my schefflera plant when the plant is growing too large or if I want to gift one to a friend or family member. Doing it too many times causes a lot of stress for the plant, which can lead to discolored leaves and worse.
When is the best time to divide my schefflera plant?
The best time to divide a schefflera plant is when it’s actively growing. This means that the new growths will have plenty of energy and nutrients, which often results in a healthier division with lots of green leaves.
Should I repot or divide my schefflera plant?
It depends on whether you’re happy with the size of your schefflera plant. If it’s getting too big, then divide the plant. However, if the plant is just too big for its current pot, then repot the plant into a larger pot.
Is it easy to divide a schefflera plant?
Yes, it is very easy to divide a schefflera plant. Once you get the hang of it, you’ll be able to do this in just minutes. Follow the step-by-step instructions above to get started today.
What tools do I need for dividing a schefflera plant?
You will need a sharp spade or shovel, pruning shears, and pots with good drainage. Make sure to use containers that are the same size as your schefflera plant divisions so you don’t accidentally repot them into pots that are too small or large. Also, ensure all tools are sterilized so you don’t transfer any diseases to your plant.
Can I divide my schefflera plant outside?
Yes, you can divide a schefflera plant outside. Just make sure to have a few bags of potting soil ready so you can pop the divisions into new pots as soon as possible without stressing them out too much.
It’s also best if you do the division on a day when the weather is good. If it’s too cold, then the divisions will have a hard time recovering.
How big do schefflera plants grow after division?
After dividing a schefflera plant, it should stay about the same size. You can expect some new growths soon after you repot the divisions into their new pots.
However, your plant might need a little bit of time to adjust before any significant growth happens. Give them about three weeks or so before expecting too much from them!
Where to put new schefflera plants after division?
After you divide your schefflera plant, you will have a couple of new plants to repot. Make sure you put them in a space where they can grow without getting too crowded, and keep the soil moist while they recover from their division.
Keep them in the same area they were in before so they can maintain their current temperature. Moving to a new location can stress them out too much and cause them to lose their leaves.
What are the benefits of dividing a schefflera plant?
There are many benefits to dividing a schefflera plant. You can expect your plants to grow more quickly, become healthier, and have fewer problems with pests or diseases in the future when you divide them regularly.
It also makes it easier to manage a large schefflera plant, and the divisions can be used to create multiple new plants. This means you get more of your favorite houseplant for free with every division.
Conclusion
In conclusion, the process of dividing a schefflera plant is very easy and only requires a few tools. The best time to divide your schefflera plant is when it’s actively growing, such as in the spring or summer.
It should be done outside on a warm day with good weather conditions so that you don’t stress out the plant too much while dividing them into new pots. Use pots with good drainage for the divisions so they don’t get root rot, and give them plenty of water while recovering.
You should expect some new growths after about three weeks or so, but it can take up to six months before you see significant results from your division.


