by Gardener Tim | Nov 4, 2021 | House Plants
Pothos plants are some of the most commonly grown indoor houseplants, but they can be tricky to care for. This is especially true when you’re repotting your pothos plant and it starts to wilt shortly after. In this post, we will go over why a pothos may start dying after repotting and how you can save it!
Your pothos is dying because of transplant shock, which occurs when you’re repotting the plant. Basically, it means that the plant is unable to adjust from its old growing conditions to new ones.
Repotting is usually a safe procedure, but there are certain safeguards that you must follow to ensure that your pothos is not harmed.
Gentle – Be gentle when you are repotting your pothos to avoid damaging the roots.
Adjust the soil – Add soil bit by bit so your pothos isn’t shocked by a large change in the soil level. Plus, be careful with the amount of fertilizer.
Use proper tools – Use a sharp knife or scissors and avoid damaging the roots as much as possible. This will give your pothos the best chance of survival during and after transplanting (and it also prevents rot from occurring).
Frequency – You should only repot your pothos when it is absolutely necessary. Pothos typically do not need to be repotted more than once every two years, but sometimes even that isn’t necessary! I wait until the plant is too big for the pot or if I suspect the roots are rotting.
How Can I Save My Pothos from Transplant Shock?
If you detect any symptoms of transplant shock while repotting, there are a few things you may do to preserve your plant’s life:
Don’t repot your pothos again – Sometimes the best thing to do is nothing! As such, you can wait out the shock and repot it when you think your pothos is ready.
Keep the plant out of drafts – The key is to do everything possible to protect your pothos from any unnecessary stress. This means keeping the plant in a warm and draft-free spot during its recovery period.
Give the plant time – It may take up to two weeks before your pothos starts looking healthy again after transplant shock.
Be careful with light levels & location – Too much direct sunlight can cause more stress. If possible, keep your pothos out of the sun while recovering from transplant shock.
Return the plant to its old spot – If your pothos was moved to a new location, you can move it back as soon as possible.
Prune dead foliage – Once your pothos starts looking healthy again, you may want to prune any dead leaves. This will prevent pests from congregating in the plants and it also makes for a neater look!
What is the Best Way to Repot a Pothos?
When it comes to repotting a pothos plant, I have some of the most important suggestions:
Do it at the correct time – The best time to repot a pothos plant is during the spring or summer. It will have the most energy and be ready to grow into its new pot. Repotting stressed pothos during winter is not recommended as it may cause the plant to die.
Find a good pot – Make sure you have a pot that is large enough for your pothos plant, but not too big. The best option is to use the same container as before or go up one size from there.
Choose the best soil – When you repot a pothos plant, be sure to use a potting mix that is high in organic matter and nutrients. I recommend using something like Miracle-Gro Potting Mix for Tropical Plants.
Be gentle with the roots – Be as delicate as possible when repotting so that you don’t damage the roots. This is essential for preventing transplant shock and saving your beautiful houseplant!
Remember to water – Make sure you water your pothos plant soon after repotting. Do not wait too long to do this, as it will be more likely to suffer from transplant shock if its roots are dry for a prolonged period of time.
Conclusion
In conclusion, there are a few things you should keep in mind when it comes to repotting your Pothos houseplant. If done the right way, the process is safe and beneficial for both you and your plant!
I hope you found this blog post helpful. Be sure to use the search bar to find more posts like this one, as Pothos is one of my favorite house plants (although nothing beats a variegated Monstera).
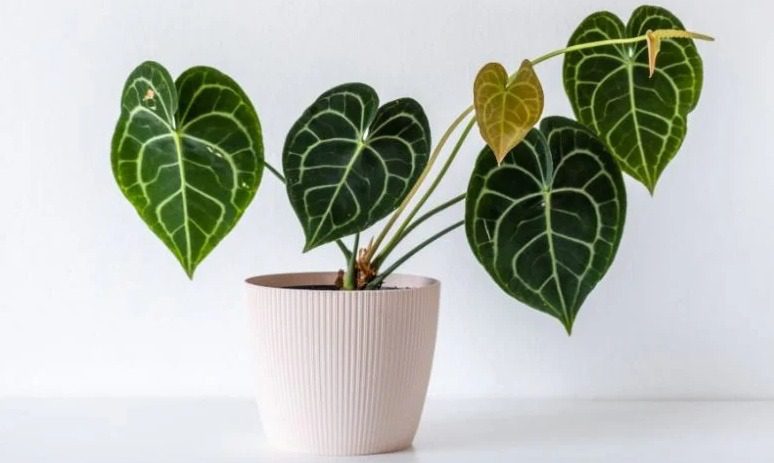
by Gardener Tim | Nov 2, 2021 | Plant Care
This article will explore the reasons why anthuriums, or any plant for that matter, can turn a yellow color. It will also provide the reader with ways to prevent this from happening and how to fix it if it does happen.
Why Is My Anthurium Clarinervium Yellow?
Your anthurium clarinervium leaves are turning yellow because of overwatering, not receiving enough light, fungal disease, or an environment that is causing stress.
Let’s look at the most frequent causes of yellowing leaves on this plant and how to cure them.
1. Overwatering
Your anthurium clarinervium is probably yellow because you are watering it too much. If your plant sits in water, the roots will rot and they cannot absorb nutrients from the soil.
This plant should only be watered when the top section of the soil is dry. You can test the soil by sticking your finger in the dirt and checking if it is moist. You can also use a moisture meter, which is a device that is attached to the soil and will tell you if it needs water.
If you find that this plant needs water, make sure to let all of the excess water drain out before returning it to its pot. In fact, drainage holes are just as important as giving the correct amount of water. The last thing you want is the roots sitting in a pool of water at the bottom of the vase.
It’s important to take action if the roots have become rotten. In fact, not taking action can mean the end of your plant. Start by removing the plant from its pot to inspect the roots. You’ll know the roots are rotten if they are black and have a foul smell.
Prune all rotten roots with a pair of sterilized scissors or secateurs. Sterilize the scissors with some rubbing alcohol before cutting into the roots of your plant to avoid spreading diseases from one plant to another.
Once you have removed all rotten roots, repot the plant into fresh soil that drains well.
2. Fungal Infections
Anthuriums are susceptible to fungal diseases. You can tell if this is the culprit if the yellow leaves have black, brown, or white spots on them.
This is most often caused by high humidity and wet leaves. The spores for these fungi are everywhere, so it’s nearly impossible to stop them from landing on the plant.
The best thing you can do is remove any infected leaves immediately and move your plant out of high humidity conditions.
If there are already spots on this plant, try treating it with neem oil, which is an organic fungicide. Make sure you spray your plant down thoroughly and apply it every ten days for at least a month to make sure the fungi are gone completely before stopping the application of this product.
While fungicides work to fix the problem, the best prevention is to keep your plant in a bright area where air circulates freely.
Make sure you don’t overwater it and let any excess water sit at the bottom of its pot to avoid fungal spores from growing on wet leaves. If this does happen, make sure to remove any leaves that become infected with fungicides.
3. Lack of Sunlight
Your anthurium clarinervium might be yellow because it’s not getting enough sunlight. You need to keep this plant in a bright area where it can get at least six hours of indirect sunlight every day.
If you don’t have the ideal spot for your plant, try moving it closer to a window or outside during the daytime so it can receive more light. You might need to move it back inside at night so it doesn’t get too cold.
You can also use artificial grow lights ( Amazon link) if you find that your plant isn’t getting enough sunlight. Make sure the lights are about three feet away from the leaves and keep them on for a few hours a day if possible to make up for any lack of natural light in the area it’s located in.
4. Environmental Stressors
Your anthurium clarinervium might be yellow because it’s reacting to environmental stressors. You should check if it’s in a drafty area or there are any heaters blowing on it that could be making the leaves turn yellow.
It can also show signs of stress if you move its location or repot it into a pot with different soil from what is used to. In fact, anthuriums don’t like having their roots disturbed too often and will react by turning all of their old leaves yellow.
Yellowing Anthurium Clarinervium Leaves FAQs
I’ll go through some of the most common questions regarding yellowing leaves on anthurium clarinervium, starting with some of the most frequently asked ones.
Should I cut yellow leaves off my anthurium clarinervium?
Yes, pruning yellow leaves is a good idea because this will give the plant more energy to focus on the healthy leaves. It will also make your plant look a lot more visually appealing. Cut above the node to encourage new growth.
Does the type of water I use affect the leaf color?
Yes, I recommend using distilled or filtered tap water since they do not contain fluoride or chlorine that can be harmful to the anthurium clarinervium.
Will too little light cause my anthurium clarinervium to turn yellow?
Yes, if your plant isn’t getting enough light it will not be able to make the chlorophyll needed for photosynthesis and is going to start showing signs of yellowing leaves.
Will too much water cause my anthurium clarinervium to turn yellow?
Yes, if your plant is constantly getting too much water it will be droopy and the leaves might start turning yellow. Make sure you only give your anthurium clarinervium some more water when the top inch of soil is dry.
Will yellow anthurium clarinervium leaves turn green again?
No, it is unlikely that the yellow leaves will turn green again. The good news is that the new foliage will be green and luscious! Just make sure you give it enough light and the right amount of water.
Conclusion
If you’re experiencing yellow leaves on your plant, the culprit may be overwatering, lack of sunlight, or a fungal disease. There are also environmental stressors that can contribute to leaf coloration, including insect bites and rough handling.
The good news is there are plenty of easy solutions for correcting these situations! Following the tips in this guide should stop the other leaves from turning yellow.
For example, if it turns out you were overwatering your plant all along (the most common reason), simply cut back on the watering frequency and remove any rotten roots.
Want more information about how to correct other issues? Please do check out our other posts by using the search bar at the top of the page.
by Gardener Tim | Nov 2, 2021 | Plant Care
When it comes to gardening, most people think of vegetables that are bright and colorful. Sure, they’re nice to look at but have you ever tried black vegetables? They might just be the next big thing in your garden! This blog post will show you 10 different types of black vegetables that can thrive in a variety of environments.
10 Black Vegetables For Your Garden
Black vegetables are unique and definitely a conversation starter. They also have many health benefits and can be used in a variety of dishes, so don’t miss out! Here are the top 10 black vegetables for your garden:
1. Black Beauty Tomatoes
There are black tomatoes called black beauties that have become very popular over the past decade because of their rich color and taste.
Along with their taste, they also have a number of benefits, as black beauties are high in nutrients, such as lycopene and Vitamin E.
2. Black Cherry Tomatoes
These are smaller tomatoes that have a sweet taste and are often used in salads.
They can grow up to one inch wide, so you won’t have to worry about getting lost in your garden!
These tomatoes take longer than most other types of vegetables to ripen but will be worth it when they do.
3. Carrots
Carrots are one of the most common vegetables but did you know that they can be black?
These black nebular carrots are black on the outside but purple on the inside.
Black Nebula carrots are a great way to add some color and nutrients to your diet. They maintain their rich shade of black when cooked, or you can grate or finely slice them into salads for some added variety!
4. Eggplant
Here is a vegetable that is traditionally dark in color. While you could argue eggplants are purple, they look like a shade of black.
Black eggplants can be used in a variety of dishes, including stir-fries and casseroles.
They have been gaining popularity over the past few years because they offer an interesting twist on classic recipes!
Black eggplants can be difficult to grow, so make sure you have the right conditions before planting them in your garden!
5. Corn
Corn is usually bright yellow, but why not try black instead? Black corn is often sold as heirloom black corn and is a great addition to any garden.
Similar to carrots, these are harvested in the fall and can be used for a variety of recipes.
Black corn can be mixed with green, red, and yellow cobs of corn for a unique dish at your next barbecue!
6. Radishes
Black radishes are another one of the most popular black vegetables. They are very spicy and can be eaten raw or cooked in a variety of dishes.
The radishes may be black on the outside, but they are bright white inside, which creates a contrasting color.
Radishes are one of the fastest-growing black vegetables, so you can use them as a quick and easy way to add some uniqueness to your garden.
7. Peppers
Peppers are another popular black vegetable and one that is easy to grow.
Black cayenne peppers can be used in a variety of dishes and have been growing in popularity over the past few years because they pack more of a punch than traditional yellow or red peppers.
Similar to radishes, these can also be harvested quickly in your garden so you can have them in no time!
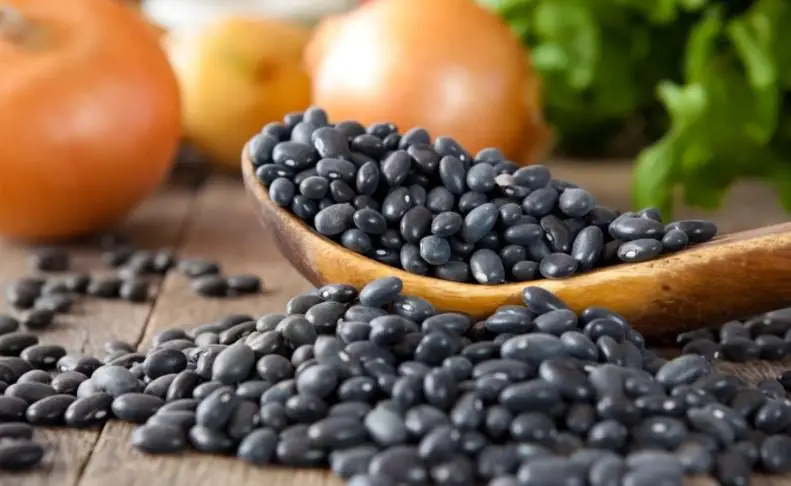
8. Beans
Black beans are another great addition to your garden. These have been around since the 1800s and first appeared in Mexico.
Black beans take on the taste of anything you cook them with so feel free to experiment!
Just like black zucchini, black beans are a great replacement for traditional yellow or green varieties. The two most popular are black soybeans and heirloom black beans.
9. Pumpkin
Pumpkins are another popular choice for fall decorating, but did you know that they come in a variety of different colors?
While most people think about orange pumpkins, there is also black pumpkins. These fruits have been around since the 1800s and can grow up to 50 pounds!
Black pumpkins do not need to be carved for Halloween, but you can use them to make some pumpkin pie if they are not too big.
10. Zucchini
Black zucchinis offer an alternative to traditional yellow and green types. They can be used as a replacement for cucumbers or squash because they have similar flavors and textures!
What Are the Benefits of Black Vegetables?
There are many benefits to growing black vegetables in your garden. First of all, they offer a lot of variety! It can be difficult to get bored when you have so many options to choose from. Black vegetables are also nutrient-dense and high in antioxidants which is great for overall health.
Conclusion
How many of these black vegetables have you grown in your garden? Let us know if there are any we missed so that we can add them to the list. If you’re looking for a challenge, try growing all 10! We hope this article has been helpful and informative.

by Gardener Tim | Nov 2, 2021 | Facts
Cup-shaped flowers are a beautiful addition to any garden. Whether you want them for their aesthetic appeal or need a cup-shaped flower for a bouquet, there’s no denying that these are among the loveliest flowers.
Cup-shaped flowers come in many different colors and shapes too. This article goes over ten of the best cup-shaped flowers.
10 of the Most Beautiful Cup Shaped Flowers
Here is a list of 10 stunning examples that will add beauty to your space…
1. Tulips
Tulips are one of the most popular flowers in existence due to their bright colors and beautiful blooms. These large blooms have a cupped shape with petals fanning out around them.
They look best in large clusters of other tulips but can also be planted alone as well. It’s recommended to plant them in the fall if you want a batch of beautiful tulips in the springtime.
Some of you may remember the tulip bubble mania that occurred in the 1600s. This was an event where tulip prices began to rise exponentially before suddenly crashing down.
2. Canterbury Bells
Canterbury bells are a popular choice due to their height and beautiful blooms. These come in a variety of colors, but the most common is purple.
They can grow up to three feet tall and will return year after year if given proper care. They are perfect for borders or along walkways as they have a cascading look that makes them fall over into the other side.
3. Saucer Magnolia
These are part of the magnolia family and have an open cup-shaped flower with small petals around them. They grow on big trees and have petals that are pale pink to white.
These are ideal for landscapes due to their height and they’re also popular among gardeners who want a tree that blooms at different times throughout the year too.
4. Mexican Prickly Poppy
This is a beautiful choice for gardens and landscape projects. It has large blooms that are bright yellow in color, making them stand out with ease.
They also have prickly leaves which add interest and texture wherever they are planted. They can also grow up to three feet tall, making them perfect for borders and beds alike.
5. Crocus
This is a popular springtime plant that has a cupped shape with small petals around it. They come in a variety of colors and bloom early in the season, so they can be enjoyed for many months to follow too.
These are great when planted alone or paired with other crocus varieties as well, creating an appealing look throughout every area you decide to plant them.
The bulbs are usually purple, but can also be found in a range of other colors, like white, pink, and orange.
6. Winter Aconite
This is a yellow flower that is ideal for the fall season. It has a cup-shaped bloom with small petals around it and blooms when flowers are scarce, making them stand out among other plants by default.
These have become increasingly popular in recent years due to their unique look and they can also return year after year if given proper care too.
7. Pasque Flower
Also known as the Wind Flower, this is a popular choice that has large blooms with small petals around them. They come in a range of colors, but the most common is purple.
So where does “pasque” come from? Well, it stems from “paschal”, which translates to “Easter”. In a way, you could call this the Easter Flower.
They grow well in dry soil and flower during springtime too. This makes them ideal for many different seasons as they will return every year if given proper care.
8. Gentian
Gentians are a stunning choice for a variety of reasons. They have large blooms with short petals surrounding them and come in a range of colors, from blue to white too. The most common color is blue, which is a personal favorite of mine.
It is native to the mountains, where it thrives in moist soil that is rich in limestone. They enjoy the sun to part shade and are easy to plant, making them ideal for beginners too.
9. Morning Glory
These are a stunning choice for any landscape and come in a variety of colors, including blue, red, white, pink, lavender, and purple too. They have a cup-shaped bloom with small petals surrounding them that create an attractive look.
They grow well on trellises as the vines will cling to them easily over time. The flower tends to bloom its biggest in the morning, which is where it gets its name from.
In regards to the months when it blooms, the morning glory flowers from early summer all the way up to the end of fall, making it a great choice for gardeners.
10. Mountain Laurel
The Mountain Laurel is a state flower for Connecticut and Pennsylvania, with hundreds of small petals around its center. These are bright white in color, but can also come in other hues too like pink or purple.
These are ideal along borders because they have an open look that makes them stand out beautifully with ease.
Conclusion
In conclusion, if you’re looking for cup-shaped flowers, these ten examples will be perfect additions to your garden or bouquet!
Be sure to research into each flower before planting too, as there are some that require different climates and others, which may not be ideal for your area.
My personal favorite is the tulip because of how bright and beautiful they are. What’s yours?

by Gardener Tim | Nov 2, 2021 | Facts, How To's
We all know honey is an amazing product. It has many uses outside of its food applications, but one that people may not realize is using it as a rooting hormone for cuttings.
Honey functions as a natural hydroponic solution, which will help your cutting grow faster and stronger. To learn more about how to use honey as a rooting hormone for cuttings, read this blog post!
How to Use Honey as a Rooting Hormone for Cuttings?
- Make the required preparations. The cuttings should be around 5 inches long and cut at an angle
- After you’ve gotten your cutting, dip each one into the honey and then make a hole in the potting mix with your finger
- You may expect roots to form in 7 – 14 days if you keep the potting media damp
If you’re feeling ambitious, try using honey to water propagate your plants. Simply dip the cutting in a jar of sugary goodness and place it straight into some water.
Honey Rooting Hormone Recipes
Some recommend mixing a scoop of honey with a cup of boiled water. However, I prefer to use honey straight from the jar.
Honey contains natural antibacterial and antifungal properties that are destroyed during the process of cooking. This is why using raw honey is the best type of honey for propagating honey.
Regular store-bought honey does not have the same benefits, but you can still use this type of honey as it’s better than nothing.
You may even want to add a sprinkle of cinnamon… It has been used to prevent food spoilage for centuries, and it’s still one of the most popular spices in kitchens around the world.
How Does Honey Work as a Rooting Hormone?
Honey works great as a rooting hormone because it’s got some pretty amazing properties. For one, honey has strong anti-fungal and anti-bacterial qualities that help keep your plants healthy!
Honey protects the cuttings from germs and enables the plant’s natural rooting hormones to encourage root development.
Rooting hormones are necessary for some plants to root well, whereas others can do so without extra assistance. When propagating cuttings, you rarely succeed every single time, but using honey and other ingredients may assist you.
Is Honey Better than Synthetic Rooting Hormones?
A recent study discovered that while honey helps to root plant cuttings, synthetic rooting hormones were slightly more effective. In fact, sometimes honey was just as good!
Many gardeners have found raw honey to give consistent results when it comes to propagating cuttings. Raw honey is also natural and won’t harm your plant. I have had great results with raw honey, and I have heard other gardeners say the same thing.
Conclusion
The use of honey as a rooting hormone for cuttings is not new and it has been used in the nursery industry since the 1980s.
It’s easy to see why, with its benefits including increased success rates, no harmful side effects or chemicals on your plants, and an inexpensive price tag.
So if you’re looking to propagate some more plants this season but don’t want to spend money on buying those expensive hormones from the store, give this technique a try!
I hope this article has helped you learn how to use honey as a rooting hormone for cuttings. If you have any questions or comments about this technique, please do drop me a message.


