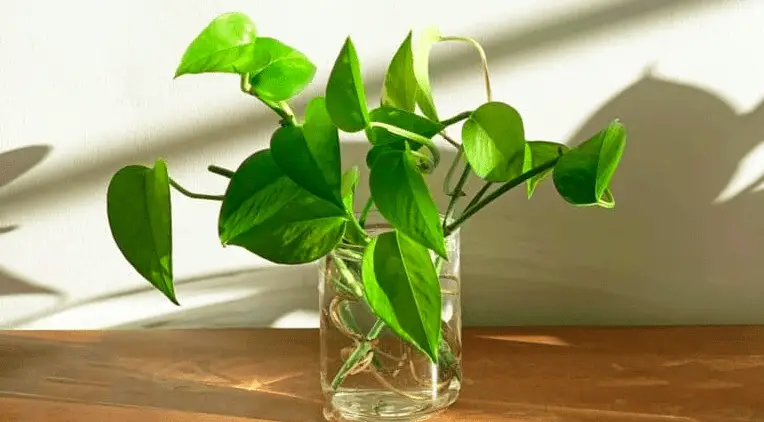
If you’re looking for an easy-to-care-for houseplant, the baby pothos is a great option. In this blog post, we will discuss how to grow and take care of your baby pothos plant. We’ll go over everything from planting to watering to fertilizing. So if you’re ready to add some green to your home, keep reading!
How to Grow and Take Care of Baby Pothos?
Baby pothos plants need special attention to grow and thrive. They are not like other houseplants that can be neglected for long periods of time. Here are some tips on how to take care of your baby pothos plant:
1) Control the light
While adult pothos plants can receive partial sun, baby pothos plants are more sensitive to light. Too much sun can scorch the leaves, so it’s important to place your baby pothos in an area that isn’t too bright or exposed to grow lights.
I keep mine on my bedroom shelf that gets small slivers of sunlight throughout the day. This is enough light for my plant to grow, but not so much that it gets damaged.
If you’re unsure about the lighting in your home, it’s always best to err on the side of caution and give your plant a little less light than more. You can always increase the amount of light your plant receives as it grows larger and becomes acclimated to its new environment.
2) Create a watering schedule
Baby pothos plants need to be watered regularly, but they also don’t like to sit in water. This can lead to root rot, which can kill your plant.
To avoid this, create a watering schedule and stick to it. I like to water my baby pothos plant every 3-4 days with a small amount of water. This seems to be the perfect amount for my plant.
Your watering schedule will depend on a number of factors, including the size of your plant, the type of potting mix you’re using, and the humidity in your home. Start with bi-weekly waterings and adjust as needed.
Be sure to check the soil before each watering. If the top inch or so is dry to the touch, it’s time to water your plant. Once you’ve watered your plant, allow the excess water to drain away. Then empty the drainage tray to avoid overwatering.
3) Soil matters
When it comes to potting mix, you’ll want to use something that is lightweight and well-draining. Dense soil will hold too much water and can lead to root rot.
I like to use a mix of peat moss, perlite, and vermiculite. This mix provides adequate drainage while still holding enough moisture for the roots.
While an adult pothos can recover from root rot, a baby pothos is more vulnerable. So it’s important to use the right potting mix and watering schedule to avoid this problem.
4) Hold back on the fertilizer
Fertilizing pothos plants is a good idea, but only when the root system has had a chance to establish itself. For baby pothos plants, wait until they’ve been growing for at least six weeks before fertilizing.
I like to use an all-purpose fertilizer that I dilute to half strength. This provides the nutrients my plant needs without being too strong. Using too much or too strong of fertilizer can damage the roots and leaves of a baby pothos.
Pothos plants are known for being tough, so it’s important not to overdo it with the fertilizer. A little goes a long way, so start slow and increase the amount you use as your plant grows.
5) Keep an eye on your baby pothos
Pothos plants are relatively low-maintenance, but that doesn’t mean you can set them and forget them. Be sure to check on your plant regularly to make sure it’s healthy and happy.
Look for signs of pests, such as aphids or mealybugs. These pests can suck the nutrients out of your plant, so it’s important to get rid of them as soon as possible. In fact, an infestation of aphids can kill a baby pothos.
This is why I always recommend having some neem oil on hand. Neem oil is a natural pesticide that will kill pests without harming your plant. Simply mix it with water according to the instructions on the bottle and spray it on your plant.
Pests aren’t the only problem you’ll need to watch out for. Yellowing leaves can be a sign of too much or too little water, while brown leaves can indicate a lack of humidity. Be sure to adjust your care accordingly to keep your plant healthy and thriving.
If you notice any problems with your plant, take action immediately. The sooner you catch a problem, the easier it will be to fix.
How Often Should You Water Baby Pothos?
Baby pothos should be watered slightly more frequently when compared to adult pothos. Every 3-4 days is a good general rule, but as with all plants, the best way to know is to check the soil. If the top layer feels dry to the touch, it’s time for a drink!
The best type of water for baby pothos plants is filtered water as it doesn’t contain high levels of chlorine or other chemicals that can harm the plant. If you don’t have access to a filter, simply let the water sit out for 24 hours before using it. This will give the chemicals time to evaporate.
When do you Re-Pot a Baby Pothos?
There’s no need to re-pot a baby pothos until it has outgrown its current pot. This usually takes at least six months to a year.
When you do re-pot your plant, be sure to use a pot that is only one size larger. A pot that is too large will hold too much water and can lead to root rot.
Re-potting too regularly isn’t a good idea as it can disturb the roots and damage the plant. So unless your plant is outgrowing its pot, there’s no need to re-pot more than once a year.
Should I Grow Baby Pothos in Soil or Water?
It’s possible to grow baby pothos in either soil or water, so which is best?
While the initial roots sprout in just a few days when grown in water, the rest of the plant takes a long time to grow. You’ll be waiting months for the pothos to develop leaves, and they may never reach the size it would if grown in soil.
The roots of a plant grown in water are also different than those of a plant grown in soil. They’re thinner and more delicate, which makes them more susceptible to damage.
For these reasons, I recommend growing baby pothos in soil. It’s a slower process, but it’s worth the wait. Plus, you’ll end up with a healthier plant in the long run.
Some people leave their baby pothos in water for the first week, and then transplant it into the soil. This gives the roots a headstart before they have to start growing in soil.
Conclusion
In conclusion, baby pothos is a great plant for beginners. They’re easy to care for and can tolerate a wide range of conditions. Just be sure to use the right potting mix, watering schedule, and fertilizer to avoid problems.
And always keep an eye on your plant for signs of pests or disease. With a little care, your baby pothos will thrive and provide you with years of enjoyment. Thanks for reading! I hope this article was helpful. If you have any questions, feel free to leave a comment below. Happy gardening!
Gardeners are always looking for new ways to make their gardens stand out, either through the use of clever landscaping techniques or by planting rare and exotic plants.
Ponytail palms are a great plant that can fit both categories. In fact, you can control how many trunks this plant has! In this article, I’ll teach you how to grow multiple trunks on a ponytail palm. Let’s get started…
How to Grow Multiple Trunks on a Ponytail Palm?
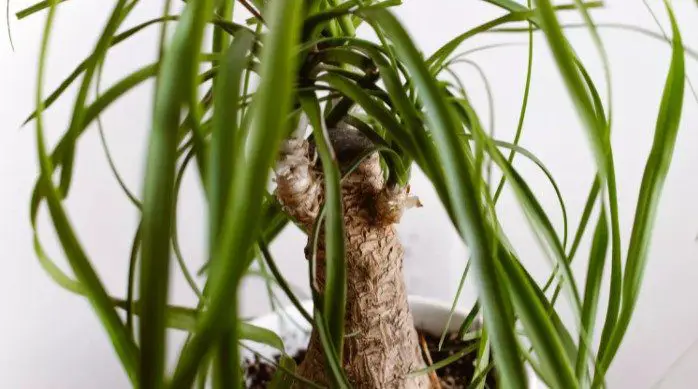
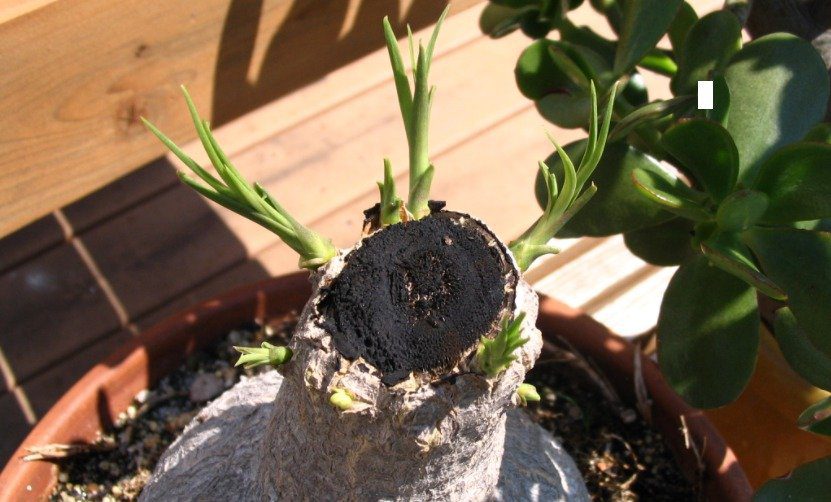
The easiest and most efficient way to grow multiple trunks on a ponytail palm is by cutting the main trunk. Doing this allows the plant to create multiple new trunks.
In fact, people have reported that new trunks have emerged when the main trunk is damaged from pests or an accident. This process can be done multiple times, which means you can really change the appearance of your ponytail palm. However, results do vary depending on a number of factors.
You can choose to make cuts in the side of the trunk or cut the top off completely. Below is an example of what happens when the top of a ponytail palm is cut off. As you can see, eight new trunks are emerging!
I would recommend always using some type of sealant if you are cutting your trunk. This is the best way to stop any infections and bad bacteria from entering the stem and causing rot.
It is also important to consider the location of your palm. If you are planning to grow multiple trunks on a ponytail palm, make sure that it is somewhere where the plant will get enough sunlight to grow.
Will Ponytail Palms Naturally Grow Multiple Trunks?
Yes, when left to grow in their natural environment, ponytail palms can grow multiple trunks. However, this process takes years and years. The palm with multiple trunks is usually very mature.
Also, these plants are grown outside in large areas. It is simply not possible for many of us to grow our palms outdoors because the weather is too cold and these plants will not survive.
As such, it’s best to take things into your own hands by cutting the main trunk to create multiple new trunks. With the cutting technique, it only takes a few months to get multiple trunks on your ponytail palm. In fact, this is one of the quickest ways to change the appearance of a plant in your home or garden.
Conclusion
In conclusion, growing multiple trunks on a ponytail palm is possible. If you want to grow three stems, the best way to do this is by cutting the main stem. This process can be tricky but will give your garden a unique look when complete!
I hope that you found this article helpful. If so, please feel free to take a look around the rest of my site. I have many other great articles and tutorials to help you make the most out of your garden! Thanks for reading.
Many people think that houseplants are only green, but there are actually a number of varieties out there. One such type is the purple-leafed plant. Purple leaf plants come in a wide variety of shapes and sizes.
Some have thick leaves that look like they’re made from felt, while others have thin leaves with unique patterns on them. They also make great gifts for your friends!
In this article, I will carefully go over some of the best houseplants with green leaves that are purple underneath.
4 Houseplants with Green Leaves That Are Purple Underneath
Here are four of the best houseplants with green leaves that are purple underneath:
1.Calathea Medallion
The calathea is well-known for its unique leaves that look like they are covered with colorful, swirling patterns. They are also relatively easy to care for and can even survive in low light.
The calathea medallion has leaves that feature a completely purple color on the underside of all leaves. This shade of purple has been described as being anywhere from light pink to dark wine-colored.
The calathea can grow up to two feet tall and one foot wide when it reaches its full size. It does best in indirect sunlight or fluorescent lighting, so you should keep it in an office or at least away from windows where the sun is shining directly through.
If you’re looking for a plant that commands attention, then the calathea medallion is the plant for you.
2.Tradescantia Zebrina
The tradescantia zebrina is a plant that’s well-known for its unusual leaves, which feature white and dark purple striped patterns. It also features small blue flowers every spring.
The tradescantia can grow up to three feet tall when it reaches full size and should be watered regularly so that the soil stays moist at all times.
It can be grown in a variety of lighting conditions, but it should never directly face the sun. If planted outdoors, then you should place this plant in partial shade to avoid direct sunlight for most of the day.
3.Oyster Plant
Here we have another plant with green leaves on top that are purple underneath. The oyster plant is a popular houseplant because it’s relatively small and easy to care for, but its leaves are quite different than those of the calathea or tradescantia.
The oyster plant has dark green leaves with a mottled pattern on them that is also purple underneath. These leaves actually look like they’re made from wood and tend to be quite thick and sturdy.
The oyster plant does well in indirect sunlight, so you should place it near a window where there isn’t direct access to the sun. It’s also best placed away from heating sources, like fireplaces or vents, since these can dry out its leaves quickly.
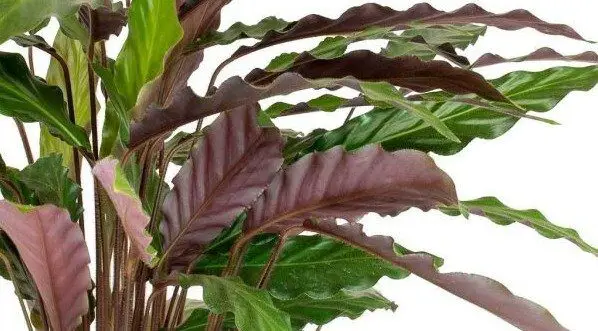
4.Velvet Calathea (Rufibarba)
Our love for the calathea hasn’t stopped yet… the calathea rufibarba is another variety of this plant that’s well-known for its beautiful purple and green leaves.
The calathea rufibarba has leaves that are primarily green, but these have a dark purple underside. The leaves are also more crinkled compared to other plants and calatheas.
The leaf patterns on the calathea rufibarba can vary depending on its age and how much sunlight it gets, so you’ll need to look closely at this plant before making your purchase.
The best way to care for the calathea rufibarba is to give it indirect sunlight and keep the soil moist at all times. If you’re looking for a low-maintenance plant, then this might be one of your best choices.
Conclusion
In conclusion, there are many types of houseplants that have green leaves, but only some will feature purple underneath. There are four plants that I believe to be the best for this category: calathea medallion, tradescantia zebrina, oyster plant, and Calathea Rufibarba.
These plants can add a pop of color to any room, so they are a great idea if you’re looking to spice up your home or office. Personally, I think every home should have at least one calathea because they are so unique and pretty.
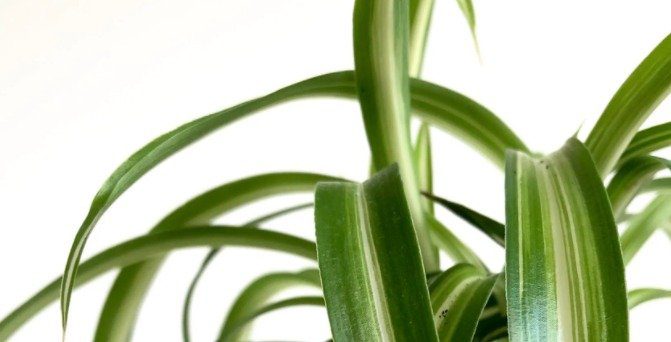
Spider plants are popular houseplants because they grow quickly and can thrive in low-light conditions. They also require very little maintenance, which is great for those people who don’t have much time to care for their plants.
However, there may be times when you need to repot your spider plant and it dies after the repotting process. If this has happened to you, then continue reading as we discuss why this could happen and how you can prevent it from happening again!
Why Is My Spider Plant Dying After Repotting?
Your spider plant is dying because of transplant shock, which is a common problem with many houseplants. The roots of your spider plant were likely damaged during the process, which is preventing it from absorbing enough water and nutrients to survive.
Repotting is usually fine and safe, but there are certain precautions you must observe to guarantee that your spider plant does not suffer any damage.
Gentle – Repotting is a delicate process and you must be gentle to avoid damaging the roots.
Adjust the soil – Your spider plant can be shocked by a sudden soil change, so do it slowly and make sure to use soil that is similar to its original soil.
Frequency – It’s best not to repot your spider plant too often, but it is recommended that they be repotted every year or two. I only repot my plants when I suspect something is wrong, like if the roots are rotten.
How Can I Save My Spider Plant from Transplant Shock?
If you see any indications of transplant shock while repotting, there are a few things you can do to keep your plant alive:
Don’t repot your spider plant again – Sometimes the best thing to do is nothing. This is why I don’t recommend repotting again or changing too many factors. You may just need to wait for your plant to recover on its own.
Keep the plant out of drafts – While your spider plant will likely survive in a draft, it can slow down the recovery process for transplant shock. The same is true with dry heat, which regularly happens during winter when we use heaters.
Be careful with light levels – Too much sunlight or not enough light can also contribute to your spider plant being stressed, so try your best to keep the plant away from direct sunlight for long periods of time.
Return the plant to its old spot – If possible, return your plant to its old spot. The location may have been a factor in the transplant shock and it won’t take long for your spider plant to start improving once you put it back into that same environment.
Prune dead foliage – If you notice some of the leaves have died, prune them off and disinfect your shears with a solution to prevent any bacteria from spreading.
What is the Best Way to Repot a Spider Plant?
When it comes to repotting a spider plant, I have some of the most essential recommendations:
Consider the time of year – Repotting your spider plant in the spring is the best time of year to do it because most plants are actively growing then. This means your plant has energy and can heal more quickly than if repotting happened in the winter.
Use a suitable pot – When repotting, use a pot that is at least two inches wider than your spider plant’s current pot. This will ensure the roots have room to grow and expand without getting too cramped inside of their new home.
Soil matters – Potting soil is great for your spider plant, but make sure to use a form of potting mix that has peat moss and perlite in it. This will keep the soil moist longer and ensure your plant is getting all of the nutrients it needs.
Move slowly and gently – Repotting should always be done carefully, but that’s especially true when you’re transferring a spider plant from one pot to another. The roots are delicate and can break off during this process if you rush or aren’t gentle enough.
Remember to water – After repotting your spider plant, water it once a week for the first month and then adjust to what its needs are after that. Too much water is just as bad as too little water.
Conclusion
In conclusion, transplant shock is a common problem with many houseplants and it can happen when you repot your spider plant. The good news is that there are ways to keep the plant alive while giving it time to recover.
Follow the tips in this guide to avoid transplant shock keep your spider plant safe. I hope you have found this guide helpful and you now know why your spider plant is dying after repotting.
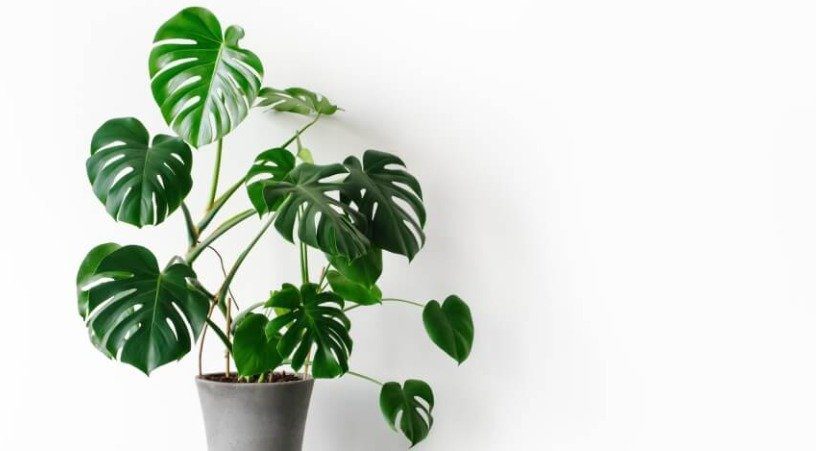
The monstera is a beautiful, leafy plant that can be found in many homes across the world. However, if you are noticing your monstera is changing after repotting it, there could be some serious problems going on with your plant.
This blog post will go into detail about why this might happen, how to prevent it from happening again in the future, and what you can do to save your monstera.
Why Is My Monstera Dying After Repotting?
Your monstera is dying because of transplant shock, which occurs when there is a sudden change in the plant’s environment and it begins to shut down. This shock can be caused by moving your plant around, changing the soil type or pot size, changing temperatures, etc.
While repotting is usually a safe practice, there are some precautions you must take to keep your monstera happy.
Care – First, you should always be gentle with your monstera while moving it. It’s important not to damage any roots, leaves, or stems. This means you should never lift your monstera by any of the leaves and you definitely shouldn’t pull on them.
Soil – Second, you should prepare your monstera for repotting by gradually adjusting the soil. This will reduce the risk of transplant shock. You also need to be careful what soil you use for transplanting because some soils contain added fertilizers
Frequency – Finally, only repot your plant when absolutely necessary. It’s important to remember that repotting requires a lot of energy and resources for your monstera, so try not to do this unless you really need it.
Now that we’ve gone over why the monstera plant might be dying after being repotted, let’s talk about how you can save your monstera.
How Can I Save My Monstera from Transplant Shock?
If you notice any signs of transplant shock while repotting, there are some things that can be done to save your plant’s life:
Don’t repot your monstera again – This will likely cause more stress to your plant. Sometimes the best thing to do is nothing!
Keep the plant out of drafts – Moving air around the leaves will cause them to dry up and die quickly. If there is a drafty windowsill nearby or doors opening nearby, keep the plant away from those areas as much as possible.
Be careful with light levels & location – Make sure to keep it away from any intense sunlight, direct heat sources, powerful monstera grow lights or anything else that might be too much for the plant at this point.
Put the plant in its old spot – If you can move your plant back to its original location, that will minimize any stress and hopefully get it back on the right track.
Prune any dead leaves – If any leaves have died, prune them off with sharp scissors or shears. This will reduce the stress on your plant and allow it to focus its energy on recovering from transplant shock instead of struggling against dead foliage.
What is the Best Way to Repot a Monstera?
I will now give my top tips when it comes to repotting a monstera plant, whether inside or outside:
Timing is important – It’s best to repot in spring or summer after new growth appears but before autumn arrives. However, repot your monstera if root rot is present.
Find a good pot – Make sure your monstera has enough room for its roots to grow and allow airflow around them. A good pot will also be heavy enough to prevent the plant from tipping over.
Choose soil – You should use a soil mix that is well-drained and high in organic material. Use an all-purpose potting soil or make your own by mixing peat moss, perlite, and vermiculite (worm castings), etc.
Carefully remove your monstera – Using a large spoon, carefully dig out your monstera by taking off the top layer of soil. The next step is to gently separate any tangled roots from the old soil.
Remember to water – Water your plant regularly after repotting it! Make sure the soil is slightly moist but not too wet. Moving forward, only water when the top inch of soil is dry to the touch. Too much water can result in monstera sweating, as well as other more serious issues.
Conclusion
Monstera plants are sensitive and can easily suffer from transplant shock if they’re moved, repotted, or when there’s a sudden change of environment. This happens because their roots have been disrupted, which causes them to stop taking up nutrients and water. Their leaves may even fall off!
When this occurs, it will lead to wilting leaves that gradually turn brown or black before falling off altogether. Just be sure to follow the lessons discussed in this article to avoid this problem in the future.
I hope this blog post has answered your questions about monstera plants and why they might be dying after repotting. If you’d like to learn more about the care of this plant, like how to care for a monstera in winter, check out my other posts by using the search bar above.