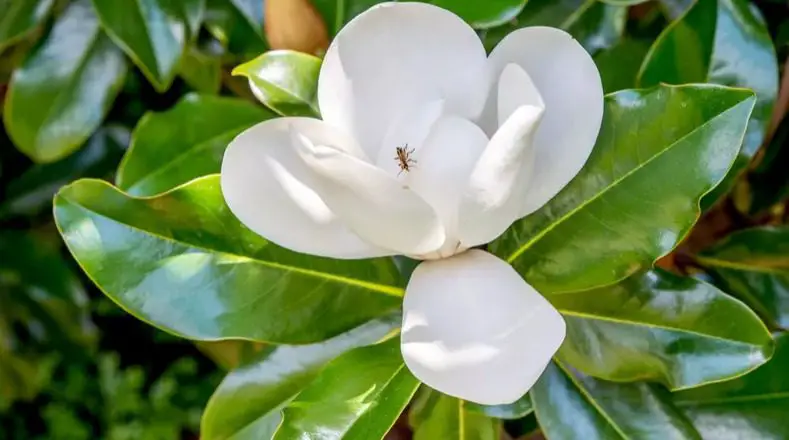
As a gardener, it can be upsetting to see your plants or flowers wilting and turning brown. This is especially the case for Magnolia trees, which are often used as ornamental plants in gardens.
They’re beautiful during their blooming season but if they start to turn brown on their leaves, what’s wrong?
In this guide, I will cover the reasons why magnolia leaves turn brown, as well as what you can do to prevent this from happening.
Why Are My Magnolia Leaves Turning Brown?
Overwatering and leaf burning are the most likely reasons for your magnolia to turn brown. The brown leaves from overwatering are moist, whereas burnt leaves are dry and crispy.There’s also a chance that pests are attacking the plant and causing the leaves to brown from shock.
I will now explain why each of these things happens and how to prevent it. By the end, you will know how to keep your magnolias healthy and green.
1. Browning Magnolia Leaves from Overwatering
The first cause of browning magnolia leaves from overwatering is when the roots of the plant are suffocated. This happens when there’s too much water in the pot and it can’t circulate properly through the soil.
To fix this, make sure the water can easily drain away from the shrug, which can be done by using soil that drains well.
I recommend only watering your magnolia when the soil is dry to the touch. Simply dip your finger in the soil up to your knuckle. If it’s moist, then you don’t need to water it yet.
You could also use a moisture meter, which allows you to see how wet the soil is without getting your hands dirty.
For young magnolia shrugs, it is usually best to add water once per week. Established magnolia trees can be watered less frequently, like every 2-3 weeks.
The biggest danger of overwatering is root rot. Any plant with rotten roots needs to be treated immediately by pruning the affected roots and discarding them. Next, the plant should be repotted into fresh soil that drains well.
2. Browning Magnolia Leaves from Leaf Burn
Leaf burn happens when the magnolia is exposed to too much sun. This causes the leaves to be dry and crispy.
Many plant owners think that the more sun their plants get, the healthier they will be, but this isn’t the case. The magnolia simply can’t handle that much direct sun in one day!
In fact, magnolia is a plant that prefers shade or partial sun. So, in order to prevent leaf burn from happening, make sure the leaves are protected from direct sunlight for more than half of the day.
In addition, you can add some mulch around your tree so it will have an extra layer of protection when it comes to water loss.
Prevent this from happening by planting your magnolia in a partially shady spot that gets at least five hours of sun per day. If you’re already experiencing leaf burn, then try moving the plant further away from any area where it receives direct sunlight.
If the plant is seriously burnt, then you can try to salvage it by pruning the burnt leaves and branches. After doing this, give the plant a good watering and leave it in an area of shade to cover.
3. Brown Leaves from Pests (Aphids, Mealybugs, and Scale)
Although this isn’t the most common for brown leaves, it is worth mentioning because it does happen from time to time.
The most common pests that can cause your magnolia leaves to turn brown are aphids, mealybugs, and scales. These insects suck the sap out of the plant which causes it to become dry and wilted.
I recommend using an insecticide spray for these bugs with a hose attachment that you can find at local garden centers or hardware stores. My favorite type of insecticide is Neem oil, which is a natural oil made from the neem tree.
To use neem oil, simply mix it with water and then pour it into a spray bottle. Be sure to shake the mixture well before each use. Then, just spray the plant leaves until they are coated and the pests should start dying off within a day or two. You may need to reapply every few days to keep the pests away.
Browning Magnolia Leaves FAQs
Magnolias are fascinating plants, but they aren’t the easiest to care for. I will now cover some of the questions I get asked about the leaves on magnolias.
Will brown magnolia leaves turn green again?
No, it is impossible for burnt leaves to turn green again. However, the plant should still survive if you are careful about caring for it. Also, new foliage will be green if you can provide the plant with adequate conditions for growth.
Should I remove brown leaves from my magnolia?
Yes, use sterilized shears to prune all of the burnt leaves. This will encourage new foliage and keep your magnolia looking healthy.
Will too much water cause my magnolia to turn brown?
Yes, it is advisable to only water when the soil is dry. This prevents roots from suffocating and becoming too wet, which leads to root rot and brown leaves on your magnolia.
Will pests on my magnolia cause the leaves to brown?
Yes, pests like aphids, mealybugs, and scales can cause your magnolia leaves to turn brown. Try using insecticide spray if you see these pests on your plant.
Will direct sun cause my magnolia leaves to turn brown?
Yes, it is possible that direct sun will cause your magnolia to dry out and turn brown. You can prevent this by making sure the area receives enough shade to recover from the sun’s rays.
Conclusion
In conclusion, there are several reasons for browning magnolia leaves. You can prevent these by knowing what causes them and following my advice above!
It’s important to remember that magnolias are sensitive plants, but they’re worth the extra care. They will reward you with beautiful flowers in spring and summer!
Thank you for reading my blog post about why are magnolia leaves turning brown. If this helped, please feel free to share it on social media or leave a comment below.
Sooty mold is a type of fungus that can grow in the home. It has the ability to take over surfaces and be extremely difficult to remove. The good news is, there are natural ways to get rid of sooty mold!
What Is a Natural Way to Get Rid of Sooty Mold?
My favorite natural way to get rid of sooty mold is to create a baking soda spray. Mix one tablespoon of baking soda with one tablespoon of dishwasher soap into 2-3L of water.
Next, spray your affected plant (or surface) every week until the sooty mold subsides. You can also use a solution of milk and water, but I’ve found the baking soda spray to be most effective.
How Do You Remove Sooty Mold From Leaves?
Mix 1 tablespoon of dish soap and 1 tablespoon of baking soda into 2-3L of water
Use a sponge to wipe the mixture over all moldy areas
The sooty mold should loosen and become easier to remove
Keep going until all mold is removed and your leaves are clean
How Do You Prevent Sooty Mold?
The best way to prevent sooty mold in the first place is by ensuring the air around your plants is circulating properly.
Make sure windows and doors are closed tightly, turn off fans, and avoid hanging misting bottles near leaves to prevent mold growth.
If you notice sooty mold starting to grow on any of your houseplants or surfaces then use one of these natural ways to get rid of it!
You should also be on the lookout for any pests that might be leaving honeydew on your plant leaves. This provides a sticky surface for the fungal spores to stick on to.
Thrips, aphids, and mealybugs are all common houseplant pests that can cause sooty mold to grow on your plants!
I recommend using neem oil, which is a natural insecticide that targets pests without harming your plants. I use it on my houseplants all the time and it works great!
Will Sooty Mold Kill My Plants?
No! Sooty mold does not kill plants on its own. It is an indicator that something else might be wrong with them, like pests or fungal diseases
The sooty mold itself is harmless to your plant and can typically be removed by using a baking soda spray. However, you should still take the time to treat whatever issue caused sooty mold to start growing on your plants
If you take the time to find and treat any problems that may cause sooty mold, then there is no reason for it to disappear! If you’re having trouble identifying what’s causing issues with your houseplants, consider hiring indoor gardening professionals.
They can come in and make sure your plants are being taken care of!
Is White Oil Good for Sooty Mold?
Yes, using white oil is a natural way to prevent bugs from causing sooty mold.
White oil coats and suffocates pests that are making it impossible for your plant leaves to breathe. It also prevents eggs from hatching on any honeydew left behind by insects, which means no more new pest problems in the future!
It’s safe for both indoor and outdoor plants, but remember that it is a pesticide. Use with caution or hire an expert!
Do Pests Cause Black Sooty Mold?
Yes, pests can bring the black sooty mold to your plant as they leave behind a sticky substance. The airborne mold then sticks to this substance and then spreads further to other leaves.
If you see any sort of sticky substance on your plant then it’s likely that pests are responsible for bringing the black sooty mold over from another source. I suggest using neem oil or a baking soda spray in this case!
Conclusion
In conclusion, sooty mold can be a pretty big problem if it isn’t dealt with, but thankfully there are natural ways to get rid of sooty mold.
If you’re looking for the best way to prevent and remove this fungus then I recommend creating a baking soda spray or using neem oil as your weapon against these pesky spores!
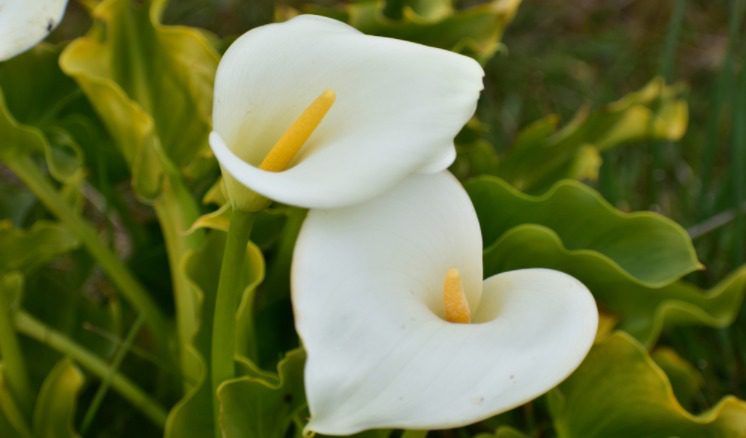
The calla lily is a beautiful summer flower that people often grow in their garden. What many don’t know, however, is how to take care of them properly. One common problem with the calla lily is leaves turning yellow and dropping off.
In this blog post, we’ll go over some of the most common reasons for this problem and how to remedy it.
Why Are My Calla Lily Leaves Turning Yellow?
Your calla lily leaves are turning yellow due to an environmental stressor or too much water, but it may also be caused by not enough light.
Now I’ll dig a little deeper into each of these reasons. By the conclusion, you should have a greater understanding of what to do if your lily begins to turn yellow.
Yellowing from Overwatering
The calla lily is a water-loving plant, but it can drown easily in too much water. If the soil in your garden is always wet and water begins pooling at the base of the plant, it’s too much. The roots can’t breathe properly when they’re soaked all day long.
You should only ever let the top few inches of soil dry out before watering calla lily plants again during the summer months. If you’ve been giving your flowers too much water, the leaves will turn yellow and drop off.
I recommend only watering when the top few inches of soil are dry, which you can test by inserting your finger into the ground. If it feels moist, don’t water yet!
Too much water may even result in rotten roots, which can be fatal for your plant. If the roots are damaged, they can’t absorb water properly and the lily will begin to yellow from lack of nutrients.
Is important to take control of root rot quickly by removing the affected calla lily plant from its pot and washing off the roots. Cutaway any damaged parts with a pair of pruning shears, then repot in fresh soil that drains well.
Yellowing from Too Little Sunlight
A lack of sunlight is another reason why calla lily leaves turn yellow and fall off.
Don’t let your flower pot sit in the shade, as it will deprive the plant of vital sunlight that’s needed to photosynthesize and produce energy for growth. The flowers themselves also need a lot of light in order to blossom brightly.
When moving your calla lily outside for the summer, place it in a spot where it will receive partial sun. This means about six to eight hours of sunlight per day – more than that will be too much and may actually cause damage.
Be sure to rotate or turn your plant regularly as well so all sides get an equal amount of exposure to the sun.
A good sign that a lack of sunlight is the reason for yellowing is if the bottom leaves are more yellow than the top leaves. This shows that the sun wasn’t able to penetrate the top leaves, which was shading the bottom ones.
Yellowing from Environmental Stress
The final reason I’ll cover is environmental stress. This can be caused by things like temperature changes, pests, or disease.
For example, if you’ve recently moved your calla lily to a new location in the garden and its leaves are turning yellow, it could be due to transplant shock – moving plants around too quickly will cause them harm because they’re not used to the change in environment.
The plant will need time to adjust and adapt before it starts growing new leaves again, so try leaving it alone for a few weeks or even months if needed. Meanwhile, make sure you water only when necessary (when the top of the soil is dry).
If you’ve recently sprayed your calla lily with pesticides or other chemicals, this could be the reason why it’s turning yellow.
It takes time for plants to recover from chemical exposure because they absorb everything through their leaves and roots. Make sure you’re only using environmentally friendly substances if needed!
If your calla lily is affected by pests like aphids, snails, or mealybugs, the plant will have a harder time photosynthesizing and producing energy – so you’ll notice yellowing leaves.
In this case, I recommend using insecticidal soap to clean off any pests from the foliage without harming the plant itself. The key here is patience! Just give it time and keep your plants healthy by practicing good plant care.
Yellowing Calla Lily Leaves FAQ
Calla lily plants require unique care to thrive. As such, I will now answer some of the questions I get asked on a frequent basis (about the plant’s leaves).
Should I cut yellow leaves off my calla lily?
Yes, you should always cut off any leaves that start to yellow and die. These will be falling off on their own soon anyways, so we want to remove them before they fall into the soil and potentially become a source of disease for your plant.
Will the yellow leaves on my calla lily spread to other plants?
Only if your calla lily has a fungal disease. Otherwise, no.
Does the type of water I give to my calla lily matter?
Yes, you should always use clean, fresh water that is not too acidic or alkaline. Also avoid tap water as it can carry harmful chemicals that are bad for your plants.
Will too little light cause my calla lily to turn yellow?
Yes, if your calla lily is not receiving enough sunlight it will start to yellow and die. Make sure you place your plant in a spot that receives at least six hours of sun per day for optimal growth.
Will too much water cause my calla lily to turn yellow?
Yes, if your calla lily is receiving too much water it will start to yellow and wilt. Make sure you only water your plant once the soil has completely dried out before watering again (approximately every two weeks).
Will yellow calla lily leaves turn green again?
No, it is very unlikely that the yellow leaves will ever turn green again. If you notice that your calla lily is developing new growth and it looks healthy, then this old yellow foliage should be removed to ensure optimal plant growth.
Conclusion
In conclusion, there are many reasons why a calla lily plant would start to produce yellow leaves.
The most common is lack of sunlight or too much water, but you should always consider the potential for disease as well!
By following my guidelines and using good plant care practices, your calla lilies will thrive throughout the entire year. I hope you found this blog post helpful and informative!
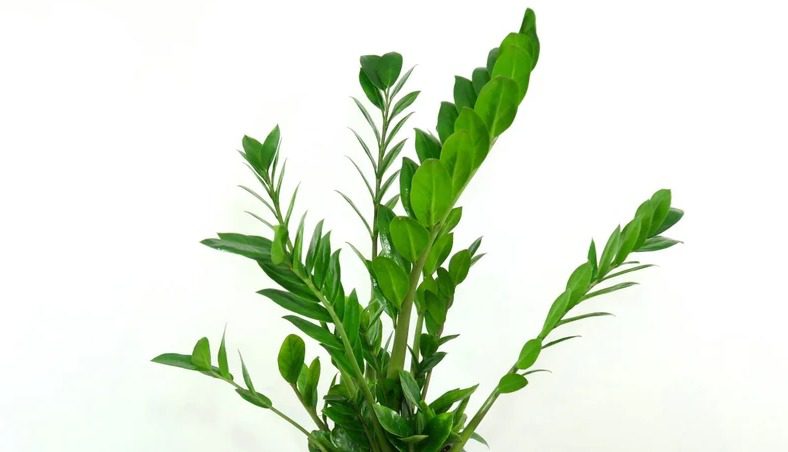
The ZZ plant is a popular choice for those who want an easy-to-care-for houseplant. It can be grown indoors or outdoors, and it’s one of the most tolerant plants in existence.
But what does this plant symbolize? Feng shui and Vastu both have different meanings associated with this particular type of foliage.
What Does the ZZ Plant Symbolize?
The ZZ plant symbolizes good luck in the Vastu Shastra. In Feng shui, it represents harmony and balance with nature.
Whether you follow Vastu Shastra or Feng shui, the ZZ plant is a great choice for those who want to bring luck and harmony into their living space.
In fact, this is why you see the ZZ plant in so many offices and homes around the world. The owners believe that the presence of the pant will bring them good luck and increase productivity.
When it comes to what the pant represents, there are four main characteristics that we can admire. These are:
Steadiness
The ZZ plant is a great example of how you should live your life. It grows repetitively and with consistency. This tells me that if I want to win at life, then it’s best for me not to give up or change my mind about something after one try!
Encouragement
The ZZ plant takes a long time to grow, but it gets there eventually end. The same can be said for us, as we grow and develop over time, we too can get to where we desire.
Dedication
The plant’s perseverance is an example of how we should never give up in life. The hardworking and dedicated nature of this little sprig makes people believe that anyone with enough resolve to achieve their goals.
Growth
Although slow, the ZZ plant grows strongly and steadily. We can learn from this to be powerful and strong in moments that test us. The snake plant shows its strength by growing to a tall height with no special care needed.
Is the ZZ Plant Lucky?
In Feng shui, this plant is believed to be a sign of good luck, not bad luck. In fact, it’s one of the few plants that can bring prosperity and drive forward opportunities for success!
This is why people grow these plants in their homes or offices, as they believe it will bring them good luck and make the space more successful.
Where Should the ZZ Plant Be Placed for Good Luck?
Believers of Feng shui say that the ZZ plant should be placed in the east and southeast areas of your home or office. This is where you want to place it for new opportunities, goals, growth, relationships, knowledge, wisdom, and health!
The eastern area represents character development while the southeastern corner symbolizes good fortune related to wealth. By placing this plant here, it will open up new opportunities for you to succeed.
Why Is the ZZ Plant Called Fortune Tree?
The ZZ plant is called the fortune tree because it symbolizes good luck and fortune. As such, it makes the perfect gift for those who are about to begin a new job or embark on an important project.
It is also commonly given as a housewarming present because it represents happiness, good luck, and overall well-being! If you have someone in your life who needs these things, then this plant will be the best option for them.
ZZ Plant Direction for Vastu
If you follow Vastu Shastra, then the ZZ plant should be placed in the north-eastern direction. This will promote wealth, success, and abundance for those who live in the home.
In fact, this is why you see these plants commonly placed next to cash registers of clothing stores or cafes! They know that their sales will increase thanks to having a ZZ plant there as people believe it brings them good luck and increased business.
Other Benefits to Owning a ZZ Plant
Aside from the symbolism, there are a couple of other benefits to owning one.
One is that they require little care and don’t need much light at all! This makes them perfect for those who have very busy schedules or live in small homes without many windows. If you want something easy to take care of but brings good luck into your life, then a ZZ plant is the right choice for you.
The other benefit of owning one is that they purify your air! They filter out toxins, remove odors from smoke and make it easier to breathe in homes with little ventilation or those who live near busy roads.
Plants reduce stress and can also be great for your health, which is why people who own ZZ plants often feel healthier and more relaxed than they did before.
Conclusion
In conclusion, the ZZ plant is a great addition to homes and offices because of its symbolism. When you grow this, it shows others that you are strong-willed, hardworking, dedicated, diligent in your character development/spiritual growth.
Whether you believe in the symbolizing or not, there’s no denying that this is a beautiful plant that can really bring life to your home or office!
I hope this article was helpful in clearing up any misunderstandings you may have about the ZZ plant. Please do check out my other articles on this plant, like what to do if they turn yellow or brown. If there’s anything else that I can answer for you, feel free to inbox me.
Crape myrtles are becoming a popular tree for homeowners because of their beautiful colors and low maintenance. But what happens when the leaves turn black? This blog post will answer that question, as well as how to prevent it from happening in the future.
Why Is My Crape Myrtle Turning Black?
Your crape myrtle is turning black because of sooty mold, which is an airborne fungal disease that sticks to the honeydew left on your leaves by insects.
Sooty mold can be treated with an insecticide that specifically targets leaf-eating insects like aphids, whiteflies, and scales.
There’s also a variety of organic remedies for this problem including horticultural oils (such as neem oil), insecticidal soaps, and baking soda. Keep reading to learn more.
It’s not harmful to you or your crape myrtle, but the affected leaves will eventually fall off and it could ruin the appearance of your tree.
How to Remove Sooty Mold From My Crape Myrtle?
If you already have sooty mold on your tree, spray it with a baking soda solution to remove the mold on the leaves. With a bit of effort, you can keep your myrtle in good health and make it look beautiful.
This baking soda spray is a natural fungicide that will not harm your crape myrtle, but it can be harmful to fish and aquatic life, so be careful if you have a pond nearby.
I start by mixing one tablespoon of baking soda with dish soap and one gallon of water.
Put the solution into your garden sprayer and use clean gloves to do the initial spraying on the crape myrtle leaves that are affected by sooty mold to remove as much black fungus as possible.
Next, use a cloth to remove the mold from the leaves. Make sure to remove all fungus spores to prevent re-growth.
You can repeat the process once every two weeks to prevent sooty mold from forming again. Using neem oil as a finishing touch may be a good idea if you are worried about the re-growth of the mold.
How to Prevent Sooty Mold From Forming on My Crape Myrtle?
To prevent sooty mold from spreading on your crape myrtle, keep the leaves dry and remove all insects. The good news is that the sooty mold is easier to prevent than it is to control.
This is why I recommend stopping it from happening in the first place! The most important thing to do is not to create an environment where fungus can thrive.
Fungus thrives on moisture, so make sure your plant doesn’t have wet leaves or be left standing in water. I recommend allowing air to flow through the branches and pruning any leaves that might be blocking a breeze. Watering can even cause yellow crape myrtle leaves too!
It’s also important to stop insect infections as early as you can. This means regularly inspecting the leaves to remove any aphids, scale insects, or mealybugs.
With a bit of effort and persistence, you can easily prevent sooty mold from developing on your crape myrtle tree!
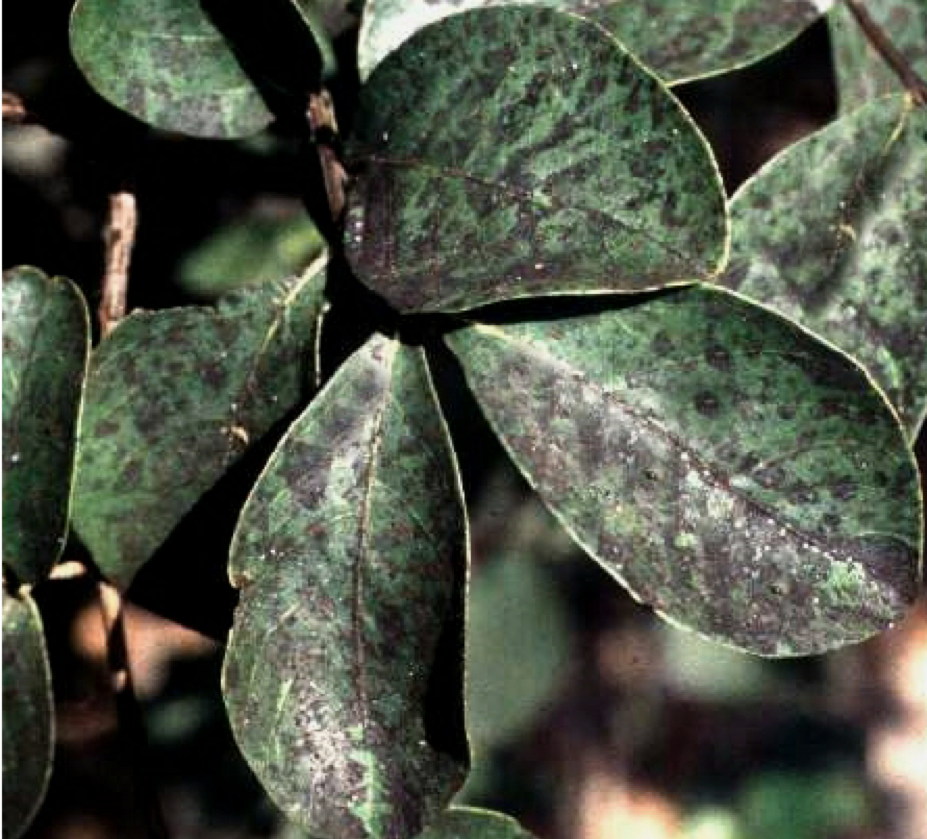
What Is Black Sooty Mold?
Black sooty mold is a fungus that sticks to the honeydew left on leaves by insects.
It’s not harmful, but it could ruin the appearance of your crape myrtle and make it look unkempt. In fact, sooty mold is more of an annoyance than a danger.
Crape myrtles can get sooty mold from being in moist, humid conditions with little airflow. It’s most common during the summer and fall months when there are lots of insects around to leave honeydew on your leaves.
What Does a Crape Myrtle with Sooty Mold Look Like?
A crape myrtle with sooty mold will have black fungal dots on the leaves and bark. It will look like dark soot has been deposited on the leaves, stems, and flowers.
The mold may be thick enough to cover some of your crape myrtle’s leaves entirely with black spots.
It looks unappealing and definitely ruins the appearance of your tree. This is why it’s so important to take steps to prevent it from happening in the first place!
Conclusion
In conclusion, crape myrtles can get sooty mold from being in moist, humid conditions with little airflow.
It’s most common during the summer and fall months when there are lots of insects around to leave honeydew on your leaves. If that happens, take a look at this blog post for steps you can take to remove it!
Also, be sure to check for insects and inspect the crape myrtle leaves regularly. This will help you prevent sooty mold from forming in the first place!
I hope this blog post was helpful and you now know how to deal with a black crape myrtle.