by Gardener Tim | Oct 27, 2021 | Outdoor And Patio Plants, Plant Care
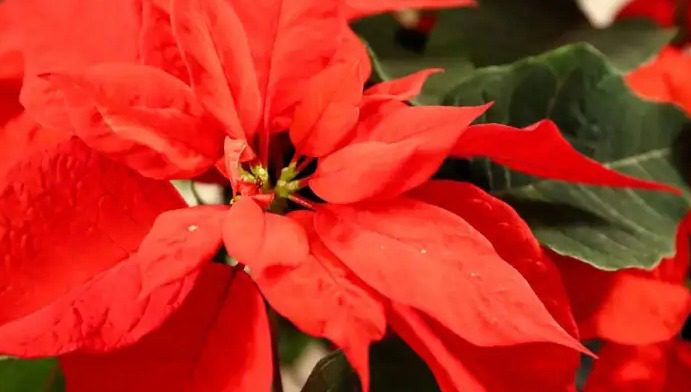
Many people enjoy the beautiful Poinsettia flowers during the holiday season. But can you leave them out in cold winter weather? The answer is not an easy one to find, but we’ve done some research and found some helpful information on the topic! Let’s take a look at what we learned…
Can Poinsettias Be Left Out in The Cold?
Poinsettias are tropical plants, so they cannot be left outdoors when temperatures drop below 50 degrees Fahrenheit. If you put your poinsettias outside and they freeze, then it could kill them.
They should remain inside until the weather warms up again. When you bring them back in, be sure to place your poinsettias where they will receive some sunlight and water when necessary.
Please note: if your plants do freeze due to cold temperatures, then it does not mean that you need to throw them out or kill them. It is possible to revive them, so do not give up hope!
Just remember that they will have a lot of damage, and it may take some time for your poinsettias to recover from the cold weather.
How Do You Keep a Poinsettia From Getting Too Cold?
You can help prevent your poinsettia from getting too cold by keeping it in a warm and draft-free area. Be sure to place the plant away from windows as these can be colder than other surfaces.
You can also help to keep your poinsettia warm by placing a blanket around the plant. Another great idea is to place it next to an indoor fireplace or heat vent, as these will help provide warmth for your plant during the winter months.
However, don’t place the plant too close to these heat sources, as this can dry out the plant. You may need to water your poinsettia more often if you put it near a heat source, so keep that in mind when placing it!
Can I Put My Poinsettia Outside for a Short Period of Time?
Yes, you can place your poinsettia outside for a short period of time. If you have snow, then this will create a beautiful Christmas picture! However, putting a poinsettia outside, even for a short period of time, can stress the plant.
Stress is bad as it can lead to your poinsettias losing their leaves. This is not the end of your plant, but it does mean that you will need to take better care of it for a while until any damage is fixed.
You can place your poinsettias outside in a protected area such as on an enclosed porch or under a covered patio. This way they still get some protection from the cold and windy weather.
If you do put your poinsettias outside for a short period of time, then make sure to bring them in when it starts to snow or rain. If the temperature is below 50 degrees Fahrenheit (or if there’s ice), then don’t place your plant outdoors at all!
Conclusion
In conclusion, if you want your poinsettias to survive the winter, then they should either stay indoors or be brought inside when temperatures drop below 50 degrees Fahrenheit until spring.
I hope this information has been helpful, and I wish you happy holidays with your poinsettias!

by Gardener Tim | Oct 27, 2021 | Plant Care
Poinsettias are beautiful but can be quite demanding. They require a lot of attention and care to make sure they stay healthy and happy all year long. But do you know how often should you water your poinsettia?
The answer is important because it will help keep the plant alive and well. By the end of this guide, you’ll know how often to water poinsettias. Let’s get started…
How Often Do You Water Poinsettias?
Generally, it’s best to water a poinsettia every day with a small amount of water. This will keep the soil damp, but it will also prevent the plant from being too wet or sitting in water.
You don’t want the soil to dry out, so water when you notice the top few inches of soil drying out. The exact amount of water you use depends on many factors, so it’s best to check the soil every day.
For example, if it’s very hot and the plant is sitting in direct sunlight, it will need more water and you should check and water every day. On the other hand, if the poinsettia is not in direct sunlight and it’s not very hot, you can wait to water every other day.
Can I Give Tap Water to My Poinsettia?
Only give your poinsettia water if it has no chlorine or fluoride. If the tap water contains chemicals, let the water sit overnight so these chemicals can evaporate before giving them to your plant. These chemicals can cause stress, which may result in yellow leaves.
Can I Use Bottled Water on My Poinsettia?
Bottle water is not good for your poinsettia because it’s expensive and has fewer nutrients than other types of water.
The best option is to use filtered or purified water that you get from the tap, but only if there are no chemicals in it (see above). If using bottled water, make sure it does not contain chlorine, fluoride, or any other chemicals.
Can I Use Cold Water on My Poinsettia?
No, using cold water can shock the roots and damage them. Always use room temperature water when watering your poinsettia, soil or pot included. Poinsettia plants hate the cold.
How Much Water Should I Use on Poinsettia?
Water your poinsettia with a small amount until the soil becomes saturated. It’s best to use a little bit of water on a frequent basis, rather than loads of water all at once!
I generally use a cup of water of my poinsettia every morning (when I drink my morning coffee). This keeps the soil moist but not wet, and it means I don’t have to worry about forgetting to water my plant!
What Happens if I Overwater My Poinsettia?
Overwatering a poinsettia is very bad for it. This can cause root rot and other problems that will eventually kill the plant over time.
Water your poinsettia until the soil becomes saturated, but make sure there’s no standing water in the pot or tray! If you notice any puddles of water after watering, wait a few minutes and then pour them out.
Root rot is a serious issue, so it’s best to avoid overwatering your poinsettia as much as possible. If root rot has already taken hold, then you should inspect the roots and prune any that are black and mushy.
Overwatering can also lead to fungal growth, which can cause the leaves to turn brown and fall off. This is common if you’re watering your poinsettia too much, especially in humid conditions where fungi can grow quickly.
What Happens if I Underwater My Poinsettia?
Underwatering a poinsettia is also bad for it, but not as serious as overwatering. If you don’t water your plant enough, the leaves will start drooping and changing color.
The bottom leaves may even fall off if you forget to water them! This can be very difficult because they are so bright and festive.
If this happens, don’t panic! There are some things you can do to save your plant. Try adding more water and see if the leaves perk up. If they don’t, try misting it with a spray bottle or giving it an extra drink of water in another way.
Conclusion
In conclusion, it is important to know how often you should water your poinsettia. Use the specific guidelines mentioned in this guide and then check the soil every day to make sure it’s not too dry or wet. If there are any questions, feel free to contact me for further help!
by Gardener Tim | Oct 27, 2021 | Plant Care
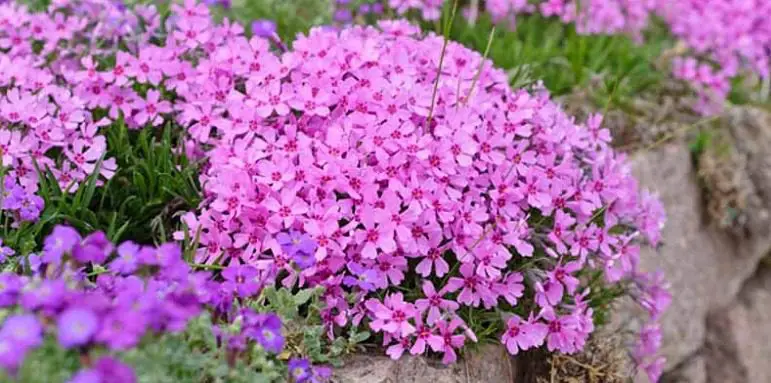
Creeping phlox is a plant that loves to creep and spread, hence the name. It can be difficult to control but also provide a nice groundcover that will help prevent other weeds from popping up.
It does well when planted between other plants such as roses, hostas, daylilies, and many others. But when do you plant creeping phlox? Let’s find out…
When To Plant Creeping Phlox?
The best time to plant a creeping phlox is in the spring or fall. However, it’s important to plant a creeping phlox as soon as possible when you receive it.
Planting Creeping Phlox in Spring: If your plant is delivered in the spring, keep it moist in the container until your ground is ready for planting. Hold off on spring planting until the soil is free from melted snow and ice and the soil is warm and ready to work.
Planting Creeping Phlox in Fall: If you get your plant in the fall, hold it for a few days until it’s ready to transplant. You must, however, be cautious not to allow the roots to dry out. Plant a few weeks before your first frost arrives to ensure that they don’t die back.
If you live in an area where winters are harsh then be sure to mulch around your creeping phlox or even protect it with some pine branches during cold snaps (if they’re not too heavy) to ensure survival.
If you’re planting in the spring then that’s easy enough – just remember to water it well afterward! If you’ve planted creeping phlox later in summer or fall, this is where we get a bit tricky…
What Conditions Does Creeping Phlox Need for Planting?
Soil – The phlox is fine with most soils, but it does need to allow excess water to drain away so it’s not sitting in puddles. Soggy soil is dangerous as it can lead to root rot, which kills plants. You can improve soil drainage by adding some organic matter – maybe a bit of peat moss or shredded leaves.
Sun – Creeping phlox flowers best in full sun, but can tolerate partial shade. It does need at least six hours of sunlight per day to grow and bloom well, so don’t plant it too far into shaded areas or you’ll miss out on the blooms!
Spacing – Creeping phlox is a spreading plant that can be planted in clumps of three or more. It’s nice to have them next to each other, but you should leave about 2 feet between the plants. This will allow them to spread and flower better in your garden.
Caring for You Creeping Phlox Through the Seasons
Once the temperature reaches 50 degrees Fahrenheit or higher, garden phlox starts to emerge from its dormancy. The first sign of life is small green leaves that appear on short stems.
With proper care, your phlox plant will flourish and grow tall. Eventually, the stalk of each flower bud will start to shoot skyward from its base or root zone – it’s a good indication that you’re doing something right!
The sunshine seems to encourage the creeping phlox, as it blooms in a colorful display. The warmth of this season will make your yard more beautiful with these vibrant flowers.
Water your phlox regularly to help them flourish. Once they become established, don’t give them too much water as this can cause rot and damage stem in the garden – just enough so that all roots are wet but not drenched (1 inch of soil).
Phlox are drought-tolerant plants, which means you can enjoy them even with less rainfall than other types of flowers. They struggle in wet soil that causes both root rot and fungi infections if left unchecked.
What Else Should I Know?
You can fertilize your phlox flower in early spring, just before it blooms. The plant doesn’t need much help to grow and bloom beautifully each year!
Phlox are deer-resistant plants; however, rabbits can be a problem for them if there aren’t any other options available. Rabbits like to munch on the leaves of creeping phlox, so be sure to protect them with netting or fencing if necessary.
If you have pets that are known for digging holes in the garden then it’s best to place the plant on a low-lying ledge where they can’t reach it because their teeth will damage the roots!
Conclusion
In conclusion, when to plant creeping phlox is up to you and your climate.
Spring or fall planting will be fine as long as the conditions are right, but we recommend spring if possible because it’s easier for them to take root in moist soil than it is dry dirt.
Keep this information in mind when next you want to buy a creeping phlox plant and want to know when to plant it for the best results.
I hope this article was helpful and you have a better understanding of how to plant creeping phlox! If you need more information on when to plant it, what conditions they require, or anything else – please do reach out to me. I’m happy to help if I can.
by Gardener Tim | Oct 27, 2021 | How To's, Plant Care
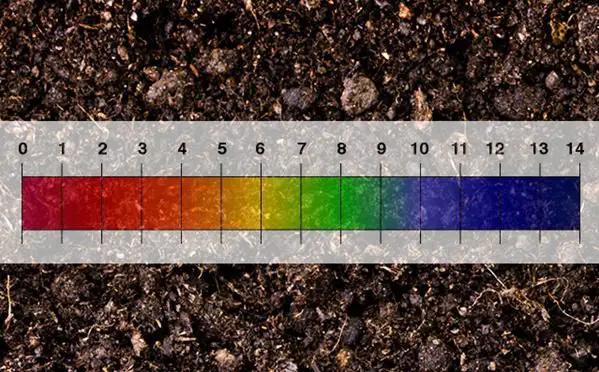
One of the most popular topics for discussion amongst gardeners is how to quickly raise pH in soil, and at what cost. Whether you want to be a hobbyist or just want to keep your favorite plants healthy and thriving, it’s important that you understand what pH is, why it matters for gardening, and what can be done about it if necessary.
How to Quickly Raise the pH in Soil?
You can quickly raise the pH in soil by using Agricultural Lime, Potassium Carbonate, Baking Soda, Wood Ash, Dolomitic Lime, Hydrated Lime, or Oyster Shell Lime.
I will now give an overview of the benefits and drawbacks of each method. In the end, you should have a good idea of which method is best for you!
1. Potassium Carbonate
This is my favorite method for quickly raising the pH levels in the soil. Potassium carbonate is available as a powder or liquid, and it is also known as Potash. It works by neutralizing acids in the soil!
Potassium carbonate is a lime-based compound that is often added to the soil using drip irrigation. It has very high solubility, making it easy to apply the entire root area with just one application.
2. Agricultural Lime
This is the most common method used by professionals. Agricultural Lime is Calcium Carbonate and comes in powdered form or pellets. It can raise pH anywhere from 0.75-14 units at a time!
Agricultural lime has low solubility, so it doesn’t penetrate deeply. This is fine for most plants, but this will be an issue if your plant is under a huge mound of soil.
3. Baking Soda
Baking soda is a cheap and easy way to raise the pH in your soil. You can use it with or without modifications, but if you have some baking powder at home, then there’s no need for anything else!
Baking soda is an effective way of changing the soil pH level. When used correctly, it can change the PH levels in less than 24 hours. The results may not be as effective as other options, but it gets the job done.
4. Wood Ash
Wood ash is an organic way to raise the pH in the soil. It is made up of calcium, magnesium, potassium, and other elements that may be beneficial for plants. However, it can also have some negative side effects when used incorrectly!
Wood ash is a good solution if you need to quickly change your soil’s pH level without spending much money or time on it. The best time to add wood ash is before planting, not after.
5. Dolomitic Lime
Known as calcium magnesium carbonate, it’s no surprise that this contains calcium and magnesium, which are both essential nutrients for plants.
Dolomitic lime is an effective option if you want your pH levels raised fast! The only drawback here would be the fact that it also increases magnesium levels, so it may not work well with certain plants because too much magnesium can be bad for them.
6. Hydrated Lime
This is a quick way of changing the soil’s pH level. However, it takes some time for this method to take effect and have an impact on your plants.
I don’t recommend that beginners use this product as too much can damage the plant. It is best suited to professionals with lots of experience in the niche.
7. Oyster Shell Lime
Oyster shell lime is an organic method for raising the pH of your garden. It has a calcium content of roughly 40%, so it’s useful for correcting soil deficiencies.
This is safe to use, whether you’re a beginner or a professional! The only concern is that it takes time to work and can be expensive.
How to Test the PH After Using These Products?
The best way to test the soil is with a pH tester, which is inexpensive and easy to use. The tester will give you an accurate reading of your soil’s pH, which is essential for knowing if the method that you used worked or not!
A neutral pH balance is ideal for most soils, but if you want to raise it past 7.5, then lime might be the answer.
It’s important to keep checking the soil as fertilizer and other materials can make your soil more acidic. This is why I advise frequently checking the soil and adjusting how much of each product you use. This will keep your plants healthy in the long run.
Conclusion
In conclusion, there are a number of effective ways to quickly raise the pH in soil. However, the best method depends on your specific situation.
I like using potassium carbonate as it’s very effective, but it can be expensive if using large amounts. It’s best to be organic where possible.
Baking soda is a good solution if you have some in the kitchen and don’t want to purchase any of the other options.
I hope this article has been helpful!
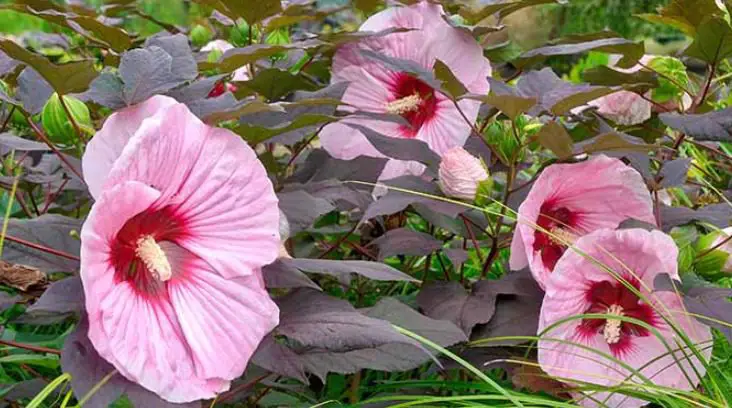
by Gardener Tim | Oct 25, 2021 | Uncategorized
If you have hibiscus plants in your garden, you may notice that some of them are producing buds but not opening. This can be quite frustrating to see as the plant is so beautiful and seems healthy on the outside.
But if this is happening to your hibiscuses, don’t worry! We’re here to give you some helpful tips about what could be causing it and how to fix it.
Why Are My Hibiscus Buds Not Opening?
The most likely reason for hibiscus buds not opening is that they haven’t received enough sun or are stressed. This is what I have noticed from my own experience as a novice hibiscus grower.
However, there are other reasons for the buds not to be blooming. For example, pests could be damaging the buds from the inside. This is why it’s important to check all buds before they bloom to keep your garden free of pests.
I will now jump into 8 reasons for this issue. By the end, you should hopefully be able to identify why your hibiscus buds are not opening and what you can do about it.
1. Not Enough Sun or a Lack of Warmth
Hibiscus plants need plenty of sun and heat in order to bloom. If you notice that your plant is not blooming, check the amount of sunlight it receives each day.
Make sure that there are no large trees around blocking any part of the plant from the sun either.
Another reason for this issue could be that the plant is too cold. The minimum temperature for your hibiscus to grow and bloom well will depend on what type of variety it is, but anything below 15°C (59°F) should not be tolerated by them at all.
If you live in a place where the weather gets quite chilly during autumn and winter, you should be more aware of your hibiscus’ situation.
2. The Hibiscus Plant Is Under Stress
If you notice that your hibiscus plant is not blooming and the buds aren’t opening, then it could be because of some form of stress.
Trying to identify the source of this stress can be difficult but it could be due to pests, weather conditions, cold drafts, or even from transporting if you recently moved home.
If your plant is under any form of stress, there’s a chance that no buds will open for some time until things get back to normal.
You should look out for signs like discoloration or wilting leaves and try to fix whatever is stressing out your hibiscus.
3. The Soil Is Holding Too Much Water
If the soil is too wet for too long, it could cause buds not to open on your hibiscus because of rot.
Overwatering or poor draining can quickly lead to root rot and other conditions that will stop flowers from forming correctly.
It’s best to water pots moderately so you don’t over-saturate the soil and let it fully dry out between watering.
If you’re not sure whether your hibiscus plant is getting too much or too little water, check the soil by sticking your finger down into the soil – if it’s moist, don’t water. If it’s dry, you can give them some water until they drain out of the pot.
4. Too Much Phosphorous in the Soil
If your plant is not blooming, it could be because of too much phosphorus in the soil. This can easily happen if you use fertilizers with high phosphorous levels on them regularly.
Phosphorus prevents nitrogen from entering plants and stops flowers from opening up properly. A solution to this would be to switch over to fertilizers that have a high nitrogen content instead.
If you are unsure about the levels of phosphorus in your soil, it might be best to get some testing done by an expert or to have a look at the ingredients list of your fertilizers.
5. Too Much Nitrogen in the Soil
If your hibiscus is not blooming, it could be because of too much nitrogen in the soil. This can happen if you use fertilizers with high levels on them regularly or over-fertilize the plant by mistake.
Having too many nitrates has a similar effect to phosphorus, stopping flowers from opening up properly and stunting growth.
If you are unsure about the levels of nitrogen in your soil, it might be best to get some testing done by an expert or to have a look at the ingredients list of your fertilizers.
6. Pruning Incorrectly and at the Wrong Time
It’s important to prune hibiscus bushes during the right time of year. If you prune them too early, it could shock the plant into not producing buds or blooms at all for that season.
If you are unsure about this, it’s best to leave the job to a professional and get some advice on when they think is the right time for your plant.
7. The Pot Is Too Small or Large
If you have a hibiscus plant in a pot that is too small, it could stunt its growth and cause buds not to open.
There’s no harm in using large pots for your plants as long as they are well-draining and don’t keep the soil wet at all times. If there’s ever standing water or moisture in the soil, it could cause problems for your hibiscus blooms.
8. Pests Are Attacking the Plant (Thrips)
Hibiscuses are very susceptible to pests and this is why it’s so important to check all new growth on a regular basis. If you find any signs of an infestation, act immediately before they spread further into the plant.
Thrips – These will eat away from inside the buds and cause them to open very slowly or not at all. You may notice that you have them if there is a lot of black dust on your leaves, which means they have been producing dark fecal matter while eating.
You can treat thrips with neem oil (Amazon link), which is a natural pesticide made from the neem tree.
Conclusion
In conclusion, there are many reasons why your hibiscus plant might not be blooming. If you have noticed any of the signs mentioned above, take a look at what could be causing it and treat accordingly to help improve these issues for next year’s crop.
I hope this blog post has been helpful and I wish you all the best for growing your hibiscus plants this year.


