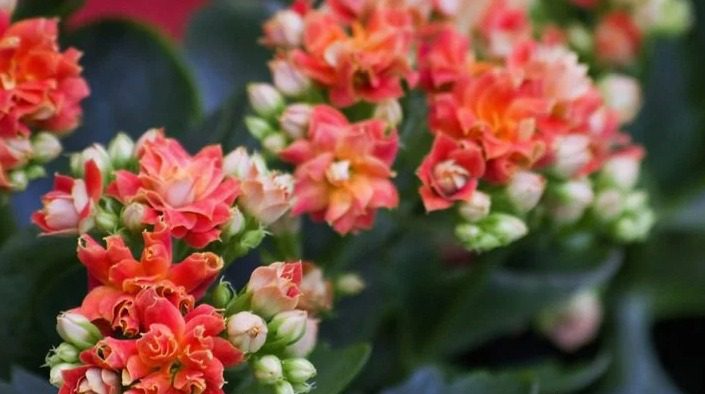
by Gardener Tim | Oct 4, 2021 | Plant Care
This question has been asked by many a gardener who has come to love the bright color of their plant, only to be disappointed when it doesn’t bloom. In fact, their flowers are likely the reason for buying the plant in the first place!
Gardeners can take comfort in knowing that this isn’t an uncommon occurrence and there are ways they can help treat the problem. In this guide, I’ll cover the reasons why Flaming Katy may not be flowering…
Why Is My Flaming Katy Not Flowering?
Flaming Katy plants don’t flower when it is the wrong season or when they are overwatered. Also, if you don’t cut away dead stems from the prior blooms, your Flaming Katy may not blossom.
I will now go into further depth about the reasons your Flaming Katy may not be flowering and what you can do about it.
1. Give the Correct Amount of Water
Overwatering your plant can prevent it from flowering. If you want to encourage blooming, allow the soil of your Flaming Katy plants to dry out more between waterings.
I recommend allowing the soil to dry out about halfway before watering again. You can test the soil by sticking your finger in it. If you can’t feel any moisture upon sticking your finger into the ground, then allow the soil to dry out before giving more water.
As well as not flowering, overwatering can lead to other problems, such as root rot and fungal infection.
If root rot is present, then I advise you to remove the affected plant from its pot and allow it to dry out for a few days before pruning all affected roots. The next step is to re-pot the plant into fresh soil that drains well.
2. Prune Your Flaming Katy Often
Flaming Katy plants require you to prune them often. If your Flaming Katy is not blooming, it may be due to the plant requiring a larger root space and more extensive foliage growth.
In order for this type of flower to take off in those respects, you will need to constantly prune away dead stems from last season’s blooms.
This will allow the plant to focus more on building a larger root system and a wider canopy of foliage, which can help it grow into a healthy flowering Flaming Katy.
3. Give It Enough Sunlight
The lack of sunlight can also prevent your Flaming Katy from flowering. I recommend giving all garden plants six to eight hours of indirect sunlight per day in order for them to perform their best.
If you are not sure if your plant is getting enough light, the easiest way to find out is by observing how it reacts after a week or two. If your plant is not flowering, then move it to a location with more light and see if the issue resolves itself.
You even want to use artificial lighting to supplement the amount of light it receives. I use LED grow lights on nearly all of my plants, especially in the winter when sunlight is less available.
It is important to note that there can be too much of a good thing with respect to how much sun your Flaming Katy gets, as well. If you notice any burning or blistering on the leaves’ edges, then reduce the amount of direct light it receives immediately.
This can happen with grow lights too, so position them at a safe distance from the leaves of your plant.
4. Wrong Season
Finally, one reason your Flaming Katy may not be flowering is that it is the wrong time of year.
Flaming Katy plants are only able to flower in very specific seasons that correspond with their natural environment. Flaming Katy plants are native to the tropics, and in order for them to flourish, they need warm soil and temperatures of about 70 degrees Fahrenheit.
If you live in a region where the temperature hasn’t got warm enough this season, then it might be best to wait until next year when your Flaming Katy has another chance to grow into its full potential.
Conclusion
In conclusion, Flaming Katy plants don’t flower when it is the wrong season or when they are overwatered. Also, if you don’t cut away dead stems from the prior blooms, your Flaming Katy may not blossom.
With the right care, your Flaming Katy plants should flourish and start to show beautiful flowers in no time at all.
I hope this has helped you understand why your Flaming Katy is not flowering. If it does, please feel free to take a look around my site using the search bar. Thanks!
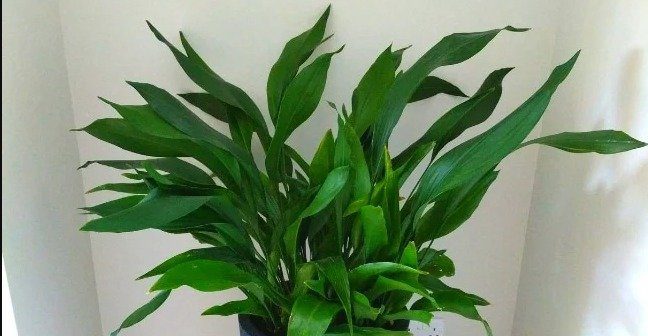
by Gardener Tim | Oct 4, 2021 | Plant Care
Have you noticed that your cast iron plant has been drooping lately? It’s not the only one… Cast Iron plants are very popular in homes, offices, and other locations because of their beautiful leaves.
But sometimes they don’t look so great. What should you do if your cast iron plant is drooping? Read below for some solutions!
Why Is My Cast Iron Plant Drooping?
Your cast iron is drooping is because it has been given too much water. Cast iron plants are drought-tolerant, so never water the soil when it is damp if you don’t want the leaves to droop.
If you have been watering the plant often, then cut back on how often you do it. I tend to water my cast iron every 7-10 days in summer and every 14-28 days in winter.
A good rule of thumb is to water your cast iron when the soil dries out about an inch below the surface.
You can test the soil by sticking your finger in about an inch. If it is dry, then that means the plant needs water. You could also use a moisture meter, which will read the moisture level in the soil.
So what happens if you overwater your cast iron plant? Well, it will start to wilt and leaves may also turn yellow or brown, which is a sign of root rot.
Root rot is bad news because it will kill your plant quickly. If you notice that leaves are turning brown and falling off or if they seem to be rotting at their base, then take action immediately!
You need to remove all of the rotten roots to save your cast iron plant. Prune them with a pair of sterilized scissors or shears and then discard them away from all plants.
Once all of the dead or rotting roots have been removed, allow the roots to dry out, and then repot the plant into fresh soil that drains well.
And never overwater again! It’s best just stick with less water when possible because this type of plant does not need much throughout its life cycle.
Also, it’s best to only water your cast iron with filtered water that is at room temperature. When you water with cold or cool water, it can shock the roots in just one watering session!
Other Reasons for Droopiness
While overwatering is the most likely reason for drooping leaves, there are some other possible causes that we should mention. This list includes:
Temperature – Cast iron plants prefer a temperature of around 70 degrees Fahrenheit. If you find that your plant is too hot or cold, then it may lead to drooping leaves and branches.
Lighting – Make sure the cast iron plant has at least four hours of bright sunlight per day for optimal growth. In some cases, the light may be inadequate so adding more grow lamps (Amazon link) would help!
Reality Check – Make sure your soil is rich enough in nutrients like phosphorus and potassium by having an expert check them out at your local garden center (or online).
Pests – Cast iron plants are vulnerable to pests like mealybugs and aphids. You need to get rid of these by using a cotton swab dipped in alcohol or soap water for the best results!
Cast Iron Leaf Droopiness FAQ
There’s a chance you have some questions that have yet to be answered. As such, I will now address some of the most frequently asked questions about cast iron leaf droopiness.
Will droopy cast iron leaves stand tall again?
Yes, once you have fixed the issue (usually due to too much water), they should return to their upright position. This is great news!
Why is my cast iron plant drooping after I cut it back?
This is likely because it was stressed out and needs more light. Make sure they get at least four hours of sunlight in your location and see if that helps!
Why is my cast iron plant drooping in one area but not another?
Maybe only a certain area of the plant is receiving enough sunlight. Make sure to rotate it if that is the issue!
What does a drooping cast iron plant look like?
The leaves will start to fall off or hang down. It makes it look like the plant is sad! This is not what you expected to see when you decided to purchase a cast iron plant.
What time of year are you most likely to see leaf drop on a cast iron plant?
Winter is the most likely time to see droopy leaves on a cast iron plant. This is because most people tend to overwater in the winter months. The truth is that they need a lot less water in the winter, especially cast irons that are drought-tolerant.
Conclusion
In conclusion, the cast iron plant is drooping because it has been given too much water. To prevent the problem from reoccurring, cut back on how often you water them or use filtered room temperature water to avoid shocking their sensitive roots with cold or cool water!
If your cast iron plant still keeps on wilting even after cutting down watering sessions and time between each session, then take a look at its soil nutrients levels by having an expert check them out at your local garden center (or online).
And if that doesn’t work, then it may be a sign that there are pests on the plant, such as mealybugs and aphids. You need to get rid of these by using a cotton swab dipped in alcohol or soap water for the best results!

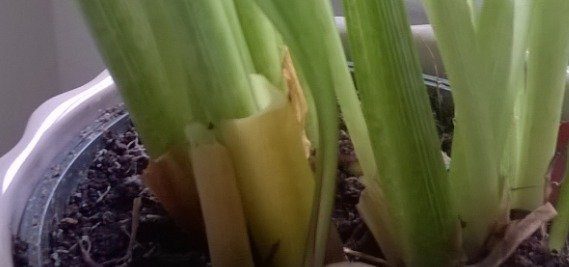
by Gardener Tim | Oct 4, 2021 | House Plants, Plant Care
The cast iron plant is a common houseplant with beautiful dark green leaves. These plants are fairly easy to take care of but they do have one major weakness – yellowing leaves.
In this post, we will talk about what causes cast iron plants to turn yellow and how you can treat them. Let’s get started!
Why Is My Cast Iron Plant Turning Yellow?
Your cast iron plant is turning yellow because the plant has been overwatered, it hasn’t received enough light, or the environment is causing stress.
I will now go into more depth on the most common causes of yellowing leaves on a cast iron plant and what you can do about them.
Yellow Cast Iron Plant from Overwatering
The most common cause of yellowing leaves on a cast iron plant is overwatering. If you’re not careful, the roots will quickly become waterlogged and begin to rot.
They need moist but well-draining soil, which means that allowing them to sit in water for long periods of time can be deadly!
Water your cast iron plant only when the top inch of soil feels dry or add a thick layer of mulch around its base so it requires less frequent watering. You can test the soil by sticking your finger in the soil up to the second knuckle. If it feels moist, wait until it dries out before watering again!
In such a case that root rot has already taken hold you need to take some steps to save your plant. Start by pruning any rotten roots and discarding them away from all plants. Next, allow the plant to dry out, before repotting it into fresh soil that drains well.
Moving forward, be strict with the watering schedule. I tend to water a cast iron plant every few weeks. They can survive for a long time without water, so tread carefully.
Yellow Cast Iron Plant from Too Little Sunlight
Another common cause of yellowing leaves on a cast iron plant is lack of sunlight. When the plants get too little light their stems will start elongating and stretching toward any available source, which causes them to become tall and leggy with long thin leaves at the top.
Just like other ferns or houseplants that require lots of bright indirect light, your cast iron plant needs more than just one hour of sun per day!
If you’re not sure if it gets enough sunlight, then place it near an east-facing window where no curtains are blocking out morning or afternoon sunshine.
You can also use grow lights (Amazon link), which are affordable and easy to use, especially if your cast iron plant rarely receives any sunlight from natural sources. I use them on nearly all of my plants during winter and in certain rooms around my house.
Yellow Cast Iron Plant from Stress
The final common cause of yellowing leaves on a cast iron plant is caused by stress. This could be due to temperature fluctuations, drafts from windows or fans, and other environmental factors that put the plant under duress.
To make sure your cast iron plant doesn’t develop these issues, keep it away from any artificial heating and cooling sources, like vents or radiators. Also, avoid placing it near large windows or sliding glass doors where you’ll get lots of drafts.
In fact, I remember this happening to one of the plants I kept on top of my TV. Basically, the heat from the TV caused temperature fluctuations that stressed out the plant.
One of the worst mistakes many people make is to repot their stressed plant into the new soil. However, this can make things worse and cause the plant to go into shock. This is why you should only repot a plant when absolutely necessary, like root rot.
Yellow Cast Iron Plant FAQ
As cast irons are the easiest plants to take care of, I’ll go through some of the most frequently asked concerns regarding yellowing leaves.
Should I cut yellow leaves off my cast iron plant?
Yes, these leaves can’t be saved, so you have to cut them off. This will help you save the plant and avoid bacterial infection.
Will too little light cause my cast iron plant to turn yellow?
Yes, cast irons need plenty of light to prevent yellowing leaves. However, they can survive in a dark room with the help of artificial grow lights. They are also one of the hardiest plants around, so don’t worry too much.
Will too much water cause my cast iron plant to turn yellow?
Yes, overwatering will cause the roots to rot and ruin your plant. Thus, you should take extra care while watering it.
Will yellow cast iron plant leaves turn green again?
No, it is unlikely that the yellow leaves will turn green again. However, the good news is that the new foliage will be green if you give the plant the correct care.
Conclusion
In conclusion, yellowing leaves on a cast iron plant can be caused by lack of sunlight, overwatering, root rot or stress. It’s important to monitor the light, watering, and temperature to avoid these issues.
Keeping your plant healthy is not too difficult – just make sure to follow the basic cast iron plant care rules. Doing this will keep the plant green and thriving for years to come!
Thank you for reading. Please feel free to leave a comment or question below and I’ll reply as soon as possible. Also, feel free to check out my other articles about caring for these beautiful plants.
by Gardener Tim | Oct 4, 2021 | House Plants
Amaryllis plants are popular flowering plants during the holiday season. They have beautiful, brightly colored flowers that last for weeks! But what do you do when your amaryllis leaves turn yellow?
There could be many reasons why your amaryllis leaves turned yellow, so let’s explore some of them below to help you figure out what is going on!
Why Are My Amaryllis Leaves Turning Yellow?
Your amaryllis leaves are turning yellow because the plant has been overwatered, it hasn’t received enough light, or the environment is causing stress.
Let’s now explore the most common causes of yellowing leaves on amaryllis and what you can do about them.
Yellow Amaryllis from Overwatering
If your amaryllis is producing yellow leaves, it could be because you’ve been overwatering the plant. Amaryllis plants are only supposed to be watered when they’re dry and never let their soil become soggy or wet!
It’s best to only add more water when the top inch of soil is dry. You can test this by sticking your finger in the soil. If it feels dry and crumbly, you can add more water!
Alternatively, you can use a moisture meter, which is an inexpensive tool that will tell you if the soil is too wet or dry. This is the most accurate method, although using your finger is fine if you don’t mind getting it a little dirty.
An overwatered plant should be allowed to dry if you want it to recover. Sometimes it can be too late, and root rot has already happened. If so, you need to act immediately by separating the plant from its container and removing as much of the soggy soil as possible.
Next, you should repot it into new soil that is well-draining. It’s also a good idea to remove any rotten roots before you repot your plant. You can do this with a pair of sterilized shears, but make sure not to damage any other areas of the plant.
Once you’ve repotted it, water sparingly until the soil is dry again to prevent overwatering! This may take a week or two before everything recovers.
Yellow Amaryllis from Lack of Light
If you don’t have enough light for your amaryllis plant to photosynthesize (absorb food), leaves can turn yellow and eventually die back completely. This usually happens first on the lowest set of leaves closest to the ground level because this area receives less direct sunlight than other areas higher up off the ground.
It’s best if your amaryllis gets at least six hours of bright (indirect) sunlight each day so that it has access to plenty of energy to produce beautiful flowers. Remember, most plants need sun exposure in order for their chlorophyll to produce food from sunlight.
If your amaryllis isn’t receiving enough light, you should reposition it in a place where it does get plenty of indirect sunlight daily for at least half the day. If that’s not possible, then consider adding an artificial grow light (Amazon link) instead to give it more access to energy!
I use grow lights on nearly all of my houseplants during winter when sunlight is at a minimum. They can be moved around, and they’re especially useful for plants that need to grow upright like amaryllis!
Yellowing Leaves on Amaryllis Due to Stress
Amaryllis plants can sometimes begin producing yellow leaves if they’re under stress from something like poor soil conditions or due to being moved around too often.
In fact, this usually happens when someone repots their amaryllis plant. In this case, all you need is some TLC and a little bit of time before the plant recovers and returns to normal.
The best thing you can do for your amaryllis is to do nothing and let the plant get climatized to its new surroundings. Try not to make the mistake of making more and more changes, which will only cause further stress!
Amaryllis Leaves FAQ
I will now discuss some of the most frequently asked questions when it comes to yellowing leaves on amaryllis.
Should I cut yellow leaves off my amaryllis?
Yes, it’s usually best to remove any yellow leaves on an amaryllis plant. The most effective way is by cutting off each leaf with a pair of sterilized shears that have been soaked in some rubbing alcohol for about 20 minutes beforehand. This will help prevent it from spreading any disease!
Is it normal for my amaryllis to lose some of its lower leaves?
Yes, it’s totally normal for amaryllis plants to lose some leaves when they’re growing. In fact, it happens every year! The lower ones will begin dying off during winter and then you can expect the plant to produce new shoots in springtime after all of its old foliage has dropped off to make room.
Will too little light cause my amaryllis to turn yellow?
Yes, it’s normal for your amaryllis to turn yellow if it doesn’t get enough light. It may also lose some leaves too. This usually happens when the plant isn’t getting sufficient sunlight during wintertime (at least six hours per day is best).
Will too much water cause my amaryllis leaves to turn yellow?
Yes, it’s possible for amaryllis plants to turn yellow due to overwatering if you water it too often. In fact, this usually happens in winter when people tend to forget about their houseplants and then they get a nasty surprise when the soil is all wet!
Will yellow amaryllis leaves turn green again?
No, it is very unlikely for your amaryllis leaves to turn green again once they’ve turned yellow. However, you can encourage new foliage by making sure your plant gets plenty of indirect sunlight, giving it good air circulation to prevent fungal growths on the leaves, and then repotting it in fresh soil that has been mixed with fertilizer.
Conclusion
In conclusion, you should now know why amaryllis leaves are turning yellow! There are several possible reasons, but you can narrow it down by thinking about what changed in your plant’s environment.
Is it too hot? Is there not enough light? Did you overwater your plant or repot it into poor soil conditions?
If so, then these are most likely the reasons why amaryllis leaves turn yellow. Fortunately, having an idea of what caused this will give you a better chance at fixing the problem!
I hope you learned something today and enjoyed reading this blog post. If so, please feel free to check out my other posts.
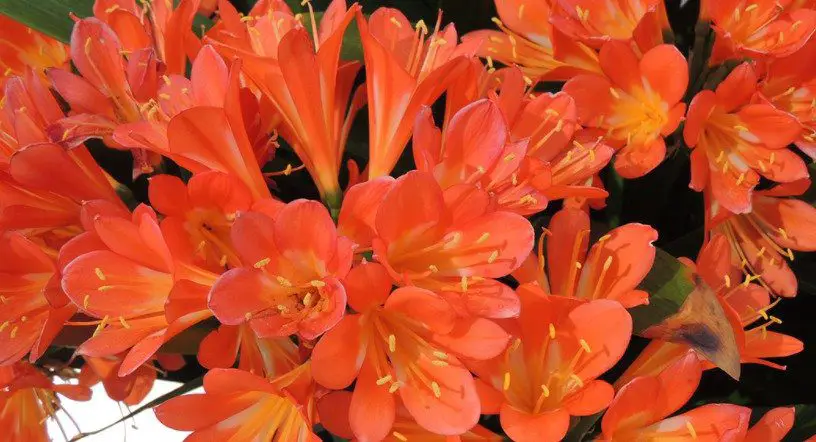
by Gardener Tim | Oct 3, 2021 | House Plants
Clivia plants are some of the most popular houseplants. They make great gifts because they are easy to take care of and have beautiful flowers that last for months.
However, if your clivia leaves turn yellow, you may be wondering what is going on with them! In this blog post, we will discuss why clivia leaves turn yellow and how to fix them so they stay green!
Why Are My Clivia Leaves Turning Yellow?
Your clivia leaves are turning yellow because the plant has been overwatered, it hasn’t received enough light, or the environment is causing stress.
I will now explore the most common causes of yellowing leaves on a clivia and what you can do about them.
Yellow Clivia from Overwatering
If your clivia leaves are turning yellow, you may have given the plant too much water. Clivias like moist but not wet soil, so check the top of the potting mixture to make sure it is dry before watering.
You should test the top inch of soil by sticking your finger in it. If the soil is moist, wait a few days before watering again. You can also use a moisture meter if you do not want to get your fingers dirty from the soil.
I tend to water my clivia every week in the summer and every two weeks in the winter. This keeps the plant happy and healthy, while still giving it time to dry out between waterings.
Continuing to give too much water can result in serious problems, like root rot and fungal infections. If you notice brown or black spots on the roots of your clivia, it has root rot and should be treated immediately.
Start by pruning any rotten roots and discard them away from all plants. Next, allow the plant to dry out to allow the roots time to heal.
You can then repot the plant into fresh soil that drains well. The recovery process may take several months depending on how badly your clivia was affected by root rot, but it will be worth the wait!
Yellow Clivia Leaves from Insufficient Light
If your plant isn’t getting enough light (for example, you keep it in a dark corner), then its leaves won’t be able to produce chlorophyll properly and will turn yellow!
It’s important that clivia plants get at least five hours of bright sunlight each day. If they don’t get enough sun, move them closer to a window. If possible, try to place clivias near south-facing windows for maximum exposure.
You can also use LED grow lights (Amazon link) or fluorescent grow lights to give your plant the light it needs. I use them on nearly all of my houseplants during the winter here in the UK.
Yellow Clivia from Stress
Clivias need to be protected from cold drafts and temperature fluctuations. If you notice that your plant’s leaves are yellowing, it may have been exposed to a draft or the temp has dropped too low.
If this is the case, move your clivia away from any doors or windows that lead outside. However, the best thing to do is usually nothing! The last thing you want to do is cause even more stress to your poor clivia plant.
This means not repotting your plant unless absolutely necessary. Doing so will stress the plant and take a few weeks for it to recover.
Clivia Leaves FAQs
Some of the most frequently asked questions about yellowing leaves will be discussed in this section.
Should I cut yellow leaves off my clivia?
Yes, it’s important to prune yellow leaves on your clivia. This will encourage new growth and help the plant recover faster than if you left them alone.
Is it normal for my clivia to lose some of its lower leaves?
Yes, it is perfectly normal for your clivia plant to lose some of its lower leaves. However, if you notice that most of the leaves are turning yellow and dying off around the same time, then it’s likely due to overwatering or insufficient sunlight.
Will too little light cause my clivia to turn yellow?
Yes, clivias need at least five hours of bright sunlight every day. If yours is getting less than this, you might want to consider increasing the amount of light it’s receiving or moving it closer to a window with more exposure.
Will too much water cause my clivia leaves to turn yellow?
Yes, if your clivia is overwatered, this can cause the water to pool around its roots and give them too much moisture. This will result in root rot and turn your plant’s leaves yellow as well.
Will yellow clivia leaves turn green again?
No, it is very unlikely that your yellow leaves will turn green again. However, this is perfectly normal and doesn’t mean that you should discard the plant or give up on it! The good news is that the new foliage will be green if you follow the basic care rules.
Will repotting my clivia cause its leaves to turn yellow?
It is possible for your clivia to turn yellow after repotting, but this usually isn’t the case. However, if you notice that almost all of the leaves on your plant are turning yellow at once and it has recently been moved into a new pot or had any soil changes, then it might be due to root shock.
Conclusion
There are several reasons clivia leaves turn yellow, but there is usually an easy solution to fix it. Learning how to take care of clivias will help you keep your houseplant happy and healthy year-round so they continue blooming for months on end!
I hope this article helps you figure out why your clivia leaves are turning yellow and what you can do about it. If you have any questions, feel free to leave a comment below or contact me through my email.


