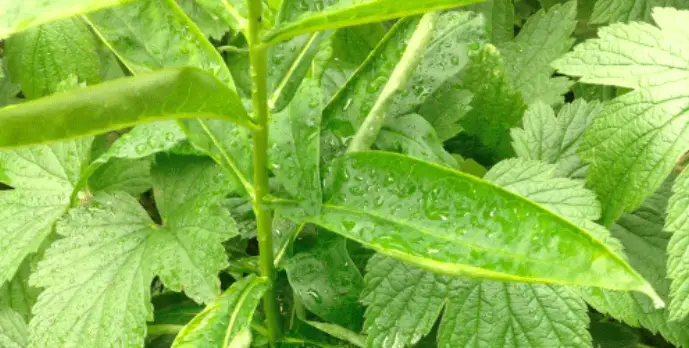
If you have noticed that your phlox leaves are curling, don’t worry – you’re not alone. This is a common problem for phlox plants, and there are a few things that you can do to correct it. In this blog post, we will discuss the causes of leaf curling in phlox plants, and we will also provide some tips on how to fix the problem.
Why Are My Phlox Leaves Curling?
Overwatering, underwatering, extreme temperature changes, stress, or soil that is the wrong pH level might all cause the leaves of a phlox to curl up. These issues might also cause the leaves to turn yellow or brown, and they might cause the plant to wilt.
The exact type of leaf curling that you see on your phlox plant will depend on the underlying cause of the problem. For example, if the leaves are curling due to overwatering, they will typically have a wilted appearance and they will be soft to the touch. On the other hand, if the leaves are curling due to underwatering, they will usually curl inwards and they will be crisp to the touch.
1. Too Much Water
Overwatering is one of the most common causes of leaf curling in phlox plants. If you think that your plant is being overwatered, check the soil to see if it is wet or dry. The soil should be moist, but not soggy.
The best way to do this is to stick your finger into the soil and see how moist it feels. If the soil is very wet or soggy, then you are probably giving your plant too much water.
To fix this problem, you will need to cut back on the amount of water that you are giving your plant. Make sure that the soil has a chance to dry out completely between watering sessions, and only water your plant when the top few inches of soil are dry to the touch.
If you’re not sure how often to water your plant, err on the side of caution and water it less often rather than more. It is much easier to correct underwatering than overwatering.
2. Not Enough Water
If your phlox leaves are curling inwards, it is probably because the plant is not getting enough water. This problem is typically caused by underwatering, but it can also be caused by drought conditions or soil that has a high clay content.
The leaves curl inwards because the plant is trying to conserve water. The more closed the leaves are, the smaller the surface area there is for evaporation.
The best way to fix this problem is to make sure that your plant is getting enough water. Water your plant deeply and regularly, making sure that the soil is moist but not soggy. You might need to water your plant more often during hot weather or if it is growing in a pot.
3. Extreme Temperature Changes
Extreme temperature changes can also cause the leaves of a phlox plant to curl. If the temperature fluctuates frequently or if it drops suddenly, the plant can go into shock, and this can cause the leaves to curl.
To fix this problem, try to keep the temperature around your plant consistent. If possible, avoid placing it in direct sunlight or in a drafty area.
You can also protect your plant from extreme temperature changes by covering it with a light cloth or placing it above ground. This will help to insulate the plant and keep the roots warm.
4. Shock
Shock is often caused when a phlox is transplanted from one location to another. This can be particularly stressful for the plant if it is moved outdoors during the winter months.
The best way to avoid shock is to transplant your phlox in the spring or summer when the weather is milder. If you must transplant your plant in the winter, make sure that you do it gradually so that the plant can adjust to its new surroundings.
You can also help to reduce the stress on your plant by keeping it well-watered and protecting it from extreme temperature changes.
Will Underwatering Cause Phlox Leaves to Curl Inwards?
Yes, underwatering will cause phlox leaves to curl inwards. This is because the plant is not getting enough water and it is starting to stress. The leaves do this to conserve water and stop themselves from drying out.
In fact, curling inwards creates a mini greenhouse effect. By curling inwards, the leaves are able to trap moisture and heat. This helps the plant to conserve water and survive in a dry environment.
Should I Prune Curling Phlox Leaves?
No, you should not prune curling phlox leaves. This will not fix the underlying problem, and it might actually make the problem worse. For example, if the leaves are curling due to stress, pruning them will only add to the stress.
I would advise fixing the issue that is causing the leaves to curl, and then giving the plant some time to recover. Once the plant has recovered, the leaves should return to normal.
Conclusion
In conclusion, if your phlox leaves are curling, it is probably due to one of four reasons. The first reason is that the plant is not getting enough water. The second reason is that the plant is experiencing extreme temperature changes. The third reason is that the plant has been transplanted and is in shock. And finally, the fourth reason is that the plant is stressed.
The best way to fix this problem is to figure out what is causing the leaves to curl and then take steps to fix that issue. For example, if the plant is not getting enough water, you will need to water it more often. If the plant is experiencing extreme temperature changes, you will need to protect it from those changes. And if the plant is in shock, you will need to give it time to recover. Once you have fixed the underlying issue, the leaves should return to normal.
I hope this article was helpful. If you have any further questions, please feel free to leave a comment below. I will be happy to help!
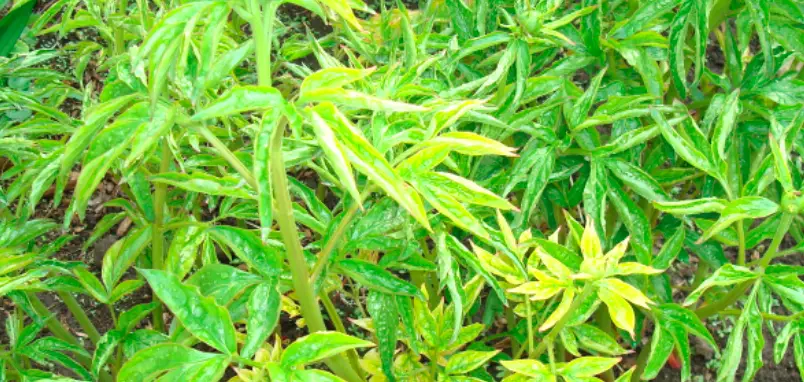
If your peony leaves are turning yellow, don’t panic! This is a common problem that can be caused by a variety of things. In this blog post, we will discuss the most common causes of yellow leaves in peonies and how to solve them. We will also provide some tips on how to prevent this from happening in the future.
Why Is My Peony Turning Yellow?
The main reasons for yellow leaves on a peony plant are overwatering, fungal infections, nutrient deficiencies, not enough sunlight, and environmental stressors.
I will now cover each of these reasons in more detail so that you can determine which one is causing your peony leaves to turn yellow. Don’t worry, I will also provide solutions for each problem!
1. Overwatering
One of the most common reasons for yellow leaves in peonies is overwatering. Peonies are drought-tolerant plants and too much water can actually be harmful to them. If you think that you are overwatering your peony, reduce the amount of water that you are giving each week.
You should also make sure that the plant is getting enough drainage. If the roots are sitting in water, they will start to rot and this will cause the leaves to turn yellow or start to curl.
If you are unsure about how much water your peony needs, check the soil before watering. If it is dry a few inches down, then it is time to water. Be sure to water the plant at the base, not on the leaves.
Check for root rot by gently digging around the plant. If you see any black or brown roots, they are probably rotted and you will need to replant your peony.
Finally, make sure that you are not watering in the evening. Water that sits on the leaves overnight can cause them to develop fungal infections (which we will discuss next).
2. Fungal Infections
If your peony leaves are turning yellow and they have spots or blotches, it is probably due to a fungal infection. The most common type of fungus that affects peonies is botrytis blight, also known as gray mold.
This fungus thrives in wet and humid conditions, so it is important to water your plant in the morning so that the leaves have time to dry before the evening.
You can also treat botrytis blight by spraying the affected leaves with a fungicide. Be sure to follow the instructions on the label carefully. My favorite anti-fungal treatment is neem oil (Amazon link), which is a natural and effective way to stop the fungal disease from spreading.
Finally, make sure to clean up any fallen leaves or petals from around the plant. Keeping your garden clean is one of the best ways to prevent fungal infections from happening in the first place.
3. Nutrient Deficiencies
If your peony leaves are turning yellow and they have pale or white patches, it is probably due to a nutrient deficiency. The most common deficiencies in peonies are iron and nitrogen.
You can solve this problem by fertilizing your plant with an all-purpose fertilizer that contains iron. Be sure to follow the instructions on the label carefully.
Finally, make sure that you are not fertilizing too often. Over-fertilizing can actually be harmful to your plant and cause the leaves to turn yellow. Also, be mindful of how much nitrogen is in your fertilizer, as too much nitrogen can cause leaf scorch.
4. Lack of Sunlight
If your peony leaves are turning yellow, it could be because the plant is not getting enough sunlight. You see, plants need sunlight to produce chlorophyll, which is what gives leaves their green color.
If your plant is not getting enough sunlight, it will start to produce less chlorophyll and the leaves will turn yellow. The best way to solve this problem is to move your plant to a sunny spot in your garden.
Just be sure not to put it in direct sunlight, as this can scorch the leaves. If you live in a climate with hot summers, it is best to plant your peony in an area that gets morning sun and afternoon shade.
Finally, make sure that you are not shading your plant with other plants or objects. This will prevent it from getting the sunlight it needs to stay healthy.
5. Environmental Stressors
There are a number of environmental stressors that can cause peony leaves to turn yellow, like extreme temperatures, wind, or drought.
If the weather has been particularly hot or cold, it can cause the leaves to turn yellow. This is because plants are sensitive to changes in temperature and they can be damaged by extreme heat or cold.
Wind can also damage peony leaves and cause them to turn yellow. Windburn is a common problem in peonies, especially in areas with high winds.
Finally, drought can cause the leaves to turn yellow. This is because the plant is not getting enough water and it is stressed. If you live in an area with drought conditions, it is important to water your plant more often.
Should I Cut Yellow Leaves off My Peony?
It is not necessary to cut yellow leaves off your peony plant. In fact, it is best to leave them on the plant so that they can photosynthesize and produce food for the plant.
However, if the leaves are severely damaged or they are preventing the plant from getting enough sunlight, you can trim them back. Just be sure not to cut too much, as this can damage the plant.
If you do decide to cut yellow leaves off your peony, make sure to use sharp pruning shears and cut at an angle. This will prevent the plant from being damaged and it will help it to heal quickly.
Finally, make sure to dispose of the yellow leaves properly. Do not compost them, as this can spread disease to other plants. Instead, throw them away in the trash.
Will Yellow Peony Leaves Turn Green Again?
No, it is not common for yellow peony leaves to turn green again. Once the leaves have turned yellow, they will usually stay that way until they fall off the plant.
The good news is that fixing the issue that is causing the leaves to turn yellow will usually prevent future problems. For example, if the problem is a lack of sunlight, moving the plant to a sunnier spot will mean future leaves will be green.
Conclusion
In conclusion, if your peony leaves are turning yellow, it could be due to a number of different factors. The most common causes are nutrient deficiencies, lack of sunlight, overwatering, environmental issues, and fungal infections.
If you are unsure about the cause, I recommend taking a sample of the affected leaves to your local Cooperative Extension office for diagnosis. They will be able to help you figure out what is causing the problem and how to fix it.
In most cases, however, you can solve the problem by following the tips in this article. Just be sure to take action quickly, as yellow leaves are often a sign of a serious problem.
I hope this article was helpful in troubleshooting why your peony leaves are turning yellow. If you have any other questions, please leave a comment below and I will be happy to help.
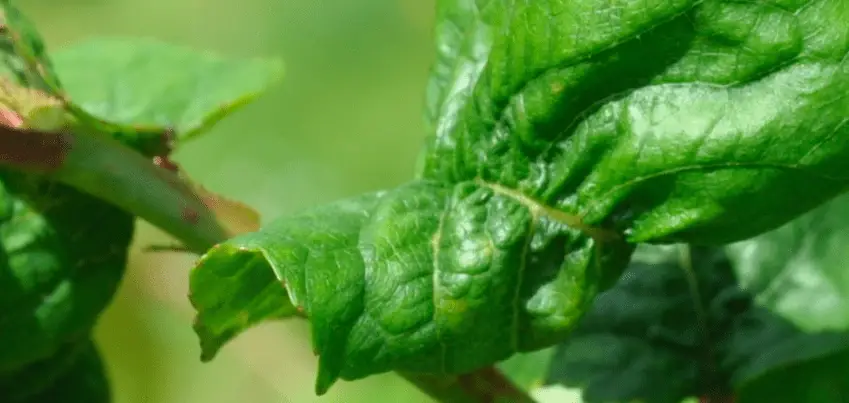
When you look at a cherry tree, the leaves may be curled. This is not an uncommon sight. In fact, it is quite normal for cherry tree leaves to curl. But why do they do this? And what does it mean? In this blog post, we will take a closer look at why cherry tree leaves curl and what it means for the health of the tree.
Why Are My Cherry Tree Leaves Curling?
Cherry tree leaves can curl due to water scarcity, overwatering, abrupt temperature changes, or incorrect soil pH levels. The exact type of leaf curl will help determine the cause. For example, if the leaves are dry and brittle, then it is likely due to water scarcity. If the leaves are soft and mushy, then it is likely due to overwatering.
I will now go over each of these reasons in more detail so that you can better understand why your cherry tree leaves may be curling.
1. Overwatering
One of the most common reasons for cherry tree leaves to curl is due to overwatering. When the roots of a cherry tree are constantly inundated with water, they begin to suffocate. This lack of oxygen prevents the roots from taking in vital nutrients, which can cause the leaves to curl.
If you think your cherry tree may be overwatered, try letting the soil dry out for a few days and see if the leaves uncurl. If they do, then you know that you were watering too much.
Watering your cherry tree once a week should be sufficient. Water early in the morning so that the roots have time to absorb the water before it evaporates. Make sure to check the soil before watering to see if it is already moist.
Finally, make sure that your cherry tree has good drainage. If water is pooling around the roots, it can lead to problems even if you are not overwatering. Make sure there is a layer of gravel or sand under the soil to help with drainage.
2. Underwatering
While overwatering is a common problem, underwatering is also a problem that can cause cherry tree leaves to curl. If the roots of your cherry tree are not getting enough water, they will begin to dry out and the leaves will curl inwards as a result.
If you think your cherry tree may be underwatered, try watering it more frequently and see if the leaves uncurl. If they do, then you were not watering enough.
Test the soil before watering to see if it is dry. If it is, then water your cherry tree. Water early in the morning so that the roots have time to absorb the water before it evaporates.
Using mulch around your cherry tree can also help to retain moisture in the soil. Mulch will help to slow evaporation and keep the roots of your cherry tree moist. Simply apply a layer of mulch around the base of the tree.
3. Sudden Temperature Changes
Another common reason for cherry tree leaves to curl is sudden temperature changes. Cherry trees are sensitive to temperature fluctuations and if the leaves are exposed to extreme heat or cold, they will begin to curl.
If you think your cherry tree may be experiencing sudden temperature changes, try placing it in a location that is more protected from the elements. For example, if you live in an area with harsh winters, try placing your cherry tree near the house where it will be sheltered from the wind.
You can also try using a burlap wrap around the base of the tree. This will help to protect the roots from extreme temperatures. Simply wrap the burlap around the trunk of the tree and secure it with twine or wire.
4. Soil with a High pH Level
Another reason for cherry tree leaves to curl is soil with a high pH level. Soil with a high pH level is very alkaline and can cause the leaves of your cherry tree to curl.
If you think your soil may have a high pH level, you can test it with a soil testing kit. This will tell you the exact pH level of your soil and whether or not it is too alkaline.
If your soil is too alkaline, you can try adding compost or peat moss to help lower the pH level. Simply mix these amendments into the top few inches of soil around your cherry tree. You should see a difference within a few weeks.
Cherry trees are sensitive trees and even small changes in their environment can cause the leaves to curl. By understanding the reasons why cherry tree leaves curl, you can help to prevent it from happening.
Will Underwatering Cause Cherry Tree Leaves to Curl Inwards?
Yes, if the roots of your cherry tree are not getting enough water, they will begin to dry out and the leaves will curl inwards as a result. They do this to protect any more moisture loss from the leaves. You see, when the leaves curl inwards, it creates a microclimate for the leaf that is more humid.
Should I Prune Curling Cherry Tree Leaves?
No, you should not prune curling cherry tree leaves. The leaves are trying to protect the tree from further moisture loss and by pruning them, you will only cause more damage.
As long as you fix the underlying problem (whether it be overwatering, underwatering, soil with a high pH level, or sudden temperature changes), the leaves should uncurl on their own. This is nature’s way of protecting the tree.
Conclusion
In conclusion, there are several reasons why cherry tree leaves curl. The most common reason is due to overwatering or underwatering. However, other reasons include sudden temperature changes, soil with a high pH level, and pests. By understanding the reasons why cherry tree leaves curl, you can help to prevent it from happening.
If you think your cherry tree may be experiencing leaf curl, try to identify the underlying problem and take steps to fix it. Most importantly, do not prune the curling leaves as they are only trying to protect the tree. With a little care and attention, your cherry tree should be healthy and happy in no time! Thanks for reading!
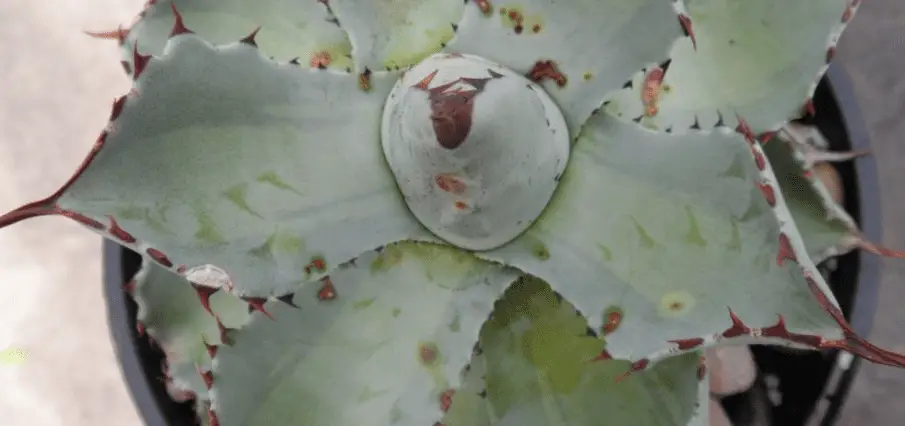
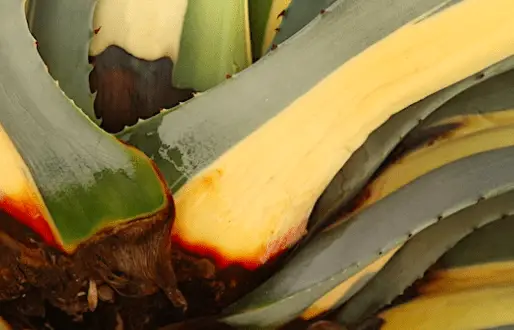
Agaves are succulents native to Mexico that are popular in gardens because of their striking appearance. The leaves of an agave plant are thick and fleshy and often have sharp spines along the edges.
However, sometimes agave leaves develop brown spots. In this blog post, we’ll discuss the possible causes of brown spots on agave leaves and how to treat them.
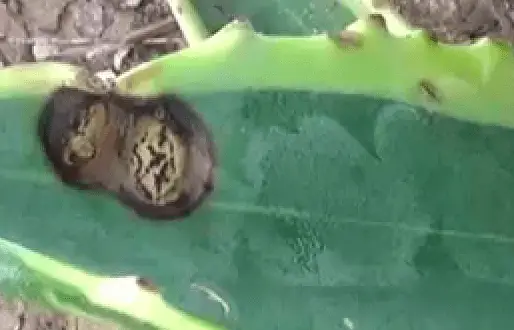
Why Does My Agave Have Brown Spots?
Brown spots on agave plants are usually the result of Anthracnose fungus, overfertilization, too much sun, pest infestation, and edema. Fungal infections are generally the source of these problems, but they may also be caused by any one of them.
The browning of your agave will give clues as to the underlying problem. For example, anthracnose fungus tends to leave blotchy, brown spots on the leaves, while too much sun will cause the leaves to turn brown and dry out.
I will now go through each of these potential causes one by one so that you can narrow down the source of your problem and take steps to fix it.
1. Anthracnose Fungus
Anthracnose fungus is a type of fungal infection that can affect many different types of plants, including agaves. This fungus thrives in warm, wet conditions and can cause the leaves of your plant to develop brown spots.
To treat this problem, you’ll need to remove any affected leaves from your plant and dispose of them. You should also make sure to clean up any fallen leaves or debris around your plant, as the fungus can spread quickly in these conditions.
You can also treat the problem with a fungicide to prevent the fungus from spreading. This will kill any remaining fungal spores on your plant and help to prevent the problem from coming back.
Neem oil is a natural fungicide that can be used to treat Anthracnose fungus. Neem oil is made from the seeds of the neem tree and is safe for use on all kinds of plants.
To use neem oil, mix it with water at a ratio of about two teaspoons of oil per quart of water. Then, apply the mixture to your plant, being sure to coat all of the affected areas. You should see results within a week or two.
If you don’t want to use neem oil, you can also try treating the problem with a copper fungicide. This will kill the fungus and help to prevent it from spreading. You can find copper fungicides at your local nursery or garden center.
Anthracnose Fungus
2. Over-Fertilization
Over-fertilization is another common cause of brown spots on agave leaves. When you fertilize your plant, you are essentially giving it a boost of nutrients that it needs to grow.
However, if you fertilize too often or use too much fertilizer, the excess nutrients can build up in the soil and start to burn the roots of your plant. This can cause the leaves to turn brown and dry out.
To prevent this problem, you should only fertilize your agave when it is actively growing, which is typically in the spring and summer. You should also use a light hand when applying fertilizer, as too much can damage your plant.
If you think your plant may be suffering from over-fertilization, you can try leaching the soil to remove some of the excess nutrients. To do this, water your plant deeply and then allow the water to drain away. This will flush some of the nutrients out of the soil and help to improve the health of your plant.
You can also try repotting your agave in a fresh, clean potting mix. This will give it a fresh start and help to replenish any nutrients that may have been lost.
3. Pest Infestation
Pests can also be a cause of brown spots on agave leaves. These pests include mealybugs, scale insects, and aphids. All of them feed on the sap of your plant, which can cause the leaves to turn brown and dry out.
To get rid of pests, you’ll need to treat your plant with an insecticide. Again, neem oil is a great natural option that is safe for use on all kinds of plants.
To use neem oil, mix it with water at a ratio of about two teaspoons of oil per quart of water. Then, apply the mixture to your plant, being sure to coat all of the affected areas. You should see results within a week or two.
If you don’t want to use neem oil, you can also try treating the problem with a chemical insecticide. Be sure to follow the instructions on the label carefully, as these products can be toxic if used incorrectly.
Damage from the Agave Snout Weevil
4. Edema
Edema is a condition that can cause brown spots on agave leaves. It occurs when the plant takes up too much water and the cells in the leaves become bloated and full of water.
This can happen if your plant is sitting in water for too long or if the soil is too wet. When the cells in the leaves fill with water, they start to burst and the leaves turn brown.
To prevent edema, be sure that your plant is sitting in well-draining soil. If your agave already has edema, you should dry the soil out completely and then allow the plant to rest in dry soil for a few days.
5. Too much sun
While agave are sun-loving plants, too much sun can also cause brown spots on agave leaves. If your plant is getting too much direct sunlight, the leaves can start to scorch and turn brown.
To prevent this problem, you should make sure that your plant is getting the right amount of sunlight. Agaves typically need about six hours of sunlight per day, so be sure to place them in an area that gets plenty of light.
If your plant is already getting too much sun, you can try moving it to a shadier spot. You can also try covering the leaves with a light cloth or piece of burlap to protect them from the sun’s rays.
Should I Prune Agave Leaves with Brown Spots?
There only time I recommend pruning agave leaves is when a fungal infection is present and the leaves are starting to rot. If you prune healthy leaves, it will put unnecessary stress on the plant. Also, when you prune agave plants, make sure to sterilize your cutting tools before and after use. This will help prevent the spread of disease.
To sterilize your cutting tools, you can either dip them in rubbing alcohol or you can use a bleach solution. To make a bleach solution, mix one-part bleach with nine parts water. Then, soak your tools in the mixture for about five minutes.
After pruning, it’s also important to dispose of the affected leaves properly. Don’t just throw them in the trash because this could spread the disease to other plants. Either burn the leaves or place them in a plastic bag and put them in the freezer.
Conclusion
In conclusion, there are a few different reasons why agave leaves might turn brown. It could be due to fungus, overfertilization, too much sun, pest infestation, or edema.
I hope this article was helpful in diagnosing the problem with your agave plant. Brown spots on agave leaves can be caused by a number of different things, but luckily, they’re all fairly easy to fix when you know what to do.
Have you ever seen sunflower leaves curling and wondered what it means? If so, you’re not alone! Many gardeners are curious about this phenomenon. In this blog post, we will discuss the possible causes of sunflower leaves curling and what it might mean for your plants. Keep reading to learn more!
Why Are My Sunflower Leaves Curling?
Water shortage, overwatering, abrupt temperature changes (such as from dry air), or soil that is the wrong pH level might all cause the leaves of a sunflower to curl up. These issues are simple to resolve, so your sunflower should be back to normal in no time!
The exact curling of the leaves will depend on the problem. For example, if your sunflower is suffering from a water shortage, the leaves will likely curl inwards to reduce surface area and prevent further moisture loss. On the other hand, if your sunflower is being overwatered, the leaves may curl downwards as a way to cope with excess water.
I will now go into more detail about each of these potential causes:
1) Too Much Water
If you think your sunflower might be getting too much water, take a look at the soil. Is it soggy or wet? If so, that’s a sure sign that your plant is being overwatered. The leaves of an overwatered sunflower will often curl downwards and become yellow or brown.
To fix this problem, simply reduce the amount of water you’re giving your sunflower. Let the soil dry out a bit between watering and make sure the pot has drainage holes to allow excess water to escape.
If you’re not sure how much water your sunflower needs, check the soil before watering. If it’s dry to the touch, it’s time to give your plant a drink.
Root rot is another possible issue if your sunflower is being overwatered. This problem is caused by waterlogged soil, which prevents oxygen from reaching the roots. As a result, the roots start to die and the plant becomes stunted.
If you think your sunflower has root rot, take a look at the roots. Are they mushy or discolored? If so, you’ll need to prune away the affected roots and replant your sunflower in fresh, well-draining soil.
2) Not Enough Water
If your sunflower’s leaves are curling inwards, it’s likely a sign of water stress. This can be caused by a lack of watering or when the weather is particularly hot and dry.
To fix this problem, simply water your sunflower more frequently. Make sure the soil is moist but not soggy and be sure to give extra water during hot, dry weather.
It’s also important to make sure your sunflower has enough humidity. Dry air can cause the leaves of a sunflower to curl inwards as a way to conserve moisture. To increase humidity, you can mist your plant regularly or place it on a pebble tray filled with water.
3) Sudden Temperature Changes
Sudden temperature changes can also cause sunflower leaves to curl. If the temperature drops suddenly, the leaves may curl inwards as a way to conserve heat. Alternatively, if the temperature rises too quickly, the leaves may curl downwards to prevent overheating.
To protect your sunflower from sudden temperature changes, make sure it is planted in an area that is sheltered from strong winds. You can also try covering your plant with a cloth or plastic sheet during extreme weather conditions.
While sunflowers enjoy full sun, they can’t tolerate heat for too long. If the temperature is consistently above 90 degrees Fahrenheit, the leaves of your sunflower will start to droop. To prevent this, make sure your plant has plenty of water and shade during extreme weather.
4) Shock
Shock is often caused by transplanting a sunflower too early in the season or moving it to a new location. If you think your sunflower is in shock, give it some time to adjust to its new environment and make sure it has plenty of water.
This happens when people re-pot their sunflowers too early in the season or move them to a new location. The plant is trying to adjust to its new environment and needs time to recover. Just give it some water and wait for it to bounce back.
Shock can also be caused by pests or diseases. If your sunflower is infested with aphids, for example, the leaves may curl inwards as a result of the stress. To get rid of pests, you can use insecticidal soap or neem oil.
Diseases can also cause shock in sunflowers. If your plant is infected with powdery mildew, for example, the leaves may become covered in white patches and start to curl. To treat diseases, you can use a fungicide.
Will Underwatering Cause Sunflower Leaves to Curl Inwards?
Yes, underwatering can cause sunflower leaves to curl inwards. When the plant doesn’t have enough water, it will start to stress and the leaves will begin to curl inwards as a way to conserve moisture.
To prevent this from happening, make sure you water your sunflower regularly and during hot, dry weather. Also, be sure to mist your plant or place it on a pebble tray filled with water to increase humidity.
Should I Prune Curling Sunflower Leaves?
No, it is not always needed to prune curling sunflower leaves. The leaves will usually go back to normal after the cause has been fixed.
If the leaves are curling due to a lack of water, for example, simply watering your plant more frequently will usually fix the problem. If the leaves are curling due to shock, give the plant some time to adjust to its new environment and make sure it has plenty of water.
In some cases, however, pruning may be necessary. If your sunflower has root rot, for example, you’ll need to prune away the affected roots and replant your sunflower in fresh soil. Additionally, if disease is causing the leaves to curl, you may need to stop the spread by pruning away the affected leaves.
Conclusion
In conclusion, sunflower leaves curling is often a sign of trouble ahead. The most common causes are incorrect watering, sudden temperature changes, and shock. The good news is that, in most cases, the problem can be fixed by simply making a few changes to your plant care routine. However, in some cases, pruning may be necessary.
If you notice your sunflower leaves curling, take a closer look at your plant and try to identify the cause. Once you know what’s causing the problem, you can take the necessary steps to fix it. With a little care, your sunflower will be back to normal in no time.