If you want to have beautiful tulips in your garden next spring, you need to start preparing now! In this blog post, we will discuss how to overwinter tulips so that they will be in bloom when the weather starts to warm up. Follow these simple steps and you will be able to enjoy these lovely flowers year after year!
Can Tulips Be Overwintered?
Yes, tulips can be overwintered! This process involves storing the bulbs in a cool, dark place over the winter so that they can go dormant. When spring arrives, you will need to replant the bulbs so that they can start growing again.
I recommend overwintering tulips in containers, but not those that are buried deep in the ground. This is because tulips are actually hardy plants that can survive underground during the winter months. However, tulip bulbs in containers are more susceptible to freezing.
It’s usually the frost that kills tulip bulbs, not just cold temperatures. As such, it’s important to protect containerized tulips from frost. One way to do this is to place them in a garage or shed that doesn’t get too cold during the winter months. Another option is to wrap the containers in burlap or straw, which will help insulate them and keep the bulbs warm.
How to Overwinter Tulips?
Now that you know overwintering tulips is possible, let’s discuss how to do it. The first step is to stop fertilizing your tulips in late summer or early fall. This will help the plants focus on storing energy in their bulbs for the winter months.
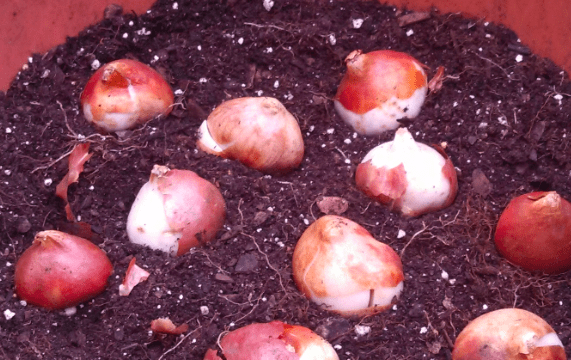
Next, you will need to dig up the bulbs and brush off any dirt or debris. Inspect the bulbs for signs of disease or damage, and discard any that are not in good condition.
Dig Up Tulips
Once you have your healthy bulbs, you will need to cure them before storing them. To do this, place the bulbs on a mesh screen or drying rack in a cool, dark place for about two weeks. This will allow the bulbs to form a protective coating that will help them survive the winter.
After the curing process is complete, you can store the tulip bulbs in a cool, dark place. I recommend using a storage container with ventilation holes so that the bulbs can breathe. You can also wrap the bulbs in newspaper or tissue paper before placing them in the container.
Make sure to check on your stored bulbs periodically throughout the winter. If you notice any that have started to sprout, remove them from storage and plant them immediately.
Protecting Tulips in Containers During Winter
If you don’t want to overwinter your tulips indoors, you can leave them in their containers, but you must take some precautions to protect them from the cold.
First, make sure the containers are made of a material that won’t crack in freezing temperatures, such as plastic or ceramic. Second, choose a location for your containers that is protected from frost, such as against a south-facing wall. And finally, insulate the containers by wrapping them in burlap or straw.
Mulch is a great way to protect tulips in the garden. Apply a layer of mulch around the base of the plants in the soil. This will insulate the bulbs and help them survive until spring.
With a little bit of preparation, you can overwinter your tulips and enjoy their beauty year after year! Just follow these simple steps and you will be well on your way to having a beautiful spring garden.
Replanting Overwintered Tulips
Once spring arrives, you will need to replant your overwintered tulips. Start by removing the bulbs from storage and cold tempering them for a few days. The period of cold tempering will help the bulbs get ready to bloom.
Some people do this by putting the bulbs in the refrigerator to trick the bulbs. Simply leave them exposed in the fridge for a few weeks, and then plant the bulbs in small pots, before placing the bulbs back into the fridge for an additional week.
Replanting Tulips in the Spring
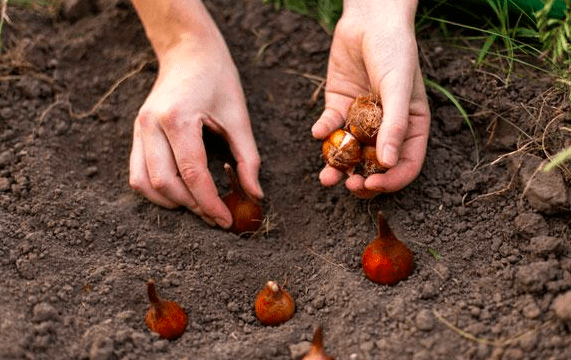
When temperatures are consistently above 40 degrees Fahrenheit, it’s time to replant your bulbs in the garden. Choose a location that gets full sun and has well-draining soil. Dig holes that are twice as deep as the bulbs, and plant them with the pointed end facing up.
Water the bulbs well after planting, and then fertilize them with a high-phosphorus fertilizer. This will help the bulbs bloom.
Be sure to keep an eye on your tulips as they grow. If you notice any that are not blooming, it is likely because they were not given enough sunlight or water. Move them to a sunnier location and increase their watering schedule until they start to bloom. Be sure to watch for any pests that could eat the tulips.
Conclusion
In conclusion, overwintering tulips are a great way to ensure that you have beautiful flowers in your garden come springtime. By following the steps outlined in this blog post, you can enjoy these lovely blooms year after year! Thanks for reading and happy gardening!
Do you have any tips for overwintering tulips? Share them in the comments below!
Mums are a beautiful addition to any garden, and they can be used to add color and life to any space. One of the most common questions that people ask about mums is how often to water them.
The answer to this question depends on a few factors, such as the type of mum, the climate, and the soil quality.
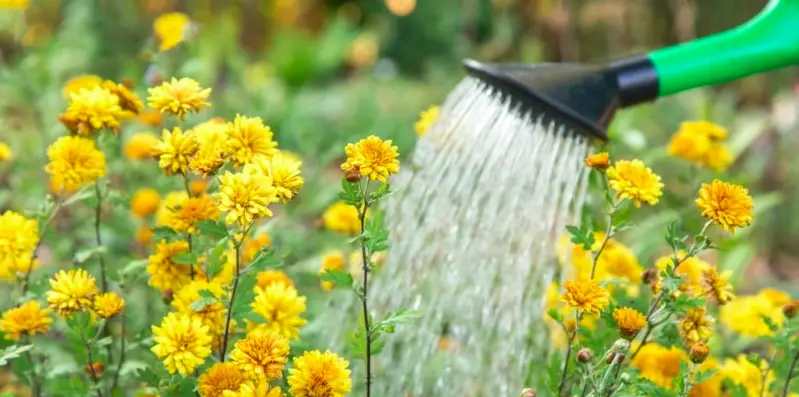
Watering frequency depends on a number of different factors, including the type of chrysanthemum, the climate, and the soil quality. Generally speaking, mums should be watered every other day, or whenever the soil feels dry to the touch.
If you are growing your mums in a container, it is important to make sure that they have adequate drainage so that excess water can drain out and prevent root rot. You may also need to water your mums more frequently if they are located in a hot, dry climate.
Another important factor to consider when watering mums is the type of soil that they are planted in. Soil with good drainage. And aeration will allow water to be absorbed more efficiently, while less optimal soils may require more frequent watering.
At the end of the day, it is best to simply pay attention to your mums and water them whenever you notice signs of dryness or wilting. This will ensure that your mums are healthy and thriving, and will help keep them looking beautiful all season long!
How Much Water Do Potted Mums Need?
One inch of water per week is generally sufficient for potted mums, although this may vary depending on the type of soil and climate. If you notice that your mums are starting to wilt or look dry, it is important to give them some extra water right away.
Personally, I test the soil by sticking my finger into the potting mix to see if it is dry. If it feels wet, then I know that I don’t need to water it right away. However, if it feels dry or crumbly, then I give my mums a good watering and make sure they get plenty of moisture throughout the week.
Potted mums need plenty of drainage holes in their pots, so that excess water can flow out and prevent them from getting soggy or root rot. You may also need to add some organic matter like compost or peat moss to help improve the soil quality and drainage.
How Deep to Water Mums?
Mums need a deep root system to thrive in all types of weather and climate conditions. That means that you should water them until the soil is thoroughly saturated, and then let it drain out a bit before watering again.
Watering 6 to 8 inches deep is ideal for most potted mums, although the exact depth will vary depending on a number of factors. Watering to this depth will give your mums the nutrients and moisture that they need to grow strong and healthy.
What Happens if I Overwater My Mums?
Overwatering mums is one of the worst things you can do, as it can lead to root rot and other serious problems. If your mums are constantly getting too much water, their roots will be unable to get the oxygen that they need, which results in root rot, wilting, brown leaves, and other symptoms.
To prevent overwatering, it is important to make sure that your mums have proper drainage in their pots, and that you are not watering them too frequently. You may also need to invest in a high-quality potting mix with good drainage properties.
Keep an eye on the weather and climate conditions, and adjust your watering schedule accordingly. If you notice any signs of overwatering or root rot, be sure to take action right away so that your mums can get back to looking their best!
What Happens if I Underwater My Mums?
On the other hand, if you are not watering your mums enough, they may start to wilt and look dry. If this happens, it is important to give them a good soaking right away so that they can recover from the drought.
One of the best ways to ensure that your mums get enough water is by using a soaker hose or drip irrigation system. This will allow you to deliver a steady, slow stream of water directly to the roots without over-saturating the leaves and flowers.
Can I Give Tap Water to My Mums?
You can, but it is generally not recommended. If your tap water has high levels of chlorine or other chemicals, it can cause damage to the roots and kill the mums over time. Most of us have tap water that contains some level of chlorine, so it is best to use filtered or distilled water instead.
Using rainwater or well water can also be a good option, as it is usually free of chlorine and other chemicals. Just make sure that the water is not too cold or you run the risk of shocking your mums with sudden temperature changes.
Conclusion
In conclusion, it is important to water your mums regularly and deeply in order to keep them healthy and thriving. Be sure to monitor the soil moisture levels, adjust your watering schedule according to weather conditions, and use a quality potting mix or other materials for optimal drainage.
If you notice any signs of overwatering or root rot, be sure to take action right away so that your mums can get back to looking their best! With proper care and attention, your mums will be beautiful and vibrant all season long.
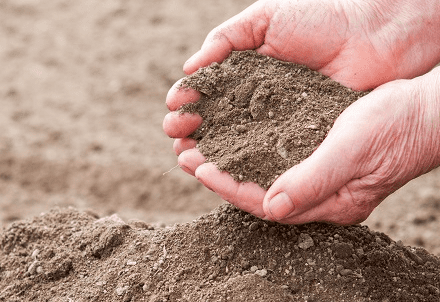
Podocarpus trees are beautiful shrubs that are becoming more popular among home gardeners. They are known for their evergreen foliage, dense growth habit, and tolerance to a wide range of growing conditions. However, which soil is best for podocarpus?
There are a few things to consider when deciding which soil is best for your podocarpus. In this blog post, we will discuss what type of soil podocarpus prefer, as well as some tips on how to amend your soil to create the perfect growing environment for these beautiful shrubs.
What Soil Is Best for Podocarpus?
As drought-tolerant plants, podocarpus trees prefer well-drained soil. They are not fond of soggy or waterlogged conditions, so it is important to make sure that your soil drains well by testing it before planting.
A simple way to test your soil drainage is to dig a small hole in the ground and fill it with water. If the water drains within 24 hours, then your soil is well-drained and will be suitable for podocarpus.
The key is preventing root rot, which can quickly kill these trees. If you are unsure about your soil drainage, it is always best to err on the side of caution and keep the soil on the dry side.
In terms of soil type, podocarpus trees are not picky and will do well in a variety of soils, including clay, loam, and sand. However, they prefer slightly acidic soil with a pH between five and six.
If your soil is not naturally acidic, you can lower the pH by adding sulfur, peat moss, or pine needles. You can also use an acidic fertilizer to help create the ideal growing environment for your podocarpus. This is especially important if you are growing these shrubs in containers.
How to Improve Drainage for Podocarpus?
As we just mentioned, podocarpus prefers well-drained soil in order to thrive. If your soil is heavy or clay-like, it may be necessary to amend it before planting podocarpus.
Adding Sand
One way to improve the drainage of your soil is to add sand. This will help to loosen up the soil and improve aeration. If you are working with a small area, you can simply mix sand into the top few inches of soil.
Any sand will do, but coarse sand is best. Avoid using fine sand, as this can sometimes compact the soil and make drainage worse. The key is to add enough sand so that the soil is loose and easy to work with.
Sandy Soil for Podocarpus
Adding Organic Material
Another way to improve drainage is by adding organic material to your soil. This can be in the form of compost, manure, or peat moss.
Organic material will help to break up heavy soils and improve aeration. It is important to add organic material before planting, as it can take some time for it to break down in the soil.
Adding a Drainage Layer
If you have a large area that you want to plant with podocarpus, you may want to consider adding a drainage layer. This can be done by placing a layer of gravel or crushed stone at the bottom of the planting hole.
The drainage layer will help to improve drainage and prevent waterlogging. It is important to use a material that will not break down over time, such as gravel or crushed stone.
Conclusion
Podocarpus are tough plants and can tolerate a wide range of soil types. However, if you want your tree to thrive, then it is best to plant it in sandy soil that is rich in organic matter. This type of soil will help to ensure that your tree has enough nutrients, but will also drain well to prevent root rot.
When it comes to drainage, podocarpus prefers well-drained soil. If your soil is heavy or clay-like, you can improve drainage by adding sand, organic material, or a drainage layer. By following these tips, you can create the perfect growing environment for your podocarpus tree.
Do you have any tips for growing podocarpus? Share them in the comments below!
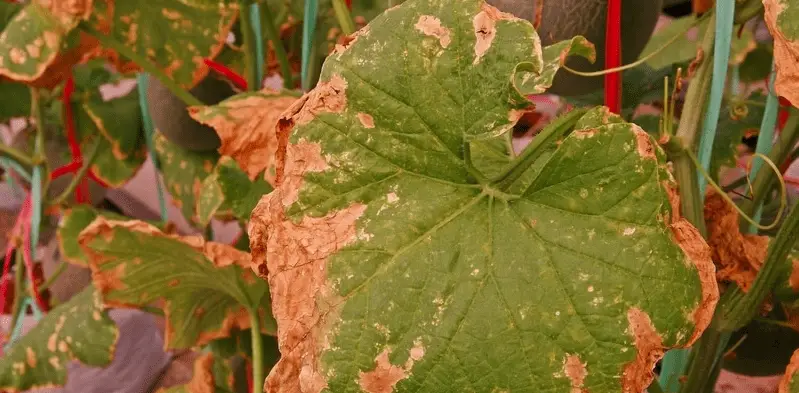
Growing cucumbers is a favorite pastime for many gardeners due to their delicious taste and ease of cultivation. However, sometimes growing cucumbers can present challenges. If your cucumber plant leaves are turning brown, immediate action is necessary. Brown leaves often indicate disease or stress and can be fatal if not addressed promptly.
Why Are My Cucumber Leaves Turning Brown?
Fungal infections, insects, overwatering, leaf burn, and nutritional deficiencies are common reasons for brown leaves on cucumber plants. The type of discoloration can indicate the cause: crispy leaves may suggest too much sun exposure, while brown spots often point to a fungal infection. In this article, we’ll delve into each of these causes. By the end, you’ll understand why your cucumber leaves are turning brown and learn how to address the issue.
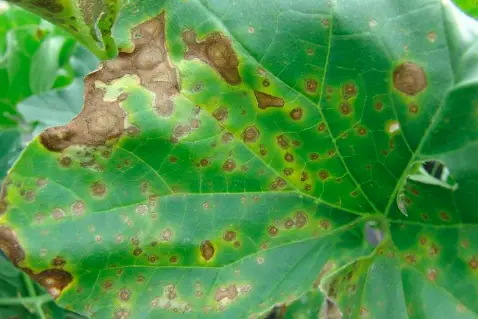
Browning Cucumber Leaves from Fungal Infection
The first reason your cucumber leaves may be turning brown is due to a fungal infection. These infections are common in cucumber plants and can cause the leaves to turn brown or yellow. Blight is the most prevalent type, causing brown or yellow spots on the leaves.
Fungal infections typically occur in warm, humid weather. To prevent these issues, water your plants in the morning so the leaves dry before nightfall and avoid overhead watering to prevent the spread of fungus. If you see brown or yellow spots, remove and destroy the affected leaves immediately.
Treat fungal infections with a fungicide, following the package instructions and application schedule. Neem oil is a natural fungicide available on Amazon that can help treat cucumber leaf fungi.
It’s also important to make sure that your cucumber plants have good drainage. If the roots are sitting in water, they will suffocate and the plant will die. To improve drainage, add sand or perlite to the soil.
Browning Cucumber Leaves from Pests
Pests are another common cause of cucumber leaves turning brown. Aphids, cucumber beetles, and spider mites are all common pests that can damage cucumber plants. These pests suck the sap from the leaves, which causes them to turn yellow or brown.
If you suspect that pests are causing your cucumber leaves to turn brown, check the underside of the leaves for small bugs. They may even be hiding in the crevices. If you find pests, you can remove them by hand or treat them with an organic pesticide.
There are also some natural ways to get rid of pests. You can make a homemade insecticide by mixing water and dish soap. Another option is to use neem oil (Amazon link), which is a natural pesticide that’s safe for humans and animals.
Beneficial insects, such as ladybugs and lacewings, can also help to control pests. These insects will eat the pests that are damaging your cucumber plants.
Browning Cucumber Leaves from Leaf Burn
The sun is so powerful that it can actually burn the leaves of cucumber plants. This is called leaf burn and it results in dry, brown patches on the leaves.
If you think that leaf burn is causing your cucumber leaves to turn brown, move the plants to a shadier spot where they will get less direct sunlight. If the leaf burn is severe, you may need to cut off the affected leaves. This will help the plant to focus its energy on new growth.
You could also block the sun with a white cloth or row cover. This will protect the leaves from the sun’s rays and prevent further damage. Personally, I like to use a tarp during the hot summer months if my cucumber plants are getting too much sun.
Browning Cucumber Leaves from Nutrient Deficiencies
Cucumber leaves need certain nutrients to stay healthy. If they don’t get enough of these nutrients, they will start to turn brown. The most common nutrient deficiencies that cause cucumber leaves to turn brown are nitrogen and potassium.
If you think that a nutrient deficiency is causing your cucumber leaves to turn brown, test the soil and add amendments as needed. You can also give the plants foliar feed, which is a liquid solution that’s applied to the leaves. This will help the plant to absorb the nutrients it needs.
It is unlikely for brown cucumber leaves to turn green again. Once the leaves have turned brown, they are usually damaged beyond repair. The best thing you can do is to remove the brown leaves and focus on new growth.
If you want to prevent cucumber leaves from turning brown in the future, be sure to water them at the base of the plant and avoid getting water on the leaves. You should also make sure that your cucumber plants have good drainage and add amendments to the soil as needed. Finally, you can protect the leaves from the sun by using a white cloth or row cover.
Should I Remove Brown Leaves from My Cucumber?
I recommend removing badly damaged leaves and those infected by fungal diseases. However, you don’t need to remove every single brown leaf. A few brown leaves will not hurt your cucumber plant and will eventually fall off on their own.
Conclusion
To conclude, there are several reasons why cucumber leaves turn brown. The most common causes are pests, leaf burn, and nutrient deficiencies. If you can identify the cause of the problem, you can take steps to correct it. In most cases, however, the best thing you can do is to focus on new growth and remove the damaged leaves.
I hope you found this article helpful. If you have any questions, please leave a comment below and I will be happy to help.
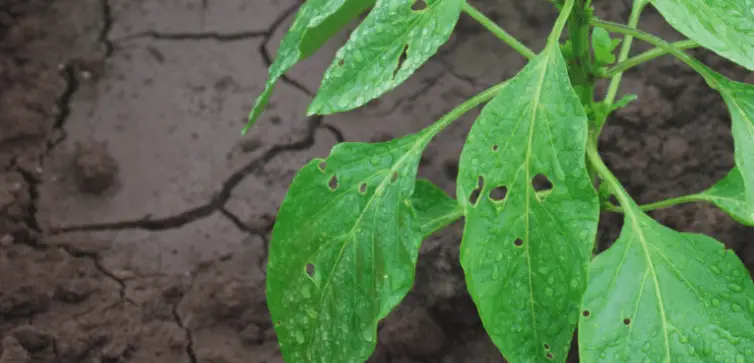
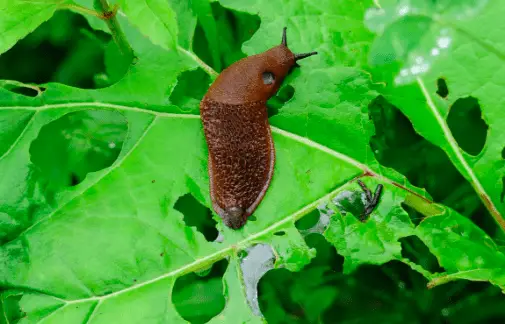
Do you own a pepper plant? If you do, then you might have noticed small holes in the leaves. While alarming at first, it’s common to see holes in pepper plant leaves. There are a few reasons why this happens, and most of them are harmless.
In this blog post, I’ll be discussing the most common reasons for holes in pepper plant leaves. By the end, you’ll know how to deal with this issue if you ever encounter it. Let’s get started…
What Causes Holes in Pepper Plant Leaves?
Pests are the most common cause of holes in pepper plant leaves. The most common pests that cause this issue are slugs, beetles, cutworms, armyworms, hornworms, cabbage loopers, and aphids. All of these pests enjoy eating pepper plants, and any one of them can cause holes in the leaves.
Personally, I’ve found that slugs are the most common culprit. They’re often active at night, so you might not even see them. Slugs will leave a slime trail as they travel, so that’s another sign to look for.
How to Remove Pests from Pepper Plant?
Large pests, like slugs, can be removed by hand. Just go out at night with a flashlight and look for them. Once you find one, simply pluck it off the plant and dispose of them in a bucket of soapy water.
Sluggo (Amazon link) is a great product that you can use to control slugs. It’s an organic pellet that contains iron phosphate. The iron phosphate will kill the slugs, and it’s safe for plants, pets, and humans.
Slugs are Notorious for Eating Pepper Plants
For smaller pests, like aphids, you can blast them off with a hose. Just aim the hose at the aphids and they’ll be gone in no time. While this will get rid of most pests, you may need to use a pesticide for stubborn ones.
My go-to solution to remove smaller pests is using Neem oil, which is an organic and natural pesticide. You can find this at your local gardening store. Simply mix it with water according to the package directions and spray it on your plants. It works bydisrupting the life cycle of the pests, so they can’t reproduce. This will help to reduce the population over time.
You can also try using diatomaceous earth, which is a powder made from fossilized algae. It works by piercing the exoskeleton of pests, causing them to dehydrate and die. You can find this at your local gardening store as well.
Preventing Pests from Returning to Pepper Plant
The best way to keep your pepper plants hole-free is to prevent pests from returning in the first place. There are a number of ways to do this:
Quarantine new plants: Before adding new plants to your garden, make sure to quarantine them for at least a week. Any pests that they have will likely come out during this time. This will give you a chance to get rid of them before they have a chance to infest your other plants.
Keep your garden clean: Pests are attracted to gardens that are full of debris. Keep your garden clean by removing fallen leaves and dead plants. This will make it less inviting for pests.
Use row covers: Row covers are a great way to keep pests out of your plants. They’re made of a lightweight fabric that sits on top of the plants so that pests can’t get to them.
Beneficial insects: One of the best ways to control pests is by using beneficial insects. These are insects that eat other pests, so they help to keep the population under control. Ladybugs and green lacewings are two examples of beneficial insects.
What Else Could Cause Pepper Plant Holes?
There are a couple of other things that could cause holes in your pepper plant leaves.
Disease (Blight)
Blight is a type of plant disease that can cause holes in the leaves. The most common type of blight that affects pepper plants is called early blight. This disease is caused by a fungus that thrives in warm, humid conditions.
The first sign of this disease is small, dark spots on the leaves. These spots will eventually turn brown and the leaves will start to die. If you think your plants have blight, it’s important to remove any affected leaves as soon as possible. This will help to prevent the disease from spreading.
You can also try using a fungicide to treat blight. There are a number of products on the market that are specifically designed for this purpose.
Bad Weather
Holes in the leaves can also be caused by bad weather. Pepper plants are sensitive to cold temperatures and strong winds. If the temperature drops suddenly or there’s a severe storm, it can cause the leaves to develop holes.
If you live in an area that’s prone to bad weather, it’s important to take steps to protect your plants. You can do this by covering them with a tarp or sheet when the weather is bad. This will help to keep the leaves from being damaged.
Animals
It’s not just pests that can cause holes in your pepper plant leaves. Animals can also be responsible. If you have deer or rabbits in your area, they may try to eat your plants. This can cause damage to the leaves, resulting in holes.
You can try using a fence to keep animals out of your garden. Just make sure that the fence is tall enough to deter them. You can also try using repellents, but these need to be reapplied regularly.
Should I Prune Pepper Plant Leaves with Holes?
I only prune the leaves if I think a fungal disease is a cause. If the holes are caused by pests or bad weather, I don’t think there’s any need to prune the leaves. Pruning fungal leaves will help to prevent the disease from spreading.
If you do decide to prune your plants, make sure to sterilize your tools before using them. This will help to prevent the spread of disease. You can do this by dipping your tools in a solution of bleach and water.
Conclusion
Holes in your pepper plant leaves can be caused by a number of things, including pests, disease, bad weather, and animals, but pests are the most common cause. Take a closer look at your plants to see if you can identify the source of the problem. If you’re not sure, ask a professional for help.
Damage can prevent the pepper plant from growing and the peppers from turning red, so it’s important to take action if you notice any holes in the leaves.
I hope this article has helped you to figure out what’s causing holes in your pepper plant leaves. If you have any questions or comments, please feel free to leave them below. Thanks for reading!