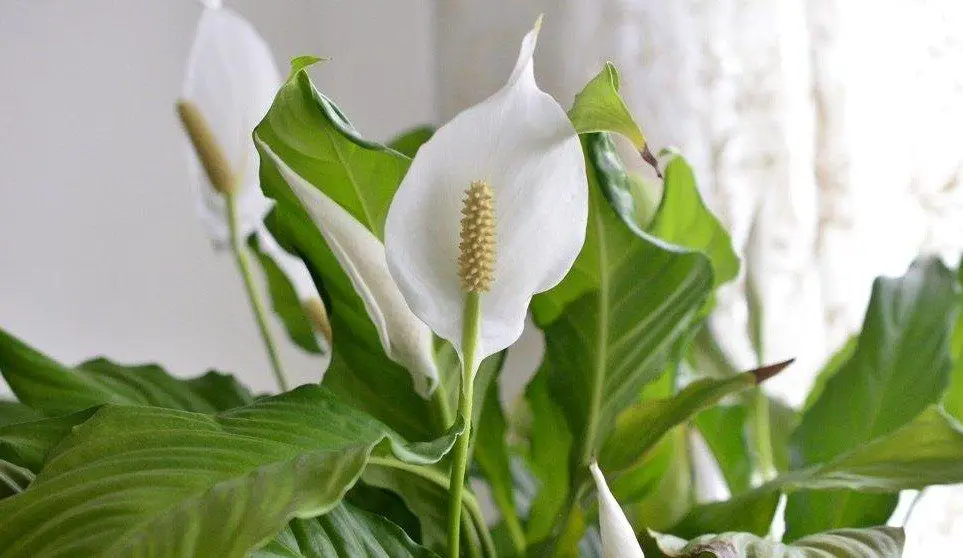
If you have a peace lily, then you want to make sure that you are giving it the right amount of water. This can be tricky because not all plants need the same amount of water. In this blog post, we will discuss how much water a peace lily needs and how to give it the right amount of H2O!
How Much Water Does a Peace Lily Need?
Peace lily plants should be watered every week with enough water to saturate the soil and reach the roots. While once a week is a general recommendation, it’s a good idea to only add more water when the top inch of soil is dry to the touch.
You can test the soil by sticking your finger about an inch deep into the pot. If it feels dry, then it’s time to water the plant.
If you live in a humid climate or keep your peace lily in a bathroom with high humidity, you may not need to water as often because the air will help keep the soil moist.
What Type of Water Should I Give My Peace Lily?
It’s best to give water that doesn’t contain any chemicals, such as fluoride or chlorine, as these can damage the plant’s leaves over time. As such, filtered water is ideal, but you can also let the water sit for 24 hours to allow the chemicals to evaporate.
Can I Give Tap Water to My Peace Lily?
You can, but it’s not ideal. As we mentioned, tap water usually contains chemicals that can be harmful to peace lily plants.
If you can’t use filtered water, then we recommend letting the water sit for 24 hours before giving it to your plant. This will allow some of the chemicals to evaporate, making it safer for your peace lily.
Can I Use Cold Water on My Peace Lily?
Coldwater is not recommended to give your peace lily as it can shock the plant. Instead, use water that is room temperature or slightly warm. This is especially important to consider during the winter months when the water is cold, but the room temperature is usually hot from central heating.
Can I Use Warm Water on My Peace Lily?
Yes, you can use warm water on your peace lily. In fact, many people find that their plants prefer it! Just make sure the water isn’t too hot, as this can also shock the plant just like cold water would.
Can I Use Distilled Water on My Peace Lily?
Yes, you can use distilled water on your peace lily. Just like filtered water, this is a great option because it doesn’t contain any harmful chemicals. However, it also doesn’t contain some helpful minerals that can be found in tap water, so we recommend using filtered water if possible.
What Happens if I Overwater My Peace Lily?
Overwatering a peace lily can lead to a number of problems, including root rot, yellow leaves, and stunted growth. If you think you have overwatered your plant, then the best course of action is to stop watering it for a week or two and see if the plant recovers.
Overwatered peace lily
If the plant doesn’t recover or continues to show signs of overwatering, then you may need to repot it in fresh, dry soil. Root rot is a serious issue that needs to be addressed asap.
Signs That Your Peace Lily Is Overwatered
Droopy leaves
Moldy surface soil
Drenched soil
Rotten roots that are black and smell
Brown or yellow leaves
What Happens if I Underwater My Peace Lily?
Underwatering a peace lily can lead to dry leaves, wilting, and stunted growth. If you think you have underwater your plant, then the best course of action is to start watering it more often.
Underwatered peace lily
If the plant doesn’t recover or continues to show signs of underwatering, then you may need to give it a deep watering. This means leaving the plant submerged in a sink or tub of water for a few hours.
After you’ve given the plant a deep watering, be sure to empty out the drainage tray so that the plant isn’t sitting in water.
Signs That Your Peace Lily Is Underwatered
Dry leaves
Leaf color change at the edges
Dry soil
Wilting
Leaf drop
Should I Water My Peace Lily Less in the Winter?
Yes, it’s generally a good idea to give less water when the plant is dormant during the winter months. This is because the plant won’t be growing as much and won’t need as much water to stay healthy.
If you’re not sure how often to water your peace lily during the winter, then we recommend starting with one every two weeks. You can increase or decrease the frequency as needed based on the plant’s appearance.
How Long Can A Peace Lily Go Without Water?
There is no definitive answer to this question as it depends on a number of factors, including the size of the plant, the type of soil it’s in, and the temperature of the room.
In general, however, most peace lilies can go for about a week without water before they start to show signs of stress. If you’re going on vacation or otherwise away from home, then we recommend asking a friend or neighbor to water your plant for you.
Conclusion
In conclusion, it’s important to water your peace lily regularly but not too much. The best way to determine how often to water is to check the soil before each watering. If the soil is dry, then it’s time to give the plant a drink!
We hope you found this article helpful. Peace out! (Pun intended.)
If you’ve ever wondered if a peace lily plant could be grown outside, then this blog post is for you! We will discuss how to care for your peace lily and whether or not it can survive outside. The answer may surprise you.
Can a Peace Lily Live Outside?
Yes, peace lilies can live outside, but only during the summer months. They will need to be brought inside when the temperature starts to drop below 60 degrees Fahrenheit.
It depends on where you live. If you live in a place that is always warm, like Florida, then you can leave your peace lily outside all year long. If you live in a colder climate, then you will need to bring your plant inside during the autumn/winter months.
When growing a peace lily outside, it is important to place it in an area that receives partial sun exposure. This means the plant should receive at least four hours of indirect sunlight each day.
It’s important that the peace lily doesn’t receive too much sun or it will start to scorch the leaves. If you live in a hot climate, it might be best to place the plant in a shady area.
How Do You Take Care of a Peace Lily Outside?
Here’s what you need to know if you want to take care of a peace lily outside:
Watering
Be sure to water your peace lily plant regularly, especially during the summer months. You can tell if the plant needs water by checking the soil. If it’s dry, then it’s time to water the plant. A moisture meter can be helpful in knowing when the plant needs water.
Too much water can kill a peace lily plant. If the soil is too wet, then it will cause root rot and may lead to your plant dying. It’s important that you water sparingly during the winter months, as this can also be harmful to plants.
This is especially true when keeping peace lilies outdoors because there is rainfall to be mindful of, which can water the plants for you. That’s why you may want to watch the forecast in your area before watering your plants.
Soil
It’s important to use a soil mixture that is well-draining. You can test the drainage of your soil by filling a container with potting mix and adding water until it starts to overflow. If there are no pools of standing water, then you have good draining soil.
Peace lilies do best in moist but not soggy soil. You can improve the drainage of your soil by adding sand, perlite, or vermiculite to it. To add moisture, you can add peat moss to the soil mixture.
Fertilizing
It’s also important to fertilize your peace lily plant regularly. You can use a balanced fertilizer or one that is specifically made for peace lilies. Fertilize the plant once every month during the summer months when the plant is growing.
There should be no need to add fertilizer in the winter months. Your plant will be resting during that time, which means you shouldn’t fertilize.
Sunlight
When growing a peace lily outside, it’s important to place the plant in an area that receives partial sun exposure. This means the plant should receive at least four hours of indirect sunlight each day.
You can leave the plant in an area that receives mostly shade for most of the day. Just make sure that the plant isn’t receiving direct sunlight for too long if you want to avoid the leaves from browning.
Temperature
You can’t control the temperature when you keep a peace lily outside. However, you should keep an eye on the temperature to make sure that it’s not too hot or too cold. The plant will tolerate temperatures between 60 and 85 degrees Fahrenheit, but it might start to suffer if the temperature gets much higher or lower than that.
Outside Peace Lily FAQ
Peace lily plants are beautiful, but they are hard to take care of if you don’t live in the right way. As such, I will now answer some FAQ about growing them outside.
Can I keep my peace lily plant outside all year round?
It’s not recommended to take your peace lily outside year-round. You should only place it outdoors in the summer and bring it back inside in the autumn when nighttime temperatures begin to drop below 60 degrees Fahrenheit.
Inside is best because the conditions are easier to control, but you can take your peace lily outside if you want. The key is to make sure that the plant gets enough sunlight, water, and nutrients to survive.
Are peace lilies invasive when planted outdoors?
No, peace lilies are not invasive when planted outdoors. However, they can become quite large, so you’ll need to space them out accordingly. I prefer to keep my peace lilies controlled in their own containers at different locations.
Can you put a peace lily outside in the summer?
Yes, you can put a peace lily outside in the summer. In fact, this is when it will get the most sunlight and grow the best. Just be sure to bring it back inside before nighttime temperatures drop below 60 degrees Fahrenheit.
Also, be mindful that the sun is very powerful during summer, which can scorch the leaves on your plant. Keep it in a spot where it will get some shade during midday hours if you don’t want to risk burning them!
Conclusion
In conclusion, you can grow a peace lily outside if you’re in the right climate. However, it’s important to give your plant all of the things that it needs to survive because otherwise, you might end up killing off your beautiful houseplant!
I recommend keeping an eye on the temperature, sunlight, and water levels to make sure your peace lily is doing well. If you follow these guidelines, your plant should thrive.
Still, I always prefer to keep my peace lilies inside where I can more easily control the conditions. Thanks for reading!
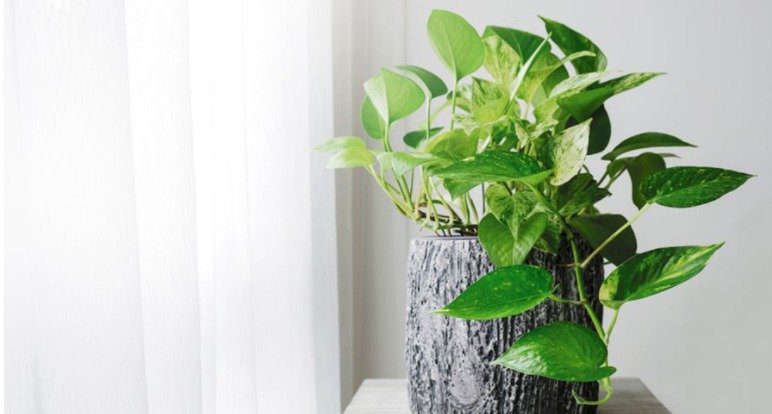
Pothos is one of the most popular houseplants, and with good reason! They’re beautiful plants that offer a lot of benefits to your home. For example, they can help purify the air you breathe.
This article will explore the question of whether or not pothos plants can have fenestrations. If you’re unfamiliar with this term, it refers to holes and cuts that are present in the leaves of plants, like the monstera.
Can Pothos Have Fenestrations?
Yes, pothos plants can have fenestrations, but it is rare and not all varieties of pothos will develop them. This means that they’re not a definitive characteristic of the plant, as is true with other plants, like the monstera.
The most common pothos varieties that see fenestrations are the cebu blue and the giant pothos, which both have fenestrations when they mature.
Why Does Pothos Have Fenestrations?
The cuts and holes in the leaves of pothos plants allow for more sunlight to reach inside and through the plant, which can be beneficial for some varieties. As pothos plants have large leaves, having fenestrations means that the top leaves don’t stop the bottom laves from receiving sunlight.
Pothos plants with these kinds of cuts are also popular decoration items because they add an interesting visual aspect that is different from other houseplants you may have.
In fact, I LOVE when plants develop these kinds of cuts and holes because they really make your home stand out. This is why the variegated monstera is my all-time favorite houseplant.
Can I Increase the Splits on My Pothos?
No, you cannot encourage fenestrations on pothos plants. You just have to wait for the plant to grow naturally, which could take months or years.
If you are impatient for faster results, then I would suggest buying a monstera plant that naturally develops way more fenestrations than pothos will. You won’t have to wait as long to enjoy the visual effect, and it’s still very impressive when you see them!
Do All Pothos Have Fenestrations?
No, not all pothos have fenestrations. Most common varieties of pothos do not develop holes in their leaves during adulthood. This means that this is something you will need to observe and look out for when you are purchasing pothos plants.
If the leaves of your plant don’t have fenestrations, then they’re probably not a cebu blue or giant type of pothos that naturally develops them as it matures. If this is true, then you won’t see fenestrations anytime soon, but you can still enjoy the plant for its other benefits.
Conclusion
To sum it up, pothos plants have fenestrations when they mature and develop naturally over time. This usually happens with cebu blue or giant varieties of pothos that have large leaves where all parts are able to receive sunlight through the fenestrations.
Pothos plants without holes cannot be encouraged to develop, so you just have to wait for the natural process of plant growth to take its course. If you’re looking for faster results, then monstera is a great alternative that can easily provide this effect in your home.
I hope this article has answered your question about whether or not pothos can have fenestrations. If you enjoyed this post, then please let me know by dropping me a message. You can also check out some of my other posts, like this one on leggy pothos plants – It will help you to improve the appearance of your pothos!
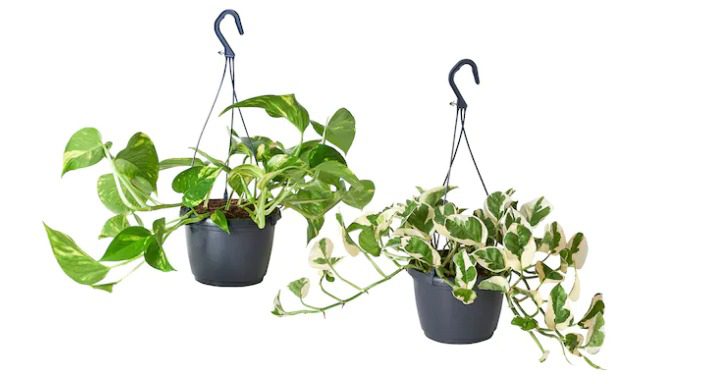
The pothos is a popular plant that is seen in most homes around the world. Some choose to keep them in containers, whereas others let them vine and grow everywhere! In this blog post, we discover whether or not pothos are good hanging plants.
Are Pothos Good Hanging Plants?
Yes, the pothos is a great hanging plant that can be hung in many different ways. It has the ability to grow up to 10 feet, which makes it perfect for climbing on walls and fences! If you’re looking for a green addition to your home that is low-maintenance, the pothos is a great option.
The leaves also act as a natural air purifier because they release oxygen at night when most plants are resting! This article will cover everything you need to know about this beautiful plant.
Hanging Pothos FAQ
There’s a chance you want to learn more, so I will now answer some of the most frequent questions about pothos hanging plants.
Does pothos grow better when hanging?
The pothos will grow in just about any condition, but I’ve found that they grow better when hanging. This is because the plant loves to climb and has space to do so. As such, feel free to hang them in any area of your home where you need a touch of green.
Should I hang or climb pothos?
The choice is yours! If you have a pothos that’s growing wildly, then it’s probably time to clip off the excess and start training it to grow in a specific direction. By doing this, you can either hang or climb your plant easily.
How do you take care of pothos that is hanging?
There are a few things you need to remember when caring for hanging pothos plants. Make sure the potting mix is well-draining and that you water them regularly (but not too much).
You’ll also want to hang the pothos in an area that gets plenty of indirect sunlight, as well as away from cold drafts or vents that may be high up in the room of your house. Here are my top care tips for hanging pothos:
Temperature: Keep houseplants in an area where the temperature is kept above 50 degrees Fahrenheit. I find that the sweet spot is between 65 and 80 degrees F.
Soil type: Pothos enjoy soil that is well-draining and rich. Also, slightly acidic soil with a pH of 6.5 is ideal.
Pot requirements: Hanging plants need a pot that is wider than the root ball and has drainage holes in the bottom. As fast-growing plants, you may need to repot them every year or so.
Light requirements: Hanging pothos tend to have a light green coloration, but they do best in bright indirect sunlight. Avoid hot sun and instead opt for more of an east-facing window if possible.
Watering: Water your hanging plants when the top inch of soil feels dry to the touch. Be sure not to overwater and allow the potting mix to dry out in-between watering sessions.
Fertilizing: I recommend fertilizing pothos once every 1-3 months during the spring and summertime. Opt for an organic fertilizer that is diluted 25 percent with water, or else use slow-release pellets to avoid overfeeding them due to their fast growth rate!
Pruning: Hanging pothos plants need to be trimmed regularly to maintain their shape. Prune the plant by cutting off any stems that are growing in the wrong direction, or else it will quickly become unruly.
Repotting: Pothos plants need to be repotted every one or two years. Use a well-draining potting mix, and avoid burying the crown of the plant – just leave it at soil level so that your hanging pothos can continue growing up. I tend to only repot my hanging pothos if it has grown too big or if I suspect an issue with the roots.
Where is the best place to put hanging pothos?
I like to hang my pothos plants near entrances and in corners, as they add life to the room and make it feel more inviting. However, you can place them wherever you’d like! Just be sure to give them plenty of indirect sunlight and water them when needed.
However, it’s best to avoid hanging pothos in high-traffic areas, as they may get damaged or knocked down easily. If you have small children or pets, be sure to place the plant somewhere out of reach.
Conclusion
In conclusion, the pothos is a plant that can be potted on the ground or hung in the air. It’s one of the best low-maintenance hanging plants out there and it will add life to your home in no time!
I like to hang mine in high areas of my home and let them grow freely. You may need to snip the vines every so often to keep them from growing out of control, but other than that they’re easy to care for.
Placing hanging pothos near entrances and in corners is a good way to make your home feel more inviting and add some life to the room. Be sure to water them regularly and give them plenty of indirect sunlight, as they need it! Thanks for reading.
Do you have a hebe plant that is looking leggy? If so, don’t panic. There are many things you can do to fix this problem. In this post, we will go over some of the best practices you can do to fix your leggy hebe.
How To Fix a Leggy Hebe Plant?
Hebe plants become leggy when the plant does not receive enough sunlight. This causes the hebe to grow towards a light source, which results in a leggy appearance.
In order to fix this issue, you will need to give your hebe more sun exposure. If possible, place it outside where it can get at least six hours of indirect sunlight per day. Also, make sure all leaves get sun exposure by rotating the plant every other day.
I’ll now go into specifics about what you may do to keep your leggy hebe plant alive…
1) Move your hebe to a brighter location
The first and most important step is to move your hebe into a brighter location. If you don’t, the plant will continue to grow towards the sun and become leggier over time.
Do not place it in direct sunlight because this can actually damage or kill your hebe altogether! Instead, make sure it receives indirect sunlight for at least six hours per day.
Also, rotate it every other day so that all leaves can receive sunlight. This will ensure all leaves receive the sunlight they need to stay healthy.
If you don’t have a space for your hebe where it can get at least six hours of indirect sunlight per day, consider buying grow lights (link to my favorite on Amazon) to help keep indoor plants alive and thriving without direct access to natural light.
When using grow lights in place of or along with other light sources, make sure to keep the lights an appropriate distance away from your plant. If you leave them too close or hang them too low, they can burn and damage your hebe’s leaves.
2) Prune the leggy leaves from your hebe
To keep your leggy hebe plant alive, you want to prune off any leaves that are growing towards the sun. These will only become weaker as they continue to grow and may even die off entirely!
In addition, if there is a lot of leaf growth happening at the base or center of your hebe, cut back some stems so it becomes bushier. This will help it become a fuller, more rounded plant overall and reduce the amount of leggy growth happening.
Also, make sure to clean your hebe by removing dead leaves whenever you notice them. Dead leaves can be a breeding ground for bugs and other pests that could damage or kill your entire plant, so this is a step you don’t want to skip out on.
When pruning your hebe, be careful not to damage it! You will need sharp shears or clippers for best results and simply snip the leaves off at their base where they meet with branches. Do not pull them because this can cause serious damage if done too roughly.
Leggy Hebe FAQ
Hebe plants aren’t too popular, so there are naturally many confused hebe owners who want to know how to fix their leggy hebe. Here are some of the most common questions I get asked about fixing a leggy hebe plant…
Should I repot a leggy hebe?
It’s not necessary to repot your leggy hebe, but it shouldn’t hurt if you do so. I only repot hebe plants if I suspect root rot or if the pant has become too big for its container.
Where should I keep my leggy hebe?
Keep your leggy hebe in an area that receives at least six hours of indirect sunlight per day. This area shouldn’t be exposed to cold drafts or dry heat, as well as have humidity of at least 50%.
Should I cut back my leggy hebe?
Yes, pruning a leggy hebe is a good idea. To prune, you will want to cut off the dried leaves from last season as well as any dead or dying branches. You can also use this opportunity to re-shape your hebe by cutting back long branches and trimming away leggy stems.
Use sterilized shears that are sharp to minimize damage and the spread of infection. Using dirty shears will cause infections that can result in leaves dying and dropping off.
Will a leggy hebe plant recover?
Yes, a leggy hebe plant will recover. If you fix the issue and provide it with sunlight, your hebe should stop growing towards a light source and start thriving again in no time.
How long does it take for a leggy hebe to grow back?
It can take anywhere from one month up to six months before your leggy hebe fully recovers. It all depends on how bad the issue is that you are trying to fix, but it shouldn’t take any longer than six months if you follow these tips.
Conclusion
In conclusion, leggy hebe plants are common and easy to fix. Just make sure you provide your plant with a six-hour window of indirect sunlight per day, cut back any leggy branches, and prune off dried leaves from last season.
I hope you enjoyed this blog post on how to fix a leggy hebe plant and that you found it helpful. If you have any questions or comments, feel free to drop a message in my inbox.