by Gardener Tim | Oct 20, 2021 | House Plants, Outdoor And Patio Plants
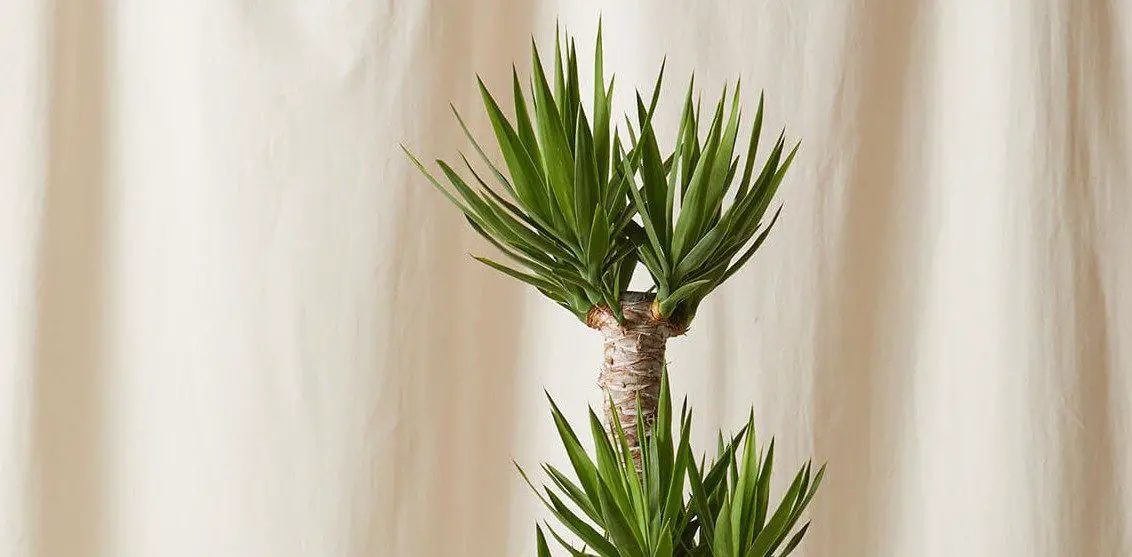
Yucca plants are beautiful plants that can be found in many gardens. However, if you notice your yucca leaves turning yellow it could mean trouble. This blog post will discuss what causes the yucca plant to turn yellow and how to fix the problem so that your plant stays healthy and looks great!
Why Are My Yucca Leaves Turning Brown?
Your yucca leaves are turning brown as a result of overwatering or leaf burn. While burnt leaves will be dry and crispy, brown leaves from overwatering tend to be moist.
This is why determining what caused the leaves to turn brown is important. I’ll go through these two causes in-depth, as well as what you can do to avoid it from happening again.
Brown Yucca Leaves from Too Much Water
If the soil is soggy and you see water coming out of the bottom of your pots, then this means that you are watering too much. This may also be accompanied by mold or fungus growing on top of the soil, which can result in root rot if left untreated.
You should never let yucca plants sit in pools of standing water, which can drown the roots and cause damage to your yucca plant.
The best way to avoid brown yucca leaves from too much water is to only water when the soil feels dry. This usually takes about one to two weeks, depending on the type of yucca plant you have and where you live.
You can test this by dipping your finger into the soil and feeling for moisture. If the top layer of soil feels dry, then it is time to water your plant! Alternatively, you can use a moisture meter that you can purchase at any convenience store.
The type of water you use is also important. Avoid using tap water as it contains chlorine and fluoride, which can damage the leaves of your yucca plant. Instead, use water from a rain barrel or filtered tap water to keep your soil moist without damaging the roots of your yucca plant.
If root rot is already present, then you need to act quickly to save your plant. The first step is to remove any rotten roots with sterilized scissors. Next, repot your yucca into fresh soil that drains well.
Brown Yucca Leaves from Leaf Burn
While water is usually the main culprit behind brown yucca leaves, leaf burn can also cause your plant to turn brown. This occurs when you expose yuccas to areas of direct sunlight or temperature extremes.
If you have been moving your yucca plant from indoors to outdoors, then the sudden change in sunlight can cause leaf burn. In this case, it is best to slowly introduce your plant into the intense sunlight over a period of two weeks before leaving them outside permanently.
If this happens, then the leaves will be dry and crispy instead of moist. You can save a sunburned yucca by placing it in partial shade for two weeks to allow the leaves time to heal.
It’s also important to be careful when using grow lights are other household heating items. While grow lights are great for providing your yucca plant with the proper amount of light, they can also cause leaf burn if you place them too close to the leaves.
The same is true for overheated rooms in the winter and summer months. If necessary, use a fan or open window to provide adequate ventilation instead of leaving your plants in an area that gets too hot.
Yucca Leaves FAQs
The yucca plant isn’t the easiest plant to care for. As such, I will now answer some common questions I get asked about the leaves of this beautiful plant.
Will yucca plant leaves turn green again?
No, it is unlikely for the leaves to turn green again. However, you can cut off the brown tips of your yucca plant to encourage new growth. New foliage should emerge in a few months.
Should I remove brown leaves from the yucca plant?
Yes, you should remove all dead leaves from your yucca plant. If you see brown tips, then it is time to cut those off and encourage new growth!
Will too much water cause the yucca plant to turn brown?
Yes, too much water can cause the roots to rot and result in leaf browning. If you notice this, then check your plant’s roots for signs of root rot. Any rotten roots should be pruned and discarded off immediately.
Why are my yucca plant leaves wet?
This is likely due to guttation, which occurs when excess water accumulates on the leaves and drips down into the soil. This is a natural process that does not harm your plant, although it can be unsightly if you have just watered your yucca plant.
Will direct sun cause yucca leaves to turn brown?
Yes, direct sunlight will cause yucca leaves to turn brown. Make sure you place your plant in a spot where it will receive partial sun and is protected from too much sunlight!
Conclusion
In conclusion, if your yucca plant has brown leaves, then it is best to check the soil for signs of overwatering. If you have ruled that out, then perhaps too much direct sunlight is the issue.
It’s important to get to the root cause of the issue if you want to save your yucca plant! If you have already identified the issue and it is root rot, then remove any dead leaves. Next, repot your yucca into fresh soil that drains well.
If leaf burn or sun damage has occurred, then take steps to provide adequate shade for your plant.
I hope this article provides you with the information needed on how to save a yucca plant that has brown leaves!
by Gardener Tim | Oct 20, 2021 | House Plants
Yucca plants are often used as ornamental plants in gardens because of their beautiful, sword-shaped leaves. However, if the leaves are turning yellow, it could be a sign that something is wrong. The following article will discuss why yucca plants turn yellow and what you can do to stop the leaves from changing color.
Why Are My Yucca Leaves Turning Yellow?
Your yucca plant is turning yellow because the plant has been overwatered, it hasn’t received enough light, or the environment is causing stress.
Let’s now explore the most common causes of yellowing leaves on a yucca and what you can do about them.
Yellow Yucca Plant from Overwatering
The most common reason why yucca leaves turn yellow is that the plant has been over-watered. When a yucca plant is overwatered, it doesn’t have enough oxygen in its roots and starts to rot.
The best way to water a yucca is to only water when the top inch of soil is dry. You will know this if you dip your finger into the top inch of soil and feel for any moistness. Alternatively, you can use a moisture meter (Amazon link) on the soil.
After watering, wait for any water to drain out before putting your yucca back into its environment. This will prevent water from accumulating near the plant’s base.
Another way to minimize the amount of water around the base is to use pots will drainage holes and soil that drains well.
If your yucca is overwatered and the leaves are turning yellow, you should immediately stop watering it until the soil starts to dry out again. At that point, reduce how much you water by half.
The type of water you use also matters. I only use filtered water, as the chlorine found in tap water can kill your plant.
If you have a houseplant that is suffering from root rot and yellow leaves, it’s important to take action immediately, or else the entire plant will die. Make sure to prune any rotten roots with a pair of sharp scissors. Next, you should repot your plant with fresh soil that drains well.
Yellow Yucca Plant from Too Little Sunlight
In addition to overwatering, the second most common cause of yucca leaves turning yellow is a lack of sunlight.
If your plant isn’t getting enough light from its current environment, you should move it closer to a window without any curtains or blinds during morning and afternoon hours when there are more direct rays of sun coming.
If the plant isn’t getting enough light by a window, you can always install grow lights (Amazon link to my favorite). They are great for any houseplant that requires more sunlight. In fact. I use them on nearly all of my houseplants in winter.
The type of grow lights you use for your yucca depends on how much light it gets naturally, as well as the room size and dimensions where the plant is growing. I would recommend using CFLs or T-lights to start out with because they are cheap and easy to install.
Yucca Plant Yellowing from Environmental Stressors
The third most common cause of yucca leaves turning yellow is environmental stressors. These are things that can cause stress to your plant, such as drafty windows or being in the path of people walking by.
If you find that your yucca is turning yellow because it’s constantly exposed to something like a draft through an open window, for example, move the plant out of the way and see if its leaves start to return back to their normal green color.
If that doesn’t work, you can always install a draft guard around the area where your yucca is growing if it continues being exposed to too many environmental stressors.
You should also make sure there are no people or pets walking by your plants because they cause vibrations in the environment that can also damage your plants. If you notice any of these things happening, make sure to move the plant away from them and see if it starts to turn green again.
If none of this works, you might have a pest infestation in your yucca plant and should seek the help of an expert at identifying what kind of bug it is and how to get rid of it. I’ve had great success with using neem oil to get rid of bugs in my houseplants.
Yellowing Yucca Leaves FAQ
Yucca plants aren’t the easiest to care for, especially when the leaves start changing color. As such, I will now go through the most frequently asked questions to do with this issue.
Should I cut yellow leaves off my yucca plant?
Yes, you should prune off any leaves that are yellow. Make sure to use a sharp pair of scissors or garden shears that have been cleaned with rubbing alcohol (to prevent the spread of any diseases or pests that may be living in your plant).
Will the yellow leaves spread to other plants?
Only if your yucca plant has a fungal infection or your plants are being kept in the same environment.
Does the type of water matter?
Yes, I recommend only using filtered water on your yucca plant. Tap water contains too many chemicals that can kill your plant.
Will too little light cause my yucca to turn yellow?
Yes, if your yucca has not been getting enough light it will turn yellow. Make sure to move the plant closer to a window with indirect sunlight during morning and afternoon hours, or install grow lights if you don’t have access to natural light in the winter months.
Will too much water cause my yucca eaves to turn yellow?
Yes, if your yucca plant has been receiving too much water, it will turn yellow. In fact, overwatering is the number one reason why people’s houseplants die.
Make sure to only water your yucca when the soil surface feels dry and use filtered or bottled water if possible because tap water contains chemicals.
Will yellow yucca leaves turn green again?
No, it is unlikely for the leaves to turn green again. The good news is that new foliage should start to appear within a couple of months.
Conclusion
In conclusion, yucca leaves turning yellow can be caused by a number of different things, such as watering problems or lack of sunlight. If you make sure to take care of your yucca plant properly (by providing it with enough sunlight and water) its leaves will stop turning yellow.
If you have found that there are pests on the plant, I recommend using neem oil or another natural pest control product.
I hope this blog post has helped answer all your questions about yucca plant leaves turning yellow. If you have any other questions, feel free to leave a comment down below and I will get back to you as soon as possible!
by Gardener Tim | Oct 18, 2021 | House Plants
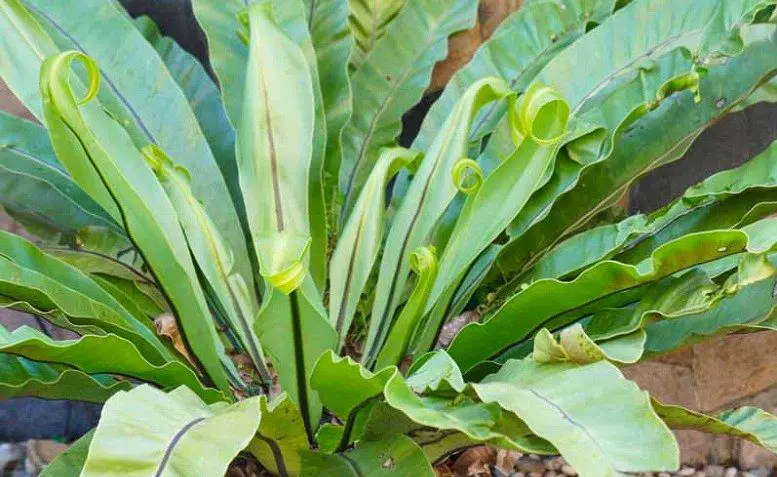
The bird’s nest fern (Asplenium nidus) is a popular houseplant and can be grown in many different conditions, but sometimes they become yellow and unhealthy.
This article will teach you why your bird’s nest fern may be turning yellow, what to do about it, and how to prevent future issues with this plant.
Why Is My Bird’s Nest Fern Turning Yellow?
Your bird’s nest fern is turning yellow because the plant has been overwatered, it hasn’t received enough light, or the environment is causing stress.
Let’s now explore the most common causes of yellowing leaves on a bird’s nest fern and what you can do about them.
Yellowing Bird’s Nest Fern from Overwatering
If your bird’s nest fern is turning yellow, the most common reason for this is that it has been overwatered. If you recently increased the amount of water that your fern is receiving, it could be caused by this.
To prevent your bird’s nest from becoming yellow due to overwatering, make sure the potting medium drains freely and only provides enough water to keep the plant moist, but not soggy.
Never allow any excess standing water in its container since soggy conditions can cause root rot. You can also help your plant by using a pot with drainage holes and soil that drains well.
The best way to prevent overwatering is to only water the soil when the top inch of soil is dry. You can test this by poking your finger into the soil. If it feels dry, you can water the plant by adding a small amount of water at a time.
Alternatively, you can use a moisture meter, which can be found in most home improvement stores, to determine if it is time to water the plant.
If the yellowing gets worse, root rot can soon take over. Your plant is asking for help, so give it some extra attention by checking for rotting roots. Any you find should e pruned and discarded away from your plants.
Next, repot your bird’s nest fern into a fresh potting mix that drains well. With a bit of time and luck, your fern should recover from the root rot and turn green again soon.
Yellowing Bird’s Nest Fern from Too Little Sunlight
If your bird’s nest fern is turning yellow and you recently moved it to a location where it is not receiving enough light, it could be due to this.
If your plant is yellowing because of too little sunlight, move the plant into a location where it will receive bright indirect or filtered sunlight for most of the day. This will allow the plant to produce new leaves that are green instead of yellow.
I keep my bird’s nest fern in a south-facing window where it receives indirect light, but not direct sunlight. I once tried keeping it in the hallway, but this started to turn the tips yellow, so I quickly moved it.
If you don’t have another suitable location to put your bird’s nest fern, consider setting up a grow light. I use grow lights for all of my houseplants, especially during the winter months when there isn’t much natural sunlight.
Yellowing from Environmental Stressors
If you recently moved your plant, it could be turning yellow due to environmental stress caused by the move. If this is the case, simply allow some time for the fern to adjust before worrying about how much sunlight or water it receives.
Many fern owners make the mistake of repotting their stressed plant. However, this usually only makes the problem worse because it only adds more stress.
If your bird’s nest fern is turning yellow, you should only repot if necessary. If it does need a new potting medium or larger container, make sure not to disturb its roots too much.
Yellowing Bird’s Nest Fern Leaves FAQs
I will now discuss some of the most frequently asked questions when it comes to yellowing leaves on a bird’s nest fern.
Should I cut yellow leaves off my bird’s nest fern?
Yes, cut all yellow leaves off the plant completely to encourage new growth. This will allow more light into its center area where it is healthy. This encourages healthy new growth throughout the plant.
Will the yellow leaves spread to other plants?
Only if the cause is a fungal infection. In this case, use neem oil or another fungicide to treat your bird’s nest fern.
Also, your other plants may be getting yellowing leaves because they are in the same exact environment as your fern.
For example, if your fern is stressed du a cold draft, it is highly likely that your monstera plant 1m away will also become stressed.
Does the type of water matter?
Yes, I recommend only giving filtered water to your fern. This will help prevent yellow leaves due to hard water build-up.
Will too little light cause my bird’s nest fern to turn yellow?
Yes, if the plant receives too little light, it will turn yellow. This is especially true for plants that are kept in low-light locations like hallways.
Will too much water cause my bird’s nest fern to turn yellow?
Yes, if the plant is left sitting in standing water for too long, it will begin to show signs of rot. This can include a loss of leaves and a yellowing stem coloration on the fern’s trunk.
Will yellow bird’s nest fern leaves turn green again?
No, it is unlikely that the yellowing leaves will turn green again. However, you can remove the yellow leaves to encourage new growth.
Conclusion
In conclusion, your bird’s nest fern may be turning yellow because of overwatering, not receiving enough light, or environmental stress.
Make sure to only water the plant when the top inch of soil is dry and provide it with bright indirect sunlight for most of the day.
If your plant does need a larger potting medium or container, make sure to disturb its roots as little as possible.
I hope this article helped and good luck!
by Gardener Tim | Oct 18, 2021 | Plant Care
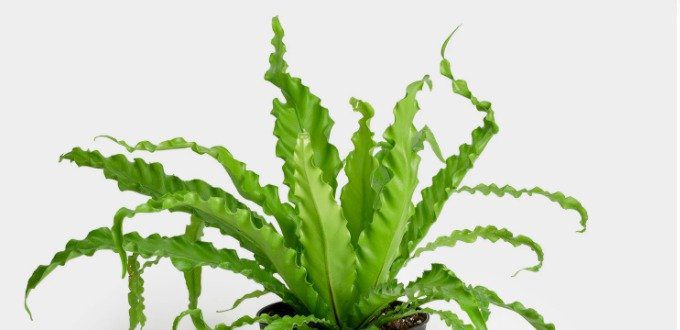
A Bird’s Nest Fern is one of the most popular types of ferns. They are known for their glossy leaves and low-maintenance requirements. But, if you notice your bird’s nest fern has turned brown, don’t panic! We have some great information that will help you get it back to its original green color in no time.
Why Is My Bird’s Nest Fern Turning Brown?
Your bird’s nest fern is turning brown as a result of overwatering or leaf burn. While burnt leaves will be dry and crispy, brown leaves from overwatering tend to be moist.
This is why determining what caused the leaves to turn brown is so important. I’ll go through these two causes in-depth, as well as what you can do to avoid it from happening again.
Browning Bird’s Nest Fern Leaves from Overwatering
Overwatering is the most common cause of brown leaves on your bird’s nest fern. The excess water causes the roots to rot, which prevents them from taking up enough oxygen. This will lead to root death and eventually affect the rest of the plant too.
Your first clue that you are overwatering your bird’s nest fern is by noticing brown, moist leaves. The second clue will be the appearance of dark mold on the soil or at its base.
It’s recommended to only water your bird’s nest fern when the tip inch or so of soil is dry. You can test this by sticking your finger into the soil. If it feels dry, then it’s safe to give your plant some more water.
To stop any water from sitting at the bottom of the container, you should always use a pot with drainage holes and allow any excess water to drain away after watering your plant.
Failure to use sufficient drainage can result in root rot. If your plant is already affected, then you need to act fast by removing the rotten roots as soon as possible. Next, repot your plant into fresh soil that is well-drained.
The type of water matters too! It’s best to avoid using water, which has chlorine or fluorine in it. I recommend using filtered water that has fewer chemicals in it.
Browning Bird’s Nest Fern Leaves from Leaf Burn
It’s not uncommon for ferns to burn their leaves when they are exposed to strong, direct sunlight. This can make your plant unattractive with brown burnt edges on the fronds.
The best way to prevent leaf burn is by gradually introducing more light exposure over a period of weeks or even months. If you have recently moved your bird’s nest fern to a new location, then it’s important to do this gradually.
To save a sunburned bird’s nest fern, you should trim off any burnt leaves. Then, provide it with low light conditions until the plant has recovered. It could be a good idea to hide the plant behind other plants or a dark curtain that blocks the sun.
Remember, leaf burn is caused by too much light exposure rather than not enough. If you are unsure about how your plant will respond in the new location then it’s best to gradually introduce more light over time!
It’s also important to be careful when using any grow lights around your fern. The heat can cause the leaves to burn, so keep any lights at least six inches away from the plant.
Browning Bird’s Nest Fern Leaves FAQs
The bird’s nest fern is not the easiest plant to grow. As a result, I’d like to address some of the most frequently asked questions about its leaves.
Will brown bird’s nest fern leaves turn green again?
No, it is unlikely that the leaves will recover. They are beyond saving and you need to focus on growing new ones!
Should I remove brown leaves from the bird’s nest fern?
Yes, as soon as you notice them. The longer you allow the leaves to stay on your plant, the greater chance that they will affect other parts of your plant. Besides, pruning will make your plant look more attractive.
Will too much water cause the bird’s nest fern to turn brown?
Yes, too much water can cause your bird’s nest fern to turn brown. This is because the roots are unable to take up enough oxygen, which leads them to die off.
Why are my bird’s nest fern leaves wet?
This is likely due to guttation, which is when the plant releases excess water out of its leaves. It’s caused by warm temperatures and high humidity, which encourages rapid transpiration.
Will direct sun cause bird’s nest fern to turn brown?
Yes, direct sunlight can cause your plant to burn and turn brown. You should always provide it with indirect sunlight or filtered light instead! This will prevent any leaf burn or browning.
Conclusion
In conclusion, there are two main reasons why your bird’s nest fern is turning brown. The first reason is overwatering, which causes the roots to rot and fail to take up enough oxygen due to excess water sitting at the bottom of the container.
The second reason is direct sunlight causing leaf scorch from too much sun exposure. The brown leaves are dry and crispy, while burnt leaves tend to be moist.
There you have it! Follow these tips if you want to avoid your plant from turning brown again.
by Gardener Tim | Oct 18, 2021 | House Plants, Plant Care
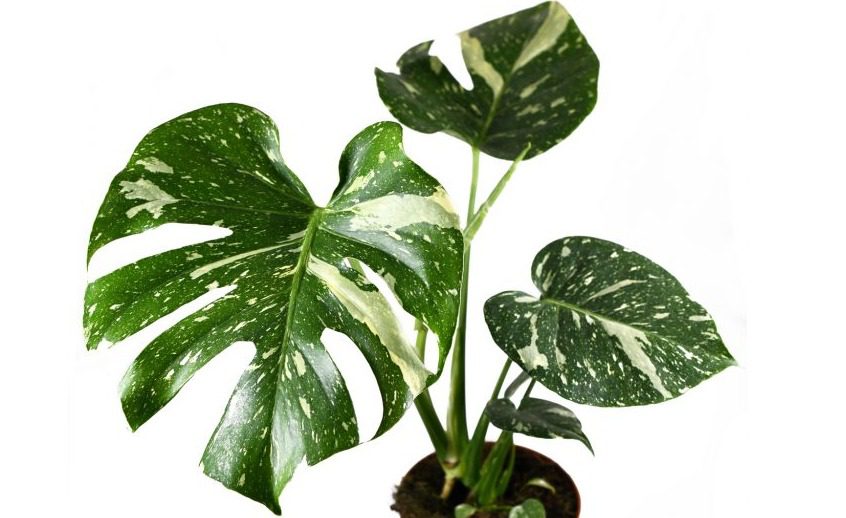
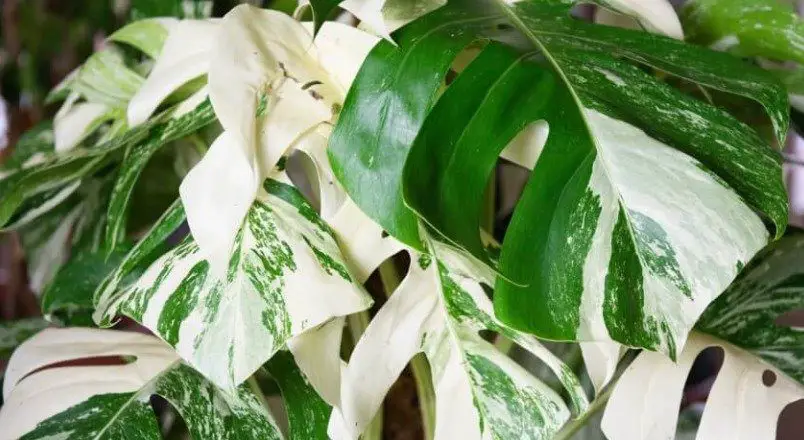
Variegated Monstera is a beautiful, hardy plant that is perfect for any living space. In fact, they are my favorite houseplants!
These plants are well-known for their long vines and green leaves with cream variegation. This variegation is unique and beautiful, which is why it can be hard to find a place to buy this plant – the demand is that high.
Read on for our care guide to help ensure the healthiest growth possible.
Variegated Monstera Care Guide
The best method to maintain a variegated monstera is to follow the same care instructions as a normal monstera, however, move it closer to the sun since the variegated variety requires more light. The following variegated monstera care guide is a good place to learn more:
Light – Variegated lights need more light than plain green monsteras. Make sure they are in a spot that gets sun for at least half the day. You may also need to use grow lights for extra supplemental light.
Watering – Keep soil moist, not wet. Allow to dry slightly between waterings and never allow the plant to sit in a tray of water or remain sopping wet for extended periods of time.
Humidity – Moderate humidity is important for growing healthy variegated monstera plants. If the relative humidity drops below 50%, it is suggested to increase the humidity by misting plants, adding a humidifier, or grouping plants together.
Temperature – The best temperature for variegated monsteras is between 65 and 80 degrees Fahrenheit. This is an average temperature though, so they can survive some hotter days too.
Potting – Repot your monstera if it is in a small pot or if the plant is suffering from root rot. Repotting too often can cause rot, so it is important to only repot when necessary.
Pests – Variegated monsteras are not more or less prone to pests than green monsteras. The most common pest problems are mealybugs, whiteflies, and scale insects.
Fertilizing – Only fertilize your variegated monstera if it is potted in soil that contains slow-release fertilizer or you have been adding liquid fertilizer to the plant’s water. Over-feeding can cause rotting and an increase in pests.
Pruning – Prune off any dead leaves and cut back any long vines to maintain a healthy, compact plant.
Does a Variegated Monstera Need More Light?
Yes, variegated monsters plants need more light than other types of monstera. This is due to the fact that they have fewer chlorophyll cells than the solid green monsters.
I recommend using LED grow lights (Amazon link) on your albo monstera plant if it is not getting enough light. They are great for helping your plant thrive, as well as maintaining the variegation.
Is a Variegated Monstera Plant Poisonous?
Variegated monsteras are not poisonous and it is safe to be around them with pets and children. However, all parts of this plant will cause discomfort if ingested, so make sure there is no risk of these pieces falling into areas where people or animals could reach them.
How to Water a Variegated Monstera Plant?
Water your variegated monstera when the top few inches of soil are dry. You can test the soil by sticking your finger in about an inch. If it is dry, then you should water the plant.
Watering too much or too little can have dire consequences for your plants, so keep an eye on the soil and be ready to water it as needed. A moisture meter might be helpful if you are unsure.
What Soil Should I Use to Plant a Variegated Monstera?
Variegated monsteras are very adaptable to different types of soil for planting, but they prefer well-draining soil that has been mixed with sand or perlite. They also like it moist, but not wet.
What Temperature Does a Variegated Monstera Need?
Although variegated monsteras are more sensitive than regular green monsters, they still prefer temperatures between 60 and 70 degrees Fahrenheit during the day. I wouldn’t recommend letting the temperature drop below 50 degrees Fahrenheit if you live in a cooler climate.
Why Is Variegated Monstera So Expensive?
Variegated monstera plants are much more expensive than solid green ones because they are harder to come by. They also take a long time to propagate, which is why you may not see them around often in stores and nurseries.
How Do I Make My Monstera More Variegated?
The only way to make a monstera more variegated is to remove the green leaves and propagate the variegated leaves. You want as much energy to go towards the white leaves, so make sure to remove the green ones.
However, it’s also important not to have too many white leaves. Monstera albo leaves that are completely white are unlikely to survive as they rely on photosynthesis to survive.
How Do You Maintain Variegation on a Variegated Monstera?
Maintain variegation on your monstera by providing plenty of light to the plant. This will ensure that the plant will receive enough light to maintain its variegation. I recommend using monstera grow lights if you are struggling to give enough light to your variegated monstera plant.
Conclusion
In conclusion, variegated monstera plants are fantastic houseplant that is worth the high price tag. They can be difficult to find, so if you do see them in stores or nurseries, I highly recommend purchasing one. However, do your due diligence by checking the plant’s health before you buy it.
For example, it’s best to stay away from variegated monstera plants that have completely white leaves. These plants are very unlikely to survive in the long run.
If you follow these care guidelines, then your variegated monstera will be a healthy addition to your home. I hope that this blog post has helped answer any questions you may have had about caring for your own variegated monsters.