by Gardener Tim | Sep 23, 2021 | House Plants, Plant Care
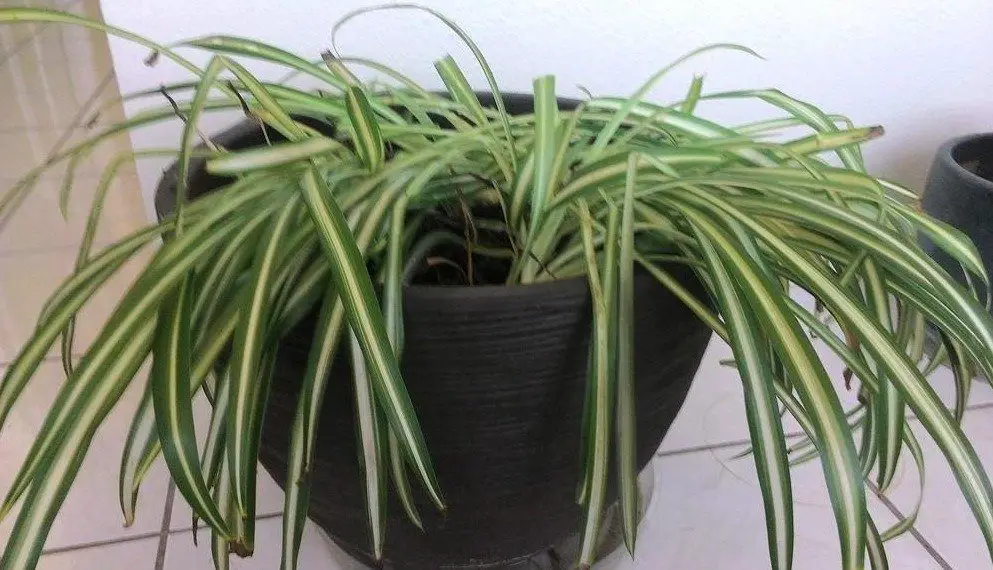
Spider plants are a great way to add some natural beauty to your home while also purifying the air. Unfortunately, sometimes they can start drooping or seem sickly.
If you have a spider plant and it is drooping, there could be a variety of reasons why this might be happening. In this article, we will discuss possible causes of drooping in spider plants and how to fix them!
Why Is My Spider Plant Drooping?
The most likely reason why your spider plant is drooping is because of overwatering. Spider plants have thick roots that are able to store water, so the plant will be unhappy if given too much water.
Another common reason for the spider plant leaves drooping is due to a lack of sunlight. In fact, low-hanging leaves go hand-in-hand with sunlight issues.
How to Stop Spider Plant Drooping?
You need to take action immediately by giving the spider plant less water and providing more sunlight. Doing this will bring the spider plant leaves back to life.
1) Less water
Giving less water is most likely the best thing you can do for a drooping spider plant. Since the roots are storing water, the entire plant will start to wilt if too much is given!
If your spider plant leaves are turning yellow because it has been overwatered, this means that irreversible damage is already starting. It’s important to act now before it is too late.
Spider plants need water only when the soil is dry. Instead of watering every day, you can water it once a week to make sure there are no issues with over-watering!
I wait until the top 50% of the soil is dry before giving more spider plants any more water. This is the best way to prevent overwatering.
When I had my first spider plant, this was actually my mistake that caused the leaves to wilt in the beginning. It’s important not to make this same mistake because once the damage happens…it can’t be reversed!
You also need to make sure that there is good drainage at the bottom of your pot so all excess water flows out easily. This prevents any standing puddles near the base of each stem which could rot out new growths and kill them entirely!
While we are on the subject of watering spider plants to avoid droopiness, it’s important to only give filtered water that is room temperature. Not doing this can shock your plant with cold water, which would also cause drooping and even worse issues.
2) More sunlight
Spider plants need sunlight to produce chlorophyll and thus make food for themselves. If you keep your spider plant indoors, it’s necessary to put them near a window where they will receive good sunlight exposure.
You should immediately move your spider plant closer to a sunny area so that it can start recovering. Windows are a good location, but make sure the sun doesn’t shine directly on the plant for too long.
If your home doesn’t offer enough natural sunlight, then you may want to purchase an LED grow light to help provide the plant with artificial light.
I use a grow light on all of my houseplants during the winter months and in rooms that have small windows. It keeps their foliage green and healthy!
Droopy Spider Plant FAQs
There’s a good chance that you still have many questions. If so, I will now answer some of the most frequently asked questions
Will droopy spider plant leaves kill my plant?
No, but droopy leaves are a sign of other issues. If your spider plant is drooping, it’s likely because the roots have stored too much water or there isn’t enough sunlight for photosynthesis to occur. So although the droopiness won’t kill the plant directly, the underlying cause of the droopiness could!
Do I need to repot a drooping spider plant?
Repotting is only necessary if you suspect that your plant has root rot. If not, avoid repotting your spider plant, otherwise, you may stress the plant and cause it to die.
What if the problem keeps coming back?
If your spider plant keeps experiencing drooping leaves even after you have tried to fix the underlying issue, then the only option is to repot it. Potting a spider plant in a new pot with fresh soil can help get rid of any root rot that might be occurring!
Why are my spider plant leaves drooping after watering?
Droopy spider plant leaves can be a sign of over-watering. Spider plants need water only when the soil is dry and should not be watered every day! Too much water will cause the leaves to droop.
Why are my spider plant leaves drooping after repotting?
Droopiness can also be a sign of shock from repotting. It’s possible that the roots were damaged during the process and need time to heal, so avoid fertilizing or watering for about two weeks after replanting your spider plant in a new pot!
Conclusion
In conclusion, spider plants can be a beautiful addition to your home. Unfortunately, sometimes they may seem sickly, and drooping is an issue that you might notice.
The best way to combat the issue is by reducing how much water it receives and providing more sunlight. If you do those two things, your spider plant leaves will be back to life in no time!
I hope this article has helped answer any questions or concerns that you had about why spider plant leaves are drooping! Let me know in the comments section what other issues you’ve experienced with your own spider plants!
by Gardener Tim | Sep 23, 2021 | House Plants
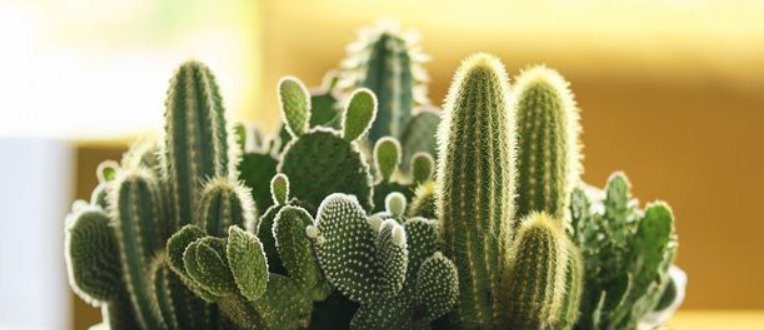
Cacti are some of the most popular house plants in the world. They are low-maintenance, easy to care for, and can live for up to 25 years! Many people know that cacti are desert plants that thrive on little water because they store it in their stems.
But what you might not know is whether or not cactis go dormant during the winter months? We’ll explore this question and provide tips on how to keep your cactus healthy through the winter months.
Do Cacti Go Dormant?
Yes, most cacti go dormant during the winter months when the temperature drops. This is called dormancy and it’s important that you don’t disturb your plant during this time!
If not properly taken care of, they can die once they’ve gone dormant for too long. The best thing to do with your cactus during the winter months is to just leave it alone.
In fact, it is shown that letting your cacti enjoy cold weather will promote flowering in the following growing season.
What Do Dormant Cacti Need?
During the winter months in most climates, your dormant cacti should go without water for around four to six weeks. You can tell if your cacti are ready to be watered again when their color returns and new growths begin sprouting up out of the soil.
Keep the cacti in a cool spot that doesn’t experience heating. This is the only way to allow your cacti to go into dormant mode. It’s advisable to keep dormant cacti in temperatures of roughly 50 degrees Fahrenheit. The area should also be dry and not very humid.
Sunny conditions can be really harsh on plants, so it’s important that you slowly and carefully introduce your cacti back into the sun when the dormancy period is over. If you’re not careful, the sun will burn your delicate cacti!
I like to place my dormant cacti on a windowsill in February/March, as this allows the plant to receive more sunlight and warmth, but doesn’t let them burn under direct sunlight.
Will Cacti Go Dormant in Warm Temperatures?
When kept inside in warm temperatures, the cacti won’t know that it’s winter, so will continue growing throughout the whole year.
This is why many bring their cactus indoors for the winter months when they don’t want their cacti to go dormant (although I don’t do this) where they will be kept at a comfortable room temperature.
That being said, always make sure that there is enough light and ventilation in the area of placement because not enough air circulation could lead to disease growth on your plant.
Cacti Dormancy FAQ
You may have a few questions on cacti dormancy, so I’ll now answer some of the most frequently asked questions.
Will cacti go dormant if they are kept indoors?
No, cactus plants will continue growing year-round in most conditions. Cacti only “go dormant” when the temperature drops below freezing. If you want to keep your plant alive during dormancy (winter), place it somewhere where it will get sunlight and make sure there is enough air circulation around it.
Can I overwater my dormant cactus?
Yes! Overwatering is often the number one cause of death for a houseplant. Dormant or not – just because your plant isn’t growing doesn’t mean that you should neglect water completely. Keep soil moist but don’t overdo it with too much H20 – this can lead to root rot and other issues.
What time of year do I water my cactus?
Cacti should be watered in the spring and summer when they are growing actively. If you’re not sure, it’s best to err on the side of caution and wait until your plant starts showing signs that it needs some H20 (new growths or changing color). Just don’t go more than a month without watering – even dormant plants need moisture!
How do I know if my cactus is dormant?
Most cacti will stop growing new leaves and look really dry. If you see this, your plant is most likely hibernating – just leave it alone until spring!
Is my cactus dormant or dead?
If your cactus isn’t showing any signs of life, it’s possible that the plant has died. Obvious signs that your cactus is dead are when spikes fall off or the plant topples over.
However, before you make this decision – check for rot or mold on the roots and in the soil. If there are no visible signs of decay – repotting is usually a good idea to see if your plant will start growing again!
Conclusion
In conclusion, yes, cacti go dormant during the winter months. It is important to keep your plant in a sunny location with enough space for ventilation and air circulation while it’s sleeping or you could risk having diseases develop on your plant.
During this time, you should water your plant sparingly (every two to six weeks) and make sure that the soil is more dry than moist. After this dormant state, you can start watering more regularly until spring when it will come out of its dormant state.
I hope you found this blog post beneficial. Thank you for reading and if there is anything else I can help with, please let me know in the comments below!
by Gardener Tim | Sep 23, 2021 | Plant Care
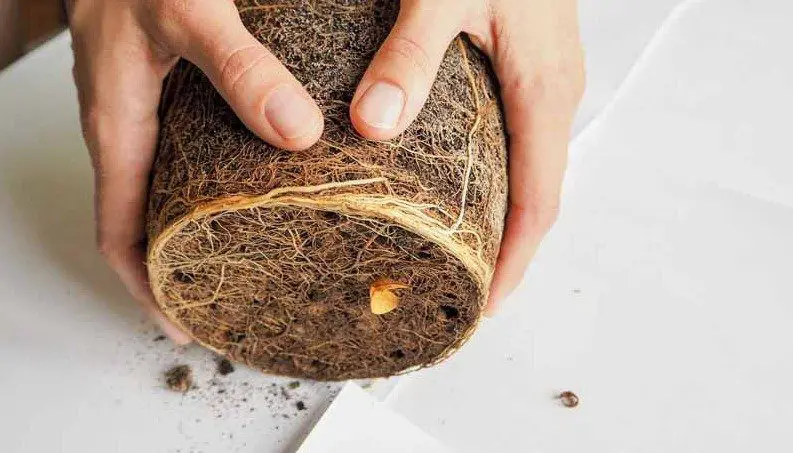
Plants are finicky creatures. They grow in all sorts of different ways, and it can be difficult to know the best way to care for them. One question with a lot of people is whether or not they should untangle plant roots when transplanting plants.
In this article, we’ll discuss what you should do when the roots become tangled and why it’s important to consider all options before untangling them.
Should I Untangle Plant Roots When Transplanting?
Yes, untangling plant roots will help a plant to grow more successfully. However, it must be done carefully and with consideration for the entire plant. Not untangling the roots can result in a lack of nutrients reaching the plant, which can lead to a slow death.
There are several ways that you can approach untangling roots of transplanted plants and each has its own benefits and drawbacks depending on your gardening needs.
The best way is to remove the bottom half with a saw, and then use a fork or chopstick to loosen the roots.
Many people use a hose to bare-root their plants. However, doing this can destroy the feeder roots, which are vital to the plant’s health.
Fortunately, roots are resilient. They will grow back again so you don’t need to worry about it too much! Just be sure not to go overboard by ruining all of them! The goal is to allow the roots to reach the new soil, not to remove them all completely.
Is It Ok To Trim Roots When Transplanting?
Yes, you can trim the roots when transplanting your plant. This, however, should be done very carefully and with a lot of consideration for the plant.
Use a pair of sterilized scissors to trim the roots. Be sure to cut them neatly and make snips instead of cuts when possible for a cleaner look.
You can also use gardening shears or pruners, but be very careful not to damage the plant by removing too much root! This will ultimately do more harm than good when transplanting plants because it will prevent them from absorbing water properly in their new environment.
Should I Break up the Whole Root Ball When Transplanting?
There is no need to break up the root ball when transplanting plants.
It is important, however, to loosen the rest of the roots with a fork or chopstick if possible. This will help your plant grow better by allowing water and nutrients easier access into the soil once you have transplanted them in their new home!
You can also use a hose for this process but make sure not to damage feeder roots while doing so.
Untangling Roots FAQs
In case you’re still a bit unsure, I will now answer some of the most frequently asked questions.
When should I untangle plant roots?
The best time to untangle roots is when you first transplant your plants. It’s best only to untangle when absolutely necessary.
How long will roots take to grow after transplanting?
If they are untangled properly, plant roots should regrow very quickly after transplanting! As a general rule of thumb, most plants will begin showing signs of recovery within two weeks or so. However, some may need up to three before they look as good as new again. Just be patient and wait for them to come back on their own!
How do I remove the bottom half of a root ball with a saw?
Wear protective gear and cut straight through the middle, making sure not to damage other parts of the plant!
What should I use if my scissors get too dirty or wet while trimming branches/roots? It’s important that they stay as clean as possible so disinfect them after each use by dipping them in alcohol for about five minutes before thoroughly drying them off.
Do all types of plants need their feeder roots intact?
No, but most will benefit from it! Feeder roots are vital because they provide water and nutrients directly into the soil where the rest of the plant’s roots are located.
Where should I cut when removing a root ball with gardening shears? Cut off the bottom half of the root ball and use a fork or chopstick to loosen any other tangled roots around it before gently shaking them out! Be very careful not to damage feeder roots while doing so though!
Is there anything else that I can do for my transplanted plants after untangling their roots?
Yes, making sure they get plenty of water is really important too because this will help your new plants settle into their new environment easily and grow even better over time!
Conclusion
In conclusion, you should always remove the bottom half of the plant with a saw and then loosen up the remaining roots by using a fork or chopstick.
If you follow these steps, you will have happy and healthy transplants that are well on their way to thriving in their new home.
by Gardener Tim | Sep 23, 2021 | House Plants
The Monstera deliciosa is a tropical plant that has been around for centuries. In fact, it is one of the world’s most popular houseplants. It has large, glossy leaves with an exotic look about them.
If you are the proud owner of one of these beauties, then you may have wondered if it is possible to propagate without using a node. Well, let’s find out…
Is It Possible To Propagate a Monstera Without a Node?
No, it is not possible to propagate a monstera without a node. This is because nodes contain everything needed for new growth. While you can keep cuttings in water for a few weeks, nothing will grow if there isn’t a node present on the cutting.
Many people make the mistake of planting a monstera leaf and expecting it to grow into a new plant. However, they are frequently left disappointed when nothing happens. This is usually the case when a monstera stem breaks and the owner tries to save the stem.
I will explain what node is and why they are so important when you want to propagate your monstera plant…
What is a Monstera Node?
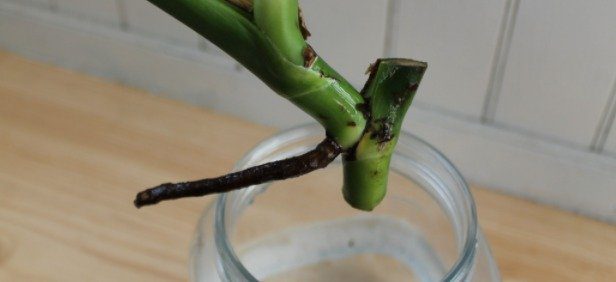
A monstera node is the point on the stem where new growth can be generated. When you take your monstera leaf and place it in water, this process will eventually create a root system at nodes on the stem of the plant.
A monstera node is found on every petiole of your monstera plant. It is important to note that they may not be easy to spot. However, if you look closely at the stem of your monstera plant, then you will be able to see white/brown knobs poking out from the plant – these are the nodes!
Monstera plants are known for their ability to put out new growth. In fact, each individual node comes with the potential of developing more leaves and roots, meaning that there can be many opportunities to propagate the monstera.
How To Take a Monstera Node Cutting?
Now that you know what a monstera node is, you might be wondering how to take one of these nodes and grow a new monstera plant. It is quite simple to propagate your own monstera stem by following these steps:
1) Look for the “V”
First, look for the perfect node to cut. Do this by looking for the “V” shape, which is the exact location on the stem where two leaves split from each other. To be sure you’ve included a node, cut two to three inches below the “V.”
When deciding where to cut, think about the shape and size that you want for your mother plant. It is best to have at least one node on your cutting, but it is even better if there are many nodes and leaves.
2) Cut with sterilized shears
Next, make a cut a few inches below the “V”. It’s important that the shears or scissors are sterilized so no bacteria is transferred to the plant. Also, be sure not to touch any leaves when you are cutting because this will spread dirt and contaminants onto your new monstera stem.
Make a clean cut. There’s no need to saw at the stem. If you are, there’s a good chance you have some blunt shears, which need replacing.
3) Prune smaller leaves
This isn’t 100% necessary, but many people do it so that most energy goes to the large plants and other important areas.
How to Root a Monstera Node Cutting?
You can choose to root a monstera node cutting in either soil or water. The decision is up to you, but there are a few factors that might sway your decision. I prefer water as it allows you to watch the node cutting grow and flourish.
Here’s how to propagate a monstera node:
1) The first step is to let the node cuttings dry for 10 minutes. Doing this prevents root rot when the open area scabs over.
2) For rooting in water, it’s best to use a tall pot with plenty of room for your stem. A wide container is also suitable but make sure that the stems are upright so they don’t tip over. Position the monstera steam in the container, and then add water on top. The leaves should be outside of the water.
You can use any type of water, but I always prefer using filtered water when watering plants or propagating new ones. You may also want to dip the cutting into honey before propagating.
3) After a few months, roots should be emerging from the node. This is when the cutting can be moved into a pot filled with well-draining soil. It may be a good idea to use potting soil with at least one drainage hole in it. A small container is necessary, too!
4) Rooting hormones can be helpful for fast-growing plants like monstera plants. Use a little rooting hormone on the end of your cutting before planting to speed up development and help new roots form more quickly than they would otherwise.
5) Plant the cutting deep to keep all roots and nodes below ground level. Make sure to bury it deep enough for stability and balance!
Monstera Node FAQs
Monstera propagation isn’t the easiest thing to learn. As such, I will now answer some of the most frequently asked questions.
What are internodes?
Internodes are the spaces between nodes. They help to increase a monstera stem’s strength and flexibility, allowing it to grow up into trees in its natural habitat…
How long do monstera leaves stay fresh?
Monstera leaves typically last around two weeks when placed in water. However, if cuttings from your plant don’t root within this time frame, you should discard them as they will not take.
Is an aerial root a node?
No, aerial roots are not nodes, but aerial roots do protrude from nodes. These long, white tendrils that grow from Monstera stems allow the plant to climb and cling onto branches in its natural habitat. You can learn more about aerial roots here.
What is a monstera petiole?
A Monstera petiole is the stem that connects the monstera leaf to the main monstera stems. They are easily identified by their darker green color, which contrasts with the paler monstera leaf.
Conclusion
In conclusion, monstera propagation is a fun and easy way to create new plants. Although many people don’t realize this at first, you can only propagate a monstera that has a node attached.
Trying to propagate a nodeless cutting is a complete waste of time. Just follow the steps above, and you’ll be well on your way to growing lots of monstera plants!
I hope you have enjoyed reading this blog post. If so, feel free to check out my other blog posts on monstera propagation, monstera care, and more! If you would rather divide your monstera into two plants, then I have a great article on how to split a monstera.
by Gardener Tim | Sep 23, 2021 | Plant Care
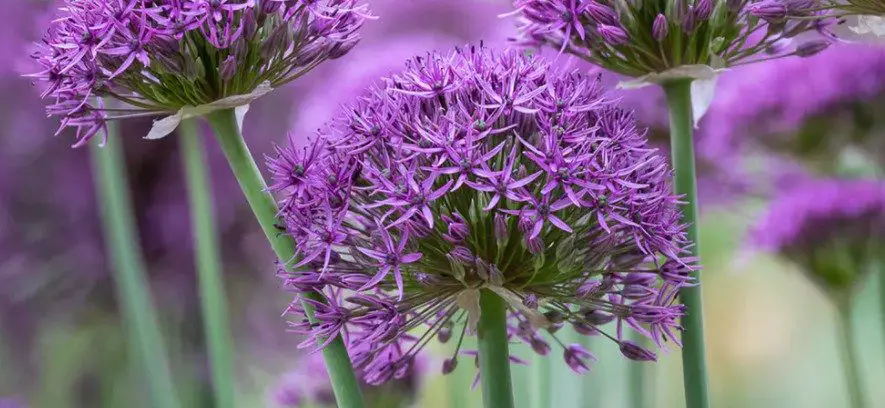
Many people have a lot of questions about allium bulbs. Do they multiply? What type of soil do you need to plant them in? What sorts are best for certain climates?
There is a lot that goes into caring for these plants, and it seems like the more we try to answer one question, the more questions arise! In this blog post, I will answer some common inquiries about allium bulbs so you can care for them properly.
Do Allium Bulbs Multiply?
Yes! Alliums reproduce by creating bulblets on their flower stalks or from their bulbils at the end of each flowering stem. This reproduction happens most often when conditions are favorable with plenty of water and rich soils, which allow them to grow quickly. While the bulblets are not as large or strong as their parent bulbs, they can be separated and replanted in another area of your yard for more flowers next year!
How Quickly Do Allium Bulbs Multiply?
Alliums multiply quickly, especially when they are given favorable growing conditions. I tend to see them germinated within 2-3 months, while it takes roughly a year to flower. They can double in size every year if planted in the right place and cared for correctly!
How To Make Allium Bulbs Multiply Quicker?
When planting allium bulbs, choose a spot with rich, moist soil and full sun exposure. While they can handle some shade or dappled sunlight throughout the day, it is best to plant them in an area where they will have access to plenty of sunshine so their flowers grow big and strong!
Doing this will give your allium bulbs the best chance of growing fast and multiplying in no time at all!
Which Allium Bulb Types Multiply the Best?
All types of alliums multiply quickly when given proper care. However, there are certain varieties that excel at multiplying faster than others depending on your climate zone, as well as how much space you have for planting.
If you live in a colder climate zone where frost comes early, try growing ‘Early Giant’, which blooms very early before other plants come out of dormancy! For warmer climate zones, ‘Purple Sensation’ is a good choice because it can handle heat and humidity better than other varieties.
If you live in the southern part of the United States where alliums are lush year-round with no frost to worry about, growing any type will give you beautiful flowers! All types grow quickly regardless of climate zone or location.
So if your garden has full sun exposure for most of the day but doesn’t get too much water during dry seasons, planting an allium variety that grows well in those conditions will be best for making them multiply more easily.
When Should I Divide Allium Bulbs?
It is best to divide allium bulbs when they show signs of being smaller and overcrowded. There are two ways you can go about dividing your allium:
Separate and replant bulblets after flowering has finished. Separating them from their parent bulb makes it easier for the plant to focus on growing one strong flower rather than splitting energy between multiple flowers!
Sift through old foliage, remove dead stems, and use a sharp knife to cut apart young offshoots attached directly to the main bulb so each little bulblet has its own small section of root system underneath it, which will allow it move forward with healthy new growth next season without getting too overshadowed.
Do Allium Bulbs Multiply Quickly in Different Types of Soil?
Allium bulbs can be planted and grown in a variety of soils, but they do best when given rich, moist soil. If you live in an area with clay or rocky soils where it is hard to grow anything at all, try growing them on the edges of your garden beds instead. Planting them around the borders will give them more room for growth without putting too much pressure on your other plants!
How To Care For Allium Bulbs After They Multiply?
Once bulblets have formed at the end of flowering stalks and started to turn green (usually after they flower), gently pull off each one with its roots attached and replant it elsewhere in your yard for next year’s flowers.
Allium bulbs multiply quickly and easily, so you can spread them around your yard quite a bit before they start to crowd each other out! Just make sure that soil conditions are right for all of them where you plant them next year – otherwise some will not grow as well as others.
After replanting bulblets one last time in the fall, store any remaining ones indoors over winter to keep healthy for planting again next springtime!
Conclusion
In conclusion, all alliums multiply quickly. They produce bulblets on their flower stalks or from the end of each flowering stem, and these can be separated easily to grow in another area of your yard! Although they are not as large or strong as their parent bulbs, you should still separate them when replanting for more flowers next year.


