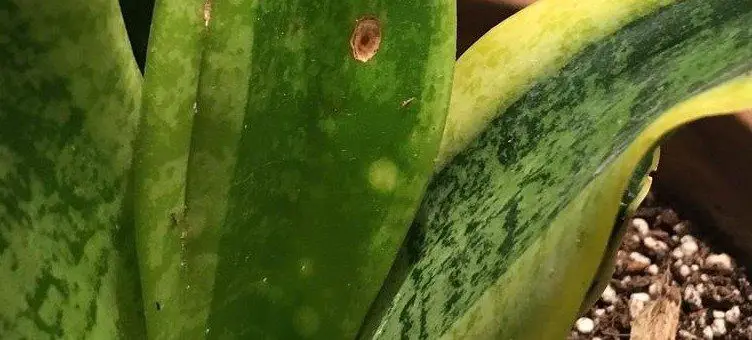
If you are wondering why your snake plant leaves have holes in them, then this is the article for you. Snake plants are a popular houseplant that can help remove formaldehyde from your home. If they start to develop little holes, then there may be an underlying issue that needs to be addressed. Read on and we will discuss what could cause these small punctures in your snake plant leaves.
Why Are There Holes In My Snake Plant Leaves?
The main reason there are holes in your snake plant leaves is that the plant is due to leaf-mining bugs. These bugs are very small and can be difficult to spot, even with a magnifying glass. They will start by eating the leaves from the inside out until they appear as if there is only a stem left.
How To Prevent Holes in Snake Plant Leaves?
The best way to prevent this problem is to remove any dead or dying leaves that could provide food for these bugs and spray your plant down with some neem oil.
If your snake plant is infested with pests, it may be only a matter of time before those pesky bugs feed on other plants in the environment.
This can cause damage to not just one plant but many more that are nearby and without careful attention could become an even bigger problem! As such, I use neem oil on every plant in my house when I notice just one pest infestation.
One of the most prevalent diseases in houseplants is leaf spot. If you see brown, yellow, and black spots on your snake plant leaves then it should be treated as soon as possible with a solution that combats this disease.
Neem oil (amazon link) not only works as a pesticide but also acts as an effective fungicide. This means that you can use neem oil to kill off any fungal infections in addition to killing insects and other pests on your crop.
Plant Care
Location: Give your snake plant bright, indirect light.
Temperature and humidity: Keep your snake plant at a temperature of 60-75°F, and avoid letting the humidity drop below 60%.
Soil: Snake plants need soil that’s nutritious and well-draining.
Watering: To prevent root rot and overwatering, the soil should be moist but not waterlogged. Water the plant every one/two weeks and allow the soil to dry out between waterings.
Fertilizing: To help your snake plant grow best, feed it with half the usual amount of all-purpose fertilizer every month in spring.
Cleaning: Over time, Snake plants gather dust and grime. Clean off the dirt with a damp cloth every few weeks to maintain its health.
Conclusion
In conclusion, it is important to keep your snake plant clean and free from any bugs or pests. If you are still noticing holes in the leaves, then it could mean that there is a bigger issue going on with this houseplant. Be sure to contact an expert if these issues persist so they can help diagnose the problem.
If you have any other questions about this article, be sure to leave them in the comments below or send a message my way.
Arborvitae trees are large coniferous plants that derive from the plant family, Cupressaceae. These arboreal plants can be found in many parts of Canada and America, where they do well with little water or soil due to their natural adaptation as a pioneer species.
Arborvitae trees are very popular for people that live in cold climates and want a tree that will survive the winter. They offer many benefits, such as being drought tolerant, having great soil erosion control abilities, and being able to grow well in compacted soils.
However, one issue with them is they can turn yellow or brown during the fall season. To learn more about this problem and how you can prevent it next year from happening again, please do continue reading!
Why Is My Arborvitae Turning Yellow?
The most likely reason why your arborvitae turning yellow is due to being in a stressful environment. This means the key to keeping your plant healthy is to provide everything it needs. Consider the following when wanting to keep your arborvitae green and luscious:
1. Not enough water
Although tolerant to dry conditions, arborvitae types should be watered at least once a week. Consider measuring the soil with your finger and if it feels dry, water your plant immediately. If your plant has been underwatered, it’s time to get out the hose and spray away! Your arborvitae might need a good soaking for several minutes before it can be on the road to recovery.
2. Not enough sunlight
This can also lead to yellow or brown leaves since when there is not enough light available for photosynthesis, the chlorophyll will start breaking down in order to support the plant.
To ensure your arborvitae has enough light, place it in a sunny spot or consider adding sun lamps (Amazon link) that will provide more warmth for your tree to thrive in.
3. Compacted soil
Arborvitae trees need at least six inches of space between their roots and other objects such as rocks so they can grow properly. Look at the roots and see if they feel confined in any way or are growing into rocks, then remove them to give your tree more space.
4. Lack of nutrients
If you have a healthy plant, there are many different types of nutrients that it needs to grow properly. One type is nitrogen and if not enough is available, the leaves will turn yellow or brown because they can’t carry out their functions.
To fix this problem, add in fertilizers which provide nitrogen as one of its key nutrients. Other nutrients include potassium, magnesium, and calcium.
The soil’s pH levels should be maintained optimally for healthy plant growth. Testing the pH can determine what nutrients are missing from your garden plot so you know how to supplement it accordingly.
Foliar sprays with iron chelate can correct any deficiency of this important mineral, which is often a cause for issues like yellowing pines.
5. Pests
Some pests that can harm your arborvitae are slugs, snails, and mealy bugs. All of these will leave their residue on the leaves which causes them to turn yellow or brown.
To prevent this from happening, use any type of pesticide available at a gardening store nearby, such as Neem oil spray or pyrethrin spray.
6. Chemical damage
Arborvitae trees are very sensitive to chemicals which is why they should be used with caution when near the plant. If you use any type of chemical in your yard, make sure it’s a few feet away from where your tree grows so as not to cause any harm!
7. The shock from being moved
The shock of being moved from its original location can also lead to arborvitae leaves turning yellow or brown. This is because it may be in a different light, soil conditions, and humidity levels, which will stress the plant out too much!
8. Disease
The last possibility for why your arborvitae is turning yellow or brown is due to a disease. It’s important that you take any plant seriously if it has leaves with dark spots, dryness in the soil, or discolored foliage.
It’s best to use a sharp knife or pruning shears to cut off any diseased areas. But if you’re really concerned, contact a certified nursery nearby and have them inspect your plant thoroughly to see what the issue may be.
How to Stop Arborvitae Turning Yellow?
The bestway to keep your arborvitae from turning yellow is by giving it the right amount of water. You should be watering up to 1 inch weekly unless you live in a place with lots of rain.
You may need to water your plant more if it has recently been planted. Otherwise, you can wait until every other week or so for watering depending on weather conditions and what type of soil is being used.
The next time your plant has a pest infestation, you should cut and dispose of the infected parts. This will help reduce any damage going forward, but it is not enough for treatment alone – you can also apply neem oil to prevent further problems from happening.
Fertilizer is essential to the health of a plant. If there are not enough nutrients available, use fertilizer and nutrient sprays to promote growth and keep your plants happy!
The plant needs at least six hours of direct sunlight a day to stay green and luscious. This is why it’s important not to block any sun rays if the area where the plant was placed has curtains or blinds, and also make sure that there are no leaves blocking its way.
Conclusion
In conclusion, it’s important to be aware of the different reasons why your arborvitae could turn yellow or brown. If you are experiencing any of these problems, make sure to fix them as soon as possible and give yourself time for the plant to grow back!
Black worms on your tomato plant? Oh, no! These pests are not only unsightly and gross, but they can also cause significant damage to the leaves of the plant. If you’re wondering how to prevent black worms on tomato plants in the future, read this blog post for some helpful tips that will let you save your tomatoes.
How to Deal With Black Worms On Tomato Plant?
So, you’ve got black worms on your tomatoes, and you’re now wondering how-on-earth you will get rid of them…
Bacillus Thuringiensis (BT)
This is a microbial product that helps to control fruit worms by attacking them from the inside. I apply it during the evening to prevent the UV rays from affecting the performance of the product.
Neem oil
If you’ve read any of my other articles, you will know how much I love using neem oil for pests and fungal problems. It’s safe to say the efficiency of neem oil has been proven. It can kill worms in less than a day and will work as an effective pesticide against all kinds of pests on tomato plants. The oil is also a natural solution, as it comes from the seeds of neem trees.
Garden dust
Garden dust is a powdered pesticide that can be used to get rid of worms on tomatoes, roses, eggplants, and other vegetables.
Insecticidal soap
This is a product that kills by contact and ingestion, which means it’s both efficient and safe. It mainly targets the soft body parts of pests like caterpillars, grubs, or worms.
Cultural control
This is a method of dealing with pests through changing and modifying the growing environment. This could involve spacing plants farther apart, rotating crops, or putting up screens to keep away bugs
The best way you can prevent black worms on tomato plants is by being proactive- start applying these methods early before it’s too late!
Beneficial predators
It is also important to make your garden more desirable for beneficial insects that will help you out. These are the friends we want, and they will keep our tomato plants worm-free!
Birds
If it’s not too cold in your region, birds should be an excellent solution for getting rid of pests on tomatoes. They love eating insects and worms, as they’re a valuable source of protein. You can attract birds to your garden by placing a bird feeder near your plants.
How to Prevent Worms on Tomato Plants?
Once you’ve dealt with your current worm problem, you will want to protect your tomatoes from future issues. Here’s how to do that:
1) You should always be on the lookout for eggs. If you see any, destroy them as soon as possible before they hatch and ruin your garden!
2) Don’t plant the tomatoes next to other plants that attract worms, like corn
3) Worms are often ignored until they get in the way of our harvesting. But, we should always take care to till the soil after a harvest, which will demolish their pupae and larvae before it is too late
4) Add insecticide to your tomatoes every few weeks
5) Promote predators that will eat any worms that appear on your tomatoes
What Type of Worm Is On My Tomato Plant?
There are many different types of worms that will attack your tomatoes, but it can be difficult to identify them. If you’re wondering what type of worm is on your tomato plants, here’s a list:
Fruitworm
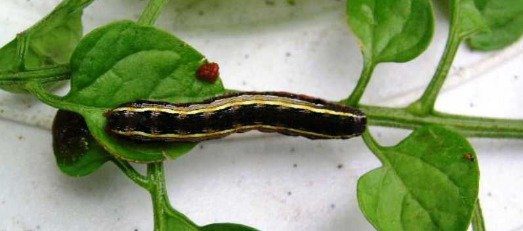
Helicoverpa zea is the most common worm found on tomato plants in North America. They can be identified by their yellow and black stripes, loops at the end of their body, and hairy legs. They tend to be one to two inches long.
The eggs are about the size of a pinhead when they first emerge. They’re white or cream-colored at this stage and it’s easy to see their delicate, paper-thin shells from afar. These pests are the bane of many fruit lovers because they will lay eggs into your favorite fruits during the nighttime.
Pinworms
The keiferia lycopersicella loves spending time in warm environments. At the eggs phase, this worm is extremely small and oval-shaped. Their color ranges from light yellow to orange, so you’ll know if you’re about to have a pinworm problem!
Once they become larva, they change to a yellowish-grey color, although the had is brown. This is an important time for them as they see a big growth of roughly 1/3 inches in length. The larvae of the pinworm drive into leaves by making blotch-type holes, where it then eats the leaf flesh.
Once they reach the pupa phase, they grow a bit more and turn even browner in color. A pinworm can lay eggs four or five times a year which means that an individual could produce close to 100 new worms within the span of 12 months – uh oh!
Armyworms
These pests are called armyworms because of their tendency to travel in small but powerful insect armies.
The armyworm may be small, but its appetite is big. This little creature can destroy an entire tomato plant in just a few days and they are not picky about what plants to feast on either. This makes them a very real threat to farmers all over the world who rely heavily on their crops.
The larvae sit on the soil and then crawl up the plant and eat both the leaves and the fruit itself. Basically, you can say goodbye to your precious tomato plant!
Conclusion
In conclusion, there are lots of ways to remove worms from tomato plants. You can choose to use BT (Bacillus Thuringiensis), neem oil, garden dust, insecticidal soap, and more! Personally, I prefer to use neem oil as I always have a bottle of it in my garden shed.
When it comes to protection for the future, be sure to keep following the advice listed just above this conclusion. The most important thing to remember is that it really pays to keep a close eye on your tomato plant.
You’re out in your garden, enjoying the beautiful weather and all of Mother Nature’s gifts. All of a sudden you notice something green crawling on the ground near your feet. What could it be? Is it dangerous?
Well, relax! It’s probably just one of the many common bugs that can be found in any garden – including yours! Here are some quick facts about 10 such creatures:
Top 10 Green Bugs Commonly Found in a Garden
Grasshoppers
Katydids
Praying Mantis
Aphids
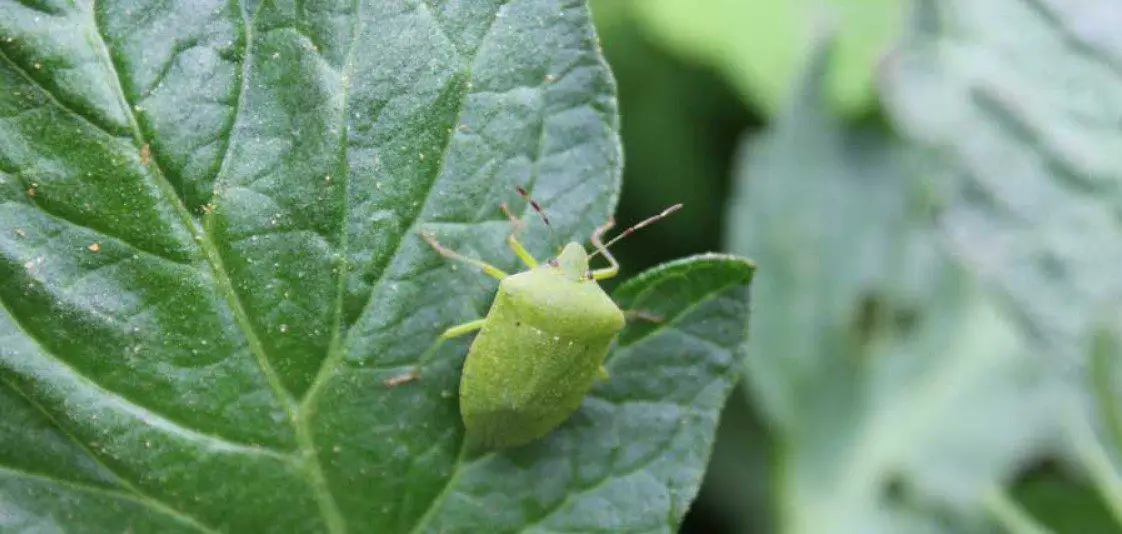
Green Stink Bugs
Cucumber Beetles
Tomato Worms
Glorious Beetles
Green Lacewing
Ambush Bugs
1) Grasshoppers
Grasshoppers are the most common green bugs that you may find in your garden. They are often confused with katydids, but grasshoppers have larger hind legs and antennae which extend outward while the mouth is located at the bottom of their head. If disturbed or frightened, they can jump great distances to get away from danger.
Their long back legs allow them to leap up to 20 times their own height!
They eat leaves off plants both above ground level as well as on the ground below
There are over 12,000 species of grasshoppers throughout the world today!
You can get rid of grasshoppers by using beneficial nematodes or ladybugs.
2) Katydids
Katydids are very similar to grasshoppers, but they have much smaller heads and longer antennae than their green cousins. Katydids also tend to be more of a brownish color rather than bright green like most other bugs common in gardens. They eat leaves off plants just the same as grasshoppers do – by eating both above ground level vegetation as well as lower plant life on the floor below them!
They can fly short distances if needed (usually less than 100 feet) but usually will jump away instead
There are over 6000 species of katydids living throughout the world today!
Crickets make up the vast majority of the katydid population
3) Praying Mantis
The praying mantis is another green bug that can be commonly found in gardens throughout the world. They are actually not a type of grasshopper or katydid but have many similar characteristics to those bugs as well, such as their largemouth and long antennae at the top of their head.
However, what really distinguishes them from other common garden pests – besides size! – is the way these insects eat: by capturing prey using its front legs first before eating it whole with its powerful mandibles (jaws). The female praying mantis will usually eat her mate after mating if he doesn’t get away quickly enough! Praying Mantises love to dine on other bugs common to gardens, such as the tomato worm.
They are usually green but can change color if needed – even turning pink or yellow! It’s believed that this is a defense mechanism used to mimic flowers in order to not be noticed by predators looking for an easy meal. The more scared they feel, the darker their color becomes!
4) Aphids
Aphid infestations are often one of the worst problems gardeners have to deal with every year because these little guys reproduce at very high rates and will eat everything from your plants’ leaves right down to their roots during their short lives.
Aphids are also known for being carriers of some pretty terrible diseases that can affect your plants, including viruses and even root rot!
They live from birth to death in about a week – so if you see them, they have been reproducing at high rates and will continue doing so until something gets rid of them or their food source is gone!
There are over 4000 species of aphids around the world today – many of which cause problems for plants by eating away at leaves both on the ground level as well as up above while leaving behind sticky honeydew residue on foliage.
5) Cucumber Beetles
Those green bugs may look like ladybugs but they actually belong to a different family entirely (despite having similar colorings and markings).
Cucumber Beetles can be found in gardens throughout the world. They love to eat plants, which is why they are often considered pests! The larvae of cucumber beetles feed on roots while the adults will feast on foliage up above as well as fruits such as tomatoes if hungry enough.
Cucumber Beetle Facts:
The female cucumber beetle lays her eggs in the soil at a depth about ¼” below where she is standing when doing so – but only after having been fertilized by a male first! This ensures that there’s no wasted effort between genders during reproduction because everything has already taken place before laying their eggs down into the earth for protection.
6) Green Stink Bugs
The green stink bug is another one of those common garden pests that can be found throughout the world. Like some other bugs on this list, they are excellent at hiding in vegetation and will feed off fruits, vegetables, corn – anything edible really!
They have no problem flying away if needed or running very fast to escape predators looking for an easy meal when threatened. If cornered though, their defense mechanism is to lift up its wings so that it looks larger than life (like a shield) while releasing its stinky odor caused by chemicals stored in glands near its abdomen.
7) Tomato Worms
Tomato worms, also known as hornworms, are commonly found in gardens belonging to gardeners throughout the world – especially when tomatoes have been planted! These large green bugs can grow up to a whopping six inches long and eat voraciously during their short lives.
They feast on the foliage of all kinds but particularly enjoy tomato plants because they love being able to hide from predators among the leaves while having plenty of food available nearby for fuel.
The larvae stage is usually where you will find them most often hiding both day and night until fully grown before becoming moths that fly away. The females lay eggs very close together so there’s no wasted effort or time between laying each individual egg just after mating has taken place.
8) Glorious Beetles
Glorious beetles are another type of green bug that is actually more closely related to ladybugs than it is to cucumber beetles. They have an appearance similar to the former, which explains why they are often mistaken for one another!
They can fly away if needed or run very fast in order to escape predators looking for an easy meal when threatened. If cornered though, their defense mechanism is releasing a pungent odor caused by chemicals stored in glands near its abdomen rather than lifting up its wings.
9) Green Lacewing
Green lacewings are close relatives of the ladybug and have an appearance similar to it as well. Unlike many other common garden bugs, they eat aphids (greenflies) instead of plant matter like most others on this list do – making them a helpful bug for any gardener looking to keep their plants healthy!
The larvae stage is where these green bugs live before becoming adults that fly away with wings once fully grown. These insects love eating up to one hundred aphids per day but unfortunately can’t control how many there actually are in your garden due to their size limiting what they’re able to catch at one time.
Green lacewings have been used for centuries to help control pest aphids and other insects.
10) Ambush Bugs
Ambush bugs also known as thread-legged bugs, love eating other insects but will do so by using a surprise attack rather than chasing them down like many others on the list.
They don’t have wings and instead crawl around plants looking for their next victim before quickly jumping out of hiding to bite into it with powerful mouthparts that inject venom to paralyze or kill whatever they happen upon.
These green garden pests are very proficient at blending in among foliage because of their mottled brownish coloration making it difficult for predators – especially birds – to spot them easily from above!
Female ambush bugs lay one hundred and fifty eggs all at once after mating taken place which hatches within only seven days. The eggs are usually laid on the underside of leaves where they’ll remain as larvae for forty-five to sixty days before becoming adults that fly away with wings once fully grown!
Conclusion
In conclusion, there are many different types of green bugs out there that can be found in a garden throughout the world. Of course, not all of them will cause damage to your plants but it is important to know what they look like so you don’t accidentally harm beneficial insects instead!
By knowing more about each individual bug and its eating habits – you’ll have an easier time keeping these helpful creatures around while still getting rid of any harmful ones causing problems for your garden because you won’t need to guess when trying to find their hiding places among foliage before spraying with pesticides meant for other species.
Green bugs come in various shapes and sizes depending upon which type they happen to be but mostly share the same coloration making it easy for predators looking for quick meals (including you) to spot them from a distance away.
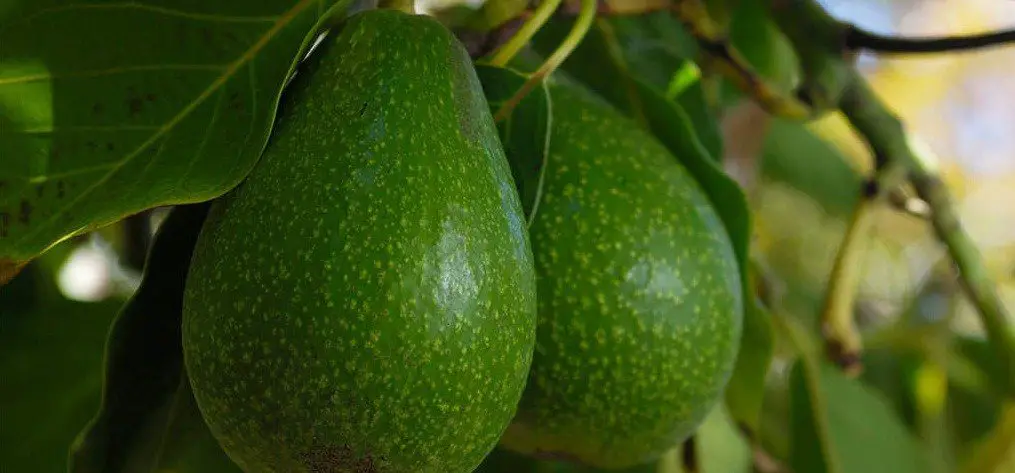
If you are growing an avocado tree or thinking about planting one, it is important to know how long it will take before the tree bears fruit. Some avocado trees can be grown from seed and others can be grafted onto existing roots. If you are not sure of the answer, keep reading…
How Long Does It Take For An Avocado Tree To Bear Fruit?
It can take 10 years for an avocado tree to bear fruit when grown from seed, whereas it will take around 4 years to bear fruit from the moment it becomes a plant.
Keep in mind that this estimate also depends on whether your plant was started with a seedling or by grafting branches onto mature rootstock (the practice used when starting plants at nurseries).
In addition, if you plan on planting the avocado seed yourself, you should know that they do not always germinate and can take months to years for them to break dormancy.
What Time of Year Do Avocado Tree Bear Fruit?
In America, avocado trees produce delicious and nutritious fruits from April through September. In fact, most varieties of avocado trees will only bear fruit in the warmer summer months.
The peak production date depends on the exact location of your tree. You see, the time of year that an avocado tree bears fruit depends on the weather conditions of the country.
For example, in Asia, the key dates are October to March, whereas Australian avocado trees bear fruit during the months of June and July.
FAQ
How to get an avocado seed to germinate?
The best way is to soak the avocado pit in distilled water for 24 hours, then place it into a mix of one part potting soil and two parts sand. You can also try stratifying your seed by placing it outdoors over winter or chilling it until next spring before planting indoors.
What are some tips on care for growing an avocado tree?
Make sure that they get enough sunlight, fertilizing them every three months during their growing season will help produce strong roots, branches and lots of foliage so be careful not to overwater them or they can get root rot!
How much sun soes an avocado tree need to grow fast?
Avocado trees do not like cold, so make sure they are planted in a location that is protected from frost and freezing temperatures. They will grow best if planted outdoors once temps reach 60 degrees Fahrenheit or higher.
What type of fertilizer should be used on an avocado tree?
You should feed your avocado every three months with slow-release fertilizer during their growing season. You can also use compost tea or fish emulsion when watering them but avoid using chemicals because it could kill the bacteria necessary for healthy root growth!
How long does it avocados grown by grafting take to produce fruit?
Usually, it will be between six and ten years before an avocado tree grown by grafting starts producing ripe avocados! Make sure that you choose a healthy rootstock if your plant was grafted onto one because otherwise the tree may not grow very well.
How long does it take for an avocado seedling to start bearing fruit?
If planted outdoors once temperatures reach 60 degrees Fahrenheit or higher, then it can usually bear fruit in five or more years but only two crops per year instead of three like trees with mature roots.
Will an avocado tree produce fruit without a pollinator?
Yes, as long as the tree is self-fertile and it can be done! But you will get more fruits if there are several avocado trees nearby.
How big should an avocado tree grow to bear fruit?
Avocado trees usually grow up to 30 feet high but they can also stay at around 15 feet depending on how much room you have for them and where you plant them in your yard. Just make sure that they receive enough sunlight each day because this will help keep them healthy and strong!
What type of soil do I need to use when planting my avocado seedling?
The best kind would be one with lots of loam or peat moss mixed into it so that it drains well. It is also recommended that you place several inches of mulch around the trunk to help keep moisture in and prevent weeds from growing up all around them!
What are some signs my avocado seedling needs more fertilizer?
If its leaves start turning yellow, then they might need a little bit more than usual so try fertilizing them again with one that has less nitrogen in it because this can cause slower growth or even burn your young tree’s roots.
How much water should I give my avocado tree when the weather gets hot?
You will want to reduce watering since summertime tends to be their only dry season but only if there hasn’t been any rain recently otherwise excessive drought could kill off your prized fruit trees!
Conclusion
So there you have it! Now that you know how long it takes for an avocado tree to grow and bear fruit. I hope this article has helped you out and if you have any more questions or concerns, feel free to leave a comment below.