by Gardener Tim | May 9, 2021 | Plant Care
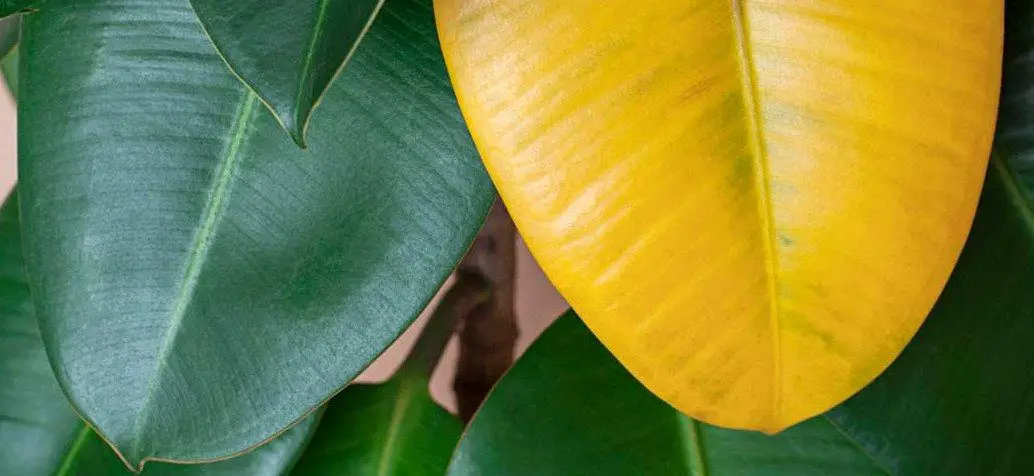
When your sweet, luscious green leaves begin to turn a more yellowish hue in the fall season, it can be hard for gardeners and homeowners alike. What many of us want to know is if there is anything we can do to turn those leaves back into the green, lush color that they were during the summer months. The answer may surprise you!
Can Yellow Leaves Turn Green Again?
Yes! There are many things that you can do to turn those yellow leaves back into a lush, green color. However, this is no easy task as it will require you to be dedicated, patient, and have a bit of time on your hands.
Why Do Leaves Turn Yellow?
The first thing that you will want to consider is what causes the change in leaf colors anyway? What happens when a tree or plant begins to lose its chlorophyll during the hot summer months?
Well, this actually plays out as an important part of the lifecycle for trees and plants all over the world. As we know from our own experience with changing seasons, fall marks not only falling temperatures but also shorter days where there is less sunlight available than in periods closer towards spring and summer.
This reduction in light impacts photosynthesis which results in lower levels of sugar being produced by your plants’ leaves themselves, which eventually results in them turning more “yellow” vs “green”.
Not enough sun
If your poor tree or plant is not receiving enough sun, a lack of energy available for photosynthesis will also result in yellowing leaves. In fact, a lack of sunlight is one of the most common reasons that leaves begin to turn yellow.
So what can you do about it? Well, if your problem is a result of not enough sun in and around your garden or yard then these are some things you can try:
Start by making sure that there is nothing blocking the trees’ access to direct sunlight for at least two hours per day during peak times. Fences, buildings, walls, etc…will all block out precious rays from reaching leaf surfaces, which will interfere with photosynthesis and cause yellowing.
You may also want to invest in a full-spectrum LED grow light, which emits the types of rays that plants need to trigger photosynthesis. Turn it on for at least 4 hours per day.
Too many leaves
Another common reason for yellowing in trees and shrubs is overcrowded branches which can lead to poor airflow, disease, and insect infestations if left untreated.
If there are too many leaves on a branch or twig it will actually stunt their growth, which results in smaller overall foliage, as well as less chlorophyll production leading to yellowing leaves.
So what should you do about this? Trim away any extra sprouts or stems from your plant’s limbs periodically throughout the growing season, so they have enough room to breathe.
Too much water
If you have a plant with yellowing leaves that are curling up at the edges or even drooping downwards, then it could be caused by overwatering.
Overwatering can cause roots to rot which in turn causes stunted growth and poor health for your plants overall. It is important to make sure that any excess water from rain or irrigation systems drains away fully.
If you do find yourself watering more frequently throughout the summer season than usual, remember not to flood out all of the soil when giving them their daily dose of H20! Water should just lightly saturate the surface level only so roots can drink up.
Temperature changes
If you have a plant with yellowing leaves that are curling up at the edges or even drooping downwards, then it could be caused by sudden temperature drops.
Leaves will start to turn yellow when they begin feeling more like autumn outside and less like summer due to shorter days associated with fall/winter seasons in most regions of North America and Canada… If this is happening before plants’ natural “fall” time, then they may not be able to adjust quickly enough for these environmental changes which can cause them some stress as well as lead to leaf dropping out completely.
So what should you do about this? Not much! Remember that your trees all have their own timetable too and in the end, they will pretty much know when to start their fall transition.
Lack of nutrition
If you see that the leaves on your plant are yellowing and there is a lack of green coloration present, then it could be due to low levels of nitrogen.
Nitrogen deficiencies can also cause young trees or shrubs to grow more slowly, which leads to weaker bark.
So what should you do about this? You will want to make sure that they receive an ample supply of fertilizer during their springtime growth spurt in order to help them produce adequate amounts of chlorophyll (the pigment found inside plants responsible for photosynthesis), as well as boost overall leaf health/coloration before summer comes around again.
What Can You Do to Turn Yellow Leaves Back Into Green Ones?
There are several things that you can do in order to turn yellow leaves back into green ones, including pruning and fertilizing. Prune your trees or shrubs during the fall season by removing dead, dying, diseased, or damaged branches as well as any suckers from their trunks.
By doing this you will be improving air circulation, which allows more sunlight penetration through the tree’s canopy which is critical for photosynthesis that produces sugar required for the healthy growth of your plant’s leaves.
Also, make sure not only to add fertilizer but also avoid over-watering them throughout the summer months, as neither one of these practices promotes overall plant health.
Conclusion
In conclusion, yellow leaves can be turned back into green ones but it will take time and effort. The best thing that you can do is to prune your trees or shrubs during the fall season, as well as fertilize them to promote new growth.
It’s also a good idea to think about why the leaves are yellow in the first place. If it is due to lack of sunlight or over-watering, then you will want to make the appropriate changes.

by Gardener Tim | May 9, 2021 | Facts
There are so many myths about black strawberries. Do they really exist? This article will debunk these myths and tell you the truth about black strawberries.
Do Black Strawberries Exist?
No, this is a myth. There are black strawberry seeds for sale on the internet, but these products are not genuine.
Pictures of black strawberries are often accompanied by these seeds. These pictures seem almost too good to be true…
Well, they are! Dark berries are a dark purple, not jet-black.
A black strawberry (Amazon link) was created by John Robertson, who crafted a resin-made strawberry and then painted it black. The artist created a delightfully intricate work of art, but nothing more.
Beware of Online Sellers
Ebay is full of fraudulent sellers selling fake items, and strawberry seeds are one example. Though the pictures of their seeds may look realistic, it is impossible to produce any black strawberries from them.
Seeds are the ultimate item for scammers to sell. You see, strawberry plants grow at a slow pace. These scammers are not upfront about the fact that black strawberries do not exist and buyers will only find out they have been scammed once it is too late.
This amount of time allows the seller to escape any complaints before they have a chance to start something new. Even if the buyer is in tune with their purchase, they may just throw the seeds in the bin and move on, in which the seller continues to advertise seeds online.
This doesn’t mean that you should never purchase seeds from your computer. I have done it many times before and it’s fine. Just be careful that you’re buying a real product.
There are plenty of online stores that you can trust for seeds and all sorts of gardening products, Stick to these in the future instead of Ebay and other platforms.
Other Strawberry Colors
The number of strawberry varieties has increased over time. If strawberries are your thing, you’re probably already accustomed to the red variety.
But there are three more you may not have seen…
The white strawberry is a unique fruit that includes the Pineberry type. There is also the yellow strawberry, which is very rare. Lastly, there is the purple strawberry, which has recently hit the market.
In fact, many people think the purple strawberry is the black strawberry, which is where some of the confusion stems from.
Conclusion
In conclusion, the black strawberry is a myth that does not exist. There are four colors of strawberries, and any color can be delicious when paired with sugar or dipped in chocolate!
by Gardener Tim | May 9, 2021 | House Plants, Outdoor And Patio Plants, Plant Care
The soil that you use for your cactus is not the same as what you would use in a flower pot. Cactus are some of the most challenging plants to grow, and they need their own special soil. If you want to know more about why this matters, read on!
Can I Use Cactus Soil for Other Plants?
Yes, cactus soil can be used for other plants. There are plenty of gardeners that have successfully used cactus soil instead of potting mix. Cactus soil is a good foundation for all plant potting mixes, as it provides great aeration and drainage.
The only requirement needed is the addition of moisture and natural fertilizer so that your plant has everything it needs to thrive.
Here’s how I do it: The base of the potting mix is made up primarily of cactus soil, which provides excellent drainage for your plants. The rest should be filled with peat moss and perlite to provide a healthy environment that allows the plant to thrive.
Giving soil advice is an impossible task as different plants have their own specific needs. For example, orchids love to be kept in dry soil, whereas ferns enjoy being watered often.
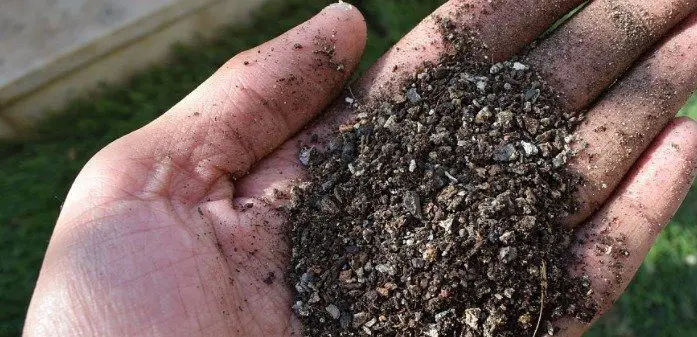
What Does Cactus Soil Contain?
Cacti grow in dry and harsh environments, so their potting mixes are composed of little more than stones, sand, and some compost. Here’s what you find:
- Sand: For extra weight and drainage
- Compost: For some microbe growth
- Perlite: Keeps everything together and get’s rid of unwanted moisture (I think you’re noticing a theme here)
- Stones: The use of rocks is a well-known technique for improving the drainage and preventing air gaps
From the gritty sand to weightless pebbles, cactus soil has a few inorganic materials that make it unique. A good cactus mix allows any excess water to escape and many succulents love this feature of their habitat.
What Soil do Regular Plants like?
You’ve got yourself all sorts of new plants – congrats! But what’s going into their potting mix? The soil you use will depend on whether the plant in question needs great drainage or if its roots should stay moist most days.
Soil is not just made up of dirt. There are many different textures that can be mixed together for the perfect potting soil recipe, depending on which plant you’re growing and what type of texture they need to grow in their habitat.
Miracle Grow Potting Mix (Amazon link) is what I use for all of my houseplants. It is filled with ingredients that provide your plants with the nutrients they need for a healthy life.
It’s worth mentioning that you don’t want to use soil from your outdoor plants on indoor houseplants, as it can result in root rot from a lack of drainage.
What is the Difference Between Cactus Soil and Other Soil?
Drainage
Cacti thrive in the desert, where they don’t need to be watered much. In order for them not to drown from flooding or remain parched indefinitely without water, it is crucial that their soil drains well and doesn’t collect too many puddles. As such, cactus soil comes with loads of stones and sand.
Unlike cacti, most houseplants are from the tropics, which means they need more water to thrive. These beautiful plants thrive on rich, moist soil that can keep them fed and watered for a few days.
Nutrients
House plants and succulents represent two opposite ends of the spectrum when it comes to nutrients. Most houseplants need soil that is rich with organic matter, while succulents thrive in dry conditions without a lot of nutrient density.
Aeration
Both cacti and tropical houseplants require aeration. As such, both types of potting mix should include materials that improve the amount of air circulation. More oxygen gives your plants a chance to breathe and promotes the maximum amount of growth.
Conclusion
In conclusion, there is no such thing as the “perfect soil mix” that can be used for all plants. For some plants, cactus soil might work just fine. However, if you have a fern on hand, then you should find something more moist for it to thrive in.
If you do have a load of cactus mix just sitting around, then you can make your potting mix more interesting by mixing in some cactus soil. This will provide excellent drainage, aeration, and a nice texture for plants to grow in!
by Gardener Tim | May 9, 2021 | House Plants, Outdoor And Patio Plants, Plant Care
Pothos plants are a popular houseplant, as they have such beautiful foliage. They can also be grown outdoors in warm climates. But what happens if you leave your pothos in the sun for too long? Is sunburn a concern? Let’s find out…
Can Pothos Get Sunburn?
Yes, the leaves on a pothos can burn. This will happen if you leave your plant in direct sunlight for too long. Pothos plants can adapt to low-light environments, so I suggest keeping your pothos in a space that receives moderate amounts of in-direct light.
How To Save A Sunburnt Pothos?
If you want to save your sunburnt pothos plant, keep reading for our plant-saving tips. Although it’s possible to save a burnt pothos, some of the leaves may have to be discarded, as there is only so much you can do to save your plant.
1) Discard any dark brown leaves
The color of the leaves on a pothos plant will change from green to brown if left in the sun for too long. In order to keep the plant healthy, sunburnt leaves should be removed before you can save the rest of your plant. Sterilize your pothos pruning scissors (Amazon link) before making cuts.
2) Move your plant away from direct sun
To keep the pothos plant healthy, place it in indirect light or in a room that is nowhere near sunlight. You should not move the plant from a low-light area to a bright place in the future. Also, be mindful about keeping your plant too near to windows.
3) Provide air
Put your pothos in a spot where it receives plenty of air. The plant will be uncomfortable and need to cool off.
4) Give it water
The plant may have been overexposed to sunlight and dried out. As such, your pothos needs to be watered a lot to stay healthy. To keep the plant moist, use a mister to spray cool water on it every day.
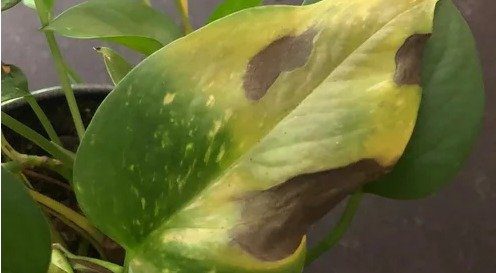
Other Reasons for Discolored Leaves
Fungal infection
It could be that brown spots on the leaves are caused by disease. House plants are susceptible to a variety of bacterial diseases, including bacterial leaf spots. There are a number of ways to reduce the risk of infection, including humidity control and proper ventilation.
Overwatering
The overwatering of this plant can cause root rot. This happens when the oxygen in the roots is depleted. This means the plant won’t get access to the nutrients it needs to stay alive.
Too much nitrogen
Fertilizer is an important part of ensuring your pothos plant stays healthy, but don’t do it too much. Too many nutrients can damage the roots, especially too much nitrogen. These brown patches are typically seen on the ends of the foliage.
Wrong temperature
Pothos need to be provided the right amount of light and warmth in order for them to grow. If you fail to provide adequate sunlight, your pothos plant will develop brown spots. The best temperature range for pothos houseplants is between 50 and 80 degrees Fahrenheit, especially if you want the pothos to grow faster. High or low temperatures can cause brown spots to appear on leaves, so keep a thermometer close by.
Conclusion
In conclusion, pothos plants are great for any home. They’re hardy and can thrive in ordinary conditions, but they do require a little TLC to maintain their health.
It’s true that they can get sunburnt, so keep them away from direct light if you can. In fact, these plants are fine in low-light conditions, so don’t be scared to move them away from the windows.
by Gardener Tim | May 9, 2021 | How To's, Plant Care
Monstera plants are tropical plants that grow in the shade and humid areas. They originate from Central America, where they can typically be found on trees or rocks near waterfalls. Monsteras have large leaves with glossy surfaces, which makes them perfect for indoor decoration.
However, you may sometimes notice black spots on the leaves! What is causing this issue? Should you be worried?
This is not an uncommon problem, but it should be taken care of quickly before it spreads to other plants in your garden or home. In this guide, I tell you how to deal with black spots on your monstera plant. Let’s get started!
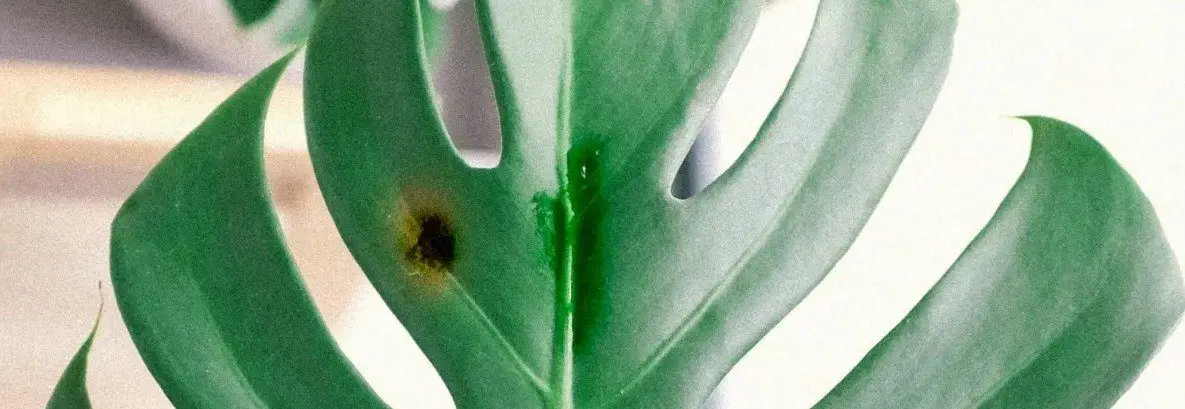
Why Does My Monstera Have Black Spots?
Black spots on monstera leaves can be caused by a bacterial leaf spot. The black spots are typically found between the veins of the leaves and are often surrounded by yellow-orange margins. This bacteria causes black or brownish-black lesions that develop in warm and humid weather conditions.
It is important to act quickly if you notice black spots on your split monstera leaves, as this bacteria can spread easily to other plants and will damage the plant very fast!
How To Fix Black Spots on Monstera?
To find out how to fix black spots on a monstera, we first need to find out what is causing the bacterial leaf issue. There are many potential issues, so we will give an overview of each issue and how you can prevent it.
If you want a quick answer, you can get rid of monstera black spots by using a fungicide, like neem oil (Amazon link).
1) Root Rot
Root rot is a problem that occurs when your indoor or outside montera plant gets too much water and the roots rot. This typically happens in winter, when it is cold and you accidentally don’t adjust the watering schedule.
To prevent root rot from happening, you should water sparingly throughout the year, make sure there is proper drainage, and ensure that all excess water flows away after watering.
2) Physical Damage
Sometimes the physical damage is just a byproduct of another issue, but sometimes it can be caused by bugs. I’ve seen monstera leaves with black spots that were being eaten away from chewing bugs (like aphids or caterpillars).
If you see this happening to your plant, take care of the problem immediately! Monsteras are not fond of pesticides and chemicals so we would suggest using an organic pesticide, like neem oil. This can also prevent other future issues because pests often come back in multiples when you don’t get rid of them fast enough.
3) Excessive Misting
Monstera plants love humidity but the monstera roots hate stagnant water. If you mist them too often, the leaves will accumulate a lot of moisture, which can result in fungus and other diseases.
This can cause black spots on monstera leaves that are otherwise not caused by an issue we mentioned above! To prevent this from happening, you should water your plant well every week, don’t leave standing water, and only mist lightly with room temperature distilled or purified water.
4) Disease
Black spots on monstera leaves could also simply be caused by disease. If you are dealing with bacterial leaf spot and none of our other solutions work, this might just be what is happening to your plant.
To prevent a disease from affecting your monstera, you should ensure proper ventilation in your home, keep humidity levels moderate (50-60%), make sure there are no stagnant water sources near or around your plant, and monitor for any issues and take action quickly if needed!
5) Sunburn
Monsteras are tropical plants and they love the sun! If your plant is in a shady area it will be less likely to develop black spots on monstera leaves. This issue can also be caused by too much fertilizer or poor drainage.
If your monstera gets sunburned, there isn’t really anything that can treat this problem besides moving the plant somewhere else where it won’t get burned again…
6) Cold temperatures
Monsteras are tropical plants and they like it hot! If you live somewhere where temperatures drop below 50 degrees Fahrenheit, your plant will stop growing. This can cause black spots to form on monstera leaves that aren’t caused by any of the other factors we have mentioned in this article.
7) Dehydration
If your monstera is not getting any water, it will start looking for moisture in its leaves. If the roots can’t provide enough water to keep up with this process, then you may see black spots on leaf tips that are otherwise healthy and green!
To make sure that doesn’t happen, you should monitor your plant’s soil every day, water thoroughly but sparingly, and create your own watering schedule.
Conclusion
In conclusion, black spots on monstera plants can be caused by many different factors, but there are ways to fix them. Some methods may work better than others depending on the plant and issue at hand.
In order to keep your foliage healthy and clean, make sure that you inspect it every day for any potential issues that could arise over time. Having a routine of inspecting your leaves will help prevent major problems from forming in the future! Make sure to follow these tips so black spots do not become an issue down the line!
If you are providing your monstera with everything it needs to survive and just need to get rid of the black spots as fast as possible, then I would recommend using neem oil.


