by Gardener Tim | Sep 6, 2021 | House Plants
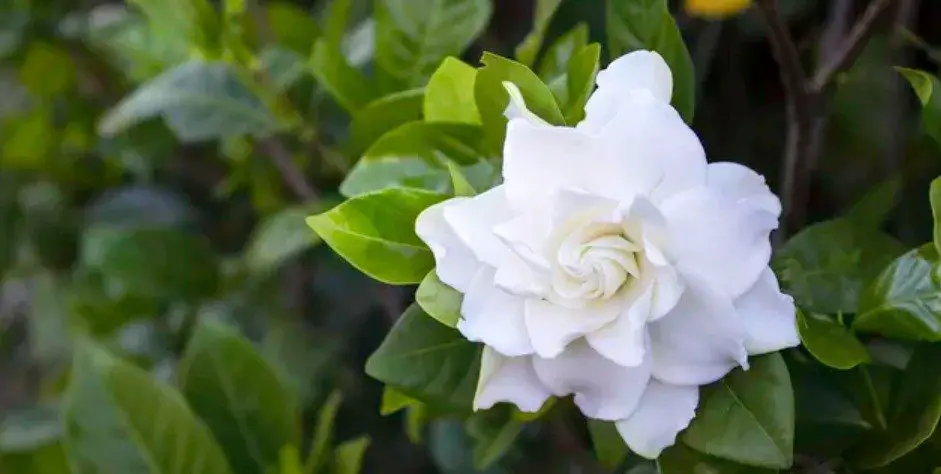
The gardenia is a shrub that thrives in warm, humid climates. The plant has dark green leaves and delicate white flowers that give off a sweet fragrance. Gardenias are popular as houseplants because they require little care and will bloom all year long with enough light and warmth.
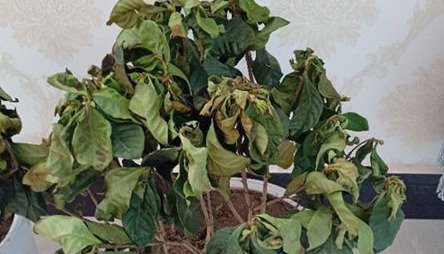
Unfortunately, the leaves of this beautiful plant can dry out quickly if not cared for properly. In this blog post, we will discuss how to tell when your gardenia’s leaves need watering, tips on how to water them correctly, and some other common problems with gardenias so you know what to look for!
Why Are My Gardenia Leaves Drying Out?
Your gardenia leaves are drying out because the plant is not getting enough water. To understand how to tell when your gardenia’s leaves need watering, you first have to know a little bit about the needs of this tropical plant.
Gardenias like humid climates and they require consistent moisture in order to thrive indoors. If the room where your gardenia is located does not get at least 50% humidity (and most homes do not) then it will be difficult for them to survive without some extra help from their owners!
You can increase the level of humidity around your home by regularly misting your plants with distilled water or moving them closer together so that their foliage creates a micro-climate that helps maintain high levels of humidity. You could even invest in a humidifier if you have a very dry home.
When your gardenia’s leaves are drying out, it can be due to a lack of water or too much heat in the environment around them. Gardenias thrive when they stay about 70 degrees Fahrenheit and require at least four hours of full sunlight each day.
If either of these things is not true for your home, then there may be nothing wrong with your plant! But if it seems like every time you water your gardenia its foliage dries out again within just a few days, then maybe something else is going on…
Can My Gardenia Leaves Be Saved?
Yes, but you need to act fast! Plants rely on their roots to soak up water from the soil, but as leaves begin to dry out they will actually start taking moisture away from those same roots!
In order to fix this problem, you need to thoroughly moisten the surface of your gardenia’s rootball. To do this you should gently remove it from its container and place it in a sink or bucket filled with distilled water for about 20 minutes.
Once time is up, take it back out and lay down so that all surfaces are exposed briefly before returning home. This process will allow any standing water inside the plant pot to drain out while rehydrating the plant at the same time!
I prefer to use filtered water to prevent any chemicals in tap water from damaging the roots of my plant. In fact, I keep a gallon of water in my refrigerator so that it is always ready to use whenever I need it!
Gardenias that are still young or have been severely dehydrated may be beyond saving even after following these steps, but you should see an improvement in their appearance within a week! If there appears to be no change at all by this time don’t hesitate to contact your local greenhouse for further assistance as soon as possible!
How Can I Water My Gardenias to Prevent Dryness?
Gardenia’s like moist but not soggy soil and if you over-water them then they can actually begin to wilt as well!
There are a couple of different ways to water your gardenias, but the right way is to let them soak up as much moisture from their soil as possible before letting any excess drain out.
This means using pots with drainage holes to prevent standing water at the bottom that will suffocate your plant roots. I like to water my gardenias when the top inch of soil is dry, which can be measured with your finger or a moisture meter.
Conclusion
In conclusion, dry leaves are usually the first sign that your plant needs more water. I recommend acting fast by removing the plant from its container and soaking it in water for 20 minutes.
Most gardenias will be revived after this process, but severe dehydration may require assistance from a more experienced gardener! If you do not feel comfortable with these steps then I recommend contacting your local greenhouse to help revive your plant as quickly as possible.
by Gardener Tim | Sep 6, 2021 | Plant Care
Gardenias are tropical flowering shrubs typically grown in U.S. Department of Agriculture plant hardiness zones 8 through 11. Gardenia leaves are generally shiny dark green on top with paler undersides, but sometimes gardenias develop yellow or white blotches on their foliage for seemingly no reason at all.
While this is never a welcome sight in a garden, there is usually a simple reason for this symptom that can be treated by the home gardener.
Why are Gardenia Leaves Turning White?
Gardenia leaves turn white because of powdery mildew, which leaves a powdery white substance on the plant’s leaves. This fungus is most likely to appear when conditions are humid and hot, such as during the spring and summer months.
Gardenias grown in shady areas with poor air circulation are more susceptible to this fungus than those grown in full sun with good air circulation.
When the leaves first show signs of damage from the disease, they may also develop small brown spots or blemishes across their surfaces, but these will disappear as the leaf tissue beneath dies off and sloughs away.
How Can I Get Rid Of Powdery Mildew On Gardenia Plants?
Although powdery mildew isn’t always easy to get rid of once it appears on gardenia plants, there are several things you can try to slow its growth and stop it from spreading.
First, you should consider moving the plant into a sunny area with good drainage or adding more organic matter to your gardenia’s soil. You can also grow plants in containers so that you can move them out of shady areas and closer to a natural source of water if they appear to be suffering from a lack of humidity.
If these steps do not help, there are several fungicides available for gardeners that will aid in the elimination of powdery mildew on gardenias.
Fungicides containing kaolin work by coating the foliage with a fine layer of clay that prevents spores from germinating on the leaves’ surfaces, while those containing sulfur or copper hydroxide affect the fungus’ ability to produce energy, thus stopping its growth.
Combine any of these fungicides with an application of horticultural oil around the roots and stems to discourage new fungal spores from developing on the plant’s stem tissue.
How Can I Prevent Powdery Mildew On Gardenia Plants?
To prevent powdery mildew on gardenia plants, keep them away from humid areas where air circulation can be poor. If you live in a hot, humid part of the country, consider growing the plants in containers so that you can move them out into more open spaces during warmer months when powdery mildew is likely to develop.
Water plants only when they need it so that their foliage does not stay wet for long periods of time, and increase the plant’s exposure to air circulation by pruning back its branches regularly.
Conclusion
In conclusion, powdery mildew on gardenia plants is best treated by improving the plant’s growing area and by applying fungicides to prevent further damage. Because powdery mildew fungus affects many different kinds of plants, it can be difficult to treat without using chemicals, so you may need to take measures to protect your gardenias from this disease.
by Gardener Tim | Sep 6, 2021 | How To's, Plant Care
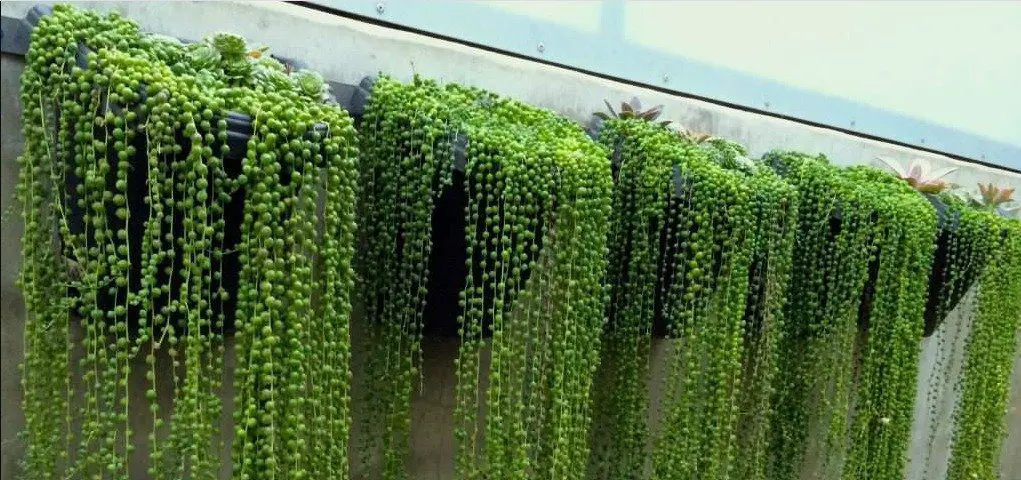
For a string of pearls, overwatering is their greatest enemy. It’s a common problem for beginners and sometimes even experienced houseplant owners who don’t know how to properly water them. In this post, we’ll tell you how to save a string of pearls plant that has been overwatered. Let’s get started!
How To Save Overwatered String of Pearls Plant?
If you notice your string of pearls is overwatered, don’t panic. You can save the plant if you take action immediately! Here are the steps to take:
1) Remove the plant from its pot. Remove as much of the soil as you can without causing root damage – this is very important!
2) Place the plant on top of some newspapers or paper towels. Newspapers will absorb the excess moisture, making it easier to remove any standing water that remains in its pot.
3) Allow the plant to completely dry out before you repot it. If there is still standing water in its pot, just remove as much as you can and allow it to be absorbed by newspaper or paper towels until fully dried.
That’s it! If you follow these steps, your plant should recover from overwatering and be ready to grow again soon. You’ll find that String of Pearls is actually very easy to care for once you learn how to properly water them – just don’t overdo it!
How to Water String of Pearls to Avoid Overwatering?
When watering string of pearls, go for a soak and allow the soil to dry out in between each time so that it’s not sitting wet at all times.
If left sitting constantly wet, string pearls can develop root rot since they’re very susceptible to overwatering.
The trick is to water when the top inch or two inches of potting mix feels dry Don’t wait until everything is completely dried up because this could cause wilting from lack of water – but don’t keep it soaking either!
You can test the soil by sticking your finger deep into potting mix. If it feels damp at the bottom, you should hold off watering for another day or two to allow them to dry up more between each watering session. You can also invest in a moisture meter, which is a great way to test for how wet the soil is, and only water when it’s dry.
A good rule of thumb is every couple of days (or once per week). There are some exceptions when it comes to how often you water string pearls though depending on where in its natural environment they’re growing and in what season too – so that’s something else to consider!
What Does Overwatered String of Pearls Look Like?
If your string of pearls is overwatered, you’ll see the plant’s leaves taking on a droopy or flaccid appearance. If its soil remains constantly wet for days at a time, it could develop root rot and eventually die!
Root rot
This is the easiest way to know that you’ve given your plant too much water. However, it is usually too late at this point, so consider the following signs in the future.
Root rot involves the plant’s roots rotting away, leaving them black and mushy. This typically involves a strong smell which you can’t miss. If the plant has root rot, it is most likely dead already.
Leaf wilt
Wilting leaves are also a sign of overwatering! Overwatered string pearls will have droopier and less upright growth with pale green or yellowish leaves that become soft to the touch. The stems may appear mushy too in this case, so be careful when touching them if they do not snap easily in half – which would indicate healthy tissue is still present underneath your fingers!
Discolored leaves
Discolored leaves are the next sign to look out for. If you see brown, black, or purplish spots on your string of pearls’ otherwise green foliage, don’t panic – it’s just a sign that they’re not getting quite enough water! Follow the tips above to save your plant.
Edema (Oedema)
Edema, or oedema as it is also known, looks a lot like the discoloration mentioned in this section. It will look a bit different in that you’ll see bubbles between your pearls’ leaves and stems – but don’t worry! In short, this happens because too much water is being absorbed into its tissues!
Conclusion
In conclusion, water your string of pearls sparingly! If you’ve already given it too much water, repotting is the best way to save it. Cut off any mushy or rotting roots and make sure that there isn’t standing water in its pot before adding fresh soil back on top of what was once wet.
To avoid having to take any emergency steps in the future, make sure to create a watering schedule for your string of pearls. Doing this will ensure that you don’t give it too much water.
Don’t forget to repot your plant every couple of years or so, as this will allow you to see how healthy the roots are. You can also cut off any mushy roots when doing the repotting process in case you missed them beforehand – just be careful not to damage its leaves while removing decaying tissue from around their stems and roots.

by Gardener Tim | Sep 3, 2021 | Outdoor And Patio Plants, Plant Care
Many people are surprised to learn that the Jade plant is actually succulent. This means it can be sensitive to changes in its environment, including sun exposure. With summer coming up, many people will want to bring their plants outdoors for some fresh air and sunshine. But before you put your Jade plant outside on the porch or patio, there are a few things you need to know about sun sensitivity!
Can Jade Plants Get Sunburn?
Yes, Jade plants can get sunburn! In fact, the leaves of a jade plant are more sensitive to sunlight than most other succulents. This means that you should be careful when putting your Jade plant outside for any length of time during daylight hours.
While it is common for jade plants to suffer from sun damage, this usually only occurs if they have been placed in direct sunlight without proper protection or adequate water supply for an extended period of time (more than five days).
If your outdoor jade plant has burned leaves and scorched stem tips, you know exactly what we’re talking about! But don’t worry – keeping them indoors until summer ends will prevent future problems with sun exposure.
Can a Jade Plant Tolerate Full Sun?
No, jade plants can not tolerate full sun. As mentioned above, this plant is much more sensitive to sunlight than most other succulents and requires some shading for optimal health.
If you are thinking about moving your jade outside during the summer months, it’s important that you only do so while giving them plenty of water (keep the soil moist) and placing them in a spot where they will receive at least partial shade from mid-morning through the late afternoon/early evening hours.
This might mean keeping your jade near an overhang or patio cover – any type of solid protection that prevents a direct exposure to sunlight makes sense! Just remember that even filtered light may cause damage if the plant isn’t getting enough moisture, particularly when temperatures are high.
How To Save Burnt Jade Plant?
If your jade plant has already suffered from sunburn, you can save it by following few steps:
1) Remove the burnt leaves
You should also remove any dead leaves, as these might attract pests like mealybugs that will further damage the plant (and then they may spread onto other plants in your collection). You can do this by hand or use a sharp pair of scissors to cut them away.
If you see scorch marks along stems and leaf joints – definitely remove those! Scorched areas on stems are usually brown but sometimes look dried out with grayish coloration. It is common for jade plants to lose some lower leaves due to sunburn, so don’t be concerned unless it seems excessive. Check new growth periodically over time prune back burned tips accordingly.
2) Move the plant to a shaded area
After removing the dead material, be sure that your jade plant is getting adequate moisture and place it in a shaded area. If you’re growing them indoors for summer (or even just part of the year), any spot where they get some filtered light should work fine – but avoid placing plants near sunny windows since this can cause further damage to leaves on plants already sensitive from sunburn!
3) Provide airflow
It is also important to provide good airflow around the jade plant while it recovers. This will help prevent fungal issues that can occur when there’s too much moisture in the air surrounding affected leaves (and stems).
4) Water
Water your plant very sparingly until new leaves begin to grow. Jade plants are susceptible to rot if they stay too wet, so don’t keep the soil constantly moist after removing scorched leaf material and moving it into a shaded location following a sunburn.
Water when the top of the soil is dry – only about once per month during summer months even less often in winter – allowing some drying out between waterings will prevent future problems!
With this information, now you know how to save jade plants with burnt leaves or tips that have been exposed to sunlight for an extended period of time. By taking these simple steps, your jade plant should heal up just fine! If you’re interested in learning more about caring for succulents
Conclusion
In conclusion, the jade plant is a very popular and well-known succulent that can be grown indoors or outdoors year-round in many climate zones. Just remember to avoid placing them where they will receive direct sunlight for too long!
Take care of your jade plants, and you’ll enjoy beautiful blooms on these ornamental specimens time after time – plus plenty of healthy new growth each spring when the temperatures start warming up outside again.
by Gardener Tim | Sep 3, 2021 | House Plants, Plant Care
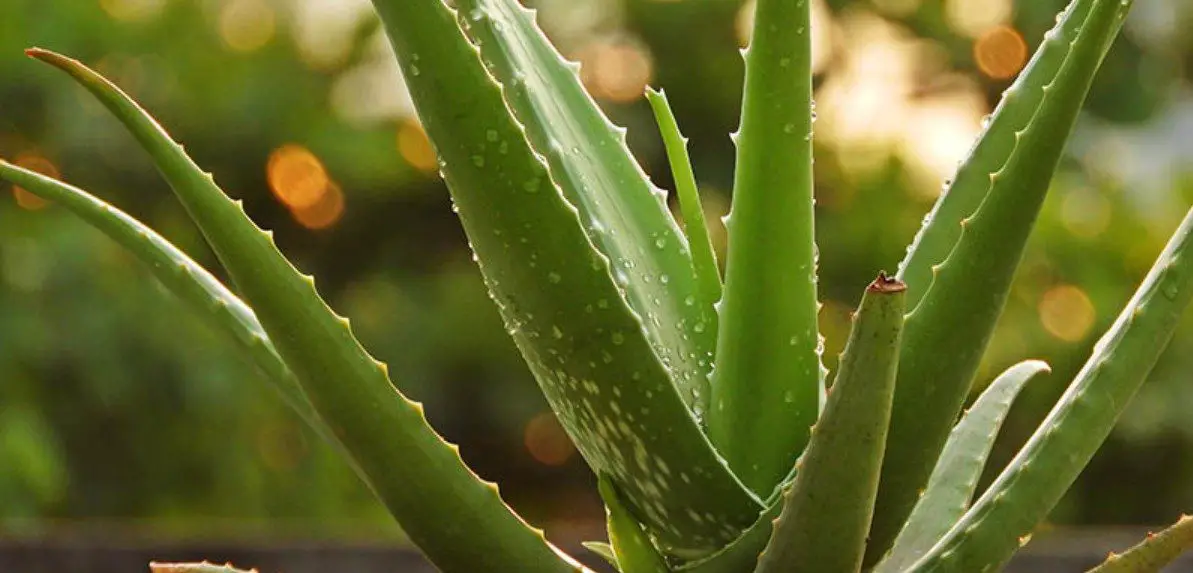
Many succulent plants look similar to Aloe Vera. One of the most common is the Tillandsia, which looks like an Aloe Vera but isn’t. Other plants that are commonly mistaken for Aloe Vera Succulents are the Dicksonia antarctica, or tree ferns.
There are also numerous types of cacti that can be confused with aloes, such as Echinopsis atacamensis and Astrophytum asterias variegated. Here’s a full list of plants that look like aloe vera…
Plants That Look Like Aloe Vera Succulents But Aren’t
There are several plants that look similar to an aloe vera plant. These include agave, yucca, haworthia, and gasteria plants. Just like aloes, many of these plants have rosette leaves and spines on the edges. Here’s a full list…
1) Agave
The agave is a species plant that belongs to the Agavaceae family. It is commonly mistaken for aloe vera, but it isn’t because they come from different continents and regions of origin.
People confuse them for aloe vera because they have the same pointed tips and can often be the same color.
The leaves of most agave species are very fibrous and have an extremely sharp terminal spine. They also feature marginal teeth that are extremely sharp, which can cause injury if touched or ingested by another living thing. Also, the spines of the agave are so strong that they can pierce through some types of rubber.
2) Yucca
This is another type of plant that is commonly mistaken for Aloe Vera because it looks very similar. However, this species comes from the asparagaceae family and originates in North America.
The plant is uniquely pollinated by yucca moths, which lay their eggs inside the plant. After hatching, the larvae feed on one of its species and then leave before it goes into pupation.
The yucca plant is unlike other succulent plants, like cacti and aloe vera. The trunk of the yucca has bark that protects it while also allowing for water to flow through.
Adapting to a wide variety of climates, yucca species have colonized mountains, coastal sand dunes, and grasslands as well as rocky badlands and deserts.
3) Stapelia
The Stapelia is commonly known as the carrion flower or starfish flower. It is another plant that can be easily confused with aloe vera, but this species comes from Africa and belongs to the asclepiadaceae family.
Some of these species grow to an impressive 16 inches in width when at full size. Also, the flowers are sometimes scented, but the scent is usually associated with rotting meat because of its carrion-like odor.
4) Haworthia
The Haworthia is a species of flowering plant that belongs to the asphodeloideae subfamily (just like the aloe vera). It is also known as zebra aloe and it’s considered succulent, but this type of plant isn’t aloe vera either.
The plant’s leaves are arranged in rosettes. They are also characterized by their white stripes or speckles on the leaves’ surface, which resemble those of a Zebra.
They are small succulents, which makes them perfect for collecting and placing in various locations around your house. In fact, you can even grow them without any soil and just by using rocks or pebbles.
5) Gasteria
The gasteria is a flowering plant that belongs to the Asphodelaceae family. It’s also known as “ox tongue” because of its shape and it’s considered an ornamental succulent, but this species isn’t aloe vera either.
The plant gets its name because of its stomach-shaped flowers and tongue-shaped leaves. In fact, “Gasteria” is Latin for the stomach.
This plant is easy to distinguish because it has a bulging stem with pointed teeth along the edges.
The blooms of gasteria succulents resemble those of aloe vera and haworthia, making them great alternatives to the aloe vera.
Why the Aloe Vera is the Best Succulent Plant
The aloe vera is not only a unique plant because it looks like no other succulent, but also because of its benefits to the human body. Aloe vera has been used in medicine for thousands of years, which makes it the most beneficial succulent plant. In fact…
- It has antibacterial properties which kill germs making it beneficial in skincare products
- Its juice reduces psoriasis symptoms on patients’ skin due to its anti-inflammatory properties
Conclusion
In conclusion, there are many plants that might be confused for Aloe Vera, but they aren’t because of their different origins and characteristics. In my opinion, nothing beats an aloe vera plant for its charm, aesthetic appeal, and healing properties, so I will stick with them! They made it into my list of plants that like dry heat, but be careful because aloes can droop if not given the correct care.


