Peace lilies are beautiful plants with long, green leaves and white flowers. They can do well in low light or full sun, but they need good drainage to stay healthy. It is important to avoid overwatering them because this will cause root rot and eventually kill the plant. Root rot starts as tiny brown spots on the roots and it can spread quickly if not caught early enough!
This blog post is going to walk you through 11 steps that will help save your peace lily from root rot so that it lives a long life!
How to Save Peace Lily from Root Rot?
You can save a peace lily from root rot by following these 6 steps:
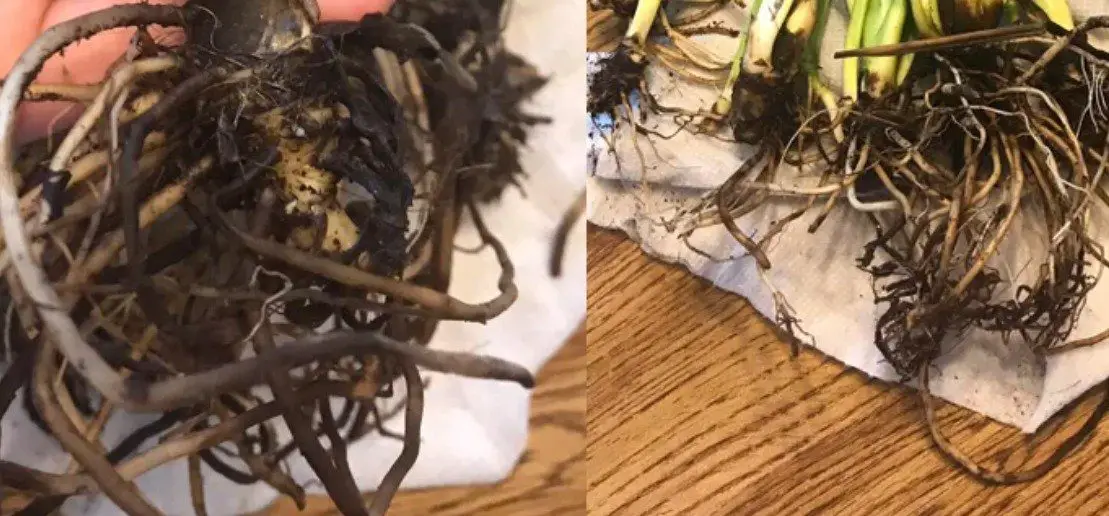
Remove the rotted root
Wash all soil from every root
Discard the old soil
Repot the peace lily with fresh soil that drains well
Apply hydrogen peroxide to kill any fungus
Water it lightly to avoid waterlogging
The steps above are the basics of what you need to know if you want to save your peace lily from root rot. If you want to save your peace lily, it’s important to act quickly and remove the rotted roots as soon as you can.
Applying hydrogen peroxide is an important step because it will kill any fungus that might be lingering. This is a great way to save your peace lily from root rot! You can then repot the plant with fresh soil that drains well. Make sure you water it lightly after doing this.
To avoid any future problems, you may want to invest in a moisture meter or develop a watering schedule. This will help you avoid overwatering your peace lily and causing root rot. Peace lilies need good drainage in order to stay healthy so make sure they are potted in soil that drains well.
If the plant still has a bad smell after doing all of these steps, it might be infected with mold or mildew! You can clean this away by putting hydrogen peroxide on a cotton ball and wiping the leaves down to remove any fungus that is growing there.
FAQ
What causes root rot in peace lilies?
Root rot in peace lilies is caused by overwatering and poor drainage. It happens when water sits in the soil for too long. The roots of your peace lilies absorb this excess moisture, causing them to rot and die off.
This will lead to yellowing leaves, drooping lower branches, brown spots on the stems or root tips that are soft and mushy – if it’s not caught soon enough!
What kind of soil works best for peace lilies?
It is important to use a light, porous potting mix that allows excess water to drain easily. You can also add some charcoal or perlite if the drainage still isn’t good enough even after you’ve repotted with proper soil.
Should rotten roots be removed from peace lily with root rot?
Yes, you should remove rotten rots from the peace lily as soon as possible. This way, you can prevent further damage from spreading to other roots. But you need to act fast!
Is root rot bad for peace lilies?
Yes, root rot is extremely bad for peace lilies. It can kill the plant very quickly if you don’t take action soon enough! This is why it’s so important to monitor your soil conditions and avoid overwatering.
What are good soil conditions for peace lilies?
Good soil conditions for peace lilies include well-draining, moist but not soggy soil that doesn’t get too much water or sunlight. You should check the moisture levels in your pot every other day to ensure there is no standing water between watering sessions!
How often should I water my peace lily plant to avoid overwatering?
Water it once every week and don’t leave it sitting in standing water! If there’s no saucer under your pot, try placing a tray filled with pebbles underneath so that the roots have something to absorb instead of being left in stagnant moisture.
When watering it from above, make sure not to let any excess water sit on the leaves as this can damage them.
How often should I fertilize my peace lily plant?
You shouldn’t have to feed it too much since they don’t need a lot of fertilizer. A once-monthly dose of 20-20-20 is usually enough to keep things going strong!
Do I need to repot my peace lily every year to avoid root rot?
The best time for transplanting your peace lilies into bigger pots is in spring or early summer after they’ve finished blooming. If you’re planting more than one together, make sure that each new container has at least two inches on all sides between plants so that there’s enough space to grow. You may even want to divide your peace lily plant.
Any other tips for keeping my peace lily healthy and happy?
Be careful with fertilizers because they can burn off very quickly if there’s too much nitrogen in them! Also, be mindful of overwatering since this is one of the main causes of root rot.
If things are looking bad, take some time out to analyze their soil quality before deciding on what needs doing next. It might just need better drainage so try adding perlite or charcoal to the soil. If it’s dry, try using a moisture meter so that you know for sure how much water is needed each time!
Conclusion
In conclusion, peace lilies can be tricky to care for because they require a lot of light and don’t like their soil very wet. You should always monitor moisture levels in the pot before watering, avoid overwatering, and check that there isn’t too much nitrogen in your fertilizer!
I hope the tips in this article have helped you learn how to save peace lilies from root rot. Feel free to share your experiences and leave any questions or comments below!
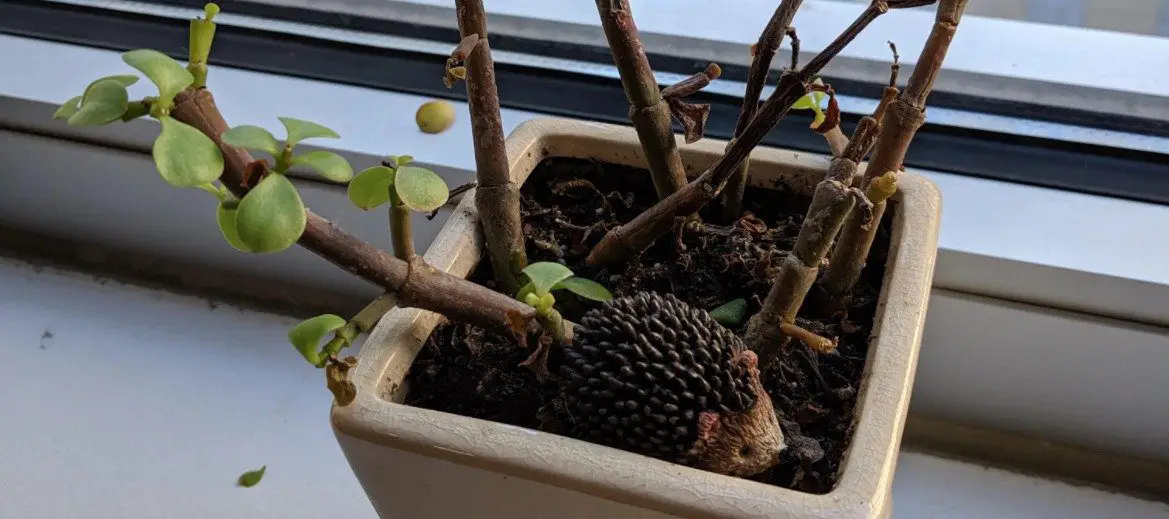
Elephant Bush is a plant that thrives in dry, hot climates. It can grow to be up to 5 feet tall and has broad leaves that are shaped like the trunk of an elephant. Planting Elephant Bush in a garden near you will provide beauty and shade all year round!
However, if your Elephant Bush starts dropping its leaves, it could be due to any number of things. In this blog post, we’ll go over some factors that may lead to a leaf drop on your elephant bush so you know how to avoid these problems next time!
Why Is My Elephant Bush Dropping Leaves?
Your elephant bush is dropping leaves because it is not receiving the water it needs or the growth cycle has ended. If you live in a hot, dry climate like the one that elephant bush thrives in, water your plant frequently enough to keep it moist. Elephant bush cannot handle being watered infrequently or unevenly.
Your elephant bush may also just be going through the normal growth cycle. Elephant bush tends to start dropping leaves in late fall or early winter. Experienced owners will notice that this tends to happen every year. As long as the leaves are being replaced, you have nothing to worry about.
If it is dropping leaves due to a watering problem, then you may want to water from the bottom by letting the plant sit in a container filled with water. Do this for 15 minutes, and then let the water drain from the bottom before returning the plant to its home.
FAQ
Will my elephant bush recover if it drops all its leaves?
Your elephant bush may appear dead after dropping most or all of its leaves, but this is not the case! Your plant has gone dormant and should start regrowing new shoots when winter is over. You can help your plant’s recovery by keeping it watered until then.
Does an elephant bush drop leaves in winter?
Yes! The elephant bush will drop most of its leaves in winter. This is part of the natural growth cycle and does not indicate that there is anything wrong with your plant!
Will grow lights help an elephant bush to grow?
Yes. Elephant bush thrives in dry, hot climates and does not enjoy being moved. Grow lights will help the plant continue growing when you cannot provide it with natural sunlight indoors.
How much water should I give my elephant bush?
Make sure the soil is moist when you water your elephant bush. A good rule of thumb for watering is to wait until the upper inch or two of soil has dried out before giving it more water. Your plant should be watered enough that this happens in between each time, but not so much that its leaves are wet afterward!
Is there anything else I can do with my elephant bush during wintertime?
Other than making sure it gets plenty of light and regular care, make sure you move your plant away from any heat sources like vents or fires if they are too close by. This could dry out your plant faster than usual, leading to leaf drop!
Conclusion
In conclusion, there are a variety of reasons why your elephant bush may be dropping its leaves. Your best bet is to water it regularly, especially if you live in climates with hot and dry summers like the one that elephant bush thrives in!
It’s also important to consider that this could just be the natural growth cycle of the elephant bush. They tend to drop leaves during the winter months, but the leaves will always regrow.
Pilea plants are a popular houseplant and one of the first to be sold by nurseries in the spring. However, as summer approaches, many people notice that their Pilea leaves start curling up.
In this blog post, we will explore why your pilea leaves may be curling and how you can prevent it from happening!
Why Are My Pilea Leaves Curling?
There are many reasons for this, but pilea leaves tend to curl inwards when not given enough water. They do this to retain as much moisture as possible.
However, there is more than one reason for this to be happening. It can be because of lighting issues, not enough nutrients in the soil, and more. The leaves can curl outwards too (doming), which is typically due to overwatering and root rot. I will now dive into each potential cause of pilea leaf curl.
Low Humidity Levels
Pilea plants are native to tropical areas and as such, they do well in high humidity. This is why pileas tend to curl up when the relative humidity drops below 50%.
If you notice that your pilea leaves have started curling inward, it could be because of low humidity levels. You can increase this by placing a humidifier near your plant or simply by misting them daily.
You can check the current humidity levels by using a humidity monitor. I personally like this one by Honeywell because it is very accurate and easy to use.
Make sure that your plant is kept indoors in an area where there aren’t any drafty windows or doors nearby. You can also place a small space heater near your plant if needed!
Not Enough Water
Pilea leaves curl inwards when they are not given enough water. If you notice that your pilea leaf has started curling, it is because the soil isn’t wet all the way through.
You should be watering your plant regularly but make sure to let their soil dry out a bit before giving them more water. Remember – over-watering can also lead to root rot and other issues so avoid this as much as possible!
Too Much Light
As with any plant, pilea plants need a certain amount of light to thrive. If you notice that your leaves have started curling inward, it may be due to exposure to direct sunlight for too long!
If this is the case, you should move them away from sunny windowsills and instead place them in indirect or filtered sun areas of your home. You can also use curtains or blinds if needed!
Not Enough Nutrients
Pilea plants need a lot of nutrients in order to stay healthy and grow. If your leaves have started curling inward, it may be because they are not getting enough nutrients from their soil!
You can add fertilizer once every month or two depending on how often you water your plant. However, make sure that you only use a very diluted amount as they don’t need much!
Overwatering
If your pilea plant leaves are curling outwards, it is likely due to overwatering. If the soil isn’t allowed to dry out between waterings, it can cause root rot and other issues as well!
You can check the soil by feeling it with your finger. If the soil feels wet, you should wait a few days before watering them again! You can even invest in a moisture meter or a humidity monitor to make sure that you are watering your plant at the correct time!
It’s important to create a watering schedule and follow it as closely as possible. This way, you will always know exactly when to water your plant again – no matter if their soil feels wet or dry!
If none of those work then you might want to contact a professional who has experience with houseplants pilea plants because there may be another underlying issue.
If you notice that your pilea leaf has started curling inward, make sure to increase their humidity by placing them near a humidifier or misting them once daily with distilled water. You should also be watering your plant every week but making sure that it dries out between each session so as not to over-water them!
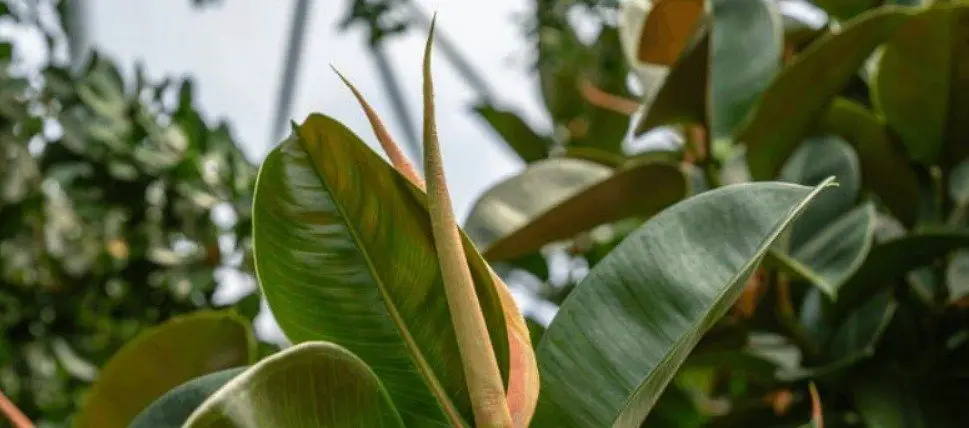
One of the most common problems with rubber plants is when their leaves start to droop. The plant may also look like it’s leaning over and losing its upright shape, too. It can be very frustrating for people who want healthy-looking rubber trees in their homes!
Fortunately, there are some steps that you can take at home to help your plant recover from leaf drooping. This article will provide information on why rubber tree leaves droop as well as suggestions for treating the problem so that you can prevent it from reoccurring.
Why Are My Rubber Plant Leaves Drooping?
If you have a rubber plant and notice that the leaves are drooping, don’t worry, it’s not dying! The most common cause of rubber plant leaves drooping is too much water. Rubber plants need to be watered sparingly or they will droop.
Wilting is actually a symptom of overwatering, which is why it’s so common for rubber plants to droop their leaves when they are given too much water. They may also droop if the soil isn’t draining properly or the plant has root rot.
How To Prevent Rubber Plant Leaves Drooping?
Dropping leaves can be an early sign of rot and other problems with your rubber tree so if you notice them dropping off, take action quickly! You can stop the leaves from drooping by following these steps:
1) Water your rubber plant once a month.
2) Use room temperature tap water rather than cold or hot to prevent the leaves from drooping after watering.
3) Make sure that you’re not overwatering it by allowing the soil to dry between each time you water it and also checking for standing water in saucers underneath the pot. If there is any, empty out all of the excesses so that this doesn’t happen again.
4) Make sure that your pot has drainage holes under the soil for excess moisture to drain out. If you’re in an area with high humidity, try misting your plant instead of watering it so that it doesn’t get too wet and stay damp all day long.
How Often To Water?
The good news is that rubber plants are very easy to care for once you get the hang of their watering schedule. Here’s how to water them:
You generally water a rubber plant every 14 days in the winter and every 7 days during spring/fall. You can adjust this schedule depending on how much light and humidity it receives.
The best way to tell if the soil needs watering is by poking your finger into the top inch of the soil. If moist or damp, do not add any more water as this will cause your plant’s roots to rot from being constantly wet for long periods of time.
When in doubt, let the pot dry out before adding more moisture so that you’re only giving it what it really needs instead of overdoing things on accident! It can be a good idea to use a moisture meter, which offers the most accuracy when it comes to knowing when your plant needs a drink.
Once you have the proper watering schedule, this should help prevent drooping leaves from being too dry or wet at all times!
Care Guide
To prevent ANY future problems with your rubber plant, it’s important to follow the most important care rules. Here’s a few of them:
Light: Rubber plants need bright, indirect sunlight. If you’re not sure where to place it in your home, look for an area that’s around 70-80 degrees Fahrenheit and has filtered light or little direct sun exposure.
Fertilizer: Give fertilizer during the growing season to promote new growth. You can do this by applying it once every few months in spring/summer and only once a year during fall.
Humidity: Rubber plants prefer high humidity so if you notice that your leaves are drying out too quickly, place them near an area where there’s lots of it.
If there isn’t enough moisture in the air around your home, try misting it daily with room temperature water instead of watering it directly so that its leaves stay wet all day long rather than dries up after just one hour or two!
Pruning: You can prune your rubber plant if it’s getting too tall or leggy around the base. This helps promote new growth and will keep the leaves looking healthy for much longer!
Conclusion
In conclusion, there are a few ways to help your rubber tree avoid drooping. The easiest is to make sure that it isn’t over-watered, which can happen if you use too much water or don’t have drainage holes in the bottom of the pot for excess moisture.
Also, remember that this problem may occur in areas with high humidity, too. If you notice that your plant’s leaves are drooping frequently during the spring and summer months when there is higher humidity outside, try putting your plant in a cooler area and adapting your watering schedule.
If none of these work or if your rubber tree seems unhealthy after all of this then I recommend consulting a specialist such as an arborist for more feedback on what might be going wrong. They can help diagnose problems with over-watering and other issues so that you know exactly how to take care of your plants moving forward!
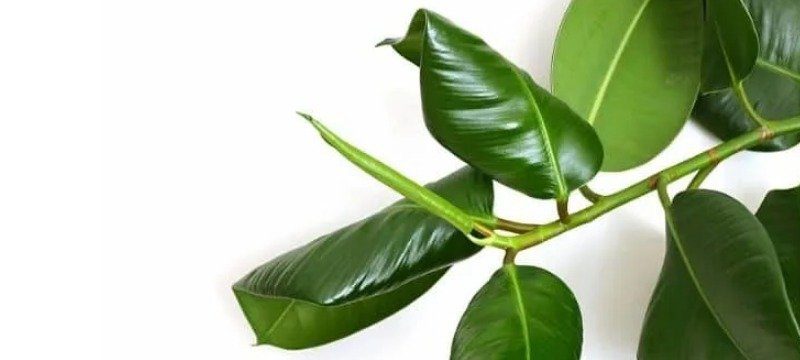
The rubber plant is a popular houseplant, but even the most experienced gardeners can sometimes overwater their plants. When this happens, the leaves will droop and turn yellow or brown. Fortunately, there are many ways to save an overwatered rubber plant…
How To Save Overwatered Rubber Plant?
1) Remove the plant from its pot and check to see if the roots are sitting in water. If so, gently transfer them into a bucket of dry soil mix until they stop soaking up water;
2) Re-pot the rubber plant into a new pot and make sure to add drainage holes. Be aware that when you have overwatered your plant it will likely continue absorbing water even from the soil mix;
3) Place wet paper towels or newspaper on top of the soil around your rubber plant for about one day to help dry it out so you do not overwater again. When wiping down leaves use room temperature water with no soap as this can damage leaves;
4) Be consistent in watering procedures by checking how much sun exposure and humidity levels receive because these factors also contribute to how quickly plants lose moisture. Also, keep away from heaters if possible since heat causes faster evaporation rates which makes it harder for your plant to absorb water.
What Does An Overwatered Rubber Plant Look Like?
An over-watered plant will have leaves that droop and turn brown because the roots are sitting in water. In fact, if left untreated the plant will eventually die.
The real issue starts when the rubber plant develops root rot, which happens when the roots are sitting in water for too long. You can tell if your plant has root rot if the roots are smelly and black in color.
What Are The Dangers of Overwatering?
If you are not careful with how much water your rubber plant absorbs on a regular basis, this can cause root rot. Root rot is very dangerous for rubber plants because it kills off the roots and stunts growth.
Also, an overwatered plant is the perfect breeding ground for bugs, like aphids and spider mites. These bugs will suck the life out of your plant until it becomes weak and dies if you do not get rid of them immediately.
How Much Water Do Rubber Plants Need?
Rubber plants need soil that is moist, but never soggy for too long. If the climate is humid and warm, then you should water them every few days. If it is cool and dry, then your rubber plant will be fine for a week without needing any watering at all!
The most important thing when it comes to watering is the pot. It MUST have drainage holes, otherwise, the plant will be sitting in a pool of water, which can lead to lead to root rot.
You test if the plant is ready for water by using a moisture meter. Stick it in the soil, and if it says dry-to-moist, then that’s your cue to water. Alternatively, you can stick your finger into the top inch of soil to see how moist it is.
Conclusion
In conclusion, there are many ways to save an overwatered rubber plant. If you catch it early on, you can quickly re-pot your rubber plant and make sure to add drainage holes in the new pot. Don’t add any more water to the pot until you see leaves stop sagging.
Moving forward, it can be a good idea to have a watering schedule for your rubber plant, especially if you are one of those people that tend to overwater their plants. If you have any more questions about how to save an over-watered rubber plant, feel free to ask in the comments section!