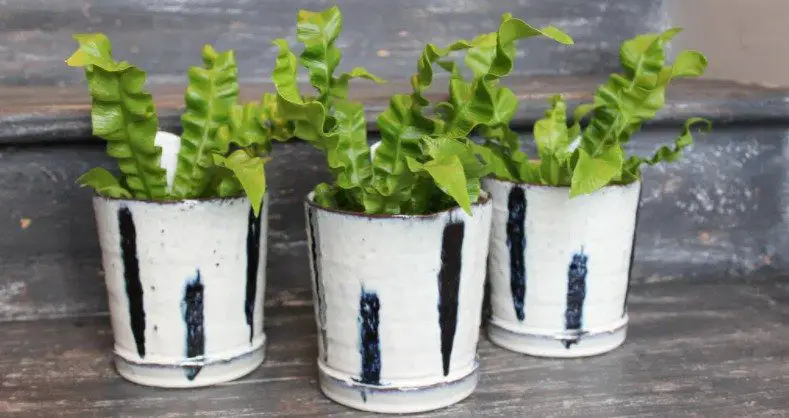
If you’re looking for a new type of fern to put in your home or office, the crispy wave fern might be just what you need. This plant has many benefits and is relatively easy to care for! In this post, we will talk about how to grow and maintain this lovely houseplant.
How To Care For Crispy Wave Fern?
Crispy Wave Ferns should receive daily in-direct sunlight, be kept in moist soil that drains well, temperature of 70-80 °F, humidity above 50%, and fertilizer once a month during the warm seasons.
Following the above advice will allow your fern to thrive and be the healthiest it can possibly be. I will now give an in-depth breakdown of the different factors that contribute to the health of your crispy wave fern.
Light for Crispy Wave Fern
Pick a spot in your home or office that receives bright sunlight. The plant will require at least four hours of sunlight per day. If there isn’t enough natural light then try using artificial lighting instead of direct sunlight if possible.
Soil for Crispy Wave Fern
The crispy wave fern, as an epiphyte, thrives in areas of dense tree coverage or palm leaves that provide a cool and moist habitat. The decomposing leaves give the crispy wave fern a bunch of nutrients it needs to grow.
As such, crispy wave ferns should be kept in nutrient-rich soil with plenty of organic matter. I like to use organic compost that drains well. Keep the soil moist, but not wet. If you notice it drying out, simply water it again until the soil is saturated with moisture.
Humidity for Crispy Wave Fern
This is a tropical plant that thrives in environments with lots of humidity. Allow indoor levels of humidity around 50% by misting them occasionally during hot days or when they are sitting on carpets all day long without ventilation – Do not forget about watering!
The soil must be kept moist at all times but never soggy wet so it can drain properly. If you need to raise humidity levels in your home, invest in a humidifier. You can also try putting the pot on top of pebbles that are filled with water and put it next to a running bathtub or shower.
The LEVOIT humidifier (Amazon link) is the perfect choice for crispy wave ferns. It’s ultrasonic, meaning it produces a cool mist instead of steam or hot water to humidify your home. That means no more worries about overheating!
Plus, it has an auto shut-off feature that will turn off at any time you want – even when the tank is still full so you won’t waste money on electricity bills and be sure not to forget about your plant during winter days with shorter daylight hours.
Does the Crispy Wave Fern Need to Be Fertilized?
This type of fern does not need to be fertilized often because its leaves are thick and sturdy so they don’t require as many nutrients from the ground as other plants do.
However, if you feel inclined to feed this plant some organic fertilizer during spring and summer when it’s actively growing (check for the expiration date on the package before using), then go ahead!
Container for Crispy Wave Fern
The crispy wave fern can be grown in a wide variety of containers, but it’s best to use one with drainage because this type likes good air circulation.
When selecting a container always consider its size and weight when deciding where to place it as they might not fit on certain surfaces or if you move them around too much they might tip over from the sheer weight of water in the plant (and your pot).
Although it is a small plant, the crispy wave fern has a relatively large root system that should not be planted in shallow pots. This will limit its growth and cause it to become too heavy.
Watering a Crispy Wave Fern
The crispy wave fern will need to be watered frequently to keep the soil moist. However, make sure the soil isn’t soggy with a pool of water. It’s a very fine balancing act, so keep an eye on it.
Watering should never occur when there are standing pools on top or around your plant’s pot because stagnant water can lead to fungus growth.
The best way to water a crispy wave fern is with room-temperature water in the morning. You see, using cold water may shock your plant, which can result in dropped leaves and other issues. Watering in the morning gives your plant a full day to take in the water before night hits.
Indoor vs Outdoor Growing
Crispy wave ferns are native to the rainforests of Southeast Asia, so are best suited to growing in any environment with good humidity. They do not fare well inside homes with central heating systems because they require humidity to thrive. If growing indoors, it’s best to invest in a humidifier to raise the room humidity levels.
If growing outdoors, you’ll need to ensure your plant is placed in a shady spot. Too much direct sunlight will burn the leaves of this fern and can eventually lead to death. If planting near other plants, be sure that they provide some shade for the crispy wave ferns.
Pruning a Crispy Wave Fern: The Basics
They do not require pruning, but some enthusiasts will cut the leaves for aesthetic purposes or to encourage bushier growth. Prune crispy wave ferns in spring before the new foliage appears. You can do this by trimming off branches and shoots from the previous season.
Pruning can also be done after the leaves have faded and fallen off for an autumnal look. If you want your ferns to retain their dark green color all year-round, trim them in late winter or early spring before new leaf growth appears.
Can Crispy Wave Ferns Be Propagated?
Yes, but only through spores or tissue culture. I like to propagate a fern by collecting the spores, which you can do by leaving a leaf on a piece of paper for a few days. After waiting, you will notice a growth of spores on the underside of the leaf.
You then simply need to collect the spores, and then sprinkle them into compost soil. These spores should be kept in shaded areas with high levels of humidity – just like the adult plant.
The spores will take a few weeks to produce their own roots. Afterward, you may transplant the new fern into pots or garden soil if desired!
Repotting a Crispy Wave Fern
When a fern outgrows its pot, it is time to re-pot the plant. This will typically happen every two or three years! You should always use fresh soil (or even better – compost) when you are transplanting your crispy wave fern from one pot to another.
I recommend lining the new container with pebbles or small stones to create a drainage layer. Your crispy wave fern should ideally have lots of space in its new pot, so make sure you use one that is significantly larger than the old container!
How to Make Crispy Wave Fern Bigger?
If you want your fern to grow bigger, you can increase the humidity of your home, give your plant a bigger pot, and follow the other care tips in this article. The priority is ensuring the roots are allowed to thrive and spread out to their maximum capacity.
How to Keep Pests Away from Crispy Wave Fern?
You can use a water spray bottle to regularly wet the leaves of your crispy wave fern. You should also dust its potting media occasionally with pest-preventative diatomaceous earth powder and keep an eye out for signs that you might have a pest on your hands. Keep an eye out for bugs and other pests that might be causing your fern to look unhealthy.
Where to Place a Crispy Wave Fern?
You should keep your crispy wave fern anywhere you like in your home or garden. I like to proudly display mine in the front room, which receives a few hours of light but isn’t hit with any direct sunlight.
You could even keep your plant in the bathroom! This may sound strange to some of you, but many people do this with plants that thrive in humid conditions.
Benefits of Crispy Wave Fern?
The crispy wave fern has many benefits that make it worth keeping as a houseplant. It’s great that they remove harmful toxins from the air by absorbing them through their foliage, giving off oxygen at night while plants usually sleep, and filtering indoor pollutants!
When you’re looking into getting a new type of fern, consider adding one of these beauties to your home because they are very easy to care for!
You may also want to consider trimming any dead leaves from the crispy wave fern as they have been shown to increase susceptibility for infection and disease while living ones improve air circulation which wards off pests and diseases better than other plants’ leaves (scientific study).
Crispy Wave Fern FAQ
We’ve gone through the main care rules for crispy wave ferns, but you may still have some questions. If so, hopefully, I answer them below:
Why are the leaves drooping?
The leaves of your crispy wave fern may droop because it’s not getting enough water. Check to make sure you’re following all the watering instructions outlined above. If your crispy wave fern still droops after this, the plant may be too cold or hot where you placed it (refer to care guidelines).
Why do crispy wave ferns have holes in them?
Mealybugs could be eating away at the leaves of your crispy wave fern, which will eventually kill the plant. You can use a cotton swab dipped in rubbing alcohol to kill the mealybugs and prevent this issue from happening again.
What is so great about crispy wave ferns?
Crispy Wave Ferns are really easy plants to care for, they’re great for beginners who want an easy-to-care-for plant! They also have a really cool texture and will add to any room’s décor.
What should I do if the leaves turn brown?
It might be that you’re not watering your crispy wave fern enough, make sure it has plenty of water in the soil but doesn’t get too wet or soggy.
Do crispy wave ferns clean the air?
Crispy Wave Ferns do a good job at purifying the air as they release oxygen and remove carbon dioxide. They’re one of those plants that can make your home feel like it has more space and makes you feel calmer just by being there!
Why are crispy wave ferns popular?
Crispy wave ferns are really popular because they’re so easy to care for, and they look great in any room. They can also help purify the air which is especially important when it comes to allergies or asthma. Plus, these plants attract a lot of attention with their beautiful texture!
Conclusion
Caring for the plant is vital to its longevity and health. It’s important to know how often they need watering, light levels needed during the warm seasons, and more.
Thank you for reading this blog post. If you think some of this information might help you care for your ferns, then please share these tips with your plant-loving friends!
If you’re a nerve plant owner, then you have probably experienced the dreaded drooping of your beautiful leaves. You believe you’re taking care of the plant, but for some reason, the leaves just won’t perk up.
You might think it’s time to throw them out with the trash, but we’re here to tell you that there is hope! Here’s how to save your drooped nerve plants…
How to Save a Drooping Nerve Plant?
To save a drooping nerve plant, you must give it everything it needs to survive, which is:
Temperatures: Roughly 70 degrees Fahrenheit
Humidity: 60-70%
Soil: Moist, well-draining soil that is slightly acidic
Water: Give more when the top inch of soil is dry
Lighting: Indirect sunlight
As the main cause of drooping is under-watering, you may have to take extreme action. You can revive drooping plants in a matter of hours by putting their pots in a sink filled with room temperature water.
Leave the pots to soak in the water for a few hours. In fact, some even suggest leaving the pot in the sink overnight with a sprinkle of epsom salts.
Reasons Why Your Nerve Plant is Drooping
There are many reason why your nerve plant is drooping. We will now talk through the main reasons and what you can do to save your nerve plant.
1. Poor watering
I think the most common reason for plants to droop is due to a lack of a proper watering schedule. Plants need water to survive, and when they don’t get enough of it, their leaves will start drooping.
The fittonia is a tropical rainforest plant, which means it requires a lot of moisture to thrive. This means giving your nerve plant moist soil and a humid environment.
It depends on the exact conditions in your home, but I water my nerve plant when the top of the soil feels dry. On average, I give my nerve plant water once every three days during the summer months.
2. Poor humidity
Similar to the watering issue, the nerve plant may droop if it is kept in a dry environment.
Make sure there are no drafts in your home that could dry out your plant. You may also want to use humidifier to raise the humidity level. Nerve plants need at least 60% humidity, which is why a humidifier can help. Here’s the humidifier I use (Amazon link).
Indoor humidity levels tend to drop in the winter, so boost them with a humidifier set at 60%. Up your plant gear with an indoor humidity gauge and use it to keep tabs on the indoor moisture.
3. Lack of nutrients
Nerve plants need the correct mixture of water and nutrients in order to grow.
If you notice that your nerve plant has started to droop, there may still be time to save it. Using a little fertilizer can really help with growth. I love using Miracle Grow (Amazon link) on my plants.
4. Soil and potting
To prevent rot, your nerve plant needs a pot with at least one drainage hole.
Peat potting mix is excellent for most house plants, as it maintains moist soil and helps with drainage.
If your plants are drooping, you can help them by re-potting them into looser soil and switching to a larger container.
Root-bound plants will droop after a while because the roots have filled up the pot and can’t take in any more water.
5. Not enough sun
Nerve plants need a specific amount of sunlight. The plant does not tolerate direct sunlight or being kept in shaded areas. I recommend placing your nerve plant on a window that faces the east or west. This will give plenty of bright, indirect light.
If you live in a low-light environment, consider using LED grow lights to supplement your plants’ growth. I use grow lights on my tropical houseplants during the winter months.
I use these lights from Amazon, which I tend to leave on for 4-6 hours every day.
Conclusion
This article provides a list of the most common reasons for nerve plant drooping, along with solutions to save your precious plant. Please share this article with any green-fingered friends if you think it would be beneficial to them. Here are a few more helpful tips:
– Ensure the plant does not get any airflow from anywhere, as this will cause it to lose moisture from its leaves. Nerve plants like tropical climates, so close nearby windows.
– Another way to stop the drooping is to provide more nutrients, such as nitrogen. To improve its overall health, give it a boost by adding organic material. You may add coffee grounds for an extra energy kick!
– The next tip for keeping your drooping nerve plant alive is to make sure it gets plenty of light – natural and artificial. Here are my favorite lights (Amazon link).
– When caring for a nerve plant, it is important to consider how much water the plant will need. For example, wilted leaves are often one sign that the plant does not have enough water.
– If your nerve plant is showing signs of pest infestation, try removing them with a spray of water and then apply neem oil (Amazon link). You should apply this to all plants nearby.
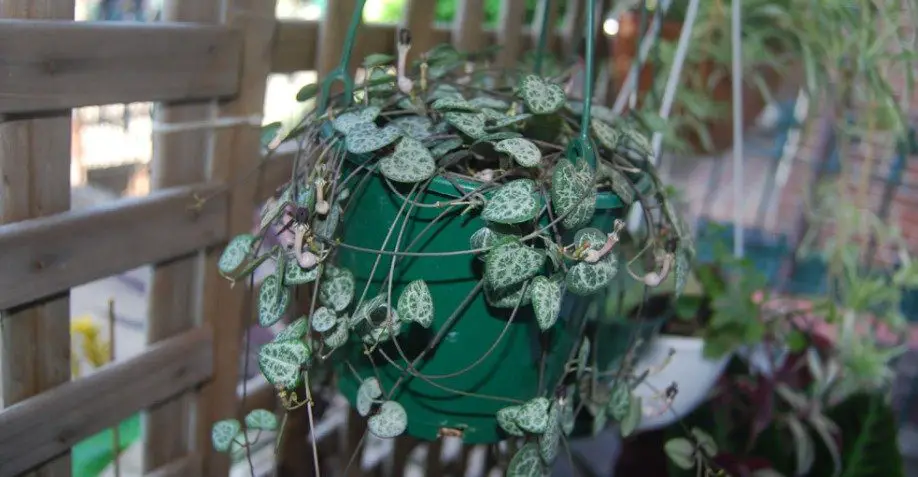
Does your string of hearts have a droopy, wilted look to it? If so you are not alone. This is a common problem that many people face with their Ceropegia plants.
The good news is that there are ways to save overwatered string of hearts! Read on for the best tips and tricks for saving overwatered plants.
How To Save Overwatered String of Hearts?
If you find that your string of hearts plant is overwatered, stop watering immediately. You should also re-pot the plant into fresh soil. If the plant has severe root damage, the vine can be propagated to produce new plants.
It is vital that you re-pot your plant correctly to prevent it from dying. Here are the steps to mindfully save your wet Ceropegia:
1) Keep out of the sun
Many people make the mistake of putting their plants in direct sunlight to remove moisture. However, this is a massive mistake, as it will put your Ceropegia plant under even more pressure.
2) Change pot
Move your plant out of the pot. You will likely have to pull quite hard to pry it out.
3) Carefully remove the roots from the soil
Take your plant and the roots from your soil mix by carefully using your hands. Cut off any dead roots with a pair of sterilized scissors. Once you’ve removed the plant from the jar, allow it to dry in a spot outside for at least two hours.
4) Pour soil into the new pot
There is a good chance that there is fungal growth in the soil. As such, plant your Ceropegia into fresh soil with lots of nutrients. I recommend using a soil mix for succulent plants (Amazon link).
5) Give adequate drainage
To avoid overflooding your pot, place it on a plastic tray with a hole to allow for excess water drainage.
6) Place your plant in the new pot
With dry roots, you can easily transplant your Ceropegia to a new pot. Add soil until about ¾ of the way up into the pot, and then carefully place the tubers, and then finally add some more succulent mix on top.
When overwatered, damage may not be seen for a while, but it’s already been done.
So you’re worried that your plant was overwatered? Next, I’ll guide you through the signs of overwatering and how to fix them.
Signs That Ceropegia Plant Is Overwatered
The main signs that your Ceropegia is overwatered are if the leaves are yellow, you notice root rot, edema, or the leaves are falling off.
Yellowing of leaves
Some plants turn yellow when they are overwatered, which is due to iron deficiency. Overwatering causes the nutrients to be flushed from the soil. I like using Miracle Grow (Amazon link) to add nutrients to the soil.
Root rot
High water content in the soil prevents roots from being able to breathe. Poor aeration results in a lack of oxygen, which leads to root rot. The excess water in the soil also promotes fungus and bacteria growth. When the root gets too wet and rots, the Ceropegia will start to wilt.
When overwatered, the soil starts to decompose and produce a sour odor. This is because there has been an increase in bacteria activity as a result of water sitting on top of it for too long.
Wilting of leaves
As we just mentioned, the leaves of your plant will wilt if it receives too much water. This seems bad, but at least your Ceropegia is telling you that it has been overwatered. It allows you to take immediate action.
Edema
When your plant has edema, the chances are that overwatering is to blame. Edema involves small water spots near the leaf bottom. These spots can burst if given more and more water, which then leads to a black leaf spot.
How to Propagate An Overwatered Ceropegia?
If you’ve already tried reviving your plant to no avail, start again by propagating it.
To save an overwatered Ceropegia, you should use a method called propagating, which allows for the production of new plants. This propagating can be done via soil or water, which we will now dive into.
Soil Propagation
We will propagate it using soil and vines.
To save an overwatered Ceropegia, first get your soil ready in a plant pot. This should also air to flow easily and not be too wet.
Cut off some of the vines (with the node attached) from your Ceropegia
Place these vines into the soil. A stick can be used to prevent your plant from falling down.
Plant each leaf about an inch or two above the surface of your soil to avoid damage from fungus and diseases.
To save a Ceropegia from being overwatered, make sure to water the soil lightly.
It takes about one month for the plant to start growing again.
It’s now time to put them into your soil mix for succulents.
Keep watering the string of hearts to see it thrive.
Water Propagation
This method can be accomplished with the use of vines. It might seem strange to give a Ceropegia that has been watered constantly more water, but this is what works.
Cut off a few of the vines (the healthy ones).
Make a hole in the center of a plastic cover, and put it over top of clear glass. Add water to the glass.
After you cut the vines and remove any leaves, drop them into the holes of the plastic cover.
Ensure that your Ceropegia plant receives indirect light, as this will aid its recovery.
Wait one month before transplanting.
Once the roots have been exposed, it’s then time fill a pot with soil mix.
Plant the new vines into the pot.
Water your Ceropegia to make it grow.
Ceropegia Watering Mistakes
Overwatering
One of the most common mistakes that people like to do when owning potted plants is overwatering their plants. As you have read above, overwatering your plant result in root rot. Some gardeners believe in applying water from below, which gives the roots just enough water.
Underwatering
Those who are hesitant to overwater their plants end not applying enough water. Light watering from above can result in no water reaching the roots at the bottom of the soil.
Inconsistent watering
Plant care requires consistency and attention. To promote your plant’s growth, try establishing a watering schedule and sticking to it.
Many people make the mistake of watering their plant every five days for a short while, and then they get lazy, which results in giving it some water sporadically every two weeks or two days.
No drainage
This occurs if you overwater plants and don’t provide good drainage. When you want to prevent root rot, it’s vital to give enough drainage for the water to drain out.
Not watering the roots
Many people fall into the habit of caring for their plant’s leaves and forget to care for its roots. Only watering the leaves will result in the roots not getting the water it needs to survive.
Using the wrong water
The type of water that you use is very important when we are talking about watering the string of hearts. Using the wrong water may contain chemicals that damage the health of your plant. I like using rainwater or water from my tap that has been passed through a filter.
Conclusion
So, that’s how you save a Ceropegia that has been overwatered. Most of you will be able to simply re-pot your plant into fresh soil.
However, some of you will have a plant that can’t be saved. The only solution when it’s too late to save your plant is to propagate a new one.
There are many different techniques for propagation, but I suggest taking a cutting from the healthy part of your plant and sticking it in some soil.
It’s not always easy to keep plants alive at first. But don’t worry! With a little care and attention, you will be able to grow an amazing Ceropegia that will amaze all those around you.
The plant kingdom is an amazing place. It covers most of the earth’s surface and contains an incredible diversity of life forms. This article will give you a brief overview of vascular plants, which make up the vast majority of living organisms in this kingdom.
What Are Vascular Plants?
Vascular plants can be characterized as plants that have water-conducting tissue, called xylem. This water-conducting tissue is composed of cells with thick cell walls, which move the liquid up from below ground.
Angiosperms are flowering plants that produce flowers and fruits. The plant also comes with roots, stem, and leaves – as you would expect. Flowers have either male reproductive organs (stamen) or female reproductive organs (pistil).
As such, angiosperm plants have a pollination process. Dicots and monocots are subdivisions of angiosperms. Some common examples are rose, mints, and maize.
Phanerogams
Otherwise known as phanerogamae, this type of vascular plant reproduces from its seeds, hence also called a seed-producing plant. These types of vascular plants are flowering plants, and they use photosynthesis to produce their food. Phanerogams are also called “flowering plants.”
Phanerogams are divided into three subgroups: monocotyledons, eudicotyledons, and magnoliids. Some common examples of phanerogams include clover, oak trees, and dandelions.
Cryptogams
Scientifically known as Cryptogamae, this type of vascular plant is able to reproduce with its spores. The cryptogamae group of vascular plants can be divided between photosynthetic and non-photosynthetic.
Plants that can photosynthesize include algae, mosses, lichens, and ferns. The non-photosynthetic variety includes mushrooms and slime.
Common types of gymnosperms are firs and pines. There are thousands of them that can be divided into four broad groups: coniferophytes, ginkgophytes, cycadophytes, and gnetophytes.
Characteristics of Vascular Plants
It is easier for vascular plants to tolerate a variety of environmental conditions as their stems transport water and nutrients up from the roots.
The transport system in vascular plants contributes to the development of a better method of asexual reproduction, such as seed dispersal and vegetative propagation.
Vascular plants have specialized tissues to transport resources, such as food or water. Here are the characteristics of a vascular plant:
Xylem
Vascular plants possess a xylem, which transports food and water to the phloem. The xylem tissue in vascular plants is rigid and can be fossilized. Xylem is present throughout multiple parts of the plant.
Phloem
Phloem is the vascular system that carries food and water to parts of the plant. The tissue includes several types of cells, such as sieve elements, parenchyma, sclerenchyma, and companion cells.
Roots
Roots are the rooted tissues of a plant. Some plants have a root system that goes down into the ground for water and nutrients. Roots also provide a plant with stability and security. Various roots have evolved adaptations to survive in the diverse types of soil found globally.
Leaves
Vascular plants come with leaves, and there are two different types: microphylls and megaphylls. Microphyllous plants, known as synangious plants or monophyllous plants, have a single vein that does not have any veins branching off of it.
Microphyllous are believed to be derived from an ancestral plant with a single stem.
Conversely, megaphylls have several veins within the leaf. Megaphylls are considered to have developed from branches that have fused with one another.
Growth
The first stage of embryonic development involves cell division to form an embryo. The embryo of a vascular plant develops to produce a plant body that is built once its organs and tissues are made. In vascular plants, the main growth occurs at the tips of the root and stem.
Structure of Vascular Plants
Vascular plants have developed specialized tissues to transport water throughout the plant. Here are the three tissue systems:
The ground tissue system
This involves round cells that have living protoplasm and thin walls. It includes tissues that aren’t vascular or dermal. Plant ground tissue is responsible for storing, secreting, and photosynthesizing.
There is an internal and external ground tissue system, also called intrastellar (in-between cells) and extrastellar. Ground tissue consists of Collenchyma, Parenchyma, and Sclerenchyma.
The vascular tissue system
The vascular system in plants is what transports water, nutrients, and carbs to the different parts of the plant. The vascular system is made up of two parts: xylem and phloem.
As explained earlier, the xylem gives nutrients to the phloem, and then the phloem transports these nutrients to the plant.
The dermal tissue system
Vascular plants develop an outer protective layer in their young parts, which is also known as the epidermis. This system controls how the plant interacts with the world around it.
The dermal tissue system is just one cell layer in thickness. It comes with a bunch of specialized cells that perform functions, including regulated gas exchange, protection against water loss, and water absorption.
Conclusion
This concludes our overview of vascular plants!
Vascular plants are the most common type of plant on earth, and they can be found in every habitat imaginable. There’s still a lot to learn about these fascinating organisms!
The plant kingdom is a vast and fascinating realm of life on earth, and vascular plants are an integral part of that ecosystem. We hope this overview has given you some insight into how these unique organisms function!
Phloem transports those nutrients from one part of the plant to another; this includes transporting sugars made by photosynthesis back through the leaf. The dermal tissue system is just one cell layer in thickness, with the purpose to protect the plant against water loss.
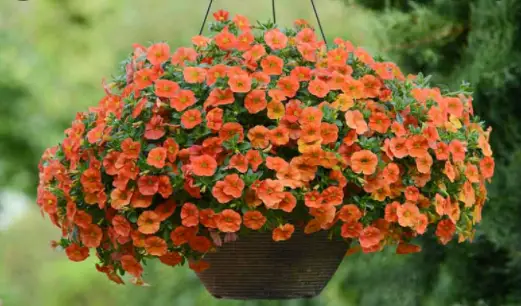
Calibrachoa is a beautiful, colorful flower that can add to the beauty of your garden. It’s also an incredibly resilient plant. So why do some calibrachoas die?
There are many reasons for this happening, but one of the most common causes is over-watering. If you find yourself in this situation, don’t worry! We’re here to help with five tips on how to fix it and keep your plant going strong all summer long!
Why Is My Calibrachoa Dying?
Your calibrachoa is likely dying because it has root rot, which has been caused by receiving too much water. With so much water at the base of the pot, the plant can’t receive the nutrients and oxygen it needs to survive.
However, that is just one of the most common reasons. I will now go into a few more possible reasons for your calibrachoa to be dying…
1. Not enough fertilizer
Don’t forget to fertilize as well! If your soil is lacking in nutrients, the plant may be dying because it can’t get what it needs. Yellowing leaves are a big clue that this is the cause.
I use Miracle Grow on all of my houseplants. This fertilizer provides every nutrient that the plant needs while simultaneously not giving too much nitrogen, which would scorch its leaves.
2. Pests
A bug infestation may be destroying your plants. If you notice any bugs buzzing around the leaves or devouring the roots, make sure to remove them with neem oil (amazon link) as soon as possible!
Mites, thrips, and aphids are the ones to look out for. Make sure you wash the plant thoroughly first to remove any bugs that may be on it, and then generously apply neem oil afterward for maximum effect.
3. Cold weather
The cold weather may be killing your plants, especially as the calibrachoa is loves being kept in warm conditions. If you live in an area that experiences cold winters, it’s important to make sure the plant is protected from any frost or freezing temperatures.
Unfortunately, you can’t make your plant a hot chocolate. But, you can move your plant into a warmer spot. If it’s too cold outside, bring the pot inside where there is plenty of natural light and warmth so that it can recover from being too cold.
4. Too much water
As we discussed earlier in this post, too much water can be the cause of many problems for all plants.
Root rot is when the roots of a plant become too wet and start to decompose. The most common cause for this problem is over-watering, but there are other causes as well.
When a plant’s roots are rotting, it can be hard to figure out what the problem is. The first step in reviving your sickly plants starts with cutting off all of their brown stems and then removing any other dead leaves that you come across. However, if you see blackened or sludgy roots on your plants, they may not be salvageable.
To avoid this from happening again, make sure that you are watering only when necessary so as not to overwater it again. You can check if the plant needs water by probing the soil with your finger. If it’s moist, then don’t water it for a few days.
5. Not enough sunlight
Your calibrachoa needs at least six hours of sun exposure per day. You may wish to place this pot on an east-facing windowsill or purchase grow lights for indoor plants. These will help give your plant just what they need when there isn’t enough natural light outside, like during the winter months here in the UK. Well, like every month here in the UK…
6. Disease
If you’re still struggling, it may be a disease. There are many types of plant diseases that can affect your calibrachoa and make them wilt away in a matter of days.
Some common examples are verticillium wilt, fusarium root rot, fungal leaf spot, and sooty mold. If this is the case for your plant, I recommend contacting an expert to figure out what type of fungus or bacteria has infected your plants before taking any corrective action.
You’ll want to add a drainage layer at the bottom of your pot so that excess moisture can leave more easily and avoid root rot from taking over. You can use rocks or gravel to help with this process!
8. Sunburn
The calibrachoa may be sunburning. If you notice any brown spots on the leaves, this is likely due to too much exposure to sunlight and not enough water intake.
This means that your plant needs more shade than it’s getting so far outside of the summer months in areas with lots of sunshine. The best way to do this would be by moving it across the room from a sunny window or adding some shading around its pot when outdoors. You could also use fabric like cheesecloth if you don’t want anything permanent.
Conclusion
In conclusion, there are many reasons why your calibrachoa may be dying. The most common reason is overwatering, but sometimes it can also be cold weather or pests that cause the problem. Make sure you’re watering when necessary and keeping an eye out for any signs of bugs!