by Gardener Tim | Sep 13, 2021 | House Plants
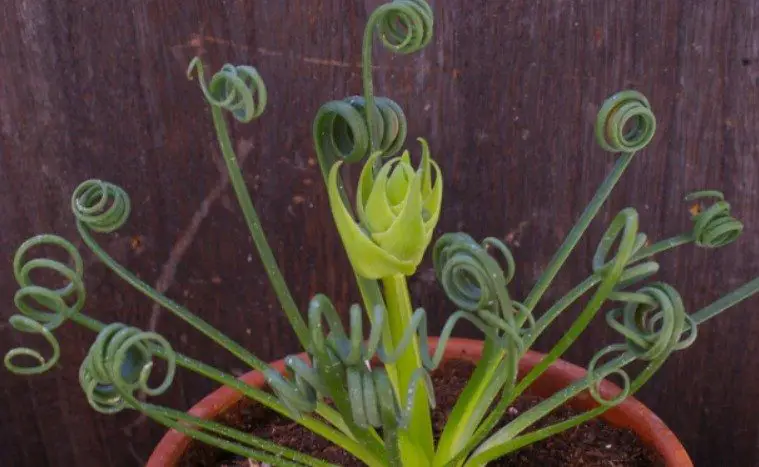
Today we’re going to learn about frizzle sizzle plants and why they might be dying. Frizzle sizzle plants are a type of succulents that can be found in sandy or rocky soil, but not much else.
They get their name from the way that their stems grow, which is almost like curly hair (or frizzy) and grows very quickly (sizzles). Let’s take a look at some reasons why your plant may be dying…
Why Is My Frizzle Sizzle Plant Dying?
Your frizzle sizzle plant is dying because it’s not getting the care it needs to survive. You see, this is a delicate plant, so you need to give the frizzle sizzle optimal growing conditions to keep it alive.
I will now talk about the best conditions for your frizzle sizzle plant. You should be able to see where you’ve been going wrong.
Light for Frizzle Sizzle
Frizzle sizzle plants need lots of sunlight. They do best in a place that gets at least six hours of direct sunlight every day, but more is better. If you don’t have the right spot for your frizzle sizzle plant to receive enough light, then it can die quickly.
This is why I love using grow lights on my plants, especially in winter. These lights are great for helping succulents get the light they need to survive.
Soil for Frizzle Sizzle
Frizzle sizzle plants are not picky about their soil, but you should avoid using regular potting mix. Succulent soils do a much better job of holding moisture and nutrients that frizzles thrive on. You can even use sand or gravel instead of regular potting soil!
Just be sure to add some pebbles at the bottom of your container so that water doesn’t sit in it when you water your plant (it will just go right through).
Water for Frizzle Sizzle
As I mentioned before, your frizzle sizzle doesn’t need to be watered very often because it’s able to retain water in its leaves/stems. This is one reason why they’re great houseplants – if they get too dry around the roots, they simply shrivel up until the next time you give them some more water!
I like to give the plant a thorough watering once every two weeks or so and wait until the soil is dry before I water it again. Using a moisture meter is a great way to know if the frizzle sizzle is ready for water or not.
Temperature for Frizzle Sizzle
Frizzle sizzle plants prefer a warmer environment. If you live in an area where the temperature is below 40 degrees Fahrenheit, I would recommend bringing it indoors during winter. Also, make sure that they don’t get exposed to any cold drafts from windows or doors.
You can give the best temperature by placing the frizzle sizzle where it would receive bright, indirect sunlight. Just remember to keep an eye out for signs of sunburn (brown spots on leaves and stems).
Frizzle Sizzle FAQ
Do frizzle sizzle plants like full sun or partial sun?
Frizzle Sizzles plants should be put into full sunlight for several hours every day. If your location only allows for partial sun, then you should rotate your planter to ensure that all sides get equal amounts of sun exposure (at least three times per week).
It would also help to move it closer to a window so that more light reaches the plant during its allotted time frame. The key is using lots of natural sunshine!
Will frizzle sizzle plants grow in the shade?
No, they need lots of sunlight. They will die if you don’t give them enough light.
Do frizzle sizzle plants need to be watered daily?
No, in fact watering them too much will cause them to die. They only require about one inch of water each week. Use a normal-sized spoon or cup and just sprinkle the water onto the soil until it starts moving through the pot.
Can you propagate frizzle sizzle?
Yes, you can propagate frizzle sizzle plants. But unlike with other plants and succulents, it must be done by separating the plant at the bulb, not via cuttings.
How often do I fertilize my frizzle sizzle plant?
You don’t need to fertilize your frizzle sizzle plant, as it isn’t a very hungry type of succulent. If you notice that the leaves are turning red (instead of green), then this usually means that they aren’t getting enough sunlight and should be moved closer to a window or outside in direct sunlight for several hours each day.
Are frizzle sizzles poisonous?
These succulents are not typically toxic or dangerous to people or pets. However, they do contain oxalic acid which can irritate the skin and mouths of humans and animals alike if ingested. It’s probably best to keep these plants out of reach from children who may mistake their appearance for something edible.
Conclusion
In conclusion, frizzle sizzle plants die because of a lack of care. Make sure you give your frizzle sizzle plant the correct amount of light, soil, water, and fertilizer to keep it healthy!
If you notice that the leaves are no longer curling, then check out my recent blog post on why the frizzle sizzle isn’t curling.
Thank you for reading my blog post on why is my frizzle sizzle plant dying! I hope that the information in this article was helpful to you and please let me know if you have any questions or need help with anything else!
by Gardener Tim | Sep 13, 2021 | Plant Care
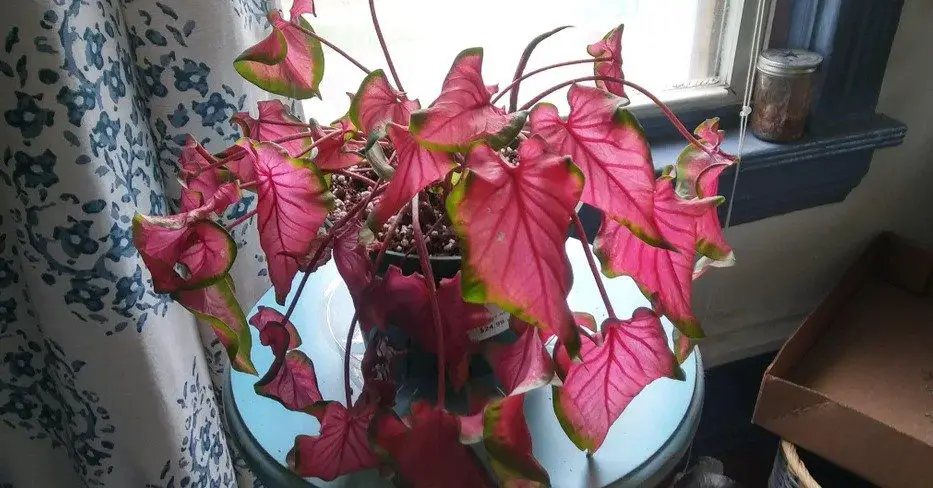
Ever had a caladium plant that seemed to be doing well and then suddenly drooped? If so, you’re not alone. This post will discuss the causes of drooping in caladiums, what to do when it happens, and how to prevent it from happening in the future. We’ll also go over some other common problems with caladium plants.
Why Is My Caladium Drooping?
It’s likely that your caladium is drooping because it is not getting enough sunlight. The caladium is an annual that loves receiving lots of sunlight on its leaves. Failure to provide enough light will result in the caladium leaves drooping.
You should also look for salt build-up, which is displayed as white spots on the top of the soil. This is very common for caladium plants. It happens when the soil doesn’t drain properly after watering. If this is your problem, it should be easy enough to fix by improving drainage at planting time and during future waterings.
You may also want to adjust the pH of the potting mix if you notice that your caladium leaves are changing. Caladiums need a slightly acidic environment in order for them to grow well, so make sure that there isn’t too much alkaline material present in your container mix or fertilizer.
The best way to test pH levels is with an inexpensive testing kit from a garden center or nursery supply store.
There is even the chance that nothing is wrong with your caladium at all! These plants are notorious for being stubborn and drooping no matter what you do. You may give it enough sun, the correct amount of water, reduce salt build-up – but nothing works!
How To Stop Caladium Drooping?
There are many ways to stop your caladium from drooping. The first is to give it enough sunlight! You may not have been providing the plant with adequate light before, so now you need to move the pot into a sunnier location or turn it every few days so all sides receive equal amounts of sunlight.
If you can’t give it enough natural light, then investing in an LED grow light can help massively. These lights are designed to be used specifically for plants and they provide the perfect amount of light. This can also help against yellow leaves.
If you’ve done all that and your plant still droops, then it’s likely a salt build-up issue. You need to flush out the soil with water from the outside or pour some water over the top of the soil to remove excess salts.
Finally, if none of those work – try trimming the drooping leaves from your plant. You will have a bare plant for while, but the leaves will grow back and you’ll have a happy and healthy caladium!
FAQ
Should I cut off drooping caladium leaves?
Yes, you can cut off drooping leaves. Use sterilized scissors to make cuts just above the node. This way, the node will grow a new leaf.
What are some other common problems with caladium?
Some of the most common issues include black leaves, waterlogged soil, and rot. A lot of these can be avoided by adding sand to your potting soil mixture before planting!
Make sure that you do not overwater your plant either – especially in winter when it needs very little moisture at all. And always keep an eye out for pests like aphids or thrips because they could also cause both drooping and yellowing leaves on your caladium plants.
Is my caladium drooping because it needs more sunlight?
Yes, this is likely the case. Caladium plants love receiving lots of sunlight. If it’s drooping, then the most likely reason for this is that there isn’t enough light reaching its leaves!
Will a drooping caladium plant die?
If your plant is drooping, then it may be that nothing can be done to save it. Caladiums are stubborn and will often go into survival mode when conditions become difficult for them – resulting in the leaves drooping.
Will grow lights prevent caladium from drooping?
Since caladiums require lots of sunlight, using grow lights can prevent them from drooping. This is because the plant will have enough light to photosynthesize and produce energy for itself!
It’s best to get full-spectrum lights though, as these will provide the most suitable level of light for your plant.
What can I do if my soil has salt build-up?
The salt build-up is very common in caladium plants – especially when using tap water or any type of softened water because these often contain sodium, which will damage your plant over time. You should use water from the outside or pour some over top of the soil to flush out all excess salts.
Conclusion
In conclusion, drooping in caladium plants is a common problem. However, it can be fixed easily and quickly by moving your plant into an area where it gets lots of sunlight or flushing the soil with water from outside to remove excess salts.
You should also consider investing in LED grow lights that are designed for indoor plants like caladiums. These can help your caladium to grow.
Always monitor changes in light levels throughout the day and make sure you take note of this issue begins happening more frequently than usual! This will help identify any problems early on before they become too difficult to fix – like salt build up which requires you to completely replace all of the soil within your pot.
Monitoring the soil for moistness is a good way to avoid fungal infections and other diseases that can cause droop in plants. It can even lead to brown spots on caladium leaves.
I hope this blog post was of help to you! If it was, please leave a comment below with any additional questions or feedback.
by Gardener Tim | Sep 13, 2021 | House Plants, Plant Care
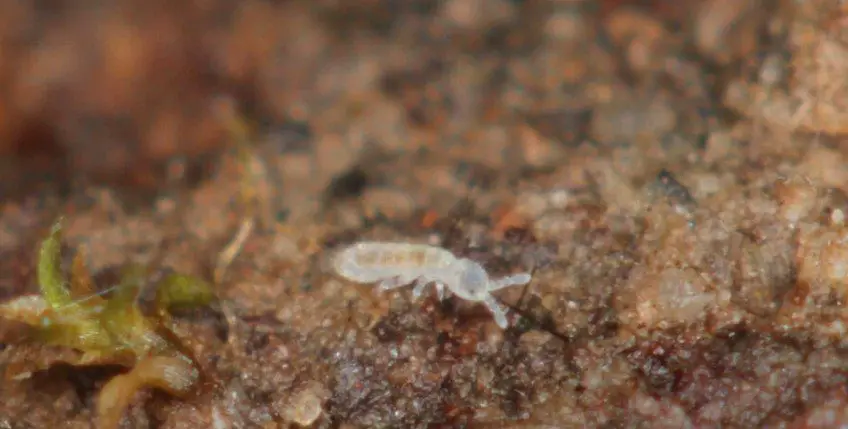
If you have ever had tiny silver bugs in your house plant soil, you are not alone. The good news is that there are simple steps to take in order to keep them away from your plants!
What Are The Tiny Silver Bugs in Houseplant Soil?
They are either springtails, isopods, or thrips. All three insects are extremely small and can be difficult to see with the naked eye. They are not overly dangerous for your plants, but they can definitely cause damage to the leaves.
They don’t bite or sting, nor will they carry diseases that could harm you or any members of your family who may come into contact with them.
Although these tiny silver bugs aren’t known for hurting people, it is still nice to get rid of them if possible!
They are often found by consumers that bought a new potted plant from a nursery! The plant was likely held with other stock plants that were infested with these notorious insects.
How Can I Get Rid Of the Tiny Silver Bugs in Soil?
You should re-pot your plant and then use diatomaceous earth as a preventative measure to keep these insects away from your soil.
Diatomaceous earth (Amazon link) is a natural product that won’t hurt your plants, but it will kill the tiny silver bugs living in your soil.
When repotting any houseplants, make sure to dump out all of the old soil and use new potting mix instead! This will prevent tiny silver bugs from coming back.
It works by piercing their bodies and dehydrating them until they die. Because it is a powdery substance, you should wear gloves while applying diatomaceous earth to protect yourself from getting any on your skin! Diatomaceous Earth can be found at most garden centers or online retailers for around $15 per pound bag.
Sprinkle the diatomaceous earth on the soil and around the base of your houseplants, as well as in any cracks or crevices where they might be hiding.
What Can I Do To Prevent Tiny Silver Bugs?
When you bring home a new houseplant from the store, always inspect it for any bugs before bringing it into your home!
A good way to keep track of everything is by taking a picture with your phone camera! This means that if something does happen to appear out of nowhere, at least you have it documented for future reference!
You can prevent any silver bugs from returning by protecting your plant with diatomaceous earth and a regular dusting of the soil.
By taking these simple steps, you’ll be able to keep your home plant free from any tiny silver bugs!
FAQ
How can I tell if there is a tiny silver bug infestation in my houseplant soil?
You may spot the bugs crawling along the surface of your pot and around its base where it meets with the soil, but you should also be checking underneath leaves for any signs of them hiding out as well! Sometimes they can be found right on the surface of loose potting soil.
What do tiny silver bugs look like?
They are extremely small and can be difficult to see with the naked eye. Their body is either shiny silver or grey color! They may also appear as light purple in hue depending on how direct of lighting you’re looking at them under.
Where did these tiny silver bugs come from?
The likely answer is your plant itself! If it came from a nursery where there were other plants present, then those little guys could’ve hopped onto yours by accident when you brought it home and repotted it into new soil!
Do tiny silver bugs in houseplant soil lay eggs?
A. Yes, these three insects will reproduce inside your potted plants and you may notice more once their numbers have increased! They can also travel from other locations where they are present to infest yours as well.
When are the tiny silver bugs in soil most active?
They are most active during the night. This is possibly why you rarely see them during the day.
Can I use household soap to get rid of tiny silver bugs in the soil?
No, you should avoid using this method because it may kill your plants! Instead, try diatomaceous earth for safe and effective bug control.
Do they bite people or pets?
No, these tiny silver bugs do not attack humans or animals in any way! If you do come into contact with them, don’t worry too much about it! They’re more annoying than they are dangerous and there is always a good solution for getting rid of them when necessary.
What foods do bugs in plant soil eat?
Springtails feed on fungi and bacteria that live in the soil. This will eventually kill your plant if not taken care of! They are also known to harm plants by feeding off their roots, which can cause damage as well.
How long does it take for tiny silver bugs to reproduce?
Springtails have a very short life cycle. It only takes about six weeks or less on average for this species of hexapoda to go from egg to adult! This is why it’s so important that you get rid of any infestations as soon as possible so they don’t multiply and take over your potted plants.
Conclusion
In conclusion, these tiny silver bugs are more annoying than dangerous, but they can still cause damage to your houseplants if you don’t get rid of them.
You can deal with this issue by changing the soil and applying diatomaceous earth to the soil. This will get rid of the bugs and make sure they never return – phew!
I hope this blog helped you understand what to do if there are tiny silver bugs in your houseplant soil!
by Gardener Tim | Sep 13, 2021 | House Plants, Plant Care
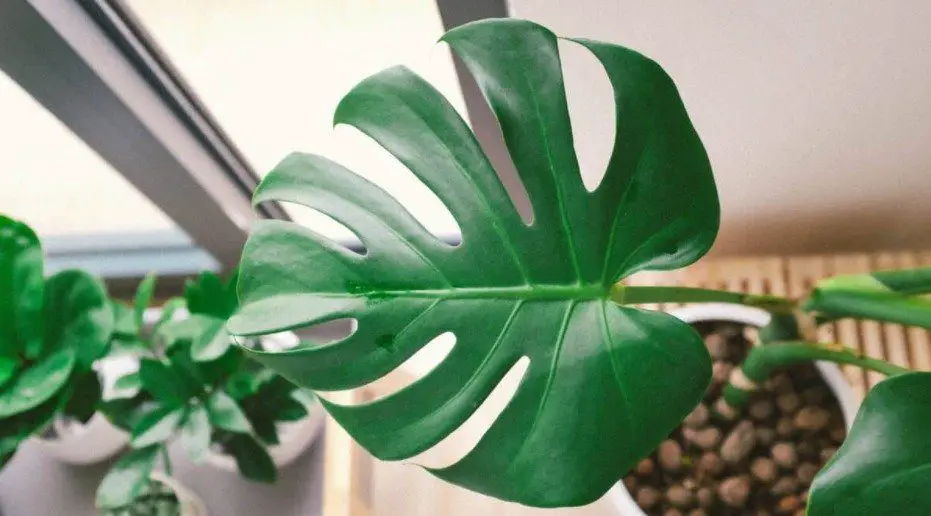
Monstera plants are popular houseplants. They have large, fuzzy leaves and grow in a vine-like pattern. As with any other plant, when the Monstera becomes damaged or diseased it can be difficult to know what to do next.
In this blog post, we will discuss how you should go about fixing your broken monstera stem so that you can continue growing it!
Broken Monstera Stem: What Should I Do?
You should remove any broken monstera stems as soon as possible. It must be done by cutting just above (an inch or so) the lowest node.
Cutting above the node allows a new stem to grow within a couple of months. As such, you can’t save the original stem, but you can grow a new one with time and patience.
I simply pop the broken stem into a vase of water, instead of throwing it away. This means I can get that last ounce of joy from the leaf! These are my favorite shears for pruning monsteras.
Monstera Plant Care: Other Things You Should Know
Make sure that the plant has plenty of room to grow. Monstera plants need lots of sunlight, strong airflow, and high humidity levels in order for their stems to continue growing tall and wide each year.
Also, make sure you don’t overwater them! If they get too much water, it will lead to root rot, which can cause a stem injury or damage. During winter months when there is no active growth happening, it’s safe to water just once every few weeks or so.
Broken Monstera Stem FAQ
You may have a few more questions about your snapped monstera stem, so I will now answer some of the most frequently asked questions for you.
Should I throw away the broken stem?
This is completely your choice. When my monstera broke, I simply put the stem/leaf in a vase of water for a few weeks. With the correct care, cut stems can last a long time. As you can tell, I hate throwing things away!
How often does this happen to monstera plants?
Monsteras are quite hardy so they rarely get diseases or become damaged in any way. However, if they do break there is a good chance it will be at its base since that part of the plant has no nodes from which stems can regrow.
What if my monstera has a lot of broken or damaged branches?
Remove all broken stems to avoid any further damage to the plant. If there is one or two healthy stems, then you may want to start again by propagating the monster plant.
Why did my monstera stem break?
Sometimes stems break because of root rot. This happens when the plant is overwatered and the roots begin to decompose.
Other times, vines may simply snap where they are too heavy or not supported well enough by trellises or other objects in your home.
There’s no way to know for sure why your monstera broke so you will have to play it safe with what I’ve mentioned above!
How often do monstera stems break?
Monstera stems rarely break. They are quite resilient and can sustain a lot of damage before they give in to the forces against them. However, mistakes do happen and you may find yourself with a broken stem.
Conclusion
In conclusion, if you find yourself with a broken monstera stem, don’t worry. There are ways to fix it!
Remove any damaged parts of the plant and cut above the lowest node on your monstera plant in order for new stems to grow within a couple of months’ time. You can start growing these new stems by propagating them in water or soil.
I hope the tips in this blog post will help you fix your monstera stem and get it growing again! As stem breakages happen when they get leggy, you may want to know how to stop monstera legginess.
by Gardener Tim | Sep 13, 2021 | Facts
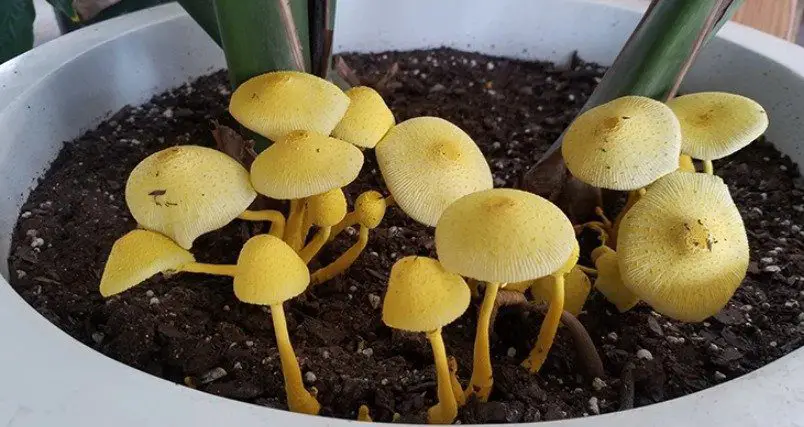
Mushrooms are one of the most well-known fungi. They can be found in many places, including soil and decaying wood. You might have noticed mushrooms growing out of your potted monstera plant recently, but what does that mean? Here’s an explanation!
Why Are Mushrooms in Monstera Soil?
There are mushrooms in your mushroom soil because the soil is fertile, moist, or fungus spores somehow got into your plant pot – or a combination of all three!
If the plant is healthy and nothing else seems to be wrong, it’s probably just a fungal growth. Fungi are neither good nor bad – they’re simply organisms that have adapted to grow in different environmental conditions!
Fertile soil has many nutrients for plants or fungi to feed on. If your potting soil contains high amounts of organic matter like bark, composted vegetation, manure, leaves, peat moss, and/or soils mixed with these materials, this can make fertile soil.
In nature, mushrooms usually break down decaying wood or animal feces from herbivores such as deer and elephants because they contain rich sources of nitrogen, which is needed by plants and some types of fungus.
While the mushrooms are usually nothing more than an eyesore, you could use a fungicide (Amazon link) to stop the spread of fungal spores and keep your soil free from any mushrooms.
What are mushrooms?
Mushrooms are the spore-bearing bodies of fungi, which tend to grow on decomposing substances. They come in many shapes and colors depending on what type they are!
Where did they come from?
They could have come from spores that were in the soil or on your plant! In fact, some types of mushroom spores can last for years.
Are mushrooms bad for my monstera?
Mushrooms growing on top of a monstera plant aren’t usually anything to worry about. Although they may look strange and unappealing, the majority won’t affect your plants’ health or growth at all!
However, there are some mushrooms that can be poisonous. This is why it’s important to know the difference between toxic and non-toxic varieties! If you’re concerned about your plant or unsure whether or not a mushroom could harm it, simply look up pictures of the possible types of fungi growing on your monstera roots, so you can identify them correctly.
If you’re worried about the mushrooms in your soil, you can repot your monstera plant into fresh soil that drains well.
Is there anything to stop the mushrooms from growing?
Not really – They often grow in moist or humid environments when the weather is warm and there’s plenty of organic matter around for them to feed on!
As such, the way to avoid fungus growth is by providing cold and dry conditions, which could actually cause more harm to your plant than the mushrooms would.
Should I remove the mushrooms if I have a cat?
yes, you should remove the mushrooms to stop your cat from eating them and becoming ill. Many types of fungi can be highly toxic to felines, so keep this in mind when dealing with fungus growth!
What type of mushroom is growing on my monstera?
There are many different species of both edible and poisonous mushrooms that could grow on your plant. The only way to identify a specific kind is by studying pictures online or consulting a mushroom expert.
Although you may think you know what type of mushroom is on your monstera, it’s never a good idea to assume – the risks are not worth it!
Are mushrooms on my monstera good luck?
That depends on your perspective! Some people believe that mushrooms bring good luck, but others think nothing of it.
How do I remove mushrooms from monstera?
You can remove mushrooms by hand with tweezers. If you are unsure if there is fungus inside your monstera, you can use a fungicide to kill any spores remaining in the soil.
Conclusion
In conclusion, it’s nothing to worry about if you happen to spot some mushrooms on top of your monstera plant, but it can be a sign that the soil is fertile or fungus spores got into your pot. You should treat any fungi with neem oil and remove all visible mushrooms from the surface!
