If you have a broken orchid stem, don’t worry! There are several things that you can do to save your plant. In this blog post, we will discuss the steps that you should take to repair your orchid. We will also provide some tips on how to prevent your orchid from breaking in the future.
Broken Orchid Stem: What Should I Do?
You should cut and remove any broken orchid stems as soon as possible. You can use a sharp knife or scissors to make cuts just above the node, which is an area on the stem where leaves are attached.
Be sure to sterilize your cutting tool before using it on your plant. Once you have removed the broken stem, you can begin the process of repairing your plant.
After you have removed the broken stem, you should apply a fungicide to the cut area. This will help prevent any diseases from infecting your plant. In time, a new stem will begin to grow from the cut area.
I usually just pop the old, broken stem into a glass of water. This is great if you want to be economical and make the most of your plant. Otherwise, just chuck it into a compost bin.
Other Things You Should Know
Make sure that the orchid has lots of space to grow. If it is pot-bound, meaning that the roots have filled up the pot and there is no room for them to grow, then you should repot your plant.
Stems often become damaged when they don’t have enough space to grow, which leads to accidents and breakage. So move it away from any potential hazards in your home, like windows or doors.
To keep the stem strong, orchids need to be watered regularly, receive lots of sunlight, and be fertilized every few weeks. By following these tips, you can help your orchid recover from a broken stem and prevent future breakage.
Broken Orchid Stem FAQ
If you’re uncomfortable with your orchid’s snapped stem, there are a few things you might want to know:
Should I throw away a broken orchid stem?
This is up to you. If you want to be economical, you can place the broken stem in a glass of water. Otherwise, you can compost it.
How often does this happen to orchids?
Orchids are delicate plants, so stems can become broken easily. However, this can be prevented by giving your plant lots of space to grow and placing it in a safe location.
What if my orchid has a lot of broken or damaged branches?
If your orchid has multiple broken stems, you can remove them in the same way that we described above. However, if the plant is severely damaged, you may need to think about if it’s worth saving. In some cases, it might be best to start over with a new plant.
Why did my orchid stem break?
There are several reasons why an orchid stem might break. Maybe the plant was pot-bound and needed to be repotted. Or maybe the stem was damaged by a pet or person. Sometimes, stems just break because they are delicate plants.
It’s also possible that the stem broke because it became too heavy. This results in an area on the stem that becomes weaker and weaker over time – eventually leading to a break. If you think this might be the case, you can try staking the stem to provide support.
Conclusion
In conclusion, if you have a broken orchid stem, don’t worry! There are several things that you can do to save your plant. Just be sure to remove the stem, apply a fungicide, and give your plant lots of space to grow. By following these tips, you can help your orchid recover from a broken stem and prevent future breakage.
Fiddle leaf figs are beautiful plants that many people enjoy keeping in their homes. They’re easy to care for, but they can be difficult to keep looking good if you don’t know how to take care of them. The following article will discuss the reasons why your fiddle leaf fig may be turning brown and what you can do about it!
Why Is My Fiddle Leaf Fig Turning Brown?
Your fiddle leaf fig is turning brown because it has been overwatered or given too much sunlight.
The two causes give leaves that look similar, but overwatered brown leaves tend to be wet, whereas brown leaves from too much sunlight tend to be dry and crisp.
I will now go more in-depth into each of these causes and what you do to prevent them both.
Brown Fiddle Leaf Fig Leaves from Too Much Water
If your fiddle leaf fig has been given too much water, its leaves will begin to curl and the tips of them may even turn brown.
This is because when you overwater a plant, it starts to drown and can’t get enough air into its roots. The lack of oxygenated cell growth in the root system causes damage and root rot, which is shown by brown leaves and wilting.
If you’ve been giving your fiddle leaf fig too much water, all you have to do is start watering it less often and in smaller amounts at a time. This will allow the root system of the plant to recover from its damage without drowning again!
It’s also important to use pots with drainage holes so the plant can drain the excess water from its soil. Perlite is also a good way to make the soil hold less water.
To check if your fiddle leaf fig needs water, simply test the top inch of soil with your fingers. If it feels dry, then you should water it. If not, leave it alone for a few more days.
But what if root rot has already present? Well, then you should re-pot your plant into new soil that is looser and drains easier. You can also add things like perlite, sand, or pebbles to the drainage holes of the pot so excess water will flow through it easily! You may also need to trim any rotten roots and discard them.
Lastly, make sure you are using distilled or filtered water when watering plants because this helps remove chemicals from municipal tap water.
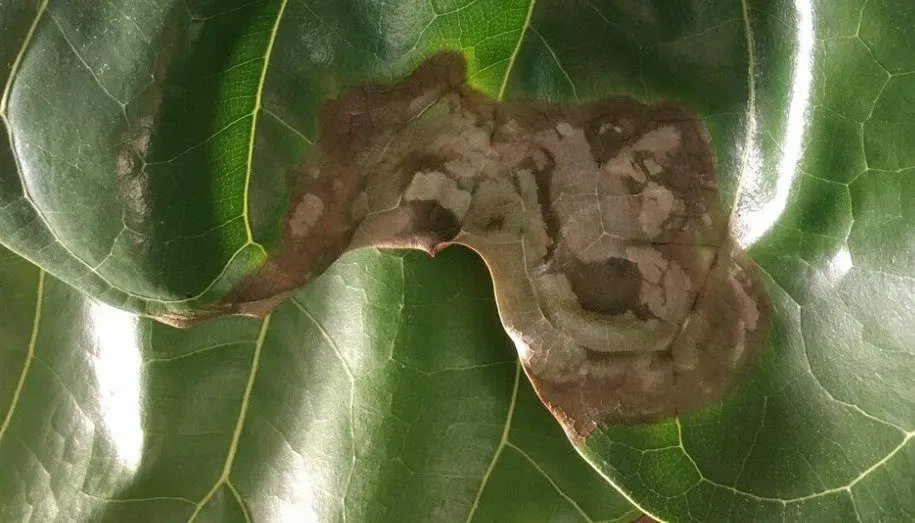
Brown Fiddle Leaf Fig Leaves from Too Much Sunlight
If your fiddle leaf fig is turning brown, it’s probably because of too much sunlight.
The leaves that turn from light exposure tend to be dry and crispy along the edges. Brown spots may also appear on the tips of some leaves, as well as smaller web-like marks.
This happens when a plant has been sitting directly under bright lights for far too long without any sort of relief; they simply can’t handle it! This causes scorched brown patches on their leaves.
To prevent your plant from getting burned, make sure to move it away from direct lighting sources, such as windowsills and lamps. Providing your fiddle leaf fig with some relief from the light will help it recover its leaves quickly.
Brown Fiddle Leaf Fig FAQs
Figs can be rather difficult to manage at the best of times. As such, I’ve received a lot of questions about fiddle leaf figs from readers. Let’s go over some common ones now!
Will brown fiddle leaf fig leaves turn green again?
No, it is unlikely that the leaves will return to green once they have turned brown. However, as long as you fix whatever is causing your plant’s browning, it should start growing new leaves in a few months!
Should I remove brown leaves from fiddle leaf fig?
Yes, it is best to trim off any leaves that are turning brown. This will prevent them from dropping onto the soil and creating further issues, as well as helping your plant look healthier!
Will too much water cause fiddle leaf fid to turn brown?
Yes, too much water can lead to root rot and cause brown leaves. Make sure you only water your plant when the top inch of soil feels dry!
When I touch my fiddle leaf fig, it seems like there is moisture on it?
Moisture on fiddle leaf fig leaves is usually due to some condensation from sitting in a humid area or too close to other plants. This is normal, but keep an eye on your plant and watch for brown spots (in case of fungal infection).
Will direct sun cause fiddle leaf fig leaves to turn brown?
Yes, too much direct sunlight will scorch and damage your fiddle leaf fig’s leaves. Make sure you give it some relief from bright lights to prevent this! Indirect sunlight is best.
Conclusion
In conclusion, fiddle leaf figs can be beautiful and easy to care for, but they often need some extra TLC. If you’ve been giving your plant too much water or sunlight, then it’s probably turning brown because of that!
Luckily, there are simple ways to fix this problem so your fiddle leaf fig will stop looking sad and start growing healthy again!
I hope you have enjoyed reading this blog post! Please do check out my other articles on fiddle leaf figs.
Fiddle leaf figs are one of the most popular houseplants, but they can be prone to yellowing leaves. If you’re wondering what is causing your fiddle leaf fig tree to turn yellow, read on for some potential causes and solutions!
Why Is My Fiddle Leaf Fig Turning Yellow?
Your fiddle leaf fig is turning yellow because it has been overwatered, there is a lack of sunlight, or it is stressed from environmental changes.
I will now go more in-depth into each of these causes and what you can do to revive a fig plant with yellow leaves…
Yellow Fiddle Leaf Fig from Overwatering
A common reason why your fiddle leaf fig tree might be turning yellow is that you’re overwatering it. Fiddle leaves love moisture and humidity, but they hate standing water! Make sure you’re only watering your plant when the soil is nearly dry.
You can test if your fiddle fig needs water by sticking your finger into the top inch of potting soil. If you can’t keep track or just don’t want to do it every time, get a moisture gauge so you know when to water without having to guess!
I tend to water them once a week during summer, but only every other week during winter. Regardless of the season, its important to always use pots with drainage holes so that the roots aren’t sitting in water.
If the roots do become rotten, it’s important to act immediately. You can fix fiddle leaf root rot by removing all of the wet soil and replacing it with fresh, dry soil. You may also need to prune some of the dead roots and discard them away from your plants (to avoid fungal infections).
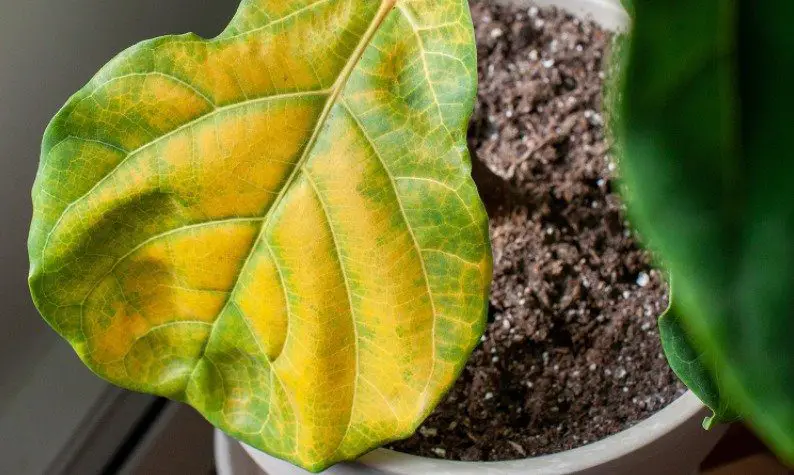
Yellow Fiddle Leaf Fig because of Lack of Sunlight
Another reason why your fiddle leaf fig might be turning yellow could be due to a lack of light. If it’s not receiving enough sunlight, its leaves will start to turn pale and become yellowish-green.
Make sure that your fiddle leaf fig is getting at least eight hours per day (preferably closer to 12) in an area with bright but indirect sunlight. It may also help to move the plant closer to where it receives more sunlight every day, or invest in grow lights if necessary!
I use grow lights (Amazon link to mine) on most of my indoor plants during winter. They help to keep them alive and looking green all year round!
Yellow Fiddle Leaf Fig from Stressful Environment Changes
Finally, make sure there aren’t any other factors contributing to your plant’s yellowing leaves.
Are you moving it from a warmer area (above 80°F) to an area with colder temps? Is the house humid one day and dry the next, or are there any large environmental changes happening in its location? All of these can stress out your fiddle leaf fig tree!
If this is the case, make sure that you don’t move your plant around too much until it has adjusted fully. Also, be consistent with watering and lighting so that its environment stays stable.
If necessary, invest in humidity trays or grow lights if needed to help keep up with proper conditions for optimal growth!
Yellow Fiddle Leaf Fig Leaves FAQs
Figs are beautiful, but they need consistent care to look their best. As such, I will now answer some of the most frequently asked questions.
Should I cut yellow leaves off the fiddle leaf fig?
Yes, you can cut off any yellow leaves from your fiddle leaf fig plant. Just make sure not to throw them away, as they are a great source of nutrients and water! If the entire stem is brown or black, however, it’s best to remove that part of the plant entirely.
Is it normal for my fiddle leaf fig to lose some of its lower leaves?
Yes, it’s actually quite normal for fiddle leaf figs to lose older leaves near the base of their stems. This is especially true in lower light conditions when your plant isn’t receiving enough energy or nourishment!
Will too little light cause my fiddle leaf fig to turn yellow?
Yes, not having enough light is one of the most common reasons why your fiddle leaf fig turns yellow. Make sure that it receives at least eight hours per day in bright but indirect sunlight to prevent this problem!
Will too much water cause my fiddle leaf fig to turn yellow?
Yes, too much water can cause your fiddle leaf fig to turn yellow, especially if it’s overwatered. Make sure that you’re only watering when the soil is nearly dry and that there isn’t any standing water in its tray or saucer!
Can I use tap water on my fiddle leaf fig?
You can, but it’s better to use filtered water that is free of chlorine. This will ensure that your plant doesn’t get any extra chemicals or additives in the water, which can sometimes cause yellowing leaves if you do not flush it frequently enough!
Will fiddle leaf fig leaves turn green again?
No, they will not. If your fiddle leaf fig’s leaves have turned yellow, then that means it is unhealthy and won’t recover from its current state.
Conclusion
In conclusion, your fiddle leaf fig might be turning yellow because it’s being overwatered, not receiving enough sunlight, or is stressed from environmental changes.
Make sure you’re only watering when the soil is nearly dry and that your plant has at least eight hours per day of bright but indirect sun exposure.
If necessary use humidity trays or grow lights to keep up with proper conditions for optimal growth!
I hope you have enjoyed this post and that you learned something new about your fiddle leaf fig! If you have other questions, please leave them in the comments below.
Prayer plants (Maranta leuconeura) are popular houseplants because they grow well in many conditions, require little maintenance, and do not need too much light. They are often grown on window sills or near a window where they can get natural sunlight.
However, if your prayer plant leaves are turning yellow then you may be experiencing an issue that requires attention. This blog post will review the common reasons why prayer plant leaves turn yellow and what you should do to fix it!
Why Are My Prayer Plant Leaves Turning Yellow?
Your prayer plant leaves are turning yellow because it has been overwatered, not received enough sunlight, or is under stress.
I will now go more in-depth into each of these causes and what you can to prevent them from happening in the future…
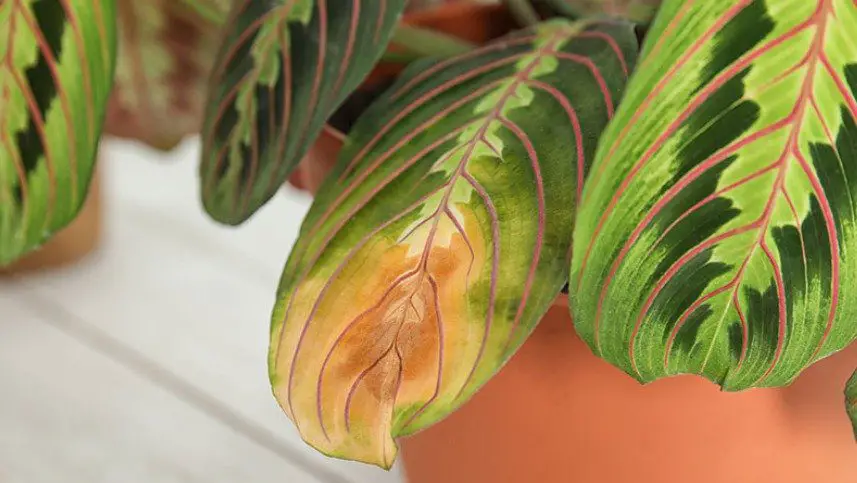
Yellow Prayer Plant from Overwatering
One of the most common reasons why prayer plant leaves turn yellow is because it has been overwatered. If you are watering your plants too much then this can lead to root rot which will kill the roots and eventually, cause older outer leaves to die off as well.
You should water your plants when the topsoil feels dry up until about an inch below the surface, making sure not to over-water them. You can do this by sticking your finger into the top inch of the soil. Alternatively, you can use a moisture meter to measure the moisture level in the soil.
If the plant has developed root rot, then you need to take action immediately. The best thing you can do is re-pot the plant into a container with new soil and take steps to prevent this from happening again.
Yellow Prayer Plant from Too Little Sunlight
Another reason why prayer plant leaves turn yellow is that they are not receiving enough sunlight. If you do not place your plants in a window that receives at least four hours of morning or afternoon sun, then this can cause older outer leaves to die off as well, turning them yellow and crispy.
To fix this problem, move your prayer plant to a location where it will receive more sunlight. If you can’t do this, then you may want to think about using grow lights (Amazon link).
I use grow lights on nearly all of my houseplants during the winter months. It gives them a helping hand to receive the amount of light they need to stay healthy and happy.
Yellow Prayer Plant Leaves from Stress
Another common reason why prayer plant leaves turn yellow is that they are under stress. There can be many reasons for this, such as repotting them too soon, pruning the roots while transplanting, or moving them to a new area that has different humidity and/or temperature levels than where they came from.
This is why it’s important not to re-pot your prayer plant unless absolutely necessary, like when it’s getting root bound from growing too fast.
If you do need to re-pot your plant, be sure to follow the proper steps to do so, like using high-quality potting soil and not pruning its roots while transplanting.
If you are moving it into an area that has different humidity or temperature levels than where they came from then take some time acclimating them before leaving them in this new location on their own.
Yellow Prayer Plant Leaves FAQs
Prayer plants are rather mysterious. In fact, they close at night! As such, I will now cover some of the most frequently asked questions when it comes to prayer plants and their leaves.
Should I cut yellow leaves off the prayer plant?
Yes, prayer plant leaves that are turning yellow and crispy should be cut off. As with most houseplants, pruning is necessary if you want them to keep growing fast and healthy.
Prune back any dead or dying branches so new growth can start from where they were once attached before they started dying/yellowing out.
Is it normal for my prayer plant to lose some of its lower leaves?
Yes, it is normal for your prayer plant to lose some of its lower leaves. This is one way that it naturally sheds older, dying leaves to make room for new ones.
Will too little light cause my prayer plant to turn yellow?
Yes, not receiving enough light from a window can cause your prayer plant to turn yellow. If you do not have access to natural sunlight, then an artificial grow light would be the best option if you want it to continue growing fast and healthy in the long term.
Will too much water cause my prayer plant leaves to turn yellow?
Yes, overwatering your prayer plant can cause it to turn yellow. If you water the plants too often or do not properly drain them, then this could even cause root rot too.
Will yellow prayer plant leaves turn green again?
No, yellow prayer plant leaves will not turn green again. They should be cut off if they are dying or turning crispy and brown to make room for new growth. You can learn more about this here.
Conclusion
In conclusion, prayer plant leaves turn yellow for many reasons. One of the most common ones is because it has been overwatered, has not received enough sunlight, or is under stress.
It’s important to try to avoid over-watering your plants, place them in sunlight that receives at least four hours of indirect morning or afternoon sun, and not to re-pot the plant unless absolutely necessary.
Thank you for reading! If we helped answer any questions, then please let us know in the comments section below. We also welcome all feedback on our posts too, so be sure to reach out!
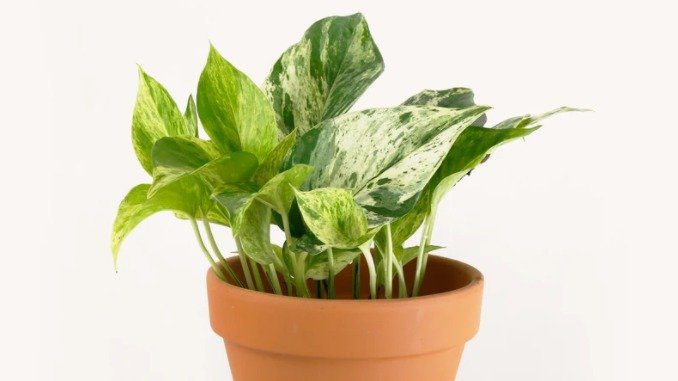
Pothos is a great house plant that you can grow in the winter. They are easy to care for and will make your home look beautiful all year round. But, as with any plant, they need some special attention during cold weather months too!
Below we’ll cover how to take care of your Pothos during the winter so they continue looking their best through the colder months.
How Do You Take Care of a Pothos Plant in the Winter?
The best way to take care of the pothos plant in winter is by keeping it warm. Pothos are tropical plants, so they need to stay in a warm environment over the winter. If you have a pothos plant that is inside, move it away from windows and cold drafts during this time of year.
It’s also important not to repot your pothos in the winter months because they don’t like too much disturbance or change at this time of year either.
I will now cover the main areas of pothos plant winter care, so nothing can go wrong with your plant this winter…
Watering Pothos in Winter
The first thing you need to know about taking care of a pothos plant in the winter is how much water it needs. Pothos should be watered once two weeks during the colder months, but never overwater them because that’s when they are most likely to get sick and die!
It’s also important to only use pots with drainage holes in the winter because pothos is very susceptible to root rot. If you do notice that your pothos is suffering, then the rotten roots will need to be pruned and the soil replaced with fresh potting mix.
You can also keep your plant on the windowsill during this time of year, just be careful not to place it too close to any drafts or cold air coming in through a window. If you have double glazing then that’s fine!
However, if your pothos begins looking leggy then this might mean it’s time for a little pruning. You can do this by cutting back the long stems and they will grow new leaves within a few weeks!
If you notice that your plant has any dead or dying stems, then feel free to cut these off as well because it’s better for the overall health of the plant. If you don’t remove them now, then they will begin to rot and spread disease to the rest of your pothos plant.
Another important thing to consider about pothos is the humidity levels. When it comes to winter, most plants will prefer a little less watering because cold air holds moisture and they don’t need as much water in these conditions.
However, if your plant begins looking dry or wrinkled during this time of year, then you can increase the humidity around it by placing it on a tray of pebbles and water or using a humidifier.
Fertilizing Pothos in Winter
Another vital part of pothos winter care is fertilizing – but, you don’t need to give them as much fertilizer during the cold season because they’re not growing at this time anyway!
In fact, many people give no fertilizer to their pothos in the winter. Instead, they only give their pothos plant water and no feeding. This works well because the soil will remain moist, but there won’t be a build-up of salts in the soil that may harm your plant.
However, if you do want to fertilize pothos in winter, then you should use a common fertilizer for all house plants and only give it about half as much compared to the summer months!
Pothos Winter Care FAQ
Caring for pothos in winter is a complicated subject. As such, I shall now answer some of the most frequently asked questions.
How often should I water my pothos during winter?
You should only water your pothos when the soil is dry. So this means you won’t need to do it very often at all!
Can pothos survive winter?
Yes, pothos plants can survive winter. But, be sure to follow the above guidelines and you’ll have a happy pothos this season!
What is the best fertilizer for pothos in winter?
There isn’t really one specific type of fertilizer that’s better than another during these cold months. However, I would recommend using half as much fertilizer as you normally would.
A pothos should be kept in temperatures above 70°F to be healthy. If the temperature is below this, then they can begin to look droopy and sickly!
When should I bring my pothos inside?
If you live in a cold climate then it’s best to bring your pothos indoors before the first frost. They can survive outside, but they will need some extra care during this time of year!
Should I move my pothos away from the heater in winter?
Otherwise, make sure the soil stays moist and doesn’t receive too much fertilizer during winter! If there’s anything else I’ve missed in this pothos care guide for winter, feel free to ask in the comments section below.