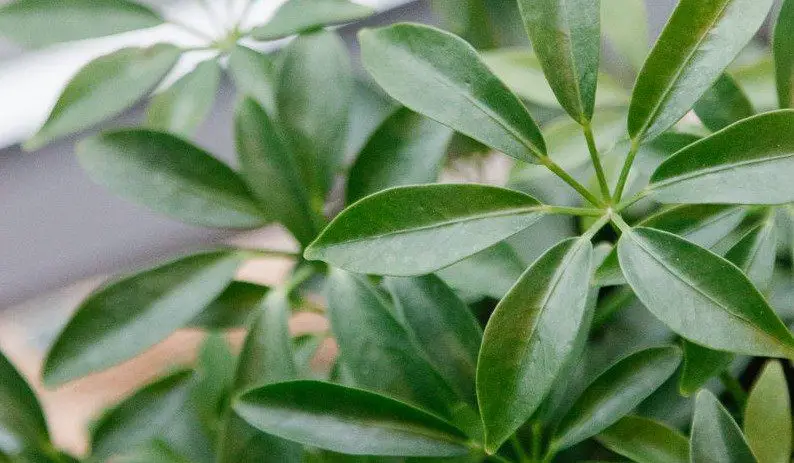
Have you ever wondered why your umbrella plant is dropping leaves? When it comes to indoor plants, there are many common issues that can cause a plant’s leaves to fall off.
If you’ve noticed that your umbrella plant has been shedding its leaves more than usual and want to know what could be causing this problem, read on for some possible causes.
Why is My Umbrella Plant Dropping Leaves?
Your umbrella plant is dropping leaves because it is stressed. This stress can be from many causes, such as overwatering, too much sun exposure, pests, and extreme temperature fluctuations.
I will now go more in-depth into each potential cause of stress in your plant, so you will know why your umbrella plant is dropping leaves and what you can do about it…
1. Overwatering
One of the most common reasons why your umbrella plant is dropping leaves is because you are overwatering it. This can be easily fixed by making sure that you only water your plant when the soil has dried out completely, and never letting it sit in soggy soil for longer than an hour or two after watering.
You can test the soil by sticking your finger in the dirt about an inch deep. If it feels dry, then you can water your plant. However, don’t water the plant if the soil is still moist.
For the most accurate results, try using a moisture meter to measure the soil’s dryness. A good rule of thumb is that your plant should be watered once every one to two weeks, depending on how fast it dries out between waterings.
If you also notice root rot, then it’s important to act fast by pruning the rotten roots from the plant, letting it dry out, and then re-potting the plant into fresh soil that drains well.
2. Sun Exposure
Another common cause of umbrella plant dropping leaves is if it’s receiving too much sun exposure. If your umbrella plant has been in the same spot for a while and all of its leaves are suddenly falling off, this could be due to it being moved into an area that gets more sunlight than usual.
You can fix this issue by moving your plant to a shadier spot. The leaves should begin growing back in about two weeks or so, depending on how much sun it was exposed to before you moved it.
Sunburnt leaves tend to turn brown and crispy too, so watch out for these signs and act quickly to prevent further damage to the plant.
3. Pests
If you’ve noticed some bugs crawling around on your soil, or even on your plant itself, this can also be causing stress to the umbrella plant. The most common pest that can be found on an umbrella plant is the mealybug.
This bug sucks out the sap in your plant, causing it to lose its leaves and look unhealthy. The good news is that you can get rid of them naturally by using rubbing alcohol to clean off all visible signs of these bugs from both the soil and the leaves.
Neem oil (Amazon link) is another good way to get rid of bugs. It’s organic and will get rid of any pests that are on your plant, while also preventing further bugs from infesting the soil in the future.
4. Temperature Fluctuations
Finally, the last possible reason why your umbrella plant is dropping leaves could be due to extreme temperature fluctuations. This can include going into an air-conditioned room after being outside on a hot day.
This can also happen if you’ve had some cold nights after spending time outdoors during hot days. This is another instance of sudden changes that stress plants out and cause them to lose leaves as a result.
The best way to prevent this from happening is by keeping an eye on weather reports and making sure that your umbrella plant gets plenty of shade when there’s extreme heat outside (or sun exposure when temperatures are chilly).
5. Environmental Stress
Finally, you may notice that your umbrella plant is dropping leaves if you always moving its location. If you’ve moved the plant from indoors to outdoors and back again, this could be causing a shock to your plant.
You can avoid this issue by only moving your plant if absolutely necessary. The same goes for repotting too – only do so when you need to.
Umbrella Plant Leaf Drop FAQ
With so much information, there is a chance that you’re still not sure what’s going on with your umbrella plant. As such, I will now answer some commonly asked questions about umbrella plant leaf drop.
How can I tell if it’s just old age or an actual problem with my umbrella plant?
If the leaves drop off without falling apart completely and have clean cuts where they fall from on your bush, then it should just be about old age – which isn’t a big deal at all! Still keep reading since there may still be something wrong though…
Why is my umbrella plant dropping leaves after repotting?
Pot shock can occur when you move your plant to a new pot. To avoid this, make sure not to touch the roots of your plant and ensure that there are holes in the bottom of your container for drainage.
Will grow lights stop my umbrella plant from dropping leaves?
In conclusion, there are many potential reasons for this, but overwatering and extreme temperature fluctuations seem to be the most common. If your umbrella plant has been losing its leaves more than usual, you should try watering it less as well as making sure that its location isn’t too hot or cold.
I hope this article has answered any questions you might have about why your umbrella plant is dropping leaves. If it hasn’t, please feel free to leave a comment in the section below!
If you have a Schefflera plant, then you know that one of the most common problems is brown leaves. These plants are typically very healthy and robust, but sometimes they do not grow as well in certain environments. This blog post is going to discuss the reasons why your schefflera leaves may be turning brown!
As a result of this, I’ll now go more in-depth into these reasons and what you can do to prevent them from recurring in the future.
Brown Schefflera Leaves from Too Much Water
Schefflera plants are tropical and love to be watered, however, they can’t handle being over-watered. If you notice your schefflera leaves turning brown and falling off, it is a sign that the plant was overwatered.
The roots of this type of plant do not grow very deep so if there’s too much water in the soil around them for long periods of time, then the roots are unable to breathe properly. This leads the plant turning brown and eventually dying.
It’s best to only give water to your schefflera when the top inch of the soil is dry. It’s also a good idea to check the saucer under your container for water that has collected there. If you see any, it is best to take out this excess water before watering; otherwise, the roots will again be deprived of oxygen and begin turning brown.
You can test the soil by sticking your finger around two inches deep; if the soil is dry, then you can water. Another option is to use a moisture meter, which offers the most accurate results.
Root rot results from too much moisture around the roots and not enough drainage in the soil. As mentioned above, schefflera plants do not have deep root systems so they need well-draining soil; if their substrate does not drain properly, then root rot can occur!
You can fix root rot by first removing the plant from its pot, then taking off as much soil as you can without damaging the roots. Next, rinse the root system with a hose until all of the dirt has been removed and there is no more buildup around it.
Next, prune any rotten roots and discard them away from your plants. The final step is to re-pot your plant in a container of fresh soil that drains well.
If you notice this problem occurring in your home or office setting where they receive plenty of sunlight through a window all day, then consider moving the plant if possible!
Although Scheffleras can handle light well enough (just not direct sunlight), prolonged exposure will burn their thin leaves, which ultimately forces them to turn and fall off. It should be noted that plants placed near east or west-facing windows will receive light earlier and later in the day; which is fine for most scheffleras.
Brown Schefflera Plant FAQs
The schefflera can be a difficult plant to keep care of. As such, I will now cover some of the most frequently asked questions on brown schefflera leaves.
Should I remove brown leaves from my schefflera plant?
Yes, remove brown leaves that are dead. If you wish to remove them, then place your hand around the base of a leaf while gently pulling upwards; this should detach it from the stem fairly easily.
Will too much water cause my schefflera to turn brown?
Yes, if you keep overwatering your schefflera, then there will be too much moisture in the soil which can cause it to turn brown. If this is occurring, you will need to simplify your watering routine.
When I touch my schefflera plant, it seems like there is moisture on it?
It is likely that the leaf has been overwatered and there will be water on it. If this happens, you should let your plant dry out so the roots can breathe properly again.
Why does my brown schefflera have black spots?
The black spots are most likely the result of overwatering. Schefflera plants do not like to be wet for long periods of time! The brown spots usually indicate that a leaf spot has developed on the leaves, so be sure to apply neem oil (Amazon link) to prevent further spot development.
Will direct sun exposure cause my schefflera leaves to turn brown?
Yes, schefflera leaves can turn brown if exposed to direct sunlight. Scheffleras are not plants that require full sun, so place the plant in an area where it receives bright but indirect light instead.
Conclusion
In conclusion, there are a variety of reasons why your schefflera leaves turn brown. The most common reason is that they’re being overwatered or from receiving too much sunlight.
You can fix this problem by taking out any excess water from its substrate and re-potting the plant with fresh, well-drained soil. You also need to remember not to give too much direct sunlight on the foliage for long periods of time as this will burn them!
I hope you have enjoyed this post. If so, please do check out my other posts on these wonderful plants.
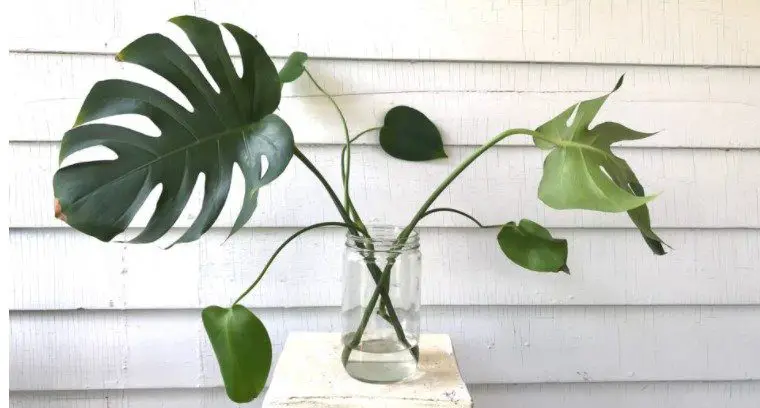
Monstera plants are an attractive addition to any home. They are easy to care for and grow in many different environments. However, when the leaves start falling off you may be asking yourself “why?” This post will discuss the common reasons why your monstera plant is losing its leaves and how you can help it get back on track.
Why Are My Monstera Leaves Falling Off?
Monstera leaves fall off when they are given the wrong amount of water or if the petiole has snapped. The most likely cause is that the plant is overwatered. If you are not sure how much water to give your monstera plant, try only watering when the top inch of soil is dry.
I will now give more in-depth answers about the causes for monstera leaves falling off. By the end, you should know how to fix or prevent your monstera plant from losing its leaves.
Incorrect water
Monstera plants do best when they are watered once or twice a week. If they are not getting enough water they will start to lose leaves. Similarly, receiving too much water will cause the monstera to droop and drop leaves.
You can fix this issue by ensuring your monstera’s soil is moist to touch, but not wet. Dip your finger into the top inch of the soil to test how moist it is. If you feel moisture, the soil is good and no more water needs to be added.
You can also use a moisture meter to test the soil. You can purchase one at your local garden center or hardware store for less than $20.
For potting plants, it is best to let them drain in between watering by removing excess water from the base of their container after they have been watered. A pot with drainage holes is an absolute must!
Snapped monstera petiole
The petiole is the stem that attaches the leaf to the vine. A break in this area prevents water and nutrients from flowing down into the rest of the plant, causing it to fall off at its weakest point.
This can be caused by rough handling, high winds, or even excess sun.
To prevent this from happening to your monstera plant you should make sure it is in a sturdy container with plenty of drainage holes at the base. You also want to keep them out of direct sunlight for extended periods as they are sensitive to heat.
Cold temperatures
Cold temperatures can cause monstera leaves to fall off. They are tropical plants that need consistently warm conditions.
If you want your plant to survive winter then it will require some special care. During the colder months, move the plant away from any windows or doors where cold drafts might hit them and keep it in a room with temps around 65 to 70 degrees Fahrenheit.
Monstera leaves falling off are one of the most common issues people have with these plants, but there are plenty of easy fixes that will get your plant back on track. By following this advice you should be able to keep monstera leaves from falling off in no time!
During winter, you will want to bring your monstera inside to protect it from the frosts. However, be careful not to place the monstera near to heaters that will cause shock and burn the plant.
Moving or being transplanted
Monstera plants are known to be hardy. However, if your monstera has recently been moved or repotted then it may be having trouble adjusting to the new soil.
To avoid this situation in the future, only transplant your monstera when it is 100% necessary. Unfortunately, many people make the mistake of trying to fix problems by transplanting and repotting, which can often make things even worse!
To reduce the likelihood of repotting your plant again in the future, start with the best pot possible. Always ensure the pot is large and has plenty of drainage holes at the base for excess water to drain from the bottom.
Lack of sunlight
Monstera plants need lots of sunlight to thrive. If they are not getting enough light, then the leaves will start losing color and dropping off.
To avoid this situation you should place your monstera plant in a south-facing window where it can receive at least six hours of sun per day.
If that is not possible, there are special grow lights (Amazon link) you can purchase for your monstera plant. I use them on nearly all of my plants during the winter months when they are not getting much natural light.
Monstera Leaf Drop FAQ
Monstera plants aren’t the easiest plants to take care of. As such, I will now answer some common questions about them.
Will my monstera plant lose all of its leaves?
No, your monstera should not lose all of its leaves. However, if you notice too many falling off at once it is best to look into the reasons why this is happening as listed above in my blog post!
Will my monstera plant grow back its leaves?
Yes, as long as the stem is still intact it should regrow new foliage. You will then need to trim off any dead or brown parts of the leaf that may start to rot and turn black. Just be careful not to remove too many green-colored leaves! This can cause your monstera plant to become lopsided and out of balance.
Conclusion
In conclusion, monstera leaves falling off can be caused by a variety of issues and it is important to know how to prevent or fix them.
The most important thing to remember is that your monstera plant needs frequent moisture, but not too much water. Another important thing to consider is the petiole of the leaf; it must be intact for the proper flow of nutrients and water throughout the rest of its body.
By following these tips, you can determine why your monstera leaves are falling off and learn how to prevent them from happening in the future.
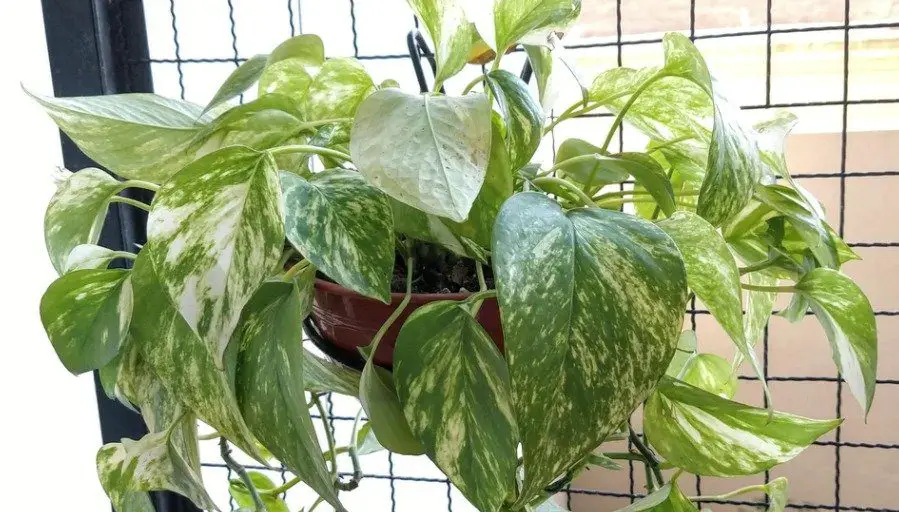
Pothos plants are one of the most popular houseplants because they’re easy to care for and don’t require a lot of time or attention. They can also be grown in pretty much any type of container, which is really convenient.
However, there may come a time when you notice that your pothos plant leaves start drooping and sagging down instead of standing upright like they used to. Let’s find out why…
Why Are My Pothos Leaves Drooping?
The most likely reason why your pothos plant is drooping is due to underwatering. Pothos plants need moist soil at all times. If the soil is allowed to dry out, even for just a little while, your pothos will start drooping.
If you have been giving your pothos plant enough water, it’s important to make sure the water is actually reaching the center of the soil. You may even have to immerse the plant into a bucket of water to soak the soil thoroughly.
Another common reason for the pothos plant leaves drooping is due to a lack of sunlight. Pothos plants need bright, indirect sunlight to grow and thrive. If they don’t get enough light, the leaves will start drooping down and looking sad.
How to Stop Pothos Plant Drooping?
You need to take action by making sure the soil is moist and the plant is getting enough sunlight. This will revive the leaves and get them standing upright again.
1) More water
If your pothos plant is drooping due to underwatering, make sure you water it thoroughly from top to bottom until all of the soil has been wetted through. If you suspect that there may be a drainage issue with your pot or saucer, remove any excess water immediately after watering so it doesn’t sit in the container for too long.
Pothos typically need water every week or so, depending on the indoor temperature and humidity in your home. They enjoy moist soil, so don’t let the soil dry out between waterings. They will start drooping if they’re too dry, so you’ll need to keep a close eye on your plant and increase or decrease watering as needed.
The easiest way to tell if the pot needs more water is by sticking your finger into the top inch of dirt. If your finger comes out dry, then you know to give your pothos more water.
The type of water matters too! For optimal growth, use water that is around room temperature or a little bit warm. If the plant gets cold from being watered with cold water, it may start dropping leaves in response to the shock!
2) More sunlight
If your pothos plant has been drooping because it doesn’t get enough sunlight, make sure the area where you place the plant is receiving bright indirect sunlight. If possible, avoid placing your pothos in a room with little to no natural light as this will not be good for their health and well-being.
I like keeping my pothos in the brightest room in the house, where I allow the plant to climb over my furniture, giving it a more natural and “wild” look that I love.
LED grow lights (Amazon link) are a lifesaver for those who cannot give enough natural light. They allow you to grow healthier, more vibrant houseplants without having to worry about them getting the proper amount of sunlight.
Full-spectrum lights are the best as they do the best job at mimicking the natural rays of the sun.
Droopy Pothos FAQs
There’s a good chance you have a lot of questions. If that’s the case, I’ll go ahead and answer some of the most frequently asked questions.
Will droopy pothos leaves kill my plant?
No, it is not going to kill your pothos. Drooping leaves are a natural response from the plant when they’re either lacking water or sunlight. It’s just their way of saying “Hey! I need something!”
While pothos plants are very hardy, you shouldn’t just let them sit with droopy leaves. Your pothos may not die for a while, but they eventually will if no action is taken.
Do I need to re-pot a drooping pothos plant?
There’s no need to re-pot a drooping pothos plant enough you suspect root rot or a drainage problem. However, if you’re worried about a rootbound pothos plant or the container is just too small, re-potting into a larger container will help solve these problems and revive your plants!
What if the problem keeps coming back?
If your pothos keeps dropping leaves and you can’t figure out why this keeps happening, you should consider moving it to a different location. This problem is often due to either too much or not enough water or sunlight.
Why are my pothos plant leaves drooping after watering?
You may have shocked your pothos with water that was too cold or hot. Always use room temperature water when watering pothos plants.
Why are my pothos plant leaves drooping after repotting?
Pothos dropping leaves after repotting is a result of your pothos being stressed by the procedure. The plant will perk up once it adjusts to its new surroundings and gets used to the temperature of the soil again.
Conclusion
In conclusion, the most likely reason why your pothos plant is drooping is due to underwatering. Pothos plants need moist soil at all times, and if the soil dries out even for a little while it will start drooping.
If you have been giving your pothos enough water but notice that the leaves are still dropping down, then check whether or not your pothos has received enough sunlight.
I hope you have found this blog post helpful, and I hope your drooping pothos plant is now standing upright again!
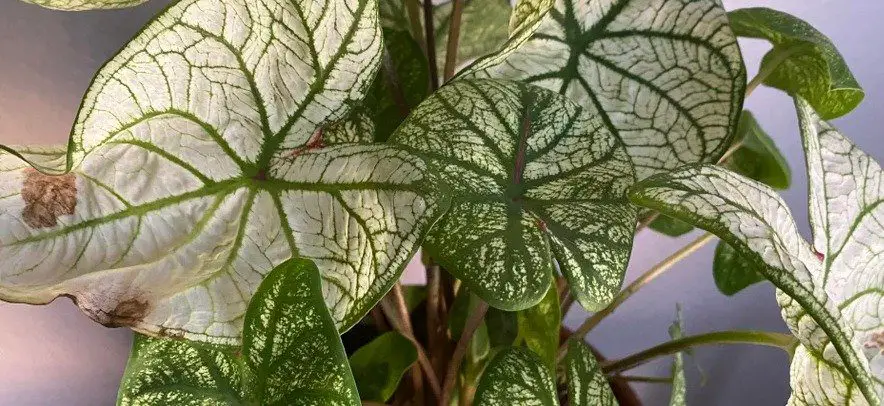
The caladium is a plant that has leaves in shades of green, pink, and white. The question on many people’s minds is “what could be causing the brown spots?” It turns out that there are several things that could cause this issue. If you want to know what they are then continue reading!
What is Causing Caladium Brown Spots?
The type of browning will reveal the exact answer, but caladium brown spots are either caused by sunburn or root rot. I will now explain what each of these issues means and how to treat them.
Caladium brown spots from root rot
This type of browning tends to be wet and fuzzy. They sometimes even have a yellow ring around the brown spot, which indicates a fungal infection is present. Not only can overwatering give root rot, but it can flush out nutrients and make caladium plants turn yellow.
You can fix this issue by removing the rotten roots, re-potting the plant, and then using a fungicide to kill any lingering fungal infection.
It’s important to stop this from happening again in the future, so ensure that you don’t overwater your plant by creating a strict watering schedule and monitoring the soil with a moisture meter.
While we are on the subject of watering, you may want to consider the type of water you’re using to water your caladium. Using filtered water is the best way type to give a caladium because it is free of any sediment, chlorine, or salts that may be present in tap water. It can prevent caladium drooping!
Caladium brown spots from sunburn
Caladiums plants can get sunburn just like we do! This happens when their leaves get scorched by the sun after too much direct sunlight. This type of spot is dry and crisp, compared to the wet appearance brought on by root rot.
The best way to fix this issue is by moving your plant into a shadier area or placing it under some shade cloth if you live in a hot climate.
You can remove the sun-damaged leaves by using a pair of sterilized scissors to snip them off at the bottom of the leaf. You can also trim around all other brown or yellowed leaves, but don’t throw them away! They are great for composting because they make a good source of nitrogen to help your garden’s soil maintain its rich properties.
Caladium has gone dormant
Also, take into account that sometimes leaves just get old and die. This is especially true with caladium plants that are notorious for problems when grown indoors. For this season, I keep my caladiums outside for as long as possible. If they start to show signs of a problem, I cut them back and let the leaves re-grow. This has been working great for me!
FAQ
Should I remove brown caladium leaves?
You should remove the brown caladium leaves if they are dead or look like they have a fungal infection. Use a pair of sterilized scissors to snip them off above any nodes.
Will root rot cause caladium brown spots?
Yes, root rot is a common cause of caladium brown spots and can be identified by the appearance of wet, fuzzy, yellowing patches on your plant’s leaves.
Is too much water causing my caladium to get root rot?
Yes! When there is too much water in the potting soil it leads to an increase in fungal growth which causes root rot. You should ensure that you implement a strict watering schedule for all plants inside or outside. This will help maintain proper moisture levels within the soil while preventing any excess amount from pooling at the roots.
Where does sunburn appear on my caladium?
Caladiums are very sensitive when exposed to direct sunlight because their thin skin burns easily due to heat absorption during photosynthesis. This type of browning on your caladium will appear dry and crisp.
How do I fix sunburn on caladium?
You should move the plant to a shadier location or place it under some shade cloth if you live in a hot climate. You can remove any dead leaves by snipping them off with sterilized scissors above any nodes that are green. Don’t expect new growth until next year!
Will neem oil fix brown spots on caladium?
Yes, neem oil (Amazon link) works for caladium brown spots. It can be used in conjunction with fungicides to treat root rot and other fungal infections, but it only masks the symptoms and does not fix them at their source.
Will brown spots kill my caladium plant?
It depends on the cause of the brown spots. If your plant has brown spots from root rot, then your caladium very well may die if you don’t take action. Sunburn brown leaves are only cosmetic and they will not kill the plant. You can remove them by trimming around all other leaves that may be affected or discolored with a sterilized pair of scissors.
What causes my caladium to go dormant?
Caladiums experience dormancy during cold weather seasons due to their tropical origins. They typically do this after growing new shoots in springtime until fall when it is hot outside again! Dormant plants should be kept inside where temperatures don’t drop below 60 degrees Fahrenheit (16 Celsius).
Conclusion
In conclusion, there are several different things that could be causing brown spots on your caladiums. They include root rot, sunburn, and even the plant going dormant for the season. If you have noticed holes in the leaves, this isn’t a fungal infection, but pests – you can learn more here.
I hope this article has helped you determine what is causing the brown spots on your caladium so that you can take action to stop it!